Hello everyone, here we are with our regular monthly post featuring cards and projects from the Design Team created in Fifteen Minutes or less. Our aim with these posts is to share time saving tips and ideas and to show you how to create beautiful projects in next to no time. So grab a cuppa, and enjoy this month's selection.
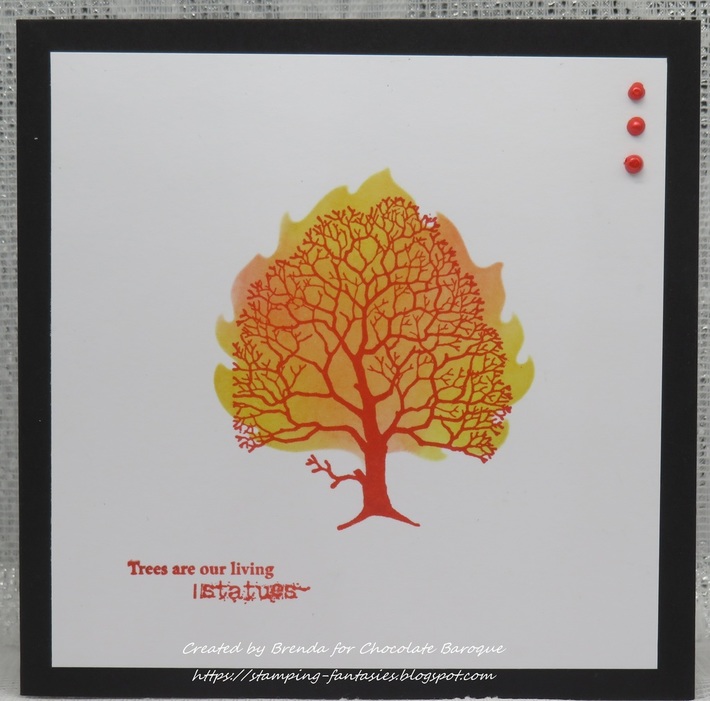
I have created two projects to share with you this month. My first card was made using a scrap of background from my stash, which had originally been created by inking around some leaves from my garden. I stamped the large tree from
Trees a Crowd onto a piece of watercolour paper using Black Archival Ink, then carefully sprinkled red, green and orange Brushos just where I wanted them. I spritzed the Brushos with water. I inked around the panel with Distress Ink. I added a sentiment strip to complete the card.
My second project is a large tag, I added background colour by covering a large acrylic tag with Distress Ink and spritzing it with water before swiping it across the tag. I used the same tree image as before and added a smaller tree image from the same stamp set stamped using green ink in first and second generation stamping to create the foliage. A sentiment, ribbon, and hand drawn birds completed the tag.
Brenda has created a series of cards using leaf stencils and Distress Inks. She has then stamped an image from the
Trees a Crowd stamp set onto the background using coloured ink. She added liquid pearl dots to finish.
For her final card, she stamped and embossed the tree onto vellum, laid the vellum over a piece of patterned paper and added a bow. She added a sentiment stamped vertically onto the background.
Two from
Rachel using the large tree image next, showing how you can vary the look of this image once again. For her first card she has used white embossing on kraft card and coloured the leaves using pens and pencils.
To create her second card, she used white embossing on black card, and added colour with mica powders, a fabulous dramatic effect.
We have more dramatic colour up next from
Zoe, who has created two beautiful envelopes. We love seeing Zoe's beautiful Mail Art each month, and it is very quick to create, a bit of masking to create a window or a strip, and you have areas of colour or spaces to write an address.
We have a selection of projects from
Magda next, she has created a tag which has been coloured with Distress Ink and flicked and spritzed with water. The image was coloured with watercolour pencils.
She has created a Brusho background for her next project:
Finally, she has used watercolour pencils and added Distress Inks to edge the background. She stamped the images with Distress Inks also.
Carole has created a very pretty card for us, she pressed Victorian Velvet Distress Ink randomly over the card, and spritzed lightly with water. On a spare piece of card she repeated the process, dried the card and stamped the top part of the Briar Rose stamp, and cut out a square. She repeated the process for the sentiment. She dried the background and stamped the Briar Rose image. She positioned the square so that it overlapped perfectly on the background.
Finally, we have three projects from
Penny, to create her first card, She stamped and embossed the fir trees on black card using black ink and clear embossing powder. She repeated this step and added moon and clouds. She used a silver pen to add highlights and to ground the trees. She stamped and embossed the tag over the scene, cut it out leaving a border, then added silver pen to the edges. She attached the tag to some greyboard and added some ribbon and lace to finish.
For her next project she stamped and embossed the small trees using white embossing powder onto navy card. She used a white gel pen to ground the trees and add a snow drift, then painted some shadow with light blue pearlescent paint. She added glitter to the trees the die cut the image into a circle, adding silver pen around the edges. On a card base she stamped the trees in one corner and added the sentiment along the bottom before adding the main circle to the card.
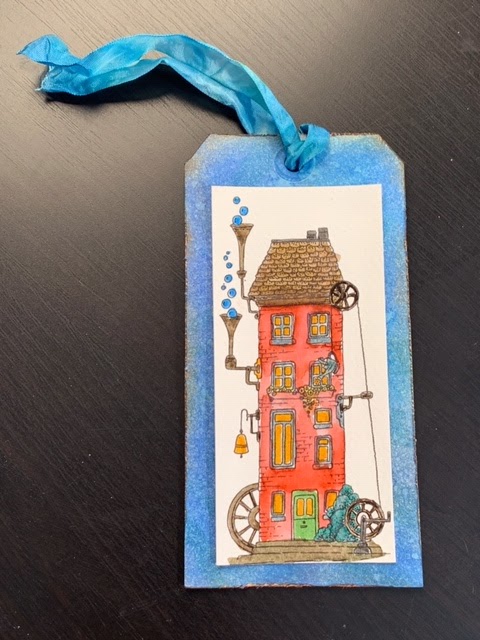
Lastly, she stamped the
Heath Robinson House onto drawing cartridge using grey ink. She used Koh-I-Noor pencils to colour parts of the image, and matted it onto red card before adding some ribbon and a button. She stamped a sentiment and attached the panel to a base card.
That brings our collection of projects to a close for this month. We hope that you have enjoyed what we have shared with you, and that you will try out some of the designs for yourselves. We will be back next month, but in the mean time, do check out our regular Design Team posts.
Thanks for stopping by,


Well done ladies , hard to believe they only took 15 mins, just shows what you can do. xx
ReplyDelete15 minutes? incredible, wish I could do something even a tad like these gorgeous samples in that time.
ReplyDeleteFaith x
Fabulous inspiration ladies, thank you!
ReplyDeleteHugs
Linda xxx
Absolutely amazing cards from the team, brilliant inspiration, Kate x
ReplyDeleteAll gorgeous cards. Thank you to you all for sharing them.
ReplyDeleteFabulous creations!!! Love especially all those with trees, wonderful makes, so inspiring!!
ReplyDeleteLovely cards, great ideas.
ReplyDeleteI love trees and leaves on cards, suitable for any occasion.