Pages

Friday, 29 June 2012

Announcing our July Stamp of the Month


Actually, there are two Stamps of the Month - we just couldn't decide which of our two gorgeous lovelies should have the official SOTM status, so they are both available at a special introductory price this month.

Here they are in all their glory and you are going to be entranced by what the girls have come up with - their endless creativity never ceases to amaze me and I hope it inspires you too.


We have the lovely Pretty Poppies and the gorgeous Dusky Damask.  Both have special prices for one month only, and there is also a multi-buy option which saves you even more.

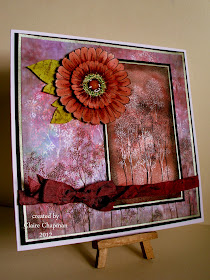
I'll kick things off with this 8x8 inch card - details coming up on my blog over the weekend.


Enjoy the blogfest to come and have a great weekend.

oh, and please continue to encourage the girls with your comments - you never know when the giveaway pixie will strike!

Thursday, 28 June 2012

Steampunkery Winner

Just a quick post to announce the winner of our Steampunkery giveaway is ....


Gill who left a comment on Judith's hinged ATC post on June 16th.

Congratulations Gill - please can you get in touch to let us know where to ship your stamps.

New stamps are being launched tomorrow, but due to a slight run in with Blogger's draft mode being more like daft mode, you might know that already!

Wait til you see them though - I'm biased of course, but they are beautiful....


Those magnificent men in their flying machines (posted by Claire)

As soon as I saw the Steampunkery themeplate I started singing 'Those magnificent men in their flying machines' and just couldn't get it out of my head so I made a computer generated sentiment to go with this card.


I've used distress stains to create the cloudy sky and distress markers to colour the image. Pop over to my blog for all the details 
Thanks for popping by and for all your lovely comments
Claire xx

Wednesday, 27 June 2012

A Treasure Map

Here's something a little different - a treasure map made with the Steampunk Travel stamps and featuring a Sea Monster from the Here be Dragons stamp set.  Find out how it was made over on my blog.


Tuesday, 26 June 2012

Mobile phone (posted by Claire)

Hi there, Claire here with another sample from 'Steampunkery and 'Steampunk Travel', I thought the mobile phone would be perfect for the man who has everything lol.


I've used Derwent pencils to colour the image and popped a die cut aperture over the top before matting on some kraft card. The lacey cogs border was also stamped on kraft. I used the digital backing paper 'Edwardian Gentlemen' and inked over with vintage photo distress ink using the Crafters Workshop 'Gears' template. In the opposite corners I used the same template with stencil paste, brushed over with mica powder for a metallic look. I added some brown velvet ribbon and a lovely little lock brad to finish off.

I hope you're enjoying the new stamps as much as I am. 
Thanks for visiting today
Claire xx


Sunday, 24 June 2012

Fly Away with me by Debbie

When I recieved the Steampunkery Stamps I knew that I wanted to make a mans card. I chose to use the Air Ship stamping it with Memento black so that I could colour it with Alcohol pens. The edges were coloured with Brushed Corduroy Distress Ink to tie on the colours. I mounted it onto black so that the image would stand out from the paper behind it which is from the Bo Bunny Serenity 6x6 pad. The base card is a white 8x8 and used the smaller stamps from Steampunk Travel with the Brushed Corduroy ink again. For the sentiment I stamped it onto card, cut it to a strip, scored twice on each side, folded and cut two triangles then glued onto the card. These are great stamps to have in your stash for lots of occasions. Debbie

Saturday, 23 June 2012

Steampunk beetle (posted by Claire)

Hi there, Claire here with my first project using the new Steampunkery and Steampunk Travel Stamps, I really enjoyed experimenting with different products to make this card.


The background was made using black and brown shades of PanPastels just blended together and then stamped with the text from Steampunk travels using versamark ink. I brushed over gold mica powder and not only did it pick the detail up beautifully it left a slight golden shimmer over the panpastel base. The next layer was  made using the same shades of panpastels this time using the 'Gears' template from Crafters Workshop. I added a top coat of Claudine Hellmuth Multi Medium Gloss , dabbed on with some kitchen roll, Next came a layer of torn card coloured with panpastels and stencil paste applied through a Tile Texture Crafters Workshop template


I stamped the beetle three times on some black Clearly for Art modelling film using versamark ink and embossed with gold. I painted the beetles with twinkling h20s and cut them out before giving them a coat of Matte Multi medium. I layered them up and finished off with a layer of glossy accents on the beetle and the clock face. You can see the detail a little better in the photo above

I hope you're enjoying all the inspiration from my team mates, these stamps are going to be perfect for those tricky male themed cards with the steampunk images and the fun sentiments
Claire xx

Thursday, 21 June 2012

Travel Journal (posted by Elaine)

I have really enjoyed playing with the new steampunk stamps, even though I don't really normally count myself as a steampunk fan. Sometimes it is great to step outside our comfort zones and get playing. For this project I used a ready made book shaped box from a high street chain.

When I first started the book was all pink and feminine. I started by choosing some 12 x 12 paper which I coloured with Vintage Photo Distress ink and overstamped with a stamp from the Texture Fragment set to give the feel of vintage paper. I made a spine by colouring a strip of adhesive canvas with Expresso Adirondack dye ink.

I stamped images from the steampunk sets and embossed them in copper metallic EP. Then I distressed the images with more Vintage Photo DI and coloured pencil shading. I finished the project by raiding my hardware selection for keys, a lock panel, book corners, pen nib etc.

Hope you enjoy playing with these great stamps!

Elaine x

Wednesday, 20 June 2012

Bright Sunny Flowers

Chocolate Baroque continues to amaze many people with the new stamps they are producing! I'd like to share some of my projects made with some of the new stamps, and I'd appreciate your comments at the bottom of the post. Thank you, and I hope you enjoy! Please feel free to contact me if you have any questions!

These are from the Sunny Sunflowers set.


I stamped the images on white cardstock, with Only Orange ink from Stampin' Up. The shading was done with Copic markers. The background is from a summer stack of paper, and I used two embossing folders on the white panels. Pearl brads completed the centers. The bottom border was a die cut given to me by a friend, and the word, "Happy" is from the Chocolate Baroque Artistic Expressions set. I don't have any sentiment stamps from Chocolate B yet, so I used one from my collection. I love the patterned background paper, so I cut a thin strip 1/4" wide, and wove it through the eyelets on the border strip. 
These Sunny Sunflowers are so bright and cheery!  You can't go wrong with flowers like these!

Tuesday, 19 June 2012

Bright little Beetle (posted by Judith)

For my second project, I wanted to create a more feminine feel with these steampunk stamps. I set about creating a soft background using Pan Pastels in shades of orange and pink. I used  the reverse Chicken Wire Crafter's Workshop template through which I sponged Versamark, and then applied a blend of the same colours of Pan Pastels as before. I then stamped the large cog and flower stamp from Punky Romance in opposite corners, again using Versamark, and applied more Pan Pastels.

I cut some flowers and leaves from handmade paper using Nestability shapes, and coloured these with Pan Pastels. I stamped the darker half of each leaf with the small tree from Steampunk Christmas. I scrunched the flowers and stuck them together with a brad. I attached them to the card with a bit of Glossy Accents, before sticking a cog in the centre, filling this with Glossy Accents and then adding some seed beads.

I coloured the beetle with Polychromos pencils, and brushed the wings and body with a little bit of gold Mica powder before I covered the body with Glossy accents for a bit of shine.


Keep popping back to see what my Design Team mates have come up with using these great new stamps over the coming days. Thanks for stopping by, Judith xx

Monday, 18 June 2012

Poppy Seeds

Good morning! I hope you are doing well! Here's a bright and colorful card to cheer anyone! A friend gave me the white oval and white butterfly diecuts, and the poppy red was really striking against the white and dark green. This poppy stamp is from Chocolate Baroque's set called Flora and Fauna. If you click on the name, it will take you directly to that location on Chocolate Baroque's website. The complete set is just beautiful, and I can't wait to use each and every flower and butterfly! I don't know what it is about poppies, but they are irresistable to me! Copic markers were used to color the flowers.


You can see a little of the sparkle and shine on the flowers in this photo. I used Copic's At You Spica glitter pens to add it. The red swirled background paper is from a DCWV spring stack.

I hope you've enjoyed your visit, and I look forward to seeing you again!

Sunday, 17 June 2012

Happy Birthday Daisies by Debbie

Hello. I think I've said in the past when I get new stamps I have to stamp them out with black to see the detail and impression they make. Well, I got carried away with this flower and stamped an A4 sheet. I stamped the large flower with Versafine Onyx Black and heat embossed with clear powder as I wanted to colour the flower with Alcohol pens. I used a selection of shades of purple pens when colouring the flowers. I cut a strip of the card and I distressed the edge with Dusty Concord then mounted onto black card. I cut out a out a single flower and placed it onto the corner of the sentiment which had been stamped onto a nestability label. The base card was embossed with a cuttlebug folder and dots of white placed where the lines crossed. Thanks for stopping by Debbie

Saturday, 16 June 2012

Hinged ATCs (posted by Judith)

When I received the new Steampunk stamps I decided that I would like to create a dimensional piece of artwork using two ATC sized pieces of wood. I had some chunky cogs that would make great little feet for these blocks. I painted the blocks using two different colours of acrylic paint, and then stamped a script stamp from the Mini Scripts stamp plate randomly over the background.

I stamped the small airship, and the small parachute with the key onto tissue paper, and applied these onto the blocks with Matte Medium so that the edges of the tissue paper disappeared into the background. I then decoupaged the larger details over the top. I added the Hat and the large sentiment to the other two panels, and some of the great words from the sets that are just so much fun. 'Toodle Pip' has to be my favourite! I used Polychromos pencils to colour all of my images. I added some small brass charms to accent the Steampunk feel, a cog, some binoculars, and a key. Finally, I added a couple more of the chunky cogs to the top of the blocks, and hinged the blocks together.


My Design Team mates have created some fabulous designs, keep checking back to see what they have made over the coming days. Thanks for stopping by, Judith x

Friday, 15 June 2012

Cabinet card concertina book (posted by Elaine)

As soon as I saw these new steampunk stamps, I felt they were crying out to be used on a kraft card based project. I wanted to do something like an advertising themed project and so the idea for this little book was born!


I cut 6 panels from kraft card using the Tim Holtz cabinet card die. On each panel I added one of the various contraption stamps in versafine onyx black ink. Making sure the ink was thoroughly dry, I added colouring with brown, white and cream colouring pencils. I added a little crackle stamping using the mini mail art set crackle stamp and shading in more Distress Photo DI. I added a computer generated title which I mounted in a chipboard bookplate with some die cut flourishes. I finished off with a couple of metal cogs.


The back cover uses  the top hat image, masked with an image from the Edwardian Gentleman plate added


I joined the panels together with cream vintage ribbon which means the book can be tied together to make it stand up more firmly.

I really enjoyed making this project, colouring onto kraft card with the pale pencils adds a really nice effect.

I have posted another project on my own blog, here is a sneeky peek -


Do pop over and take a peek here at this project where I went to town with embossing and metal!


Elaine x

Tall Trees and Sunny Sunflowers (posted by Claire )

Hi there, Claire here with a card made using the beautiful new Sunny Sunflower stamps and one of my old favourites, Tall Trees. I love these delicate trees and created a little forest to co-ordinate with the backing paper from Essence of Nature with PanPastels


To create the little forest scene I used permanent red shade panpastel and black panpastel then added a little white for a misty effect. I stamped and embossed the trees with Pearl White WOW EP  and then stamped again with black archival ink. 

I made the flower using the large and small flower from Sunny Sunflowers, coloured with distress markers and cut out. I added Sepia glossy accents the the centre and some deep red ribbon.

Claire xx


Wednesday, 13 June 2012

Vellum Sunflowers (Posted by Claire)

Hi there, Claire here with another card made using the beautiful Sunny Sunflowers stamps. 


For this card I've stamped and embossed the flowers and leaves onto vellum using WOW White Pearl embossing powder and coloured the flower and leaves on the reverse with PanPastels from the tints set. The sentiment is from the 'Loving Sentiments' set, its one of my all time favourite sentiments and the font is so beautiful too. 

Thanks for visiting today, I hope you're getting lots of crafty ideas from my team mates beautiful samples. 
Claire xx

Tuesday, 12 June 2012

Announcing Steampunkery (by Glenda)


Last week we released two new stamp sets, Steampunkery and Steampunk Travel.


Available individually or as a great value multi-buy, these mix so well with our other Steampunk stamps (Punky Romance and Steampunk Christmas).

The girls have been having great fun with these sets and they will soon be showing you their wonderful artwork, both here and on their own blogs.  You can find out more details of how the card above was made on my blog.

There is more Sunny Sunflower artwork to come too, so lots of reasons to stay tuned (or become a follower if you aren't already).  

And as if that weren't enough, I have one Steampunkery multi-buy to give away and I will be selecting ALL the comments from now through to the 16th June.

Best of luck!


Monday, 11 June 2012

Flowers and Ambrosia (posted by Elaine)

This is another sample from me, using another lovely Bo Bunny collection of papers called Ambrosia.


I stanped the flowers and leaves onto different papers from the collection and decoupaged two layers for the flower. I added jewels for the centre of the flower to echo the stamped design. I added script stamping in turquoise and a sentiment in burgundy. I wanted to piece everything together like a bright, sunny patchwork quilt, just right for the lovely sunny weather we finally seem to have got!

Elaine

Saturday, 9 June 2012

It's not yellow!


Well hello there, thought I had better start contributing to the DT blog and what better way than with these gorgeous sunflowers. This brand new stamp set, Sunny Sunflowers, is so versatile that it just inspires you to play.

The first thing you will notice, apart from the stunning detail of the stamps, is that these are not yellow.  I decided I wanted to create something a little different, and as I have said many times "this is my design and if I want purple trees/green sky etc then I shall".  It was actually the colour which inspired me first so I began by sticking a page from an old encyclopaedia to a hand cut tag ( I used Claudine Hellmuth multi medium - great for all sorts of projects).  I then lightly painted over the top with matte acrylic paint, just to shabby it up a little.  Once dry I used a stipple brush to add Tumbled Glass distress ink around the edges and followed up with some toning oil pastels to build up colour.

For the sunflowers and leaves I stamped several images onto self-adhesive labels* using Adirondack pigment ink in Pitch Black.  Then I set to and coloured them using a selection of alcohol markers and oil pastels. Once completely dry I cut them all out, peeled off the backing paper and stuck them in position.  I used a grey marker to create the shadow around the images.  Finally I added some paper flowers, pins and gems. So even if they are not yellow I'm quite pleased with my sunny sunflowers.

Thank you for visiting and please keep coming back to see what other goodies my DT buddies have come up with.

Lesley

* Self adhesive labels are brilliant for stamping on.  You can colour the images with a variety of mediums and then once you cut them out you have an instant sticker - no trying to glue awkward, fiddly little areas.  Also fabulous for printing your downloads and backing papers onto.  You can punch them, die cut them, use them for matting and layering.  We currently sell A4 single sheet labels on the Chocolate Baroque website, why not give them a try.

Thursday, 7 June 2012

Pastel Sunflowers (posted by Judith)

Hi folks, I'd like to show you another sample that I have made using the lovely 'Sunny Sunflowers' stamp set from Chocolate Baroque.

I have chosen to create this sample using Pan Pastels in shades of yellows browns and greens, reminiscent of a field of sunflowers. There is a local farmer that grows sunflowers near where I live, and I love to see them in the Summer.

I created a base for my card using two shades of Yellow Pan Pastel, and then sponged Versamark through the Mini 'Art Is' Crafters Workshop Template in two opposite corners of my card. I swirled a mixture of yellows and green Pan Pastels over the top of this, and then burnished the surface with some paper towel. I stamped the large swirl from the Butterfly Dreams stamp plate in the two remaining corners using Versamark. I then again used a mixture of yellow and green Pan Pastels as before to cover the Versamark.

I stamped two large sunflowers, two smaller flowers and several leaves before heat setting these with a heat gun. I coloured them using a small Sofft tool and Pan Pastels. You can pick the colour up with these small tools and use them just like a paintbrush with really good accuracy. I have used two colours of green on my leaves, and two colours of yellow on the petals, to give shading, just like I would when using pencils.

Finally, I used a Nestability shape which I coloured with Pan Pastels and stamped a greeting from the Loving Sentiments stamp plate.


These flowers are just so cheery aren't they? Don't forget to keep checking back to see what the other Design Team members have been making over the coming days. Judith xx

Tuesday, 5 June 2012

Sunny Sunflowers (posted by Claire)

Hi there, I've used traditional sunflower colours for this card, combined with some added sparkle from stickles for this card.


I've used distress markers to colour the flowers and leaves from Sunny Sunflowers, and layered the flowers up for dimension. I've added stickles to the centre for some sparkle. The backing paper is from the Essence of Nature cd and I've added some kraft core'dinations card which I embossed and then sanded. I've added a sentiment from the Essence of Nature themeplate and an organza ribbon bow.

Claire xx

Monday, 4 June 2012

Purple Daisies by Debbie

Hello Crafty folks. Recently I treated myself to a selection of Wow powders and was curious to see how white the white powder embossed. I wanted to use a dark colour so chose a deep purple that's in my stash. I stamped the large flowers from Sunny Sunflowers with Versamark and embossed an A4 sheet and was very pleased with the result. I cut the card to a square 5 1\2 by 5 1\2 inch. I used a white Derwent Coloursoft pencil to add highlights on the petals. The ribbons around the card are from the White Ribbon mix over on the Chocolate Baroque website. The sentiment is from the Birthday words and fits in the oval nestability well and I stamped the flower to add detail with Versacolour violet. I finished the topper with a scalloped oval and mounted with foam pads.
Hopefully you will keep visiting as the girls on the Design Team have some beautiful creations to come. Debbie

Saturday, 2 June 2012

Lovely leaves (posted by Elaine)

As anyone who knows me well will be aware, I love natural images and I especially love leaves, so I my first sample uses the leaves from the Sunny Sunflower plate.


This is an easel card, using paper from the Bo Bunny Serenity 6 x 6 pad as a background. I embossed the leaves in Ranger Queen's Gold embossing powder. I love this EP for it's wonderful brightness. I embossed onto white card and then added citrus and pesto Adirondack dye inks to shade the leaves. I curved the leaves slightly to give some dimensions before mounting with silicone glue.  I added an embossed sentiment and green ribbon to finish.

Hope you enjoy the samples from the team from this lovely sunny set of stamps.

Elaine

Friday, 1 June 2012

Sunny Sunflower winner

I'm on the ball today and I'm delighted to announce the winner of our Sunny Sunflower stamps.  When her name came up I was delighted because she's a very worthy winner.

It's Margaret Iddon!!!

Margaret is hosting the Chocolate Baroque AlphaTag swap over on the Chocolate Baroque Forum and she is doing such a great job of managing the swap and photographing all the tags.  So much so, that I created a page here on this blog to show off the monthly collage photos she puts together of all the tags received.  You can see the tab at the top or click here to go take a look.

If you want to see each of the tags in more detail, you will need to sign up to the Forum.  It's completely free and once signed up, you can become a member of the 'Alpha Tag Swap' group.  The swap is closed to new members, but you can still see the photos and read the discussions as people share how they made their tags.

Congratulations Margaret - I will get your stamp set out to you today!


PS: We have more new stamps launching today!  Long story, but we had a real problem with the master plate for this one and had to delay the launch, but there are two sets and I think you're going to love them ...

PPS: I won't be blogging about them until next week, so make sure you are on our email list to be the first to see them (and find out about the Stamp of the Month offer).

PPPS: ... think steampunk ....!