Pages

Saturday, 30 April 2016

An old rose (by Miranda)


Hello there,

Happy to be here again and show you my play with one of the older CB stamps called Rose Set.
 It's a very detailed rose but it is gorgeous I think...it took me some while but as I love to color it was not a punishment.......

I made the background again with a favorite technique I am using quit a lot these day, fluid inks.....like Ecoline and used also white to get that soft coloured finish. Some parts are coloured using Distress inks and some are coloured using pencils. It's tricky to use water based mediums over the top because the background stays reactive........

Randomly I stamped partial the small text fragment from Eccentric Edwardian sheet using Memento Toffee Crunch.

The next step was stamping several ornament stamps from the Fancy Flourishes clear stamp sheet. I have embossed them using clear mat embossing powder and blended afterwards with Distress inks to let them pop......

Than just some plain stamping with these ornaments and adding some crackle effects using the crackle fragment from the Echoes of Italy.
Well, enough text for now, onto the card......


Hope you did enjoyed it and hope to see you next time!
Thanks for your visit and I always like to read your comments, any questions....feel free to ask!


Friday, 29 April 2016

Be still my beating heart (by Lesley)

Well, what a fantstic Birthday month we have had.  Thanks to all of you for your messages of support and good wishes that you have emailed to me and the wonderful comments you have been leaving on the blog posts.

As a final celebration of making it to our fifth year, which I think is a great milestone in itself, I wanted to release a stamp that summed up Chocolate Baroque.  So when Sue sent me this particular floral design I just knew it would fit the bill. And here is our latest single clear stamp in our Heart series entitled Flowering Baroque Heart

This wonderful stamp is just bursting with elegance and charm and sums up what we are all about; stunning handrawn images and quality, which all of us put our heart and soul into. I just know you will fall in love with this exquisite individual stamp.


There are so many ways in which you can use it and the Design Team will be wowing you during the course of next month with their brilliant samples.

Here I have coloured just the flowers and leaves to emphasise the flowering branch and then added some shading, whilst below Debbie has done the reverse and coloured the heart only.  You can see how versatile this stamp is going to be.

Finally from our heart to yours, thank you for making our Birthday so special. Looking froward to the next one already.


Thursday, 28 April 2016

Do you have Fifteen Minutes to spare?

Hello everyone, it is time to share the second of our bi-monthly fifteen minute card posts with you today. Thank you so much for your positive, encouraging responses to the first post, we really appreciate your lovely comments, and we are so glad that you enjoyed what we shared with you last time. We hope that you will look forward to these posts each month, and that we can bring you some quick and simple ways of using the stamps both new and old, that you have in your Chocolate Baroque stash.

Julie has created a quirky card using an image from the Punky Flower stamp set. Some soft shading at the base of the stem 'grounds' the flower.
Rachel has chosen warm orange tones set against a black background to create her card. Mounting everything onto a white card base still gives a clean and simple feel to the card.
Dominike has been using more scraps from her craft table for her cards:

Lesley has created her card by stamping the image first in black, and then by embossing the image using white embossing powder, slightly offset from the original image. She then swiped Distress Ink over the top in three different shades. Finally, she added a sentiment stamped onto a strip of card, and mounted it onto 3D foam pads.

Zoe's first card has a steampunk theme. She has mixed subtle background stamping, with punchy splodges of colour. She has then created a butterfly using a wing stamp and a pen nib.
Her second and third cards use vertical stamping for the sentiments, a very clever way of drawing the eye up and down the card.

Her final card is a clean and simple monochrome card with some hand drawn elements for added detail.

Brenda's leafy card was created by masking the central square area, and stamping the leaves repeatedly around the outside.She stamped the images several times before adding more ink to get a graduated look. She removed the mask and stamped the sentiment, using a fine black pen to add freehand lines around the square. She sponged some Distress Inks, but this could be left white.
Vronnie has created two beautiful cards using embossing as a resist:

Claire's vibrant card uses Brushos for the background:
Anne has created a series of notecards, which would be sure to brighten anyone's day:


Well, we hope that you like our selection of designs this time around, and that we will inspire you to create something in under fifteen minutes. Thank you to both the Design Team and the Guest Design Team girls for their efforts in provding artwork for this blog post. We will see you again next month with more inspiration.


Wednesday, 27 April 2016

A little ray of sunshine (by Brenda Weatherill)


It hard to believe that it is almost the end of the month and this is Brenda's last guest post for a while.  Time really is flying this year.  Anyway she is going out in a blaze of glory with her clever combination of Spring and Autumn themed stamps.

Hello again, I’m back again with another Spring inspired creation, this time using Pan Pastels, toadstools from the Autumn Poppy set and one of the rabbit images and pussy willow from the Glorious Spring stamp set.


I started with the reverse side of a piece of centura pearl, masked a sun and created the background with Pan Pastels. Next I stamped the images, rubbed out the Pan Pastels from the toadstools and coloured them in with Spectrum pencils. The sunrays were then sponged in with Distress Inks and some extra shading added beneath rabbit and toadstools to ground them.

I hope I have given you a little inspiration today and you can see this and another card using Chocolate Baroque stamps over at my own blog here.

Brenda

We have loved seeing your work over the last three weeks Brenda, thank you for inspiring us with some fabulous artwork and we look forward to you returning later in the year.
 

Tuesday, 26 April 2016

Elephant Walk (by Magda)


As you know Magda joined the Design Team earlier this month and I thought it was about time you knew a little more about her. I put the usual questions I always ask new DT members so here goes.

What what were your first Chocolate Baroque stamps?
I remember that it was a parcel with several stamps : Peacock set, Indian Elephant, Texture Fragments,Serenity and Tranquillity set

What style of stamping do you prefer?
It is quite difficult to say which style of stamps I prefer. Chocolate Baroque stamps are very inviting and it is always a challenge with myself to see the final result of style.

What stamps are on your wishlist?
There are a lot of items  signed in my list, here  just some of them: Floribunda Net Individual, Another Brick in the Walled, Sketchy Doodle Flowers, Sunburst Scenes, Music Fanfare

Can you tell us in one sentence what crafting means to you
I would love to stay all the day in my craft room with ideas to put on paper, using several colours, stamps etc.,  fortunately I have found a good balance between my “world” up stairs, the one down stairs and the one outside.


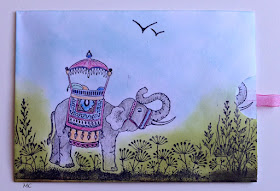
And now here is Magda's latest project for you using a combination of stamps.

Elephant Walk

Thinking about a Catwalk I named my project “Elephant Walk”. It is easy and nice to realise , even if it is twice to do, one time on the envelope and the second time on the card.


  1. Colour the upper part with Distress Inkpad Tumbled Glass for the sky, leaving some white spaces as clouds
  2. Use Distress Inkpad  Peeled Paint for the grass.
  3. Stamp with Archival black on the left side of the envelope and on the right side of the card one elephant of Indian Elephant.
  4. Stamp with Archival black the grass and the plants of Floral Edges.
  5. Stamp with Archival black the birds of Landscape Edges clear stamp set
  6. Colour the Elephants with Faber-Castell Pencils.
  7. Close the envelope and trim its right side to insert the car.
  8. Punch a half hole in the middle of the right side of the envelope.
  9. Stamp the sentiment that you like on the card and glue a ribbon on the right side to pull it out from the envelope.

 
Thank you for stopping by
Magda