Pages

Tuesday, 31 January 2017

Fifteen Minute Cards

Hello everyone, today sees the second of our monthly posts from the Design Team full of quick cards made in fifteen minutes or less. We are sharing tips and techniques which will enable you to make a range of cards that will look both eye-catching and have that wow factor, but will only take a short time to create. These cards would be perfect for creating as batch cards, for craft sales, or for wedding invitations, for example. We also have cards that would be perfect for beginners to attempt, that are not so difficult that you feel you could not make them. Some of the cards may have new techniques that you have not yet tried, so grab a cuppa, and enjoy our blog post. You can click on the Design Team members' names to reach their individual blogs, where you can read more about their projects and see more of their work.

We are featuring some very romantic cards this month; you may be aware that we have recently been promoting a lot of these stamps due to our TV shows on Hochanda, and so the Design Team have already been working with the stamps. With Valentine's Day coming up, we may be able to help you with some ideas for cards for the loved ones in your life.

Zoe has created a very elegant card using an image from the Harlequin Rose stamp plate. Stylish matting adds a very smart finish to her card:

She has created a colourful tag using a sentiment from the Words of Love stamp plate. This would make a super gift tag for that special someone. She has used Distress Crayons, which she scribbled on to the tag and rubbed in with her fingers. She then inked over the top with Distress Ink and spritzed with water for texture. She inked through a heart shaped stencil and spritzed again with wayer to give a 'less than perfect' shaped heart image. She added some splatters of black ink, added the sentiment, and some chrome highlights.

While Zoe was creating some cards, she had been using bubble wrap to make patterns on her gelli plate. Rather than waste the ink, she blotted this onto a card blank, stamped some flowers and added some sequins and a sentiment, and she had created another quick card.


Brenda's first romantic card was created by stamping a background using two colours of Distress Inks and an acrylic block with gridlines. She then stamped the Rose from the Harlequin Rose stamp set and bleached out the colour before matting the background onto the base card.

For her second card, she created a background using three colours of Distress Ink onto which she repeat stamped the heart from the Harlequin Rose stamp set. She then stamped a sentiment from the Rose Stem Script stamp set and used dies to cut a circle to place in the centre of the hearts.

Claire has used a beautiful stamp from the Parfum de Paris stamp set to create her card. She has used second generation stamping to elongate the stamp. and then added a sentiment from the Words of Love stamp set.

Rachel's first card has been created using alcohol inks on yupo paper. She has used Archival Ink to stamp the image, which she wiped away, revealing a batik effect.

For her next two cards, she has used Archival Ink to stamp the images, Distress Inks for colouring, and lots of matting and layering.


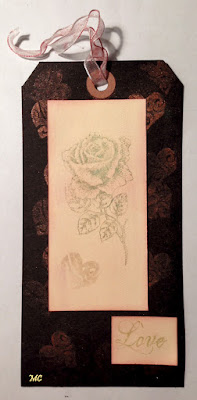
Magda's beautiful tag has been created using Versamark and mica powder. This gives a very rich feel to the background:
Gerrina's first card has been created by stamping partial images of the butterfly and cog fragment from the Steampunk Butterfly stamp set onto watercolour paper. She has coloured her images with alcohol markers, and added lines with a ruler and pencil. Finally, she matted the background onto coloured card stock.


For her second card, she stamped the flowers, covering them with masking paper, drawing lines as before with a ruler and black pencil. She coloured the background with Distress Ink. The images were coloured with alcohol markers.

Penny has created a Valentine card for us by blending Distress Inks onto a background, and faux bleaching the panel. She then edged the panel with gold pen, before matting it onto black card. She stamped the heart, lock and key onto acetate and embossed them with black powder.  She cut them out and attached them to the card, adding a sentiment from the Key to my Dreams stamp set.

For her second card, she stamped the flowers onto white card and coloured them with alcohol pens. She then embossed the panel with a frame style embossing folder and blended Distress Inks around the edges and added gold pen. She matted and layered the panel onto a base card and finished with a sentiment panel.

For Penny's final project, she has created a dramatic black tag, die cutting the shape, and edging it with a silver pen. She stamped the images using Versamark, and embossed them using white embossing powder. She painted the images using pearl watercolour paints and added white gel pen. She matted the panel onto white card and cut around the shape before adding a ribbon.

We hope that you will join us next month when we will be back sharing more of our quick makes with you, but please visit the Design Team Blog every day for our regular posts from the Design Team girls. Thanks for stopping by,


Monday, 30 January 2017

Romantic Roses (by Julie)

Hello crafty people. I have two romantic cards to share with you today.


My first card is made with the Harlequin Rose set. The centre panel is stamped with the smaller rose design that I inked up by applying brush marker direct to the stamp and then stamping onto the card. I masked off the stamped image before adding more roses. Don't worry about the ink drying before you are ready to stamp the design, a few deep breaths or "huffs" onto the stamp will reactivate the ink and you are good to stamp. The tassel border has been stamped into each corner. To get the distressed look I stamped the excess ink off onto scrap paper, before stamping onto the panel. The white base card was stamped with the small rose stamp as before, using Sepia Versafine ink and the centre panel was finished off with some sepia coloured lace ribbon underneath the stamped sentiment.


For my second card, the base card was coloured with Shaded Lilac Distress ink and stamped with the tassel border from Harlequin Rose. The leafy panel is the new Leafy Panel background stamp that I have coloured with brush markers along with the  rose which you can find on the rather wonderful Rose Stem Script  set and to finish off I added a sentiment from Words of Love.

Thanks for stopping by and please be sure to call back soon to see some more Design Team inspiration.

Julie x


Sunday, 29 January 2017

Say it with roses

Hello,
Yet the end of the month. !

Today I would like to say good morning dressed with gold.


I hope the quality of the photo is not so bad because it is difficult to get a good light these days.

1- I embossed the Big Bold Background Leafy rubber stamp with gold embossing powder on a gold paper.
2- I embossed the stamp with gold embossing powder on a white paper, sticked on another white paper.

I hope you like. Take care.

Bonjour
déjà la fin du mois.
Ce fut un plaisir de travailler avec ces magnifiques tampons. Pour cette dernière publication du mois, j'ai travaillé avec les poudres à embosser or, sur papier blanc et sur papier doré.
J'aime beaucoup le résultat. N'est-ce pas ?

Prenez soin de vous. A bientôt.

Saturday, 28 January 2017

Miss You (by Magda) - Words of Love

My third "Romance" project for this month is a Tag, that you can also use as a bookmark to remind you.

Step by Step

1. Spray 4 pieces of Tando Creative Twinchies  with the colors you like of Deco Art Media Mister 
    using as the last colour a shimmer spray.
2. Stamp with Versafine Onyx Black  the Heart and Miss You from Words of Love Rubber stamp
on the dry pieces
3.  Glue the Twinchies with Ranger Triangular Collage Glue stick on a black tag  and colour a piece
     of Rayon  Seam Binding 14 mm ribbon with Distress Stain Barn Door for the embellishment


Thank you for passing by, and start to think about how you can use the lovely Chocolate Baroque Stamps for your Valentine projects.

Magda


Friday, 27 January 2017

My Love is Yours card (by Anne)


Good morning. I am excited to share one of my samples for Lesley’s first TV shows on Hochanda at the start of the month. Lesley demonstrated several sets of stamps from Chocolate Baroque featuring a romantic theme with gorgeous roses and heartfelt sentiments. Great for creating projects for loved ones, Valentines Day, Weddings and Anniversaries too.

Materials:
How to make:

Stamp the rose panel twice in Pumice Stone Distress Ink. Trim and edge with alcohol marker.

Lightly colour the roses with Victorian Velvet Distress Ink and blot with kitchen towel (to stop the stamped image from bleeding too much). Stamp the sentiment with Distress Ink. Attach the ribbon and glue to the card front.

Stamp the hearts with Versamark and emboss with gold powder. Colour with watercolour pen and a water brush. Cut out and apply to the card front. The large leafy heart was attached with 3D foam for added depth.

Wednesday, 25 January 2017

Tulip Dream (by Corine)


All too soon it is the final week of Corine's guest designer spot and this week she has designed another beautiful project using her Gelli plate and several of our stamp sets.

Hello!

Today it is my 3rd and last time this time to post a card as guest designer. I hope you enjoyed my samples. On this card I used tulips of the sheet Spring Bird Tulip stamp set. 


I used stamps from the sheets:


  • On a Gelli Plate Background I started with embossing the window with gold embossing powder. 
  • Then I masked the window and used stencils, stamps and ink to create the background over the Gellie plate print.
  • Next I embossed the tulips with gold embossing powder and coloured with markers and a waterbrush.
  • Finally the sentiment was stamped with black ink.

Till next time,

Corine

I just love the depth that Corine has given to this background with her layering of stencils and stamps, really should try this myself at some point. Anyway a huge thank to Corine for the fabulous inspiration she has given to us these last three weeks and we look forward to seeing her again later in the year.

Meanwhile our regular girls still have tons of wonderful creations to share so please pop back again soon.

Tuesday, 24 January 2017

Infinite Love (by Asha)

Good morning, friends.  I'm back with another romantic creation using the lovely Harlequin Rose A4 stamp sheet.

I started by inking the background with Distress Inks: Chipped Sapphire, Dusty Concord, Seedless Preserves and Fossilised Amber and used a chicken wire stencil to add some interest.

Then I stamped the image on the with VersaFine Onyx Black, applying VersaFine Crimson Red on the bold letter. I added colour to the rose with Faber Castell Polychromos and lashings of clear glitter on the word "love". To finish the project - a few burgundy pearls.


This is a simple project but the colours add a touch of drama. I've got more details of tools and products over at my blog.

And make sure you swing by the DT blog often because at the rest of my talented teamies are creating projects that will amaze you. Trust me... I've had a sneak peak!

Have a LOVEly day!

Beijinhos,
Asha

Monday, 23 January 2017

blue roses (by Veronica)


For one of the samples for Lesley's first show on Hochanda I made this small  notebook.

The cover was covered using  tissue paper coloured with brusho powders and crumpled up, glued on to the cover with modge podge. I used purple and turquoise powders.
The plaque used soft form relief paste and mica powders. I brushed the powders over the rose and leaves of the rose script stamp before adding the relief paste and leaving it to dry overnight. Once it was dry and peeled off the stamp, it was glued on using pva glue.
The mica powders are absorbed by the paste, and will not brush off - you will get a stained stamp though, but it will clean off.


close-up of the plaque, and the open notebook


The large 8" square card used the large stamp from the harlequin rose set, coloured with blue and green brusho powders, with grey powder for the background, and gold mica powders for the swirl. The large lacy border was stamped onto the base card using broken china distress ink, whicgh was also sponged round the edges.
Card mats were gold, green and blue.


The last one is red, not blue and shows the lid of a snall hexagonal box also covered with crumpled tissue paper.
I stamped the large image from harlequin rose three times, coloured it with promarkers, cut out the rose and decoupaged it. The 'raindrops' are glossy accents.


Lesley will be back on Hochanda at the end of the month  with a one-day special, featuring some really lovely stamps that are a little bit different, so check the programme listings for times, you won't want to miss this one!

Meanwhile, my team-mates have some lovely samples to show you using the roses.............

Sunday, 22 January 2017

Rose Canvas and Leafy Trails (posted by Claire)

Good morning, I hope you're all having a lovely crafty weekend. This morning I'm sharing a couple of projects made for Lesley's last shows on Hochanda.

Do you ever start a project with one idea and go off on a complete tangent and make something completely different? That's what happened with this canvas as I coloured the gorgeous roses from Rose Stem Script with my pencils planning to make 3 CAS cards but got totally side tracked and ended up making this lol.


I used acrylic paints to create the background, adding some stencilling with texture paste and then created texture around the images to frame them. I used scrunched up tissue paper with matte gel medium and once it was all dry I added silver highlights with gilding wax. I stamped the sentiment on an acrylic tag and embossed with silver embossing powder and added some little roses that I'd made with air dry clay to finish off. I wasn't sure how the tissue would work but it's quite solid once the gel medium is dry.

My second project is a card made with PanPastels and distress inks. I began by creating the background with PanPastels and then overstamped with the beautiful Leafy Trails Big Bold Background stamp. I watercoloured the image with distress inks and then distressed around the edges with Gathered Twigs distress ink. I layered the image on cream and brown card and added the sentiment (from Words of Love) with some garden twine. I used a couple of little berries and some ribbon to finish the card off.


Thanks for visiting, keep checking back as my teamies have lots of beautiful projects to share!
Claire xx

Saturday, 21 January 2017

Leafy Heart (by Judith)

Hello everyone, I have another project to share today along romantic lines with you. I wanted to make something that might be suitable for my lovely Husband for Valentine's Day, that was a little bit different. We have been together for a very long time, and it gets harder to come up with different ideas after so many years together! He is very fond of texture, and so I decided to create a textured piece to add to the card, keeping the colours very earthy, which would appeal to his tastes.

I used a book page to stamp the Big Bold Background Leafy Background stamp, using Versamark and gold embossing powder. I then coloured the image with water based markers and a water brush. I painted a wooden heart with Brushos, and then using Ultra Thick embossing powder, I added three layers of the embossing powder over the top. I stamped part of the same image into the heart while the powder was still soft from the last heating from the heat gun, and swirled some gold mica powder over the image. Finally, I added some toning ribbon and card to complete the project.

Thanks for stopping by, Judith xx

Friday, 20 January 2017

Love by Zoe

Good morning (just) Lovelies, oh my goodness I'm late, I could of sworn I'd scheduled this post 😤 I've been so busy helping my Mum with her new place I'm chasing my tail lol

So this is my second post this month for the Romance theme.

I used a die to cut my heart and stamped using Versafine Inkpad and heat embossed using a pink Pearlescent embossing powder and heat embossed the beautiful Baroque Orchids background stamp, I then blended distress inks Worn Lipstick and Scattered Straw over the embossed background, tore some vellum and heat embossed using gold EP the Love from The Journal Today set, attached, added some sequins and Voila a very simple but I think pretty card.

 
Thank you so much for visiting, I love to read your comments, have a wonderful day xx Zoe xx 

Thursday, 19 January 2017

Hearts and Flowers (by Julie)


Hello, I hope you are enjoying the romance theme that we have for you this month. The stamps are some of my favourite, especially the lovely new Belle Flower background stamp that the centre piece of this decorative frame has been created with.


For this piece I first added a good coat of white Gesso to the picture frame and once dry, sponged on some gold and silver Aztec paint. To protect the finish I gave the painted frame a good coat of Acrylic Wax.
The background was all stamped with Sepia Versafine and I used the really lovely rose stamp from Harlequin Rose and over stamped it with the Love sentiment from Words of Love.
For the hearts I melted some clear and silver ultra thick embossing enamel in a melt pot and poured through a metal, heart shaped cookie cutter that I had placed on the Belle Flower background stamp. Once the enamel cools enough to remove the cookie cutter and stamp, dust the stamped image with copper mica powder and spritz with water to set.
Assemble the frame and adhere the hearts with 3d glue gel.

Many thanks for taking a peek.

Julie x 

Wednesday, 18 January 2017

Butterfly Inspiration (by Corine)

Today is the second in her series of three posts this month and this week Corine has put together a wonderful collection of our stamps, displaying them on a beautiful Gelli Plate background.  Here's another one for you to enjoy.


Hello!

Here I am again. This is my second post in January. I will show you today a card with a butterfly stamp from the sheet Briar Rose Butterfly.

I used stamps from the sheets:


  • On a Gelli Plate background I used stamps, templates and ink. 
  • I stamped the text with black ink.
  • I also embossed the butterfly and tulip with gold embossing powder and coloured them with Zig-markers. 
  • Finally I cut the tulip and butterfly and added them to the card.
Thank you for looking and I hope you try something like this with your stamps.

Corine 

I totally love the contrast of the colours on this card and all the detail in the Gelli Plate background.  This is another lovely project, thank you Corine.  If would like to see more of this talented lady's work then why not pop over to her blog and have a little nosey around!  

And don't forget to keep dropping in here to nose about at more fabulous designs from our team featuring the gorgeous stamps shown on Hochanda at the beginning of this month.