Pages

Tuesday, 31 March 2020

Basketful of Blooms by Penny

Good morning peeps I hope you are all well.  It's my job to bring you the last post of this month and I have quite a big project to share with you today.  It features stamps from the Doodle Birds , Doodle Butterfly , Rustic Fragments and Edgy Edges sets, Versafine Clair inks, Distress ink, clear EP and some die cuts from my stash.


On a piece of light green card I stamped one of the texture images radomly in 1st and 2nd generation ink.  I then stamped a dragonfly image in another colour randomly over the card and blended ink around the edges.  I stamped the large floral images in various clours onto white card repeatedly and embossed them with clear EP.  I then fussy cut them and painted any white spaces.


I took a piece of Kraft card and stamped another texture image, a basket weave effect, in brown DI.  I scored and folded three edges to create a 3D basket.  I used red liner tape to construct the basket  and attach it to the background panel.  I then took an ivory base card and stamped several 'worker' images around the edges in different colours.  I attached the background panel with the basket onto the base card, arranged and attached the large flowers in the basket and added some foliage die cuts from my stash.  To complete the design I created a paper bow using the lovely border image.


Thank you for stopping by today, I hope you've enjoyed my post and perhaps I've inspired you a little.  Take care and stay well,


                                    x  x  Penny  x  x

Monday, 30 March 2020

Stamping on Surfaces (by Judith)

Hello everyone, I have a few more projects to share from last month's TV shows on Hochanda. This time, I have been looking at various surfaces and how the stamps could be used to decorate a project.

My first make is a card, using the Snowdrop Script stamp set, and I have chosen a simple colour scheme of pastel blue, reminiscent of the bluebells that I have chosen to stamp. I coloured a piece of drawing cartridge using Distress Ink, and then stamped the bluebells repeatedly, using blue ink in first and second generation stamping, to create a bluebell meadow. I coloured the images with Koh-I-Noor watercolour paints, using blue, green and purple.

I edged a whiteboard heart with blue ink, and again stamped a single bluebell image and painted it with the Koh-I-Noor paints. I added the word 'Bluebell' to finish.

I took another whiteboard heart and covered it with texture paste. I spritzed the large bird from Doodle Butterfly with water, and pressed it into the paste. I allowed the paste to dry completely, and them coloured the surface with beige coloured ink, adding a deeper colour into the bird image and around the edges with a dry brush. I also added some copper wax around the sides of the heart.

I used a piece of texture card for the background, and painted it using acrylic paint and tinting medium. I added a border from the same stamp set using Archival Ink.


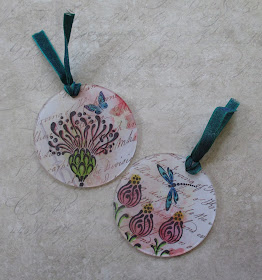
For my final project, I stamped a collection of flowers, butterflies and dragonflies from both Doodle Butterfly and Doodle Birds onto circles cut from Designer Papers 8" x 8"- Chic Script, which I then coloured with pencils. I adhered these to Circular Acrylic Tags, which would make really pretty additions to cards, or lovely gift tags. These were fairly quick to make and colour beautifully.


I hope that you will try out some of the ideas that the Design Team have given you this month with these fabulous stamps. Thanks for stopping by, see you next month!

Judith xx

Saturday, 28 March 2020

All Things Bright and Beautiful (by Zoe)

Good morning Lovelies and welcome to my final post of the month.

I adore these stamps, they are so versatile.

I made a set of Greyboard ATC's which I Gesso'd first and just randomly brayered on neon acrylic paints. I used the fragments on the background for texture and heat embossed in gold the main images.

I used Watercolour markers and spritzed with water to create this background. Versafine Clair inkpads are fabulous and such a great variety of colours. I used those to build my images up. More fragments in the background.

I used Crushed Olive Distress Oxide inkpad to stamp my envelope.

I used a whiteboard tag from the website, with Distress Oxides- Black Soot, Antique Linen, and Evergreen Bough, to create the background. The alphabet I kept as one and stamped using the Evergreen Bough. The beautiful edge is heat embossed in gold.

And finally a whiteboard heart ATH from the website, Distress Oxides-Shaded Lilac, Lemonade and Marigold. I heat embossed the bluebells and word, coloured in using watercolour markers, I edged with a gold wax.

Thanks again for stopping by, see you next month.
Have a wonderful day and happy crafting xx Zoe xx

Wednesday, 25 March 2020

Quick Cards (by Christine)

Hello everyone, today sees the final blog post this month from our Guest Design Team member, Christine. She has made some speedy cards for your inspiration.

Christine writes:

Hello everyone.

My final blog post for March!

The first project comprises four examples of quick cards to have available in your stash! I used four mini gelli plates of different shapes, Distress Inks and stamps from Rustic Fragments set to give detail. I then chose some beautiful floral stamps, colouring in two of them with sparkle pens, but leaving two of them simply stamped, (I thought the colour from the gelli plates was enough). Floral stamps used are:

Rose Set
Rose and Thistle set
Medici Flower
Rose Stem Script


The second card was also quite a fast one to achieve. I had a circles stencil on my desk so chose blue, pink and yellow Distress Oxides and mixed them across the stencil. I cut the resulting image into different widths of strips and glued them across a piece of white card on the diagonal. Once complete, I cut out a 5" square then stamped one of the Geometric Trading Hearts with Versafine Clair Onyx Black in the centre. On a remaining piece of the striped background card, I stamped one of the sentiments from the same set.
Mounting on black card was the final step before adding to the card blank.


My final card showcases the stunning stamp sheet called The Folk Art Garden.
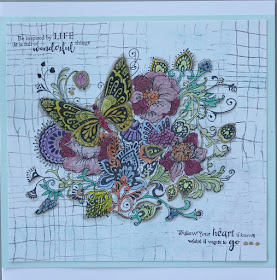
The first step was to create the background using the Open Weave stamp and Distress Ink. I then stamped the image with Versafine Clair Onyx Black ink and coloured it with pencils. When I was finished I added Glossy Accents to the butterfly and then glitter around some of the elements. The sentiments are from The Folk Art Garden stamp set.

I hope you have enjoyed my blog posts and look forward to catching up with you later.
Happy crafting!

Christine
xx

Tuesday, 24 March 2020

A Snowdrop spells Spring by Brenda


Good morning to you all, I hope you are all staying safe and well during these very difficult times. 

Snowdrops are one of the first signs that Spring is on it's way so the beautiful Snowdrop Script was very appropriate for the shows and for this card I kept to soft yellows and greens of Versafine Clair, using worker stamps to create the background, an acrylic block and inks for the focal panel and the stamped the image with Verafine black, bleached out the colour from the Snowdrops and added some glitter to the flower heads.


I kept this one monochrome with just a pop of red to draw the eye. The flowers are from Doodle Birds and Doodle Butterflies stamped in Versafine Clair, a panel across the middle stamped with Edgy Edges and a couple of Dragonflies from the Butterfly set.


A Whiteboard Tag inked with Oxides, to get a softer and more controlled inking I dab my inks onto a piece of acetate, spritz with water and then apply from the top onto the tag (or card as the case may be). Random stamping using elements from Edgy Edges and Rustic Fragements.....this is such a useful set and a must have for your crafty arsenal, flowers from Doodle Birds, small Butterflies stamped and cut out and sentiments stamped onto Aida fabric.


Three apertures cut with a die and placed over backgrounds inked with Oxides and over stamped with images from Rustic Fragements in coordinating colours of Versafine Claire, then Butteflies, a Bird and Flower from Doodle Birds and Doodle Butterflies again stamped with Versafine Claire.


Simple masking and inking with DI's, some stencilling and then the Bluebells and sentiment from Snowdrop Script stamped with Versafine Claire.

Myself and the team always appreciate your visits and encouragement, many thanks from us all and stay safe.

Monday, 23 March 2020

Let's Doodle! (by Sandra)

Hello

I am sharing some more of my cards from the February show on Hochanda

These cards were made using the fun Doodle Birds and Doodle Butterfly Rubber stamp sets.
The stamps are great for giving a silhouette look whilst still being able to see the background.

My first card uses stamps from the Doodle Butterfly set. I used Brushos for the background, I then stamped the Border and Bird.  The sentiment is from Edgy Edges. 
I finished the card by blending around the edges with Distress ink and layering onto a piece of card.


My next card I used pale green Distress Inks for the background.  I stamped one of the Birds  from Doodle Birds and added a little "perch" from Doodle Butterfly. I then added "foliage" made from another of the birds tail and the Peacock Feather. Sentiment is from Words of Inspiration.


For my next card I used my stamping platform to repeat stamp the flower head from Doodle Birds in lovely citrus colours, I then die cut a circle and stamped the butterfly.


My last card I blended Distress Inks for the background and used a variety of stamps from  both sets of stamps because they work so well together!


Thanks for looking
Sandra x

Sunday, 22 March 2020

Doodle Delight (by Julie)

Today marks my last post for Chocolate Baroque as I make way for a shiny, new design team member. I have loved my time on the team, however it is time to move on, so I will get on with showing you my last three projects.


My first card is stamped with Doodle Bird and is a very clean and simple design.
I inked up the flower and rose head images with red and green dye ink and stamped around the card edge. Some of the images are lighter than others and that is because I stamped twice before re-ink the stamp. I added in the dragonfly and butterfly images and coloured the butterfly with polychromos pencils.
The card was finished off with a sentiment from Snowdrop Script before being mounted onto red card-stock.


My second card has been stamped with Doodle Butterfly Once all of the main images were stamped I applied Broken China Distress ink over the entire card before outlining the stamped images with a coloured fine liner pen. I then darkened the edge of the card with Hickory Smoke Distress ink before over stamping with the net image from Rustic Fragments and finishing off with white paint pen dots.


My last project was created on one of Chocolate Baroque's whiteboard tags. I inked up the letters from Edgey Edges with a red dye ink and stamped onto the left edge of the tag, before inking up the pattered image from the same stamp set, using a purple dye ink and stamping onto the right edge of the tag. I applied purple dye ink around the edges of the tag before outlining with a marker pen. Decorative twine was wound around the tag before stamping the bird (from Doodle Birds) onto spare card, cutting out and sticking onto the front of the tag with 3d foam pads along with the word "Journal"

Thanks for stopping by and please call back soon for more Design Team inspiration

Julie xx

Friday, 20 March 2020

Things with wings! by Rachel

Hello there! Rachel here today to share some more of my samples from the February shows. In a couple of these samples I have also used the  background papers from the January shows too.
For the first sample I have made an Artist trading heart  covered with one of those background papers from the January shows. I also used the doodle butterfly stamps done in mega flake.

On this next card I used both the doodle birds and doodle butterfly stamp sets and also the letters from the Edgy edges stamp set.


Next we have more doodle birds done onto an oxide baclground....


And finally I went back to the background splash papers and made a tag using up some of those doodle butterflies I had created in mega flake!


I hope I have brought you some inspiration for your new stamps!
Have a great day.
Hugs
Rachel x

Thursday, 19 March 2020

Spring part 2 - (by Magda)

Here I am again with butterflies which are dancing in the warm air and in my projects of today.

Sadness flies away card


I used  a Brush wash on a white cardstock for the background
Stamped with Jet Black Archival the sentiment from Butterfly Perfumery rubber sheet, and 
Gothic Fragments  while  the butterfly from Butterfly Poppy Collage is stamped with Carnation Archival  


Happy Dance page
                                   
step by step

1.  Colour a pice of white cardstock with Distress Ink Pad green, blue and yellow
2.  Stamp on in the Butterfly from Just Butterflies in black and randomly a swirl from Butterfly Florals in
     red with Distress Ink Pad
3.  Cover all with white Gesso
4.   Squeeze a tissue towel and glue it on top of the cardstock with  Inkssential Glue n Seal


5.  Blend again with the colors of point 1.
6.  Stamp with Archival Jet Black the flower from Wisteria Lane
7.  Stamp with Archival violet  the butterflies from Just Butterflies, on a white cardstock, colored
     with a light coat of Distress Ink Pad Seedless Preserves and cut them out
8.  Stamp with Archival Jet Black the sentiment from the plate Butterfly Perfumery  on a white     
     cardstock coloured with yellow Aquarelle Pencil
9.  Glue the butterflies, the sentiment on the mat  as shown

10. For the big background of the page :  blend Distress Ink Pad Seedless Preserves  ( same color of 
      point 7. used for the butterflies)
11. Stamp randomly with water all around butterflies of  Just Butterflies plate.


12. Glue  the mat on the page.

I hope you enjoyed my March "Spring" month.  Thanks for passing by
Magda


Wednesday, 18 March 2020

Creating Layers (by Christine)

Hello everyone, today sees the return of Christine with her second blog post this month. She has created something for everyone this time with a range of cards and techniques.

Christine writes:

Hello everyone, I'm back with my second blog post for March.

I used Drawing Cartridge for this first project since I intended to use a fair amount of water through the process. I started off by tearing some paper and, using different shades of Distress Oxides, created the hills and the sky. I masked off an area on the sky for the sun.
The next stage was to stamp trees from the Trees a Crowd set. I used Smokey Grey from the Versafine Clair range as I did not want them to be too prominent; to that end, I also used second and third generation stamping to build up depth.
I then chose Fired Brick Distress Ink and used a tree and texture brush to add colour to the two large trees and then the same ink using a couple of the very small flower stamps from the Orchard Design a Tree sheet to add detail.
The main feature is the lovely Tree House which I stamped directly onto the card with black ink and then separately on white card which I then fussy cut minus the top branches. I added colours that I thought would blend well on the fussy cut and then adhered it to the main images. I added grey watercolour pencil aroumd the house to give it some shadow and depth.
I had kept the mask on the sun area so added some yellow Disress Ink and carefully swept it around the edges. When the mask was removed, I added a little yellow to blend the colour. The sentiment is from the Tree House stamp set.
I added some birds via stencil in my stash and the little MDF owl just finished off the piece.

I went for a clean and simple look for this piece. I cut three pieces of square card, each about an inch bgger than the next and temporarily centred them together. I chose two stamps from the Autumn Hedgerow set and stamped them evenly across the cards. I then cut black mats for each of the three white cards, allowing a narrow border on each one. I then adhered the white cards onto the mats ensuring the stamped images were as exact as possible.
The focal stamp is called Shared Beauty. I used Versafine Satin Red for all of the stamping. I used a circle die to cut it out and the next larger die to cut out a black mat. The mat is adhered to the smallest square and the circle image raised for dimension.
This could be a card or it could be framed. I am not yet sure!


My last card today used alcohol inks and a lifting ink. First order of the day was to cover Yupo Paper with alcohol inks- I used three in the pink/plum spectrum. Once the inks were totally dry, I used the beautiful large flower stamp from the Celebration Bouquet set, covered it with lifting ink, and then stamped it straight on to the Yupo paper. A soft cloth rubbed fairly firmly over the stamped area revealed the image below. The ink was still on the stamp of course and I added it to some cartridge paper. The resulting image gives a lovely watercolour effect.
I created the background paper using Seedless Preserves Distress Oxide Ink and the same stamp with Dusty Concord Distress Oxide Ink. The sentiments are from the same stamp set.

I hope you enjoy looking through these.
Happy Crafting!

Christine.

Monday, 16 March 2020

mini concertina book (by Veronica)


Last month's TV shows also featured the lovely rustic fragments set, and I decided to use all the fragments as backgrounds for a mini book kit that  I discovered I had bought and stashed away safely many moons ago.
There were two mini books in the kit by Tando, which is sadly out of stock at the moment, so I still have one left.....
I painted the blanks with white gesso first, then coloured with distress oxide inks - I think I ended up using mainly wild honey for the background and stamping the fragments  and edging with vintage photo.
I stamped various birds ,butterflies and flowers from the doodle birds and doodle butterflies using black versafine ink onto the panels, and two of the larger birds on the covers. One or two highlights were added using a white pen
The covers were glued into place using ordinary craft glue

Sunday, 15 March 2020

Butterflies and Birds by Penny

Good morning everyone I hope you're all happy and well.  I'm here with my first post this month featuring a couple of my samples from last month's shows.  


Golden Birdsong.

 For this card I have used the Doodle Birds, Edgy Edges and Rustic Fragments stamp sets, Versafine Clair ink, Distress inks, Versamark ink and gold EP.  


On a white base card I stamped a couple of images randomly in different colours of DIs, then added one of the texture images over the top.  


On separate card I stamped a border image in blue ink, when that was dry I stamped a bird on each border with Versafine ink and embossed them with gold EP.  I trimmed each border, edged them with gold pen then attached them with 3D tape to the front of the card.  On another piece of white card I stamped and embossed a butterfly image, cut it out and attached it to the card. 


Inspirational Garden.


For this project I have used stamps from the Doodle Butterfly  Doodle Birds and Edgy Edges sets, Distress inks, Versamark ink, Versafine Clare inks, white EP, and gold pen.


I stamped several floral images and a butterfly onto Kraft card withVersamark ink and embossed them with white EP.  I watercoloured the images with DIs and added gold pen around the edges of the panel.  I then stamped the border image onto a spare piece of Kraft card and painted some of the leaves before edging with gold pen.  On another piece of Kraft card I stamped a couple of solid floral images randomly over the card creating a background panel, and edged it with gold pen as before. 


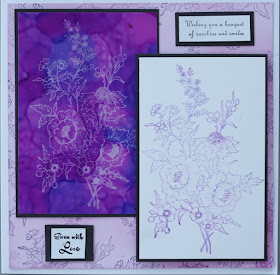
On an ivory base card I stamped two of the worker images around the edges to create a border.  I attached the focal panel to the background then wrapped the border around both panels before attaching them to the base card.  I stamped and embossed a sentement on a strip of Kraft card, then attached it to the card.
Thank you for stopping by, I hope that I have tickled your crafty taste buds!  I'll be back later this month with another post, until then stay well and take care,


                                        x x  Penny  x x


Friday, 13 March 2020

Stamping on Black Card (by Judith)

Hello everyone, I have a few projects to share with you today using the stamps that we brought to you on last month's TV shows on Hochanda. All of the projects share a common technique; stamping on black card with acrylic paint, which suits these doodle style stamps really well.

For my first project, I painted a piece of sticky backed canvas with some paint, watered down slightly, blending the colours where they met. I dried this layer, and stamped a flower from Doodle Butterfly over the top using white acrylic paint, for a subtle effect. Once dry, I stamped some of the words found on Snowdrop Script and Edgy Edges, using Archival Ink. I added some doodle stems using green Archival Ink.

To create the flowers, I added white paint to the stamps, then added the other colours over the top, before stamping onto black card. I chose a mixture of blue and green paint over the white. I fussy cut the images, leaving a slight border, and adhered them to the tag shape, which I matted onto black card as well. Some coloured ric rac completed the tag.

For my second project, I coloured a whiteboard tag with green and blue ink before stamping the image from Edgy Edges using Teal ink over the top. I created two butterflies as before, and stamped the sentiment onto a strip of left over card, which I then cut into pieces before adding to the tag. Blue and green ribbon complete the tag.

This card feels a little on the busy side! However, I wanted to show you what you could do with these stamps, and you could certainly leave some of the elements out, or incorporate them all!

I started by colouring the background with Distress Inks, and adding overstamping with a mesh design from Rustic Fragments. I used a darker version of each colour from the background for a tone on tone effect. I edged the background with the top of the flower head using black ink for a decorative border.

I created the flowers and dragonflies in the same way as before, using green, yellow and pink paint on top of white paint.

Thanks for stopping by, I will be back later in the month with more projects to share with you.

Judith xx