Pages

Sunday, 30 November 2014

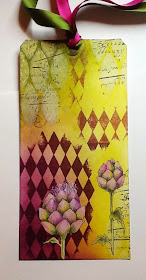
Artichokes and Diamonds (posted by Lesley)

This tag started out as a three colour challenge set for me by Glenda when I was up visiting her in Scotland..She picked three colours of Distress inks for me - Seedless Preserves, Crushed Olive and Peeled Paint and I used these to colour the background on the tag. It was then left lying around for a couple of days because, although I loved the colour combination, I didn't know where I wanted to go next.
Eventually I decided to use the artichoke image from the Mellow Fruitfulness set. I stamped it onto a self-adhesive label and painted it using the same three Distress ink colours used to colour the tag.. I added some texture with soft relief paste (watch out for this product coming to the website soon) and the Blazonry stencil, then stamped over the top with a script stamp from Eccentric Edwardian
Next I randomly stamped the image from Harlequin Fragments, and stamped the stamens of the artichoke using white paint. I cut out the artichoke images and split them up before sticking into place. Just a few scraps of toning ribbon finished it off.
Sometimes it's good to walk away from a project rather than just keep going because you feel you have to finish something.  If you give yourself some space you return to it with fresh eyes and often a sudden influx of inspiration. 

Thanks for joining me today and keep tuning in for some gorgeous creations from the girls with the fabulous new steampunk stamps.


Saturday, 29 November 2014

Autumn Edges in Cool Colours (by Shirley)

Hello everyone, I hope you are doing well.    Time is flying as here we are at the end of November already.

I have a design to show today using the new fabulous Autumn Edges stamp set.  As we are getting to the end of Fall Season and the hot colours have left, I've used cool colours for this card. 


The center background was created with Dylusion Spray inks -  I spritz water after spraying the inks, added a little sea salt and let it dry (which creates the watermarks if you are not familiar with this easy technique). 

I shook the salt off and then stamped the Owl from November Fairy and part of the leaf edge to the top and bottom with Cobalt Archival ink.    Using a little bleach and brush (do not use synthetic brushes with bleach) I removed the colour inside the leaves and around the owl.  This technique gives a bit of a batik look.  I added a little colour back onto the leaves using Distress Inks on my craft mat with a brush and water.

The light blue background is coloured cardstock.  I stamped part of the tree and solid leaf edge with Cobalt Archival ink.   The leaf die cuts were coloured with Distress Inks after embossing the back with a stylus.

Thanks for your visit and have a great day,
Shirleyx

Friday, 28 November 2014

A couple of Autumn projects (posted by Claire)

Good morning, Claire here with a couple of quick projects. This time of year is so hectic there isn't always time for elaborate projects. The first is a card made using Autumn Edges. I'm really trying to come up with some fairly flat designs that can be posted cheaply, hopefully this one will fit the bill.


I'd seen a few images around blogland that had been stamped and embossed with white before being coloured and decided to give this technique a try. I coloured the mushrooms with Graph'It markers and then crated a background with PanPastels. The fairy is from the August Fairy set, again stamped with versamark and embossed with white embossing powder. The sentiment is from Fairyland words, this time I stamped with a Memento inkpad in Teal Zeal.

For my second project I've covered a little notebook to be used for jotting down recipes. I began by cutting a strip of red card slighly wider than the book. Using the book as a guide I scored the card to create a spine and left about an inch of card to overlap the back of the book.


Next I cut white card slightly smaller and stamped the images and 'Recipes' from Mellow Fruitfulness in Memento Tuxedo black ink. I coloured the images with my Graph'It markers and distressed the edges with Tumbled Glass Distress Ink

Hope you like these two quick projects, we're all getting in the mood for some steampunk fun with the gorgeous new stamps! See you soon
Claire xx

Thursday, 27 November 2014

Steampunk dives under the sea with our brand new stamp releases

Today we are launching two new A5 additions to our Steampunk themed range. If anyone has read Jules Verne's classic 20,000 Leagues under the Sea I am sure you will agree with me that the images of these marine creature could easily be from the pages of that book.  Sue has really let her imagination loose here and has designed some wonderfully quirky, fun stamps.

The first, which is our Stamp of the Month, is Steampunk Funky Fish

swiftly follwed by Steampunk Sea World

Of course you can purchase these as our usual money saving multi-buy

These new releases mix very well with our other sea related stamp sets so that you can create your own underwater scenes.  The Design Team girls have some dazzling creations waiting in the watery wings, here are a couple to get your creative juices working.

This colourful tag is from Florence, don't you just love those cute shrimps out for an afternoon swim!


And this tag by Doreen really captures the essence of the fantasy ship. I'm sure Captain Nemo would be proud to sail that!.


This is just a small selection of the brillliant inspiration you can expect to see during December. Remember to visit every day to make sure you don't miss anything and if you find time to comment too that would be excellent. It could be your name drawn at the end of the month for our £15 gift voucher. Enjoy


Tuesday, 25 November 2014

Mellow Fruitfulness - Stampbord By Florence

Hi everyone


Today I would like to share with you two project I have made using the fabulous Mellow Fruitfulness Stamp Set.

For my first project I have used a piece of Stampbord to make a fridge magnet.


Stampbord is such a wonderful medium to stamp onto.  There are different sizes available on the Chocolate Baroque Web Site.

I colored my Stampbord with Distress Inks using a piece of Cut-n-Dry foam and left it to dry.  

I stamped my image using Archival Ink.

I then scratched off some of the ink to reveal the white chalky surface of the Stampbord to create some high lights.

I attached a small magnet to the reverse of the board.

For my second project I have used the same artichoke stamp from the set to make a card.


I used one of my own backing papers for this card and just stamped the image directly onto the printed paper using Archival Ink.  

There are lots of pretty papers available on the Web Site in this section here.

I colored the image using water color crayons and blended the colors with a damp paint brush.

I used a die to cut out the ornate edges (fancy edged scissors will create the same effect) and stamped the wording onto them using Archival Ink

I then made up the card as seen. 


If you haven't already, do check out all of the amazing projects made by the DT.  You are in for a real treat.

Take care everyone
Happy Stamping.

Florence x


Monday, 24 November 2014

Fruity Recipe Book by (Debbie)

 My post today has a few photographs as I wanted to show the inside of the
Recipe book I've made.
The front cover is made with A4 white card and I ran it through the embossing machine in an A4 embossing folder.
I cut the card to A5 size and coloured with Vintage Photo Distress ink, a few sprays of water and when dry rubbed a little gold polish. The label was stamped with black ink and embossed with clear powder. I water coloured with distress inks.


For the inside pages I use Microsoft Publisher, drawing lines leaving the top of the page blank to be able to stamp in the space.
The stamping of the fruit inside was done like the front panel.
The edges of the pages were distressed with the vintage photo.


There are ten pages in the book for a few of my favourite recipes that I hunt through my various books for. It will contain chutney, cake, jam and scone recipes.


I bound the book with my Bind it all so in the future can take it to pieces and add more pages.

 
Many thanks for stopping by
Debbie

Sunday, 23 November 2014

A Burst of Colour by Doreen

Hello to you all, I am back again sharing another sample made from the new stamps that have just been released for November .

I have used three of the stamps from the Autumn Edges sheet for this card.
I started by making my background blending yellow and red Panpastels onto some textured card .

The toadstools have been white embossed with Versamark and I stamped the trees with brown Archival ink.


Saturday, 22 November 2014

Fruitful Birthday (by Asha)

Good morning, friends! Today I want to share with you a card project featuring the cherries from the new Mellow Fruitfulness A5 sheet. These colours are my current favourite combo of warm orange and yellow with a sprinkling of olive green and a pop of red. Leaves from last month's Autumn Poppy A4 sheet is making a guest appearance too, stamped in the background. I've fussy cut the leafy border from the new Autumn Edges A5 sheet and finished the project with a greeting  from the Birthday Words A5 set.


Here's a closer look at the card. The background is a blend of various Distress Inks and I used alcohol markers to colours the images. Check out the deliciously ripe gloss of the cherries!  And to make sure you don't miss it, I've fussy cut the image and mounted it on foam tape. Details on how I created this card will be posted on my blog.


So there you have it - a warm and mellow card... perfect for these cold November days. Don't forget to swing by the DT blog regularly for more card ideas by my team-mates. Happy crafting!

Beijinhos,
Asha

Friday, 21 November 2014

Falling Leaves (posted by Judith)

Hello everyone, my projects today show how well the various stamp sets from Chocolate Baroque mix together. I have chosen to use stamps from the Nature Table stamp set alongside the Autumn Edges stamp set on my first card.

I began by stamping the mushroom border and a mushroom cluster from the Nature Table stamp set along the bottom of the card. I used a permanent black pen to add a few lines to join them together. I masked the images before stamping the mushrooms on a tree twice on the left hand side of the page. I drew a continuation of the tree to the top of the page, and again masked all of these images.

I coloured the background with Brushos, using a combination of yellow and orange, with a hint of violet, until I was happy with the overall colour. I dried the background with my heat gun, and then added foliage stamping along the edges and behind the mushrooms, using various shades of archival inks. I used bleach to remove the colour from some of the foliage, and then proceeded to colour all of the images with watercolour pencils. I also coloured the foreground with watercolour pencils.

I stamped lots of small leaves onto scraps of paper, and stuck these onto the card, some on the ground, and some tumbling down randomly, as if they were falling from the trees overhead.


I wanted to show how a much simpler card could be made using the same mushroom stamp, taking much less time, but producing a really pretty card nonetheless. I made a mask with an oval aperture in the centre, which I placed onto a piece of smooth watercolour paper. I then stamped the mushroom border onto the paper, and coloured it using Distress Inks and a waterbrush. I used a loose style, not trying to be too precise. I dried the image and then covered it with the mask that I had used from my first card. I added a small circle mask to represent a moon, and then coloured the sky, using a combination of three Distress Inks in orange, blue and plum. I removed the circle mask and added a little bit of grey to soften the starkness of the moon, before swiping some yellow across the moon and a bit of the sky to either side.

I removed the mushroom mask, and coloured the tops of the mushrooms with a bit of yellow as well, to represent the light from the moon. I then coloured in the ground with a bit of lilac. I added a streak of yellow for the moonlight, deciding where it would shine.

I stamped the sentiment taken from the Bewitched Moonlight stamp set, and a fairy from the Summer Fairy stamp collection using Versafine Onyx Black Ink.

A much quicker card, but still achieving a great look. I hope that I have given you some inspiration with these versatile stamps. Thanks for stopping by, Judith xx

Thursday, 20 November 2014

Feeling mellow yellow...or red? ( by Miranda)


Hi there,

Today I want to show you two samples made with the lovely Mellow fruitfulness sheet, isn't it great? This time I've used the apples, the little cherries and the fruity border. These backgrounds were already waiting in my stash to be treated with some lovely stamps.  On the first one I did also use the background fragment(one of my favorites) from the Dusky Damask sheet. The leafy border on the right is also a stamp from that sheet. The background was created using the acrylic bloc technique.(you can find this here)
 I stamped the damask fragment onto damp paper so you can see only some vague patterns. I've embossed the word( Artistic expressions) with Wow Magical mauve embossing powder. I've stamped the apples with Memento red and some Memento Elderberry on the leaves. The leafy branch is stamped with Memento black. Than coloured them with colourpencils. And some accents with a white Sharpie marker. O, yes there are also some cherries at the top! Well I think I have never used such a vibrant red card, it is really popping!


Now onto the 2n one..........this is one of the backgrounds I've been playing with during the holidays.......lots of inks flowing, water misting and coloured fingers.......but we had fun doing that. I've used Shadow paint inks, they are similar to ecoline. Than I've stamped one of the fragments of the Harlequin fragments several times onto very wet paper, some less wet and some dry. Using different inks, like gold, white, orange and purple.
The fruity border from the Mellow fruitfulness sheet is stamped with Memento inks; Pear tart, Grape jelly and Morocco. It's easy to use the small Memento dewdrops for this.
I gave some structure to the top using an embossing folder and rubbing several Inca Gold waxcolours (Viva decor) over it. It creates a beautiful shine........


This way you can easily create a ten minutes card, look in your stash for a background paper( self made or scrap paper) and match your image inking up the same colors.


Here you can see the sparkle of the Wink of Stella marker on the border. 


I also want to say thank you for your visit and your inspiring comments, always a joy to read! If you have any questions, please ask .........

creative greet and seize the day!


Wednesday, 19 November 2014

Guest Post - Framing it by Lou Withers

Hi there, this is the second week for Lou's wonderful artwork and this week she has used her altering skills to great effect with these hanging frames and the Autumn Edges stamp set.


  • For this week's project I took three simple wood frames and painted them first with black gesso and then used bronze Crackle Paint over the top. 
  • Next I stamped the trees on to off cuts of card.and fixed into the frames.
  • I added micro beads whilst the paint was still wet, then adhered other beads in copper and turquoise randomly on the images and around the frame. I  made the rings in copper wire to join it all together and added some hardware in the shape of chains and a label style bracket.
  • Finally I rubbed over with Sapphire Treasure Gold to act as highlights.

It's a beautiful time of year and as I said last week, the stamps speak for themselves.

Lou xx

Thank you Lou for a stunning project, the colour combos give this a real rustic autumnal feel, gorgeous. I am sure you will all join me in saying 'well done', can't wait to see Lou's final project next week.

Tuesday, 18 November 2014

Autumn in colour

Hey everyone, are you having a great time?
Yes, Autumn  is the greatest season of all, I'm sure everyone loves Autumn colours. I have made you some colourful cards with these colours that I like and with the great Chocolate Baroque Autumn Edges rubber stamp sheet, I hope you  will enjoy my samples!

I made the first card with some watercolour markers, I worked with them directly on my stamps. I spread a tiny bit of water over the colours on the stamp to get that watercoloured effect on the leaves (around the border). I used yellow, light orange, darker orange and brown. I used some light yellow Distress Ink to make the sun shine on my paper, then I stamped my trees in the middle of the card and coloured the ground with the same colours that I used on the leaves. I stamped the fantastic fruits of Autumn border on another piece of paper and again I coloured the picture with the same colours I used before. I cut the stamp out, coloured the borders and placed it on my card using 3D foam.


My second card was made with Dylusions Ink and a stencil. First I spread some water on my white card then I used the three different greens of Dylusions Ink. After everything was dry, I placed my web stencil on the background and wiped away the colours a bit with a babywipe. I took my mushroom stamps from the Autumn Poppy rubber stamp sheet and with a wet babywipe and some bleach I made my stamp wet and stamped it on the background of my card. You get a wonderful white mark of the mushrooms, but be careful with your stamps, wash them  immediately because bleach can destroy the rubber!
At the front of my design, I stamped my mushroom border stamp with Versamark and black embossing powder then I took a small brush and some bleach to take away the colours out of the mushrooms. When everthing was dry I coloured  them in with some alcohol markers, and as a finishing touch I've put some crackle on them, it gives such a lovely realistic view!

Have a lot of fun creating your beautiful Autumn cards for this year. Enjoy!
Greetings,
Maria

Monday, 17 November 2014

Autumn Edges - 10 minute Cards By Florence

Hi everyone

Thank you for your visits and kind comments left on the posts.
We always love to hear from you.

Today I would like to share with you two quick and easy cards made using the new Autumn Edges Rubber Stamps.  These stamps are so beautiful and are perfect if you make cards in a clean and simple style or if you are new to stamping these would be a great set to start you on your stamping adventure.


I used one of my own backing papers for this project but any pretty papers or pages out of an old book or magazine will work in the same way.

I stamped my image and sentiment on to the backing paper using Archival Ink and trimmed it to size. The Happy Birthday sentiment I have used is from the Birthday Words set.

I then mat and layered my card as seen.

For my second card


I used a piece of the same backing paper and trimmed it to size.

I stamped the mushrooms using Archival Ink and colored them using water color crayons and a damp paint brush.
I find it easier to color the image with the crayons and then just smooth and blend the colors with a damp brush.

I stamped the spotty pattern using one of the stamps from The Harlequin Fragments set and VersaMark ink.  I then dusted over the stamped pattern image with some chalks using a small piece of cotton wool.   

I stamped the sentiment using one of the stamps from The Essence of Nature Set and Archival Ink.

I made up my card as seen just adding some embossed lines at the side.

Thank you for looking.

Happy Stamping
Florence xx


Sunday, 16 November 2014

Autumn Edges (by Debbie)

 
Two cards from me today using the Autumn Edges stamps.
I was inspired by lovely long walks through the leaves with the dog.
The crunch of golden leaves under foot reminds me
of being a child jumping in piles of garden leaves.
 
For the first, I stamped with brown Archival ink and water coloured with
Distress inks. The horse chestnut and acorns had a little glossy accents on them
to give a shine.


The second card was made using the Foliage colour Big and Juicy ink pad.
I stamped the solid leaf border across the bottom. Next I inked up the other leaves and again water coloured them. I cut out the leaves and fixed them to the card with sticky pads.


Thanks for visiting
Debbie