Pages

Tuesday, 30 June 2015

Tag Fragments (By Judith & Lesley)

Hi there, today is a joint contribution between Judith and myself.  A couple of weeks ago we were lucky enough to have a play day together and in between the catching up chat you have with a friend you haven't seen for a little while we managed to get a little inky! Strangely enough we both started to use the same colours on a tag and so decided that we would do a tag swap. And here are the results.

So first we have Judith's tag. I coloured the background with Distress inks in Shabby Shutters, Squeezed Lemonade and Dried Marigold, splashed water over the top and patted dry with kitchen towel to give a partially faded look. Then Judith took over.

  • To make the tag stamp the raindrops from Seasonal Fragments with Potting Shed Archival ink. 
  • Next stamp the Snake's Head Fritillary and Honey Bees on to a self adhesive label with Versafine Black Onyx. Colour with pencils of your choice (Judith used Polychromos) and fussy cut. 
  • To finish add die cut corners, tinted with the same Distress inks as the background or stencil a similar image with the inks. Remove the backing from the images and stick into place. 
  • Finally stamp the phrase from the See Beauty clear stamp set with Black Onyx. 
For my tag Judith dabbed some Acrylic Wax randomly over the tag and then sponged the same Distress inks over the top. She then used kitchen roll to polish the tag, thereby removing the ink from the wax to leave her faded background. Here is what I did next.

  • To make the tag stamp one of the floral style images from Seasonal Fragments three times on to 160gsm cardstock with Dried Marigold.  
  • Use a water brush to paint over the images with Squeezed Lemonade.and when dry cut around all three images, cutting one of them slightly smaller than the others. 
  • For the flower centres die cut three circles, two x 30mm and one x 15mm, stamp them with the image from Rustic Fragments using Versafine Olympia Green and colour with watercolour pencils in several shades of yellow and orange (I used Aquarelles). 
  • To give the effect of meadow grass stamp the image from Rustic Fragments along the bottom edge of the tag using Olympic Green. 
  • Stamp the images again on smooth white paper and choose three parts of the image to make stems for the flowers. Colour with Shabby Shutters and when dry cut out and stick to the tag with wet glue. 
  • To complete, attach the centres to the flowers with glue gel and then the flowers to the stems with wet glue. Stamp the phrase from Amazing Birthday with Olympia Green.
It is so interesting to see that, although Judith and I completed our tags over 200 miles apart, we have both focused on a flower theme. I hope you like our joint designs, it is really good fun to start a project and then had it over to a crafty friend to finish.

Thank you for joining us today and I hope you come back soon to see some gorgeous projects created by the Design Team using the new Birds of Paradise stamps.


Monday, 29 June 2015

Christmas Masterboard (posted by Judith)

Hello everyone, I hope that you have been enjoying the fabulous artwork from the Design Team this month using the Rustic Fragments/Seasonal Fragments Multibuy stamp set. As we near the end of the month, I wanted to show you another great use for these very versatile stamps; creating masterboards. I have chosen one of the leafy designs and contemporary colours to make a masterboard, which I have then turned into a couple of Christmas cards, showing you that you can use the images all year round for lots of different purposes.

To create the masterboard, I covered a piece of smooth white card with Aqua Adirondack ink, and then stamped the leafy image using a deep red and dark green. I filled in the gaps using the aqua ink to create a softer backdrop for the stronger leafy images.

I covered a 5" x 7" card front with part of the masterboard. I chose a greeting from the Bold Christmas Words stamp set, and stamped this onto a die cut, using red ink. I hand cut a dark red layer to mat the sentiment onto. I made a couple of flowers using die cuts to complete the card.

I had plenty of the masterboard left over, and decided to make another card in a clean and simple style this time. I used a large white card blank, and cut a strip of dark red card, to which I added a strip of the masterboard, after I had inked the edges with Barn Door Distress Ink. I stamped a sentiment from the Warm Christmas Greetings stamp set on to the card. I stamped and embossed a large poinsettia from the Steampunk Christmas stamp set onto scrapbook papers a couple of times, and cut these out. I then stuck them to the card with some foliage die cuts as before.


Thanks for stopping by, Judith xx

Saturday, 27 June 2015

Fragments and patchwork.....by Miranda


Hi there,

Today my last makes with the Fragments for this batch........ I know I will be using them often.....

I've made two cards using the Rustic fragments and the Seasonal Fragments. You can also buy them both in a multi-by and save some money.....
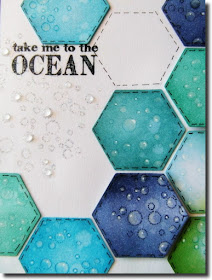
I combined it with a patchwork pattern using die cuts. As I said before I am in the mood for geometric shapes, I have already used the squares and circles before and now on to the hexagons.

Here is the first one......I've sponged the hexagons with Distress inks, splattered some water and embossed at first with Wow pearl white and some have been given accents with the matching Distress markers. And finally I gave them some transparent pearl pen accents.
I've combined them with the toadstools of the 'Autumn Poppy' sheet. These fragments are from the Seasonal Fragments.


And the 2nd one......more a sea theme style combined with the 'Seaside dreams' sheet.
Made similar to the other one but with a smaller hexagon die cut. These bubble fragments come from the Rustic Fragments.  


Also some transparent pearl pen droplets.......they match very well with these bubble fragments


Thanks for your visit and nice comments and hope to see you next time,
Enjoy your day,


Friday, 26 June 2015

Rustic Love (posted by Claire)

Good morning folks, Claire here with a sample made using Rustic Fragments, this time i've teamed them up with some of my favourite stamps from Punky Romance.


I made my background using Barn Door and Pumice Stone distress ink, blending them lightly on some white card with my blending tool. Then I stamped the fragment with Pumice Stone distress ink to create some texture.

I stamped the cogs with Versamark and embossed with silver embossing powder. I stamped 'Love' with versamark, and embossed with red sparkly embossing powder. Before I heated the powder, I used a fine brush to dust the red powder off the cogs and then sprinkled on some silver. I wasn't sure if this would work but the silver powder stayed in place perfectly.

Next I stamped the heart, again embossing in red. I stamped the image again, this time on vellum and embossed with silver embossing powder and cut them out before layering them up with some silver cogs.

Thanks for visiting today
Claire xx

Thursday, 25 June 2015

Paradise found (by Lesley)

Well here we are, almost the end of another month. We have had the longest day already and with a distinct lack of Summer sun I think it is time we all went a little exotic.

Today sees the launch of our July Stamps of the Month and both A5 sets are themed around the glorious Bird of Paradise.

First we have As Free as a Bird


followed by A Little Bird Told Me


and, of course, both stamps are available as our usual money saving multi-buy


The elegance and majestic nature of these images are a treat for those of you who find calm and peace in colouring your stamped designs.  And with the subject matter you can be as flamboyant with your colour choices as you wish.  And don't forget that those swirly tails make great corners and stunning backgrounds.

The card I have made illustrates how you can combine patterned paper with stamping and colouring.


  • Using a background paper from the new Crafty Individuals Paper Pad, Weekend in Seville, stamp the bird from A Little Bird Told Me directly onto the paper using Versafine Onyx Black. 
  • Stamp just the body of the bird onto a self adhesive label and colour him according to your taste (I used Faber-Castell Aquarelle and Polychromos pencils). 
  • Fussy cut the bird, peel of the backing and stick into place matching up with the stamped image on the background paper. 
  • Stamp the two birdcages and use a black fineliner and rule to give the illusion of them hanging. 
  • Add the sentiment, mat and layer on to red card and then on to a folded 7" square white card.
I am sure you are going to love playing with these and there are masses of inspirational projects to come over the next month from our brilliant Design Team girls. So keep watching and enjoy.


Wednesday, 24 June 2015

Colourful Christmas (posted by Judith)

Hello everyone, it is my turn to hijack the Design Team blog again this week, with another look at the Chocolate Baroque Challenge Blog. We are preparing for our upcoming Anniversary celebrations on the challenge blog, and during the course of the next challenge there will be some exciting things happening. We hope that you will find some time to keep popping over to take a look and maybe leave a comment or two while you are there.

We are taking a look back at Challenge Four this week, and showcasing some artwork from your entries in October of last year. The projects have a common theme of Christmas running through them.

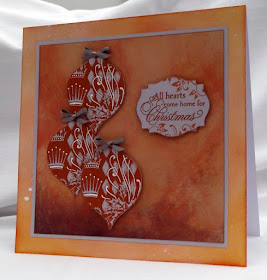
Firstly here is a lovely card from Lesley, the white highlights really make those baubles look stunning against the soft inked background:
Our second card is from Rachel, using one of the really useful Big Bold Background stamps, perfect for Christmas cards in a hurry. Her vibrantly coloured and paper pieced baubles make her card look so dimensional.
Finally, Debbie has created a fabulous steampunk Christmas card with Distress Inks.
Thank you so much ladies for supporting our challenge with your stunning artwork.  They are all so different, yet follow a common theme and the challenge colours. It has been great to see these again.


We hope that this trip down memory lane has inspired you to enter one of our challenges. There is a monthly prize of £15.00 to be won and all details of the challenge can be found on the 'How it Works' page of the blog. If you click on this link, it will take you to the current challenge where you can enter straight away.

Lesley will be back next week with look at a previous challenge and showcasing more of your entries. I hope that you can join us for another inspirational visit.


Tuesday, 23 June 2015

It's a bright, new day (by Lesley)

Well good morning everyone, here we are on day one of my new journey.  And for those of you who don't yet know I now own and run Chocolate Baroque (quick pause for a happy dance!). So please excuse the indulgence of using this blog to say a few important things.


I have bought the business from Glenda and Adrian who are now starting a new journey of their own.  There was a public announcement yesterday on the Shop Blog and a special email sent to all our followers and supporters. And I have to say the response was overwhelming, so I hope you don't mind if a give a big shout out to all of you for your messages of congratulations and good luck wishes. To know that I have your support is a great start to this new adventure. Thank you from the bottom of my heart.

I also want you to know that there there will be more exciting stamp designs from our wonderful designer Sue, that the quality of our stamps will remain in the expert hands of Val and that we intend to give you the same customer service you have come to expect from Chocolate Baroque.

I am also blessed with a brilliant Design Team who continue to blow my mind away with their talent. Thank you Sue, Val and all the DT girls for your care and support during this transition.  

Most of all I want to give the biggest cheer to Glenda and Adrian! It is not without sadness that we are now going our separate ways, career wise, but I know that we're all destined for different things and I wish them all the success in the world with their new venture at Portpatrick Studios; you deserve the best guys. We are still the bestest of buddies and there are all sorts of things the four of us are going to share together in the future. Can't wait!

So back to now, and the reason you looked in on this Design Team Blog. I have a rather simple piece today. It is just a die cut heart, coloured and stencilled with Dylusions paints, stamped with white gesso using one of the new Seasonal Fragments and finished with words from the Positive Beauty clear set.


It may be just a heart but it is my way of letting you all to know that I shall put my heart and soul into running Chocolate Baroque and into bringing you fabulous stamps, exciting products and a whole heap of inspiration. Thanks to your generous comments I think we can all hold hands and travel this new journey together - full of heart.


Monday, 22 June 2015

Seasonal Snowflake (by Debbie)

I have found with the Seasonal Fragments stamps that they are such a great inspiration to making cards all year round.
This is the first card I've made that will go into the box of festive cards for this year.
 
 
I used the snowflakes with a three blue inkpad and stamped all over the card. The stamp was rotated and the snowflakes fits together well. The tree is from Turtle Doves and again I used the same inkpad. A die cut snowflake and sentiment was added.
I'm sure that I will use the snowflakes stamps, there are two in many other cards.
 
Thanks for visiting
Debbie

Sunday, 21 June 2015

Textured Art Block (by Julie)

Hello, thanks for popping in. My project for today is using the  Rustic Fragment stamps along with the new wooden Art Blocks that have recently been introduced to the website.


I started by spreading Pearl, Soft Form Relief Paste over the top of the large basket weave and large mesh stamps. These need to be left to dry for about a day. You can speed up the time by putting them in an airing cupboard but that will still take about 12 hours. Once dry, peel the relief paste from the stamps and colour with alcohol ink and gilding wax. 
After painting the Art Block with cream acrylic and adding a stamped Fragment background, I rolled out some white polymer clay to a thickness of about 4 mm and then placed some Gold Leaf over the top. Next take your chosen texture stamp and stamp directly onto the Gold Leaf and polymer clay. You do not need to spritz with water as the Gold Leaf acts as the release agent from the stamp.
Use a cookie cutter to cut your shapes and then oven bake. Once baked you can colour the edges with alcohol ink.
To finish off I edged the block with Tarnished Brass Distress Paint.

Thank you for taking the time to look at my Art Block xx

Saturday, 20 June 2015

Rustic Fragments - Simple cards by Florence

Hi everyone

I hope you are enjoying the weekend.

Today I would like to share with you two simple cards made using the new Rustic Fragments Set.  

For my first card I have made a masculine card and I would like to dedicate this to all crafting Fathers and Grandfathers out there.  I hope you have a wonderful Fathers Day.


For the background stamping I stamped the image using brown Archival Ink but then added a little bit of embossing to give it a little bit more depth and to give it an abstract feel.  
I used an embossing pen for this and just applied the ink to the card in a brush stroke fashion.
I stamped the Eccentric Edwardian onto a separate piece of card stock, cut him out and attached him using foam pads.  I used a 350 gm board for this because I wanted him to be a chunky embellishment.

For my second card I have used the same stamp as above to make a basket of flowers. 


I embossed the image on card stock and cut out the basket shape.
For the flowers in the basket, I have used the Sunny Sunflower set of stamps. The flowers are stamped and then fussy cut out. To color them, I used a sponge and some Distress Ink.

Little baskets would look beautiful stamped in pastel colors for Easter projects.  Maybe with some chicks from the Steampunk Birds or maybe a basket of Daffodils from the Spring Bird Daffodil Set.  Or, what about a basket of Poinsettias for Christmas cards!   This is a really versatile stamp set to have in your stash. 

These are only a few suggestions for the basket idea.  Maybe you have some of your own that you would like to share with us using the comments box below?? 
Don't forget that if you do leave a comment, on any of the posts, during the current month, your name goes into the monthly comments draw.
Thank you for looking.

Happy Stamping
Florence x

Friday, 19 June 2015

Making an Impression (posted by Judith)

Hello everyone, I have a cheery card to show you today, using the current stamps of the month, Rustic Fragments/Seasonal Fragments multi-buy.

I created the background by painting a piece of smooth watercolour paper with acrylic paint. I used the paint in a very diluted fashion to give a washed effect to the background. I added a large textured linen stamp across the background using a saffron coloured ink, and then filled in the rest of the background with the flower head design, using a plum coloured ink. I stamped a greeting from the Mackintosh Sentiments clear stamp set across a piece of hand dyed ribbon that I had left over from another project. I attached this to the background.

To create some added texture for the card, I rolled out three pieces of polymer clay, and cut them into circles. I stamped the flower head stamp into the clay, and following the manufacturer's instructions, I baked them in the oven. Once they had cooled down, I painted these with the same acrylic paint as I had used on my background. I added a bit of metallic wax to pick out some of the details of the flowers.

I hope that you feel inspired to try something like this out for yourselves, as these stamps are great for adding texture to all sorts of surfaces. Thanks for stopping by, Judith xx

Thursday, 18 June 2015

Fragments for Autumn (by Asha)

Hello there! It's my turn to share a project and I'm playing with 2 stamps with an autumnal look from the Seasonal Fragments sheet. To be honest, I'm not sure if these are meant to be autumnal but just roll with me here! :)

First I created a rich, spicy background by blending various shades of orange, yellow and brown Distress Inks. Then I stamped the fragments. The mushrooms are from the Autumn Poppy A4 sheet, coloured with alcohol markers, fussy cut and adhered to the card.  Then I applied flicks of silver like its catching the moonlight.

These fragments stamps are so versatile and you'll be reaching for them all the time. The rest of the Design Team have more ideas for these stamps so make sure to swing by often.

As always, details of tools and products used in making this card is available on my blog. Thanks for stopping by and have a fabulous day!

Beijinhos,
Asha

Wednesday, 17 June 2015

A Magical, Mystery Tour (by Lesley)

Hello everyone and a warm Wednesday to you all.  As you may have realised by now Judith and I are taking over the Wednesday post on the Design Team to have a wander down memory lane of our Challenge Blog, which is coming up to it's first birthday.

It is really wonderful to look back at all the contributions we have been sent by you, our very creative readers, as it is good for each one of us to review our own past artwork.  Only by looking back can we actually move forward, that is how we grow as artists and crafters.  So I would urge everyone, and I include myself in this, to open the doors to your art archive and have a quiet time looking at what you have created. I think you will be surprised at how far you have travelled and you may even be inspired to recreate a favourite piece in perhaps a different set of colours or with new stamps. Great way to give your a mojo a kick start too.

This week as I had a lovely meander through Challenge 3 from September of last year I found we had a few designs that shared a similar theme.

First we have Milva who created a fabulous mystical flavour with her entry featuring a stunning magical castle, you can definitely imagine Rapunzel living in one of those towers can't you!


Next we have Sally's oriental tag, subtle and delicate. I find this so realistic you can almost hear the wind gently blowing the lanterns in a mountain breeze. Very tranquil.


Finally, Penny gave us a colourful card she called Autumn Eastern Promise and it is easy to see why.


Her clever use of the peacock feathers to create leaves gives her composition that eastern, almost spicy appearance.

Well done ladies for supporting our challenge with your glorious artwork and for giving everyone so much pleasure and inspiration with your entries.

So has this look back inspired you to enter one of our challenges? Apart from the fun of working with colours you may not have thought of putting together yourself there is the chance to win a £15.00 voucher to spend on Chocolate Baroque stamps.  Why not hop over to our Challenge Blog by clicking on this link to see the current colour selection and to find out how you can enter.

I hope you can join us again next week when Judith will be taking you on another Challenge revisit and showcasing more past entries.

Tuesday, 16 June 2015

Circles and Seasonal fragments by Miranda


Hi there,

Today my 2nd take with the Seasonal Fragments, I like these stamps so much! And again a clean and fresh card, easy to create.
This time I was inspired by the circle shape. I have cut out several sizes of circles and stamped two of the flower fragments using Memento Black. I have coloured them with alcohol based markers. Than I draw circles with pencil around it and made a pattern with a fineliner. I have used the sentiment from the Amazing Birthday sheet.


I have added lots of pearl pen accents but it doesn't show on the photo's.......


So, get out your circle die cuts, punches or circle cutter and have some fun with these shapes!
Hope to have inspired you and till next time for more shapes and CAS cards.


Monday, 15 June 2015

Rustic Canvas (posted by Claire)

Good morning folks, Claire here with a project featuring Rustic Fragments, one of this month's new releases, they are really useful stamps like all the others in the range. For this project I've combined them with stamps from the Sewing Multibuy.


I began with a canvas board, primed with gesso before applying texture paste roughly with a palette knife. I let the texture paste set for a few minutes so it wasn't too 'squidgy' before stamping into it with the open weave fragment. Then I left it to dry thoroughly before applying acrylic paint in pinks and creams. Once the paint was dry I added some stamping using the other fabric fragment using potting soil archival ink. Next I highlighted the texture with gold gilding wax.


I stamped some of the sewing themed stamps onto cream card using Potting Soil Archival ink and cut them out. I added a little colour to the lacy border with my Graph'It Markers and then set to with glue and foam pads layering them all up.

I added lace, a flower made from scraps of fabric and tulle and then popped in a tag stamped again with the fabric fragments and overstamped with 'Imagine' from Artistic Expressions. I also stamped 'Enjoy the little things ....' onto some tissue and applied that to the corner of my canvas using matte medium.
To finish off I've added some faux pearls and a little button topped with a twine bow.

Thanks for visiting today
Claire xx


Sunday, 14 June 2015

Rustic Fragments - Simple Card by Florence

Morning everyone

I would like to share with you a really simple card made using the Rustic Fragments rubber stamp set.
I have used just two of the stamps from the set on this card but any combinations of the stamps will work just as well.

I thought this card design may work as a modern style Valentines card.
I chose this card to share with you because I wanted you to see just how beautifully the fine lines of the images stamp and emboss.


To make this card
I have used white coated card and stamped with Staz-On.

Stamp and emboss the weave patterned stamp onto a piece of coated card.
Place a circle mask over the top right hand quarter of the stamped weave pattern and color using a dye based ink and leave to dry naturally.  A brayer is useful for adding the color but you may need to apply a little extra ink, using a sponge, between the embossed pattern.
Cut a circle out of a piece of white coated card stock and stamp and emboss the dotty pattern.
Stamp the word Love.
Make up the card as seen using a foam pad behind the small stamped circle embellishment.

The weave pattern stamp is such a great pattern image.  Stamped in pastel or neutral colors it looks like hessian.  Stamped in green and blues it looks like netting.

That's all from me today.

Thank you for looking.

Florence x

Saturday, 13 June 2015

Let the wind blow (by Debbie)

 
Good morning.
 
The Seasonal Fragments are proving to me that they are going to be a go to set of stamps, that will have so many uses.
 
 
My card is made from only three stamps. The dandelion seeds from the Seasonal Fragments, the fairy from December Fairy and the thistle from Thistle Butterfly. I used Seedless Preserve Distress Ink to colour and added a little colour to the thistles with pens. All of the stamping is done with black Versafine to help show the detail. A little stickles was added to the fairy wings.
 

I also made a little tag using the flowers from the Seasonal Fragments. I will be adding it to a tag book that I'm in the process of making.

Many thanks for visiting
Debbie

Friday, 12 June 2015

Mixed Media Frames (by Julie)

Today I want to show you two frames that I have made using the new Rustic Fragments stamp set. 


I started by spreading molding paste through a Prima Stencil (Bamboo) and when dry, painted the whole frame with a pale blue acrylic paint, followed by some gold gilding wax to highlight the stencil.
The background was created by stamping two of the Rustic Fragment stamps on top of each other, using Cracked Pistachio and Weathered Wood Distress ink.
I used the lovely Butterfly Blush  set and kiss stamped with the Rustic Fragments to get the texture on the butterflies. I found that inking up the solid stamp and then stamping onto scrap card, before kissing with the fragment stamp provided a much crisper design.
As you can see I have finished the frame with some cream cord and pale blue buttons that I had in my stash.


For my second frame I decided to just spread the molding paste straight onto the frame and then pulled a Contour Tool through the paste to create the squiggles. Once dry I painted with a light brown acrylic paint, followed by gold gilding wax and a touch of a pale-blue pearl paint to highlight the contours.
The flower is from the Fresh Blooms stamp set. I stamped three of the images from the set and then over stamped them with some of the Rustic Fragments  using blue, red and orange dye ink. I then cut them out and layered them up to create the 3D flower.
The background was stamped with the large woven Fragment stamp and then water-coloured with brown and blue pencils, however I felt the patterns clashed too much so over-painted a square panel with the pale-blue pearl paint for the flower to sit on, just leaving a border of the fragment stamp instead.
As before I finished the frame off with some brown cord and buttons from my stash.

Thanks for stopping by xx

Thursday, 11 June 2015

A Little Summer Rain (by Asha)

Good morning, fellow Chocoholics! It's my turn to show you a project using one of the new stamp sets released in June called Seasonal Fragments. There are 12 adorable stamps in this set, each with a seasonal connection. And that mean you'll get plenty of use from it all year 'round.

Today's card is a simple make. I've used the water droplets as falling rain and paired it with little blooms form the same set. First I heat embossed the rain in white followed by some background blending with Distress Inks. Next I stamped the sentiment from the Loving Sentiments sheet, followed by the little blooms from Seasonal Fragments. I added a little colour to the flowers with pencils and finished the card with a fabric flower, held in place by a brad.


So there you have it - a little summer rain can be a good thing! Thanks for dropping in today. Do swing by tomorrow for more wonderful ideas from the rest of the Team. As always, products and tools are listed on my blog.

Beijinhos,
Asha


Wednesday, 10 June 2015

A Colourful Challenge (by Judith)

Hello everyone, it's my turn to hijack the Design Team blog this week to talk to you about the Chocolate Baroque Challenge Blog. As we are nearing the first Anniversary of the challenge blog, we are making lots of preparations for the occasion. We hope that you will all share the occasion with us, and stop by to see what is going on, there is bound to be some excitement along the way!

Each week during the month, the Challenge Blog offers something different for the our visitors, some Design Team inspiration, a step by step tutorial, or a look at some of your entries into the competition. This week, there are two free digital downloads designed by Lesley. The downloads are all available on the blog for you to collect and use in your own projects, and full instructions on how to save them are included within the blog posts. Take a look on the blog at the downloads and the Design Team inspiration that has been made using the downloads for you.

This week we are showcasing some entries from the second challenge set in August of last year. These cards are all based on a floral theme, but have very different end results. Enjoy this blast from the past from Janice, Crafty, Kate and Sally:

Janice

Crafty

Sally

Kate
It has been great fun revisiting one of our older challenges, and looking at all of the amazing artwork again.

If you have not entered one of our challenges yet, then do think about having a go. It's a great opportunity to stretch yourself working with different colour options that you might not have considered. Sometimes we need to kickstart our imaginations, and the colour swatches are a great way to do just that. There is the chance to win a £15.00 voucher to spend on Chocolate Baroque stamps. Why not hop over to the blog by clicking on this link, you can see the current colour selection and find out how you can enter. We look forward to seeing your entry.

We will be back next week with another look at past challenges and some of your artwork.