Pin It button on image hover

Thursday, 6 December 2012

Butterfly Corners (posted by Claire )

Good morning, Claire here with a card featuring the gorgeous new Steampunk Butterfly stamps. As soon as I saw the stamp sheet I fell in love with the beautiful Art Deco style corners and wanted to show them off. 

I took a 6x6 card blank and stamped the corners in each of the 4 corners of the card. I also stamped the corners 8 times on scraps of white card. I coloured all the corners using my promarkers and created a frame in the centre of the card by cutting out 4 of the corners and popping them up with 3d foam. I cut out the flower from the remaining 4 corners and again used 3d foam to decoupage the corners on the card. The sentiment  and frame are from 'Best Relative Ever', die cut with nesties labels 4. I was going to leave the card at that but I couldn't resist adding a couple of butterflies from 'Steampunk Butterfly', again coloured with promarkers, with little black faux pearls for their bodies.

I hope you're enjoying all the inspiration from my talented teamies, 
Claire xx

Wednesday, 5 December 2012

Altered Dress Form (posted by Judith)

I'm always excited to receive new stamps to work with from Chocolate Baroque, and the latest release have been an absolute pleasure to work with. I'd like to show you a project today that I made, using a mixture of old and new stamps, which is something that I really like to do.

I have painted a dress form with acrylic paint, and then covered areas with images stamped onto tissue paper taken from the Lace Fragments set Punky Romance set and the new Steampunk Butterfly set I have coloured areas in with pencil, and then covered the whole thing with beeswax.

I then made some handmade flowers using metal and fabric in coppery colours to contrast with the soft aqua tone of the dress form, and stamped a couple of butterflies, using copper embossing powder. I used rusty keys for their bodies.


I added copper wire around the stem of the piece, to finish.


Keep checking back to see more projects from my Design Team Mates over the coming days. Thanks for stopping by, Judith xx

Tuesday, 4 December 2012

Peace Arch (by Clare)

Hello, again!  Don't you just love the Chocolate Baroque Gothic Fragments set, released in October this year?  I had stamped several, then colored them differently, and thought this color combo looked striking!  I love the stained glass windows in cathedrals and churches, and this looks regal to me.

I stamped and enbossed the arch in gold, then colored it with yellows and golds, grays and blacks.  I had the background cardstock in my stash (the black and tan embossed pattern), and the gold patterned paper was in a new stack of old-timey Christmas paper.  I cut just a little rectangle from a shiny gold matte from a picture I had taken out of a frame, and layered the "Peace" over that.  It was embossed in silver, then detailed with a black glaze pen.  The inside of the card was stamped with another stamp from the Gothic Fragments set, and the sentiment is from the Chocolate Baroque Joyful Christmas set.  A little bit of gold ribbon, overlayed with some black sequined trim, and that's it!  I hope you're inspired!


Monday, 3 December 2012

Steampunk Valentine (posted by Elaine)


As soon as I saw the image of these stamps and I knew they would be winging their way for me to test, I knew what I wanted to do with these flowers which was to make a masculine bouquet card!


Using some self adhesive silver foil I had had in my stash for ages, I stamped the roses 12 times, six large and six small in archival ink and heat set them. I cut them out carefully, cutting some sections down which I then decoupaged with silicone glue. I embossed the stems onto black card with silver EP. I arranged the "bouquet".

I mounted the bouquet onto a panel of Prima script paper which I am loving at the moment. That is matted onto silver mirri card and then a panel of the silver paper backed onto kraft card, embossed in a folder and highlighted by rubbing in black acrylic paint. I edged my card with some washi tape,  added a heart cut from red satin mirri card and black die cut letters for the sentiment and finished off with a bow tied from frayed red sari ribbon.

I apologise that the picture isn't better, but foil makes for a difficult subject reflecting loads! Hopefully you can get the idea!


Elaine

Sunday, 2 December 2012

A Steampunk Butterfly (posted by Shirley)

Hello Everyone

I'm super excited to be here today to post my first Design Team creation  !     The new Steampunk Butterfly set is beautiful and has been so much fun to 'work' with.     The number of creative possibilities using these designs are endless.   


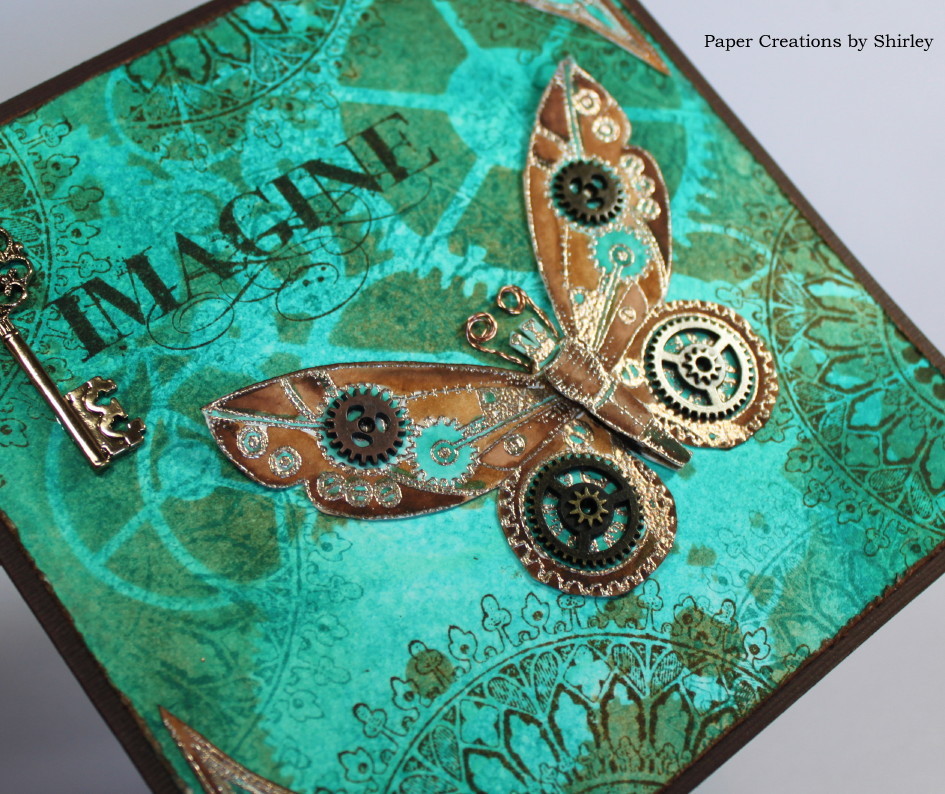
To create the background I started with Vibrant Turquoise Dylusions Ink, spritzed it water and blotted with paper towel.    Next I used CraftersWorkshop Mini Gear stencil with Tea Dye Distress Ink.   I over-stamped using the beautiful Window/wheel fragment with Salty Ocean and then Vintage Photo Distress Inks. 

I embossed the Deco Corners & Steampunk Butterfly with a metallic embossing power and painted with my Tombow markers.    And for the finishing touch I added some little cogs & a key that were hanging out in my stash.   I also raided my husband's garage for some copper wire to use for the antennae. 

Imagine is from the Artistic Expressions set which I tend to use a lot, it's very versatile.   I stamped it with Walnut Stain Distress Ink.

Here is a closer look:


I hope you enjoyed this design.   My new team mates have amazing creations to post, so stay tuned for more from the beautiful Steampunk Butterfly set !   

Have a great day
Shirley

Saturday, 1 December 2012

Introducing Shirley Deatcher

Shirley Deatcher
I would like to introduce you to our newest Design Team member, Shirley Deatcher from Canada.

I've been admiring Shirley's work on the Chocolate Baroque Network for a while and I am delighted to welcome her to the team.  Shirley has a great eye for colour and design and I think you are really going to love seeing what she creates with our stamps.

I asked her to tell us a bit about herself, so it's over to Shirley to let her tell you in her own words how she feels about being part of the Chocolate Baroque family:

Welcome to the team!
Thank you!  I’m very excited & honored to join the group of talented & helpful ladies here at Chocolate Baroque.  I would like to thank Glenda for this wonderful opportunity.   I’m having great fun working with the new Steampunk Butterfly A5 set.   I hope you can come back tomorrow for my first DT Blog post featuring Dylusions and Metal!

How did you first hear about Chocolate Baroque?  
My dear sister who lives in the Netherlands gave me a set of Chocolate Baroque Stamps as a gift during a visit here at the end of summer of 2011.   Almost immediately I was on-line to check out what else was available!

What is it you like about our stamps?  
I fell ‘in love’ with the gorgeous & elegant  designs.  Those feelings ‘grew’ when I starting working with them and found there are endless design combinations with each set.   I’m also extremely impressed with the value and service from Chocolate Baroque.   I’ve received orders in five days to Canada after placing an on-line order, and that’s with a 5 hour time difference !

What was the first set you bought? 
My sister gave me the beautiful Harlequin Christmas set and the first I bought was Peacock Fan.


Do you have a favourite stamp set? 
That’s too difficult, I can’t pick!

Where do you get your inspiration?  
I gain inspiration from nature, our gardens and also from talented and friendly bloggers.

Do you have a favourite technique?  
I enjoy different techniques and seeing what results you can achieve.    I started with heat embossing and creating backgrounds with Smooch Inks, but my crafting style continues to evolve.

Do you have any tips for beginners? 
Have fun and don’t be afraid of using colour in your designs.

Some of Shirley's colourful cards

What’s on your Chocolate Baroque wish list right now?  
Almost everything that I don’t already own !   At the top of the list is the Artistic Affirmations set as they work well in Art Journaling and in combination with other designs.    Next are stamp sets that I can use for creating backgrounds such as Dusky Damask, Decadent Brocade and Lace Fragments.

Shirley will be back tomorrow with a beautiful card featuring our December Stamp of the Month, Steampunk Butterfly.  You can see more of Shirley's work in her album on the Chocolate Baroque Network, or visit her blog at http://papercreationsbyshirley.blogspot.ca.

Please join me in giving Shirley a big warm welcome - it's great to have you on board Shirley and we're  looking forward to tomorrow's blog post!


Snow Tree (by Clare)

Hello!  It has gotten downright chilly here in Tennessee!  I do wish it would snow, but until then (and if it does) I'll have to settle for trying to make the abience with my stamps, paper and the rest!

This card was made using the Chocolate Baroque stamp set, Terrific Treescapes.  Just click on the name to go to the webpage so see more details on it.  This set is so versatile, and there are so many choices!  I used an embossing folder, and some glittery diecuts to accent the main image.  I applied some snowy glitter to the trees, which you can see better in the second photo.  This makes me feel a little more chilly!   Yay! 


Friday, 30 November 2012

December's Stamp of the Month - Steampunk Butterfly

I know Christmas is just weeks away now, but we are looking beyond that with our wonderful new stamp set, Steampunk Butterfly.

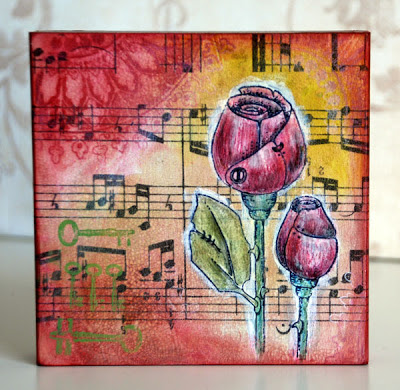
The rose on this set is cleverly drawn to look like it is made of riveted metal and Sue, our wonderful stamp artist, almost didn't include it. I'm so glad she did as it has been extremely popular with all of our design team and you will see it coming up over the next month in many different guises.  Pop over to my blog (glendawaterworth.com) to read how I created this mixed media wood block.


The big butterfly on this set is a delightful collection of gears, cogs and bolts - just crying out to be embellished with watch parts, Ideology bits and pieces or decorated chipboard shapes.  The design team have really blown me away this month with their samples and I know you're going to love them too.


Steampunk Butterfly is our December Stamp of the Month and will be on special offer right through this month (there's a special price for our wholesale customers too).

But wait ... there's more!

Each Friday we are going to pick a favourite stamp set to put on offer for one week and this week, it is the turn of Family Christmas, a lovely A4 set with a nostalgic feel.

And finally, I had a few requests for specific Christmas sentiments, so I came up with a little handful which we have produced as clear stamps (so much easier to position) and they are available separately or as a multi-buy.  Visit the Clear Stamp department to see them all - they start at just £1.99.


I am finding these Christmas sentiments SO useful for quick cards, especially flat, no-embellishment cards (keeps the postage costs down too).

So, if you've read this far, you deserve a reward.  How about a giveaway?  It's been a while since we did one*, so please leave us a comment and we'll put your name into the draw.  I will pick two winners next Friday - one will win Steampunk Butterfly and one will win the full set of Christmas sentiments.

Tomorrow I will be back with news of a different kind - we have a new designer on the team!!


PS - last time we did a giveaway (Gothic Fragments), I never got round to announcing the winner.  We did contact the lucky lady (Lynn Hardy) and sent out her prize, but I do apologise to anyone waiting to hear - my bad!

Thursday, 29 November 2012

A Christmas Bauble (by Clare)

Merry Christmas, everyone!  It's that time of year to celebrate again, and the Chocolate Baroque set Pears and Baubles is an awesome one to start your cards with!  The detail on these stamps is so exquisite and fine!  It was a lot of fun, and very relaxing to sit and color all the little spaces!  This is one set I will be using over and over again!  The word "Joy" is from the Chocolate Baroque set, Ivy Trails.  I stamped the bauble in black ink and colored it in with water-based markers, then cut it out close to the outline.  Some little shiny round stickers were placed in the center, on the word 'Joy", around the periphery of the ball, and on the bottom left corner.  I used the smaller ornaments for the inside of the card. 


Wednesday, 28 November 2012

Two Roads (posted by Claire)

Good morning, my sample this morning features the new clear stamps Terrific Treescapes, this time I've created a misty Autumn scene by combining them with stamps from Woodland Dreams 


I've had this card in my head for a long while and these new stamps were just perfect to create it. The sentiment from Woodland dreams was the inspiration for the card, unfortunately its a little blurred in the photo but it reads 'Two roads diverges in a wood, and I, I took the one less travelled by'. 
It can get a bit tricky making quite complicated scenes using a brayer but its so easy with PanPastels. I  used a torn paper mask for the hills at the back of the scene and also a mask for the sun but apart from that I just used the Sofft tools to create the scene with shades of green and brown PanPastel. I stamped the trees with Memento inks. The little bird is also from  Woodland Dreams, coloured with distress markers. I've used brown card for matting and layering and one of the Guild papers in the background.

Thanks for visiting today, 
Claire xx

Monday, 26 November 2012

Spring is in the air (posted by Claire)

Good morning, Claire here with another sample using the gorgeous new clear stamps 'Terrific Treescapes'. These stamps work beautifully with so many of the other sets, for this wedding card I've combined them with the little church from Sunburst Scene's

I began by stamping the church image in the foreground and then adding the trees to create the scene. I stamped the images in black archival ink. I've used distress markers to colour the scene and then used Tumbled glass distress ink for the sky.

I die cut the image using a circular die and layered it up over a little doily. I used a backing paper from one of the Guild paper packs and layered a larger doily over that. The flowers are from my stash and the leaves have been cut with crealies dies. I've added some green ribbon and  a little pearl buckle to finish off.

Hopefully this card will be a little reminder of the spring sunshine after the dreadful weather we've been having. Thanks for visiting today
Claire cc

Sunday, 25 November 2012

A few little Party Birds by Debbie

I was delighted when I saw these clear stamps as they fill a gap in my stamp collection. The Party Words and Birds stamps are a little querky and ideal for quick cards. Here are a few I've made.
For the birds on this card I did the paper piecing technique using scraps of left over paper.
Simply stamped and coloured with alcohol pens.
Another quick card, I love the way they can be stood on the sentiment. A couple of washi tape strips for extra detail.
I took inspiration from DT buddy Lesley for this card. I love her polka dot papers available for download from the website. For the red hearts on the flowers I stamped onto the card. I stamped another three, coloured them red and covered with glossy accents. I cut the hearts out and decoupaged. Thank you for visiting Debbie

Friday, 23 November 2012

Autumn garland (posted by Elaine)

Like the other girls in the team, I have really enjoyed working with the Terrific Treescapes clear stamps. It is hard not to be inspired by the amazing aumtumn colours around us at the moment and this is my attempt to capture the mood of this lovely season.


I started off with a white die cut oval and added several different die inks, using a masked sun and hills to build up my landscape. I stamped in my trees with coffee archival ink.  I fixed the oval onto a kraft panel matted onto a brown 8 x 8 card. I then cut lots of different leaves and twigs in autmny colours using the Tim Holtz Autumn Gatherings die and used them to frame the inked landscape. I added a sentiment from the Artisitc Affirmations set.

Elaine

Wednesday, 21 November 2012

Through the window (posted by Claire)

Hi there, Claire here with an altered art project combining the beautiful new clear stamps 'Terrific Treescapes' with some of my favourite stamps from Christmas Creatures and Home Sweet Home.

I recently had a Graze Box delivered and as soon as I opened it I thought it would be perfect for making a window scene so these stamps were just perfect to put my idea in to practice.

I began by painting the box with white acrylic paint. I've used lots of masking and coloured the images with promarkers, adding the deep blue sky with chipped sapphire and broken china distress inks. I've added a die cut icicle border along the top of the window:
 .

Here's a photo of the front of the box, again combining Terrific Treescapes with Christmas Creatures.


I hope you like my little window scene
thanks for popping by today
Claire xx

Monday, 19 November 2012

A Winter Scene (posted by Claire)

Good morning, the new clear stamp set Terrific Treescapes are just my cup of tea, I love creating scening cards and these beautifully designed trees are perfect for this kind of project. 


I've used PanPastels to create my scene, I've used shades of grey, ultramarine blue tine and a little red tint and diarylide yellow tint for the clouds. I didn't use masking for the hills but just sketched in the hills with a sofft knife tool and then stamped the trees using Memento Tuxedo black ink, adding a litle grey for shadows.

I've simply matted the scene in red, white and then black card. 
I hope you're enjoying all the wonderful projects from my talented teamies
Thanks for visiting today
Claire xx

Sunday, 18 November 2012

Tangled Garden meets Felt by Debbie

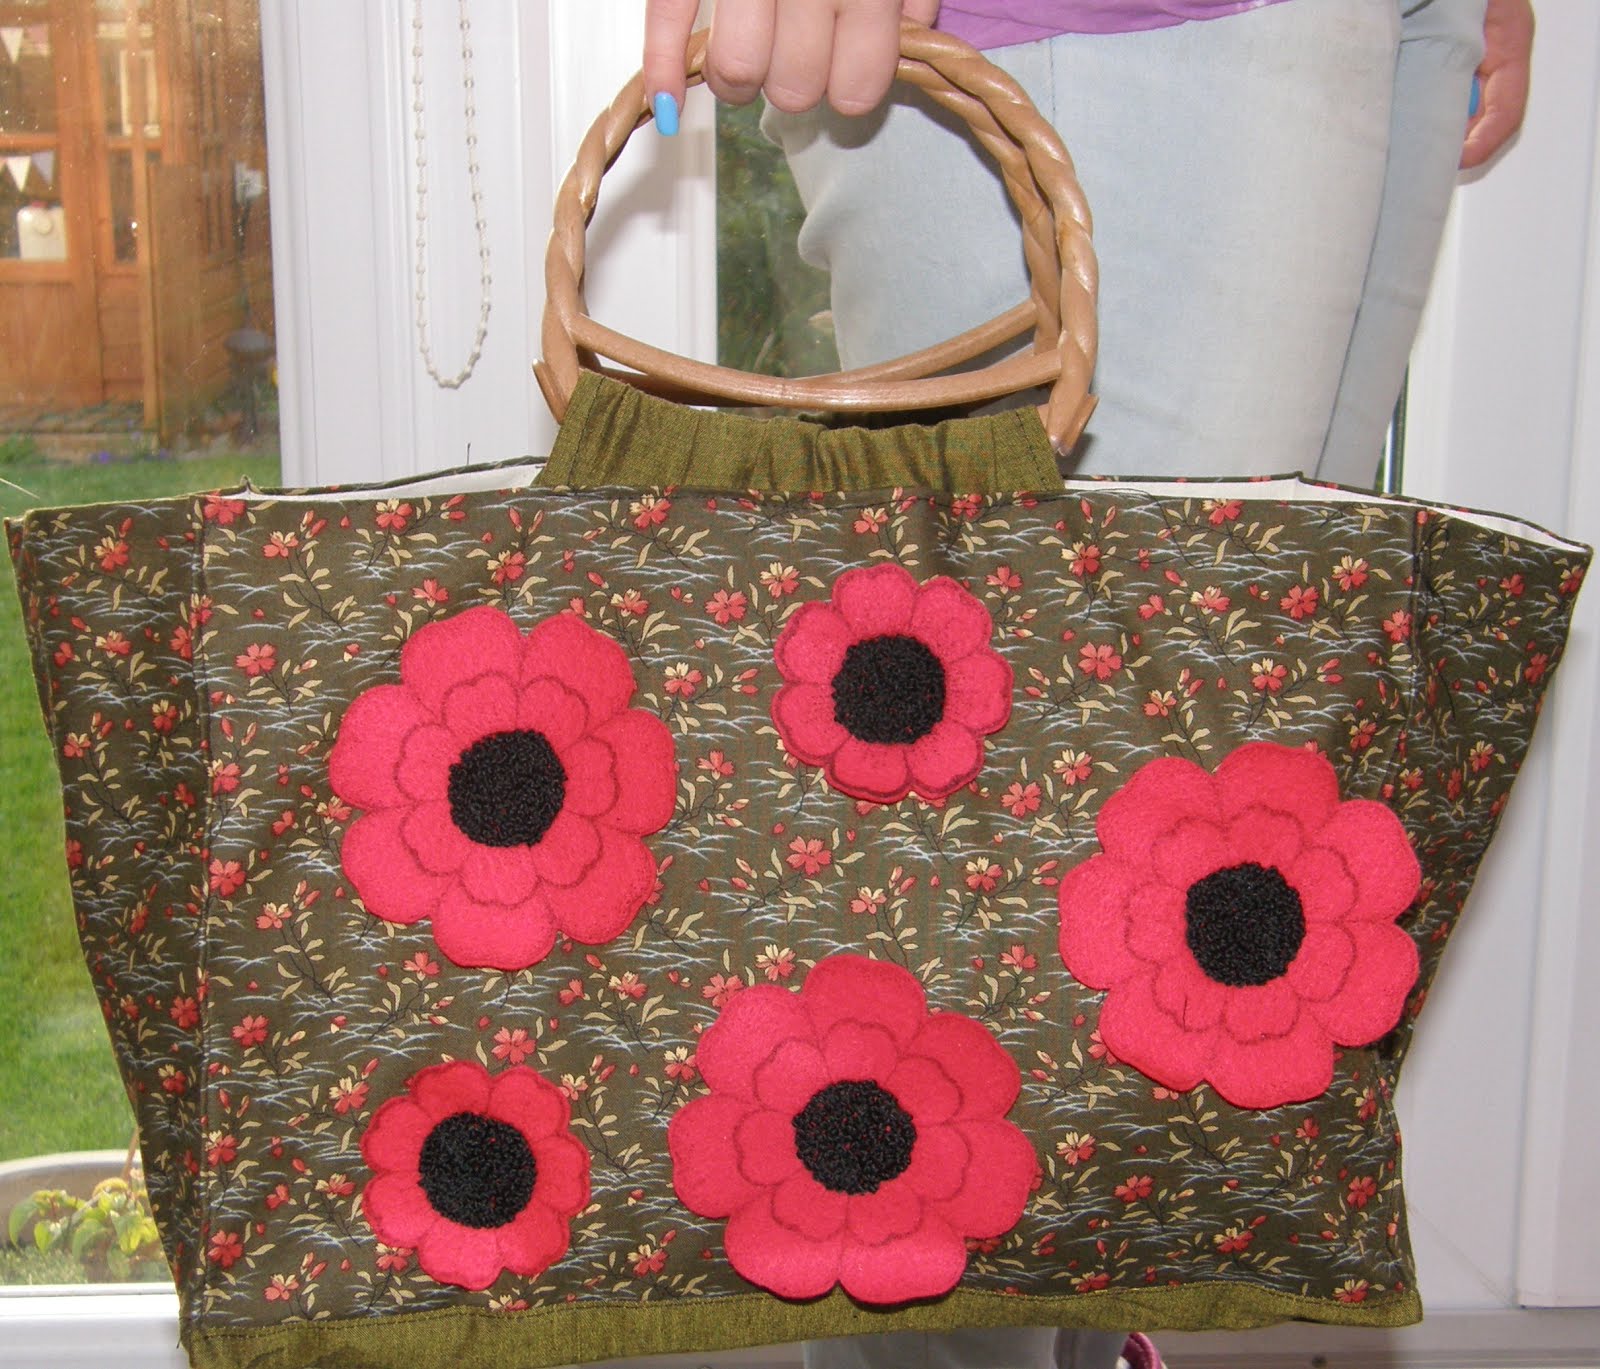
Well, my project today doesn't use card but it does involve stamps and ink. I love the versatility of stamps and immediately new that the large flower would be great stamped onto felt. It gives a great impression as there are no fiddly bits to cut out.
I used Black Stazon and stamped twice then cut them out. The centers are lots of french knots stiched with three strands of embroidery thread. A brooch back is stitched to the back so that it can be moved from the hat to my jacket. This photo gives a better view of the french knots.
We all have crafty things that we hang onto and feel they are to precious to use. I bought this fabric over two years ago and it fell into the strokable catergory. My first thought was to make a cushion but I decided the fabric was a good size for a bag.
I hope this post has inspired you to think about different ways of using your stamps. Debbie

Saturday, 17 November 2012

Snowy Christmas Trees (posted by Judith)

Hi folks, for those of you that like to make batch cards at Christmas, I have a set of samples that I'd like to show you today.

I made a set of masterboards, using a couple of snowflakes from the Damask Reindeer stamp set, which I embossed with white embossing powder over two thirds of each piece of white card. I then stamped the chosen colours of Distress Ink directly onto my craft mat and spritzed them with water, ensuring that I had at least covered an A4 area with colour. I laid my card face down onto the mat to pick the colour up, and patted it around a few times, until I had covered the card with colour, then set it aside to dry.

Once the card was dry, I took a piece of Cut 'N ' Dry foam, and one of the colours of Distress ink, and just blended over each snowflake. This really makes the snowflakes pop. I cut two ovals from the end of card that was free from embossing, and stamped one of the tree images in dark brown ink onto each oval. I left this to dry completely. I then stamped the tree again with Versamark, offsetting it slightly, and embossed it with white embossing powder. It then looks like the tree is covered with snow. The clear stamps are so useful for this, as you can line them up exactly, then just shift them a fraction, to get the snow effect.

From the remaining card section, I cut a large tag shape, and a strip of card 6 cms wide. I matted each oval onto a frilly oval shape that toned with the ink colours, and then placed them onto the cards and tags. I stamped a sentiment from the Warm Christmas Greeting set onto each card, using one of the Distress Ink colours that I had used on the background.

The ribbons that I have used are also available from the Chocolate Baroque website.
Keep checking back for more inspiration from my Design Team mates coming soon, thanks for stopping by, Judith xx


Friday, 16 November 2012

Tangled garden by Miranda.....


Hi there,
Today here some creations I've made with the new and gorgeous stamp sheet 'Tangled Garden'! I enjoyed it very much to play with these stamps, there are beautiful butterflies on it, one of my favorites!
Here is number one.... made with the Pan Pastels on linen structured paper as you can see here very well. The butterfly has been decoupaged and coloured with Derwent Soft Colour pencils. Added some gemstones on the body. The text is from the Artistic Affirmations sheet. On the background you can see fragments of the Lace Fragments sheet.


The 2nd one has become a Christmas one with the large open flower from the sheet. I've filled the flower with the texture fragments sheet and also coloured with Pan Pastels.( Phtalo green and Permanent Red shade )On the background you can see another pattern of the Texture Fragments. Also a lovely Ivy vine is used from the Christmas Foliage sheet. The Christmas sentiment is from the clear sheet 'Warm Christmas greetings'


And here are some creations made with those fantastic Pan Pastels and the new clear sheet 'Terrific Treescapes, they are great especially for this kind of work!


Till next time, have fun and enjoy creating


Thursday, 15 November 2012

Bottlecap Flowers (posted by Claire)

Good morning Claire here with a project made using the new Tangled Garden stamps. I'd had these little vases for a long time but never found any silk flowers that would look right in them. As soon as I saw the new stamps I new that I'd be able to make the perfect flowers for my little vases.


They were very quick and easy to make. I used watercolour paper as it holds its shape very well when making flowers. I coloured each sheet of paper with ink and glimmer mists until I got the colours I needed and then once they had dried I stamped the large open flower from Tangled Garden twice and the detailed flower twice on each sheet with versamark and embossed with gold embossing powder. I cut the flowers out and layered them up.

The flower centres were made with bottle caps crushed in my cuttlebug, I used the centre of the detailed flower and glossy accents in side the bottlecaps:


I found that drinking straws were the perfect height to be used as the stems for my flowers so I painted some with gesso and acrylic paint. I attached the straws while I was assembling the flowers. I layered up the 3 layers of petals with strong wet glue, once this was dry I punched 2 small holes in the centre of each and threaded some ribbon through before attaching the straw at the back of the flower with a hot glue gun. The ribbon then ties around the straw in a pretty bow so the back looks pretty too.

Thanks for visiting today
Claire xx