Pin It button on image hover
Showing posts with label Shared Beauty. Show all posts

Wednesday, 28 October 2020

Keeping it Simple (by Christine)


Hello everyone. This is my final turn on the blog for this year.

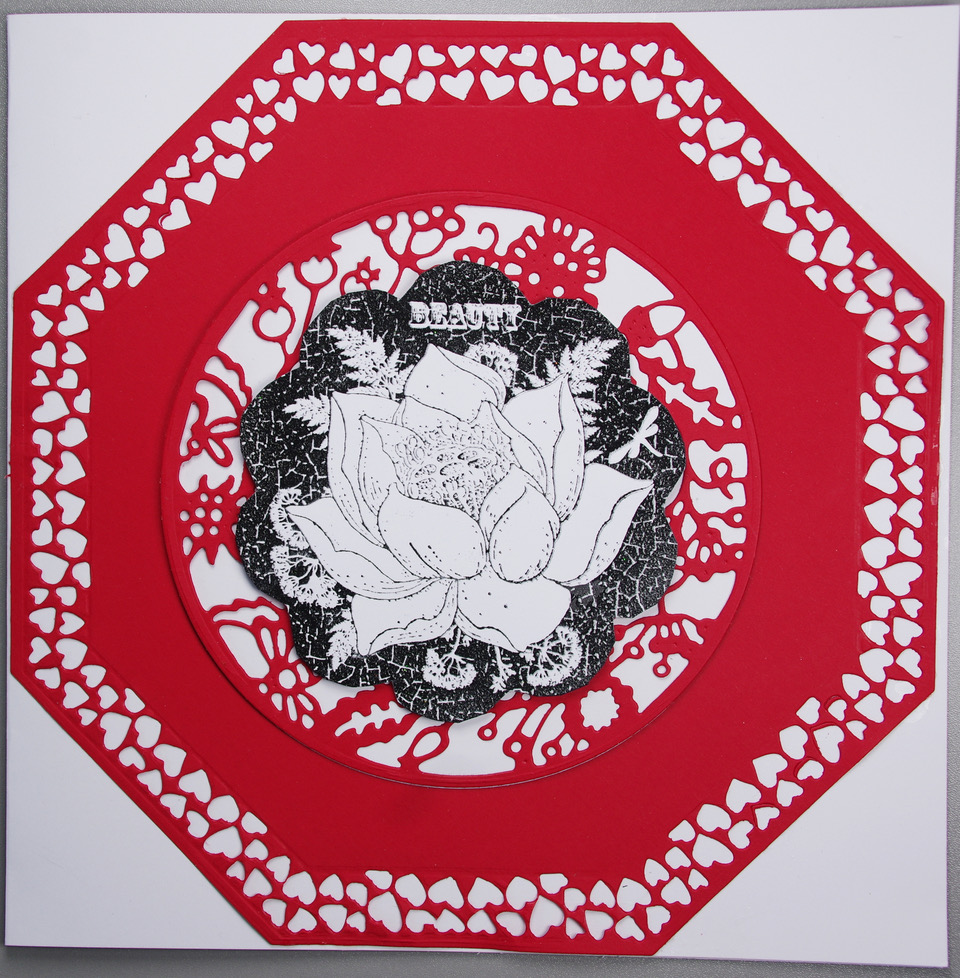
The cards in my first two blog posts took some time to create so this time, I decided on a simple but elegant example. I also wanted to use some of the lovely dies I have in my stash to enhance the stamping.

The stamps I am using are from the beautiful Shared Beauty set.

I used octagonal dies to create my first layer. I had just received some red cardstock and thought the colour perfect for what I wanted to achieve.

Two circular dies, one very decorative, created my next layer. I then stamped the image with Versafine Clair Nocturne and used clear embossing powder to give it shine and impact against the matt red card. I used adhesive foam to attach it to give the card depth. I decided against adding a sentiment, but it would be easy to add an appropriate one when the need arises.

Originally, I had stamped the image in red and then embossed it but the shade of red just didn't work with the red card, so I had a spare image to use. I also had a circular frame cut in white card from the original piece of work, so it was obvious to use the two together. On the theme of keeping it simple, I added some white pigment ink to black card using the circles stencil from the Chocolate Baroque Strip Stencil - Collection 1 set and then positioned the stamped image in the centre. I added one of the sentiments to the card as a finishing touch.

Quick, simple, but I think effective.

Take care, stay well and see you the next time.

Happy crafting!

Christine.


Wednesday, 18 March 2020

Creating Layers (by Christine)

Hello everyone, today sees the return of Christine with her second blog post this month. She has created something for everyone this time with a range of cards and techniques.

Christine writes:

Hello everyone, I'm back with my second blog post for March.

I used Drawing Cartridge for this first project since I intended to use a fair amount of water through the process. I started off by tearing some paper and, using different shades of Distress Oxides, created the hills and the sky. I masked off an area on the sky for the sun.
The next stage was to stamp trees from the Trees a Crowd set. I used Smokey Grey from the Versafine Clair range as I did not want them to be too prominent; to that end, I also used second and third generation stamping to build up depth.
I then chose Fired Brick Distress Ink and used a tree and texture brush to add colour to the two large trees and then the same ink using a couple of the very small flower stamps from the Orchard Design a Tree sheet to add detail.
The main feature is the lovely Tree House which I stamped directly onto the card with black ink and then separately on white card which I then fussy cut minus the top branches. I added colours that I thought would blend well on the fussy cut and then adhered it to the main images. I added grey watercolour pencil aroumd the house to give it some shadow and depth.
I had kept the mask on the sun area so added some yellow Disress Ink and carefully swept it around the edges. When the mask was removed, I added a little yellow to blend the colour. The sentiment is from the Tree House stamp set.
I added some birds via stencil in my stash and the little MDF owl just finished off the piece.

I went for a clean and simple look for this piece. I cut three pieces of square card, each about an inch bgger than the next and temporarily centred them together. I chose two stamps from the Autumn Hedgerow set and stamped them evenly across the cards. I then cut black mats for each of the three white cards, allowing a narrow border on each one. I then adhered the white cards onto the mats ensuring the stamped images were as exact as possible.
The focal stamp is called Shared Beauty. I used Versafine Satin Red for all of the stamping. I used a circle die to cut it out and the next larger die to cut out a black mat. The mat is adhered to the smallest square and the circle image raised for dimension.
This could be a card or it could be framed. I am not yet sure!


My last card today used alcohol inks and a lifting ink. First order of the day was to cover Yupo Paper with alcohol inks- I used three in the pink/plum spectrum. Once the inks were totally dry, I used the beautiful large flower stamp from the Celebration Bouquet set, covered it with lifting ink, and then stamped it straight on to the Yupo paper. A soft cloth rubbed fairly firmly over the stamped area revealed the image below. The ink was still on the stamp of course and I added it to some cartridge paper. The resulting image gives a lovely watercolour effect.
I created the background paper using Seedless Preserves Distress Oxide Ink and the same stamp with Dusty Concord Distress Oxide Ink. The sentiments are from the same stamp set.

I hope you enjoy looking through these.
Happy Crafting!

Christine.

Monday, 31 December 2018

A New Year Wish (by Judith)

Hello everyone, it is hard to believe that another year has passed. I hope that you have all enjoyed a wonderful Christmas, and are looking forward to 2019 with optimism and hopes for a year full of promise. Some of you will not have had people to share Christmas with, or may have missed loved ones. You may not be feeling that the New Year brings much joy, or anything to look forward to. We hope that you can feel part of our community, and know that we are always here to share your crafting experiences, and offer friendship through the blog and our Facebook Group. We also have a Ning Group where you can make friends with other Chocolate Baroque fans, and chat and exchange tips and ask questions. If you sign up for the weekly newsletter from Chocolate Baroque, the links for all of these places are included within the newsletter.

Personally, I have had a mixed year, but I always feel that a new year offers the possibility to try new crafting challenges, and to learn new skills. I always want to be able to do something else! My craft room is bulging as it is, but there is room for more, and I love to experiment with colour and texture. My two projects that I am sharing with you today are both very cheery, and will hopefully chase away the Winter blues. The first one is a scrapbook page that I made as a TV demo for the Hochanda shows last month, featuring Lesley's Designer Papers 8" x 8" - My Floral Soul, and the Movie Strip Collage stamp.

I started the project by stamping a fern from the Wild Meadow stamp set onto the background. I added a sepia photograph of my parents, celebrating their golden Wedding Anniversary. I changed the photo to a sepia effect, because I wanted to use it for a different occasion. I stamped the flower image onto a spare piece of card a couple of times, and coloured it using Koh-I-Noor paints. I decoupaged the image, and added it to the page. I made my own ticket, and stamped a sentiment from the Shared Beauty stamp set onto the centre. I added brown ink onto a couple of scrabble tiles, which are my Mum and Dad's initials and a bingo piece, to represent the number of years they have now been married, and also added those to the background.

These papers are lovely for scrapbook pages, they are the perfect size, and are great to add a bit of stamped detail if you wish. I added a piece of kraft card behind mine for extra stiffness.

My second project uses the same background paper , but in the plain version, to make a pretty card. I stamped the Be Kind image onto some book paper a couple of times, using Versamark and gold embossing powder. I added three different colours of Distress Ink for shading. I also stamped and embossed the image onto a piece of kraft card, and added the book page flower layers onto the kraft card script layer. I then adhered this panel to the decorative paper. I stamped the sentiment onto the background with a deep orange ink, which I then used to edge the paper. A kraft card mat finishes the card.

Thank you for your support in 2018, your visits to the blog, and your kind comments. Have a wonderful New Year, and we look forward to your visits in 2019.

Take care and best wishes,

xxx

Saturday, 29 December 2018

Floral abundance! (by Rachel)

Hello there! I hope you have had a wonderful Christmas and are now gearing up to the New year! I have some final makes from November's shows to share with you today....
This first one used the stamp shared beauty and tagtastic plus one of the designer papers. I stamped the image all over the card then coloured in using distress inks. Finally I have added a piece of the designer paper cut out in the shape of the tagtastic stamp.


In this next one I used the movie strip collage stap and stamped onto a ready made background that I had done using brushos. I then used inks to colour the image.This image was then added to another layer of the designer paper and finally onto a card.


My third card was made using a piece of designer paper that I stamped onto. I then added some lolly sticks which I had already sparingly covered in gesso and once dry hadcovered in oxide inks. I then did a bit more stamping and finally added the flower from the movie strip collage stamped image.


In this finally card I stamped directly onto designer papers using first the Be Kind stamp and then some of the grasses from the show. I also added the word stamps to the right hand side of the card.


I hope you have enjoyed seeing what I have done with these stamps and those fabulous papers.

Wishing you a peaceful last few days of 2018 and all the very best for 2019.

Rachel x

Wednesday, 19 December 2018

Butterfly frame by Brenda


Good morning to you all, Brenda here and I hope you are almost prepared for Christmas, only 6 sleeps now!!

My first share this time is a little frame which I stamped with Distress Ink and the lovely Fern from the Wild Meadow set, I used two colours to ink the stamp to give a variegated look and then distress the edges with the same colours. Inside the frame I used one of the Designer papers and stamped a sentiment from Shared beauty and stamped, coloured and cut out three Butterflies from April Fairy and Just Butterflies.


Here I have a tent card using Movie strip collage which I stamped once, masked and stamped a second time, coloured with with pencils and added some Distress Ink around the blooms.


I loved the colour of this particular sheet from the Designer papers and followed the colourway stamping images from Wild Meadow and Floral grunge with Versafine Clair inks. I made the base shape with the Tagtastic stamp stamping three times with Versamark and embossing with detail white, then cutting out the three tag shapes slightly larger to create a black frame. I fixed the thee together with card hinges in the back, fixed the stamped papers, some cord and embellies. I also stamped sentiments from Be Kind and Shared beauty.

This is my last post before Christmas so I would like to wish everyone a peaceful Christmas season.


Tuesday, 11 December 2018

gift box (by Veronica)

 Today I am sharing a couple of samples using the shared beauty stamp.
I had some hexagonal boxes lying around that hadn't been used, and one just fitted this stamp....
The box was white, so it got a base coat of peeled paint distress oxide ink, and was then stamped with the fern from wild meadow in iced spruce distress oxide ink.
I stamped the image several times in black versafine and clear embosssed them.
On one image I coloured the ferns and leaves with green brusho powder,  the word with yellow, and the flowere with orange then I cut the entire image out and stuck it onto the lid.


The remaining images, I coloured the flower only using orange brusho powder activated with a damp paintbrush.
 Once they were dry, I cut out sections of the flower and decoupaged them onto the original base image.


I also made a very grungy looking card with this stamp, using a white embossed image and black brusho powder.
The background was randomly stmaped with the ferm from wild meadow using a dark blue ink pad, and the same ink sponged round the edges.


Sunday, 9 December 2018

Autumn Harvest by Penny

Hello peeps I hope I find you all well, I have my first project of the month to share with you today.  I know everyone is probably up to their eyes with Christmas preperations but if you have a couple of minutes why not grab a cuppa and join me for a bit of crafty fun!


 I'm sharing a sample from last months new stamp releases, featuring the beautiful Shared Beauty stamp, several images from the Wild Meadow set, one of the gorgeous new designer papers from CB My Floral Soul; Distress Inks, copper EP, Versamark ink and some bits and bobs from my stash.


I cut a piece of the paper to size and stamped the Shared Beauty image in one corner, using Versamark ink, and embossed it with copper EP.  I masked the image with masking tissue then stamped and embossed some images from the Wild Meadow set.  I removed the masking tissue then used Koh-I-Noor paints to colour the focal image. 


I stamped more meadow images around the edges of a white base card, using DIs and blended some ink around the outer edges.  I matted and layered the focal panel before attaching it to the card.  I stamped and embossed a sentiment onto white card, die cut it and added ink before attaching it to the card.  A cheerful, colourful card for many occasions.
Thank you for dropping by and I hope this project inspires some of you to have a go!  


I'll be back later in the month with some more crafty fun, keep well evryone and try not to stress too much over Christmas!


                             xx  Penny  xx


Saturday, 8 December 2018

Colourful Tags (by Judith)

Hello everyone, I have a project to share today using some of the stamps and papers that we brought to you on last month's TV shows on Hochanda. I wanted to use a little bit of everything in this project, and incorporate lots of colour to cheer up these gloomier days that we are having at the moment.

I started by stamping three of the Tagtastic tag shapes with Versamark, and covering them with white embossing powder. I also added three of the little tag 'hole' shapes onto the background of each tag, and then heat set everything. I stamped and embossed three of the flower designs, Shared Beauty, Floral Grunge, and Movie Strip Collage, and a little butterfly from the Wild Meadow stamp set onto some of the lovely papers designed by Lesley, and used the papers to help me decide on the colours that I used to colour each tag. I settled on three colours of Distress Ink for each tag.

Once the tags were coloured, I stamped the sentiments from the Shared Beauty stamp set over each tag in the same colours of Distress Ink. I cut the flowers and butterflies out of the papers, and adhered them to the tags, and then attached the tags to a tryptich made from corrugated card. Finally, I added some rainbow coloured ribbon to each tag.

Thanks for stopping by, Judith xx

Thursday, 6 December 2018

Tagtastic book by Brenda


Good morning, Brenda here with some samples made using the gorgeous new stamps and papers Lesley showcased on Hochanda.
                                                

My first share is a little book which I made using my Zutter, something that's not see the light of day for far too long.

I used Distress Oxides to created the pages and pockets to hold the tags which were all made using the new Tagtastic stamp.

I cut each down slightly to enable them to fit into the pockets.


I managed to incorporate all the new stamps into this one: 

Shared beauty,  Movie strip collage, Floral grunge and Be Kind 

I used a variety of inks and stencils along with sentiments from Floral Delight.

Also used are some of the stamps from Wild  Meadow which is a really beautiful stamp set and so useful.


The pages also had a liberal helping of structure paste and stencilling to add interest and texture.


This one uses one of the new Designer papers along with a little wooden frame I bought at Stamp Magic from Lesley and David stand there. I felt it lent itself to rustic colours so inked the edges and fixed over the DP, the bloom is from Movie strip collage which I stamped several times onto vellum and heat embossed with detail gold, cut out and layered up, adding a little gold glitter as well. The corn is a die cut also glittered with gold and copper ultrafine glitters. The sentiment is from Birthday words.

I hope I have offered a little inspiration to get out your stamps and get inky.                                                                     

Monday, 3 December 2018

Where imagination meets reality (by Rachel)

Hello there! Rachel here today with the first of my posts from the November shows. I did so love working with those papers - and I thought the new stamps were just gorgeous.


I started off by using one of the papers to fill the back of this box and then stamped on it using some stamps from the wild meadow stamp set. Next I stamped the Shared Beauty image onto a piece of the paper and fussy cut it and hung it from the washing line in the box. Finally I repeated this process with the Floral Grunge stamp and then decoupaged that image up.

I do hope you feel inspired by this piece - I was so pleased to see it displayed so prominently in the shows!

Big hugs

Rachel xx