Pin It button on image hover
Showing posts with label Ladys Slipper Orchid. Show all posts

Wednesday, 12 August 2020

Lady's Slipper Orchid (by Jodie)

Hello everyone, today sees the first of three posts this month from our Guest Design Team member Jodie Heuser.

Jodie writes:


Good morning everyone,

I'm extremely excited to have been asked to be a Guest Design team member for this month.

Chocolate Baroque has so many new and exciting designs in stamps it's often hard to choose which ones to use.


Since we are in the middle of the dog days of summer here in Florida, I decided to go with a flower theme. 


Supplies:

Stamps- Loving Sentiments Rubber Stamp sheet- A5, Ladys Slipper Orchid

Colour- Brusho Crystal Colour (Set of 24- Crimson, Violet, Lemon Yellow, Sea Gree, and Turquoise)

Ranger Archival Ink- Jet Black

paper- Watercolour paper, cardstock

Waterbrush- detailer tip 

Water Spritzer Bottles- 2 pack

Double sided foam tape

Gold photo corner stickers


Cut the watercolour paper to 4" x 5 1/4" (10.16cm x 13.34cm) and stamp the image using Archival ink.

When you first begin using your Brusho colours, take a thumb tack, and pierce a hole in the top. I cannot stress enough that a little goes a long way.

Lightly spritz the paper with water. This will help the colours blend easier.

Begin by sprinkling which ever colour of Brusho you want to start with onto a non stick surface, then using your watercolour brush, mix a bit of water with the crystals and begin painting in the image. 

Use less water if you want to have deeper colours, and you can mix the colours together to create a specific shade.

Let each colour dry before going on to the next colour, which will help lessen the chance of colours bleeding together.

Once the piece is dry, cut a piece of purple cardstock to 5 1/2" x 8 1/2" (13.97cm x 21.59cm) and fold in half.

Cut a piece of light purple cardstock to 4" x 5 1/4" (10.16cm x 13.34cm) and layer onto cardstock base. Next cut a strip of medium purple cardstock, 4" x 1 3/4" (10.16cm x 4.45cm) and place on the right hand side of mat.

Cut out your image and layer onto card using foam tape.

Stamp the saying onto white cardstock with Archival ink, and mat with gold cardstock.

Attach the saying to the front, then adhere the photo corner stickers.


Thank you so much for checking out my project, and please join me next week, when I will use inks to colour in the stamps.   

Saturday, 25 April 2015

Just in case (by Lesley)

How many times do you wish you had a card right now? Perhaps for an unexpected birthday or that time when you forgot or even just because you want to cheer someone up.  Today's card has been made for when I need a standby.

  • Stamp the Ladys Slipper Orchid image onto watercolour paper with Versafine Onyx Black. When dry colour with watercolour paints or pencils. Leave to dry thoroughly.
  • If necessary add extra colour and shading using coloured pencils and then fussy cut around the lace edge.
  • Cut two pieces of co-ordinating background paper; one at 15 x 9.5cm and one at 15 x 10.5cm.
  • Attach the larger piece portrait style on the front of an 8" square card with double sided tape (make sure the fold of the card is at the top to make it tent style).
  • Fix a piece of ribbon across the second piece of paper and the attach across the first piece as illustrated.
  • Position the watercolour topper using 3d foam pads.
You will notice there is no sentiment on this card and that is because, as yet, I don't know when I am going to use it. But I have one ready, just in case.

So the next time you have a crafty session, why not make up some of your work into finished cards but leave out the sentiment, just in case!

Thank you for stopping by today. Please keep popping in so that you can receive a daily dose of inspiration from the very creative Design Team.

Thursday, 23 April 2015

Lady's slipper orchid (posted by Claire)

Good morning folks, my card today features this gorgeous individual stamp, called Lady's Slipper Orchid. I've actually coloured it to represent a an Iris for my card, I adore the rich colours of irises, they are so beautiful.


I've used a distress ink background created using Chipped Sapphire, Dusty Concord and Seedless preserves inks. The image has been layerd up three times. the first layer was stamped and embossed with Gold EP. Next came the script background, stamped in brown on cream card. 

Lastly I stamped the flower on white card,coloured with Graph'It markers and cut out before layering the image up on 3d foam pads. I've added lace, pearls, ribbon and a button topped with a twine bow to finish off.

Thanks for popping by today
Claire xx


Wednesday, 15 April 2015

Ladys Slipper Orchid with Lace (by Shirley)

Hello everyone, I hope you are doing well.

I have a design today featuring the gorgeous new cling single - Ladys Slipper Orchid.


The larger background was created with Evergreen and Pistachio Distress Stain Sprays.   I over stamped using a fragment from Lace Fragments with Evergreen Distress Ink.  When dry I embossed a lace stamp with white across the top and bottom, also from Lace Fragments.    I coloured the Orchid with pencils.   The ribbon is purple which looks very dark in the photo.

Thanks for stopping by and have a great day,
Shirleyx

Monday, 13 April 2015

Ladys Slipper Orchid - By Florence

Hi everyone

Thank you for stopping by. 

I hope you have had a great weekend.

If, this is your first visit to the Chocolate Baroque blog, then a big warm welcome.  Grab yourself a cup of coffee and have a good look around.  There is a new post every day with inspiring projects and fabulous ideas on how to use the stamps.

Today I would like to share two projects made using the new Ladys Slipper Orchid (Cling Singles) Rubber Stamp. 

There are four new amazing stamps in the Cling Singles Range .
To see the set "Bird Cage" multi-buy offer please click HERE.


My first project is a fridge magnet but with a small alteration this could also be a book cover, a little hanging or an embellishment for a wooden box.


To make this project

Paint a piece of MDF (approx size 9cms x 13 cms) with Gesso.
Apply a coat of purple craft paint and leave to dry.
Apply a coat of cream colored craft paint roughly over the purple and remove some of the cream paint, using a wet wipe, allowing the purple to show through a little.
When the base coat is dry, add a tiny hint of yellow craft paint using a dry brush.
Sand if necessary to give a good smooth stamping surface.
Stamp the image onto the prepared piece using Black Archival Ink.
Color the image with diluted Distress Ink.
 Fix the ink with a spray fixative.
Apply 2 coats of Mod Podge to seal the project.
Edge the piece with gold wax or sponge on some gold craft paint.


Chocolate Baroque have a large selection of MDF and wooden products on their website which are ideal for painting and stamping onto and which can be seen HERE.


My second project is a quick and easy card.


To make this card

Apply some Distress Inks to a piece of white card stock (approx size 9 cm x 13 cm).
Stamp the image using a permanent ink.
Using a damp paint brush, remove some of the Distress Ink from the stamped flower image.
Fix the inks with a spray fixative and (optional) seal with a gel medium.
Make up the card as seen.

Thank you for looking
Have a great week.

Florence x

Tuesday, 7 April 2015

When you need to be quick (by Lesley)

There are times when we want to give a hand made card but time is of the essence and when you are up against the clock is usually when your mojo has gone into hiding! Know that feeling? Me too, I knew that I was scheduled for today's blog post however we were spending a wonderful Easter break with Glenda and Adrian; time was running out.


  • Stamp the Ladys Slipper Orchid with Vintage Photo Distress ink onto smooth white cardstock.
  • Using a fine detail waterbush start brushing the colour from the inked outline of the orchid head. 
  • Work through the whole flower and, if necessary use a heat gun to ensure the image is dry. 
  • Cut around the lace edge and mount onto contrasting card with 3d foam.
  • Stamp the sentiment from the Amazing Birthday clear set with Versafine Vintage Sepia ink.
  • Fold an A4 piece of cream cardstock in half and trim to size. Add the ribbon and attach the topper with double sided adhesive tape.
TIP:  Use a very light touch and a semi dry water brush with this technique (keep a piece of kitchen towel to hand so that you can take off excess water from the brush). By not flooding the image with water you can be more precise in the colouring and shading. Also, start with the head of the flower and work your way down to avoid smudging the leaves.

So the next time you're in a hurry why not give it a try.

Thank you for dropping by today and don't forget you can see new artwork every day created by the wonderful design team.


Thursday, 26 March 2015

Stunning new stamps launched today (by Lesley)

It is almost the end of another month so today is the launch of our April stamp sets and are you in for a treat.

When we launched our first individual cling mounted stamps back in December the response was terrific and now we are adding four more to the collection.

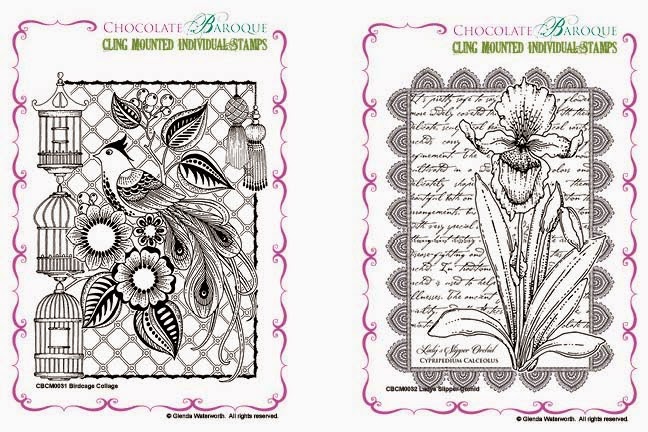
First we have Birdcage Collage and Ladys Slipper Orchid


All four stamps are available individually or as a money saving multi-buy.

Here is a stunning card made by Glenda using the Birdcage Collage


Stamped and then painted you can see this design is ideal for colouring and many of the elements are crying out to be decoupaged. And coming soon on the Shop Blog will be a post from Glenda on how she made this beautiful card, so watch out for that.

Our other stamp launch for April is an A5 clear set entitled Awesome Orchids.

This clever set features two orchid flower images and a sentiment plus a single stem and four individual orchid heads. Now you can design your own flower, how cool is that?
Here I have created three mini cards using the single stem and a selection of the orchid heads, which have then been coloured with watercolour pencils. The backgrounds have been stamped with the crackle and speckled patterns from the Natural Eggs set and the ART letters are from our Newsprint Alphabet clear set.

I just know you are going to have fun with these new stamps and keeping checking back on a daily basis for some truly inspiring projects created especially for you by the Design Team. 

Told you you were in for a treat.