Pin It button on image hover
Showing posts with label Words of Gratitude. Show all posts

Friday, 11 February 2022

Tall Grasses (by Judith)

Hello everyone, I hope that you are all keeping well. I have a project to share with you today, mixing and matching several favourite stamp sets. That's the beauty of Chocolate Baroque stamp sets, once you have them, they can be used with other sets from your collection.

I started this project by stamping a couple of bees from Honey Bee and masked them using Masking Tissue. I worked out where I needed them to be by placing a couple of the foliage stamps on my background, so that I knew how tall they would stand. I then covered my gelli plate with green and blue Distress Oxide Ink and placed my background smooth stamping paper over the top.

I stamped a phrase from Words of Gratitude using third generation stamping in a couple of the corners. I wanted the words to be visible, but not overpowering.

I used a couple of silhoutte grasses from Walk Tall, and various shades of Versafine Clair to create a grassy meadow, using first, second and third generation stamping. I chose shades of green and purple.

Finally, I removed the masks and coloured the bees with watercolour pencils. I added a touch of water using a waterbrush to blend the colour. A touch of grey pencil around the bees makes them look three dimensional, but they are flat on the page.

Thanks for stopping by, I will be back later in the month, with something else to share. Take care, Judith xx


Saturday, 25 December 2021

I'm Grateful (by Judith)

Hello everyone, I'm popping in with a Christmas wish for you all today. Normally Lesley would be here today wishing you all the best for the festive season. As you probably know, our lovely Lesley has very recently been ill, and is currently at home recovering, being looked after by David. Lesley will need to take things slowly for a while. I am sure like myself, you wish her a speedy recovery.

I spoke to Lesley yesterday morning, and a thought for this post had already formed in my mind, two words, 'I'm grateful', grateful that Lesley made it through her heart attacks, and that she is still here with us. We have a lot to be grateful for, don't we? We might moan about the state of the world right now, with Coronavirus, lockdowns, rising food prices, etc., but we still have friends, family, crafting, a smile, our pets, there is always something that we can be grateful for. 

I have not made anything new to share with you for this blog post, but I looked through my old blog posts, and found these projects to share with you:

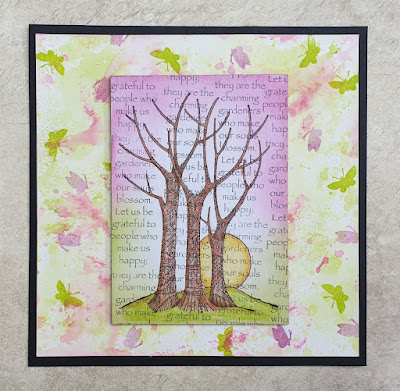
I have used a sentiment from the Words of Gratitude stamp set to create a background, (very apt on this occasion), for the Tangled Birch tree. I used soft pinks and greens on the whiteboard panel and the larger background behind. The little butterflies are from the Baroque Meadow stamp set.

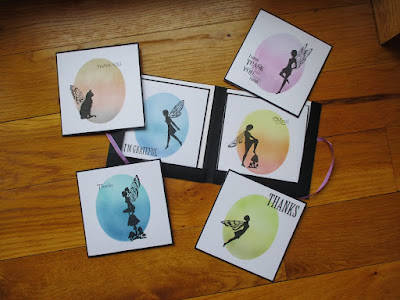
Here is a very quick set of thank you cards using the same Words of Gratitude stamp set of sentiments, plus a variety of fairies across the whole range of fairy stamp sets from Chocolate Baroque. These are perfect for any time of year but great for sending out after Christmas.

Thank you to all of you, our customers, for supporting us this year, for visiting the blog and Facebook Group, buying our stamps and other products, watching the TV shows, and leaving so many friendly supportive comments. We appreciate every single one of them.

Thank you to the rest of the Design Team for your hard work over the past year, your beautiful samples and support, you help make Chocolate Baroque shine. 

Finally because I can, I want to commend David and Lesley on their hard work this year, ensuring that the stamps have been top quality and the service to you the customer has been first class. They work so hard to make Chocolate Baroque an outstanding business, but they make us feel part of the family too.

Wishing all of you health and happiness over the coming season and for the year ahead. Sending lots of love to Lesley as she rests and starts to recover.


Monday, 6 July 2020

Looking at Backgrounds (by Judith)

Hello everyone, I hope that you are all keeping well. Even in times like these, I hope that you have been able to find some enjoyment in your crafting, in whatever form that has taken. A lot of you have been saying that your mojo has taken a walk, but hopefully the inspiration here on the blog, on the Facebook Group, and Lesley's daily Facebook live posts are continuing to provide you with lots of ideas.

I have created a card for you using the lovely Katya, and stamps from the Timeless stamp set. I used a piece of card from my stash that had been washed with a tea bag dipped in warm water. This gives the card a lovely aged feel, perfect for the look I wanted. It's a very quick way of colouring a background.

I stamped Katya using dark brown Archival ink, and covered the image with masking tissue, before adding the large image from the Timeless stamp set a couple of times. I then added lots of the smaller images using second generation stamping to fill the rest of the space, and overstamping the other image as well. I used sepia tones, keeping in with the general colour palette.

I removed the mask, and coloured Katya with Koh-I-Noor Polycolour pencils, these blend really well, and add a pop of colour to the main image. I felt that the main decorative piece on Katya's headdress reminded me of a cog, and so she fitted so well with the 'Timeless' theme, a lady from a bygone era.


To create my second card, I added Distress Inks to a piece of Drawing Cartridge with some water, and then stamped the little butterflies from Baroque Meadow across the background using toning colours of Versafine Clair inks. I used a whiteboard postcard, and stamped a sentiment from Words of Gratitude across the background using grey Archival Ink. I added some shading around the edge of the postcard using Distress Ink and stamped the Tangled Birch over the top, which I coloured with pencils as before.


My final card, which I shared at the time of the TV shows was a really quick card, a simple Brusho background with the same wording added. I then stamped the images from Baroque Meadow in black ink, and added a piece of black ribbon, before mounting the project onto black card.


These lovely stamps are so versatile, always a pleasure to create with. I will be back later in the month with more ideas to share with you. Take care for now, and stay safe,

Judith xx

Sunday, 5 July 2020

Two Bookmarks (by Zoe)

Good morning Lovelies and welcome to my first post this month.
I hope you managed to catch the amazing shows last month on Hochanda featuring these amazing stamps.

I used Chocolate Baroque's Strip Stencils to create both backgrounds.
The first using the fabulous Tangled Birch stamp.
My second bookmark I used the words from the show as my background and diecuts to create the focal point, I do love verses and words to create backgrounds. https://www.chocolatebaroque.com/words-of-unmounted-rubber-stamp-multi-buy-a6.html

Thank you so much for visiting, I do hope I have given you some inspiration.
I'll be back later in the month with a couple more samples from the show.
Until then, stay safe and keep well.
Big hugs xx Zoe

Friday, 22 May 2020

Feeling Gratitude (by Magda)

Hello,
my second post of this month is a layered Journaling Page, that brings in evidence two Chocolate Baroque stamps.
You can hardly see the first pink-brown background with the blue flowers and orange dots, the second layer of gesso with green swirls will give a nice light under the craft tag.


I stenciled the tag with light green flowers, scored the tag and blended with Distress Ink pad Walnut Stain , at last I stenciled again with white.


The decoupage "A Heart full of love" is coloured with watercolored pencils.
The sentiment on the project is in the plate Words of Gratitude  is stamped with Archival Black jet on a white cardstock coloured with Distresss Ink Pad Mustard Seed 
Glue all the pieces on the page.


As a quick idea here two ATC changing the colour but using with the same stamp Essence of Nature Words to Dazzle and Sparkle and stencil 


I hope you enjoyed my projects this time too,  hugs
Magda  

Friday, 27 July 2018

Be grateful (by Miranda)


Hello there,

Today my 3rd and last guest DT post for now. Again I have used the lovely Crafty Individuals patterned paper pad 6"x6" (weekend in Seville) and coloured them using color pencils.


This time I have used the 'Bird of Joy' stamp. I stamped direct onto the patterned paper and coloured it using color pencils. After attaching it to the right front flap I decoupaged it.
When I mounted this stamp I cut of the words from the bird so I can use them separately. But it is a risky job.......


Here you can see the card........


On the left flap I stamped one of the beautiful Art deco floral corners
Also coloured with pencils. Than I stamped the words from the 'Words of Gratitude' and die cut it.


On the inside of the card I used the full paper because it has such a beautiful framed pattern. Only stamped the sentiment from the Words of gratitude onto it. Such a beautiful and true sentiment.


And here the card from another point of view.......when it's closed.....


Well, I hope you liked it and maybe you get some inspiration to take out your patterned papers and have a play!
Thanks for your visit and always appreciate your comments,

Till next time,


Saturday, 17 September 2016

Home Decor (by Magda) Soft Form Relief Paste

I thought about a sentiment of home decor for my second post of September and as with the previous project I am again using Soft Form Relief Paste.

1. Spread a thick layer of Soft Form Relief Paste Pearl on the whole Words of Gratitude Rubber
    stamp and let it dry completely for about 24 hours.
2. Remove the shape and blend only on the sentiments you will use with Distress Inkpad Salty Ocean.
3. Cut the sentiments you have chosen and keep the rest for future projects.
4. Make a panel using corrugated cardboard, altering the surface.
5. Darken some areas with Distress Inkpad Walnut Stain.
6. Use Soft Form Relief Paste Pearl and Transparent on Ronda Palazzari Texturised Stencil in some
    areas of the panel to give texture.
7. Add extra colour to the panel and the sentiments with  Tim Holtz Distress Crayons set 2 red.
8. Stamp the little heart of Word of Love set on Kraft Cardstock and cut all around the shape.
9. Glue the sentiment pieces and the heart with Inkssentials Glue n Seal matte
10. Don't forget the red ribbon as hook.

Did my home decor inspire you?
Magda


Sunday, 19 June 2016

Dots n' Stripes- Baroque Ornament (by Magda)

This is another beautiful stamp of the Baroque Ornament series, and here is my "Feeling Gratitude" card as my second post for this month.

Step by Step

Background:
1. Blend several colours of Distress Ink Pad on the cardstock
2. Stamp with water Dots 'n Stripes for the background
3. Stamp with Versafine or Archival the main image
4. Apply randomly white Gesso through the stencil

Sentiment:

5. Blend several colours of Distress Ink pad on the cardstock for the sentiment.
6. Stamp the sentiment from the Words of Gratitude stamp set with water first.
7. Stamp the same sentiment again not in exactly the same place with Versafine or Archival.
8. Stamp Dots 'n Stripes on a blank cardstock and cut out the shape.
9. Position the background on the blank cardstock and draw around the sentiment in order to cut it out later, using the arched edge of the Dots 'n Stripes stamp, where it is possible.
10. Cut and glue on the card background.
11. Add some Stickles dots to give light.

I enjoyed creating this project and hope you will try stamping with water. If you have any questions, please contact me.

Thank you for stopping by,

Magda.

Sunday, 5 June 2016

Textured Ornaments (by Judith)

Hello everyone, I have two cards to share with you today, using the current stamps of the month.

I have used the Palm Fan Baroque Ornament stamp to create my first card, creating a wrinkle free distress background using a palette of blues and greens. I added a stencil over the top of the background. The sentiment is from the Birthday Words stamp set.

For my second card, I created a wrinkle free distress background as before, using a colour combination of blues and purples, and used the Tangled Baroque Ornament stamp as my focal point. The sentiment is from the Words of Gratitude stamp set.

Further details of how I created my cards can be found on my blog. I hope that you have been enjoying the inspiration provided by the Design Team using the Baroque Ornaments, do keep checking back for daily posts from my team mates. Thanks for stopping by, Judith xx

Saturday, 8 November 2014

Colourful Fruit and a Quick Make (by Shirley)

Hello everyone,  I hope you are doing well.   It's wonderful to be back here with the Design Team after taking a couple of months away during our move.    

The new Mellow Fruitfulness is a wonderful set with elegant fruity images that will work well for gift tags on homemade jams, cook book covers and more.   My first design below was quick to make with the exception of the colouring.


The background is Peacock Feathers Distress Ink (using an acrylic block to apply) along with blending the same ink with a honeycomb style stencil.   I stamped the fragment from Texture Fragments with Mowed Lawn Distress Ink.   The images from Mellow Fruitfulness and sentiment from Words of Gratitude were stamped with Black Archival Ink which I coloured with pencils.

This second design is a quick make, only ten minutes if you don't count my thinking about what I was going to do.


I used designer papers from my stash, a couple of die cuts, ribbon and the wonderful apple image and sentiment were stamped with Olive Archival ink to compliment the papers.   It's such a great image, it works well on it's own but a little water colouring would not take long. 

Thanks for your visit and I hope you are able to keep checking back to see what my talented teammates have created this month.

Have a great day,
Shirleyx

Friday, 15 November 2013

Thank you Fairies (posted by Judith)

Hi Folks, I have a project to show you using the gorgeous new Winter Fairy Collection stamp set. Around this time of year, we have lots of thank yous to send, and so I decided to make a gift wallet containing some thank you cards, using lots of the fairy images from both this stamp set and the Autumn Fairy stamp set.

I started my project by cutting some paper masks from scrap paper and inking through the masks with a variety of inks onto plain white card cut to size.


I blended the colours as I graduated down the area that I was shading to get a soft blend. I removed the mask and stamped one of the fairies from the stamp plate over the shaded area. On each card, I added a sentiment taken from Words of Gratitude or Pretty Poppies stamp sheets. I added black matting to the cards to tie in with the stamping.


I cut two pieces of black card 21cms x 19.5cms.  I then scored 1.5cms at one end of each piece, and overlapped them, sticking them together at this point. I scored 2.5cms at each outer edge, and 2.5cms along the bottom, cutting out a gap where the overlap occurred along the bottom. I trimmed the bottom edges slightly at each of the four ends. I folded the sides and the bottoms inwards, and secured the outer corners with glue or double sided tape.


 I placed a piece of ribbon across the middle of the front of the folder before sticking on the front design. I actually used two pieces of ribbon, a shorter piece on the right, and a longer piece on the left to wrap right around the back.


Thanks for stopping by, Judith xx

Monday, 29 July 2013

Fancy Flower and Mixed Media (by Shirley)

Hello everyone, I hope you are enjoying the summer. 

I have a design today using a little mixed media along with another flower from the beautiful Fancy Flower set along with a fragment from Lace Fragments. .


I started with a sheet from the Leafy Brocade Printable set and glued it to water colour paper with Modge Podge.   I love the printable sheets, the designs are beautiful and you don't have to store paper, just simply print when you would like one.

Next I added a thin layer of Gesso and when dry I coloured in blotches with Neocolour II crayons (water soluble).   I spritzed water over top and let the colours run together.   I stamped the images with Teal Blue Stazon Ink (permanent water proof ink)  I coloured the flower with Tombow markers and blended with a brush & water.  I outlined with a water based Sharpie paint pen.   I added stickles to the center of the flower.    The sentiment is from Words of Gratitude

Thanks for stopping by and have a great day,
Shirley

Monday, 6 February 2012

Dandelion frame (by Claire)

Hi there, here's another sample using some of the gorgeous new stamps from Chocolate Baroque. These beautiful delicate dandelions are from Rose Tree and the sentiment is from Words of Gratitude


Its one of my all time favourite sentiment stamps, I've used it so many times and never get fed up of it.
This was a really quick and simple card to make using distress inks and memento inks
For more details pop over to my blog.

I hope you're managing to keep warm in this wintery weather, at least its perfect for crafting and all the new stamps are a wonderful reminder of better weather to come
Claire xx