Pin It button on image hover
Showing posts with label Chocolate Baroque Clear Stamps. Show all posts

Friday, 1 March 2013

Stamp of the Month - Going LARGE!

In more ways than one we're going LARGE with this month's new stamps.  I'd like to introduce you to the Big Bold Backgrounds - each one is a hefty 14 x 14 cm - that's 5.5 inches, otherwise known as huge.


They are all available as individual stamps, but as you can see, we are doing a super duper multi-buy on all six - click here for details.

They are also available as multi-buy pairs too if you don't want all six - click on any of the images below for details of that multi-buy, or visit our New Stamps this Month department to see them all.


Then we go from one extreme to the other with some petite and decorative little clear stamps with a fresh spring feel to them.


I've been running around after broken down cars this week and haven't had much time to create, but I did manage this card with the Leafy Trails.


I coloured the leaves with inktense pencils, the sentiment is from Fly Away with Me and the butterfly is from Butterfly Poppy Collage.  I also used Wild Meadow to create a faint image behind the text (which appears darker on the photograph for some reason).  I used the new Ornate Scroll clear stamp with Archival Sap Green to create the border around the edge of the white card.

Now we really couldn't choose a single stamp of the month from all those big bold backgrounds, so guess what?  All six are on special offer this month so you can pick and choose.


Have a great weekend!

Thursday, 17 January 2013

A little gift box (posted by Elaine)

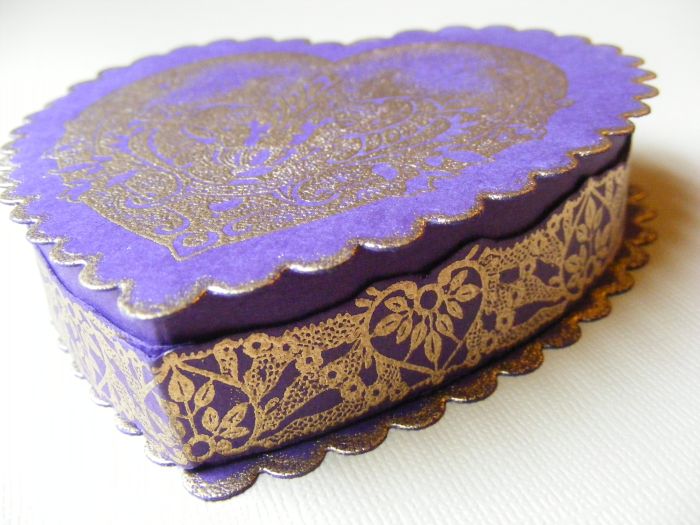
I love heart images, so the new CB clear heart images are right up my street! For this project I used the Elegant Baroque heart which is so beautiful and crying out to be embossed. I decided to make a little heart shaped gift box.

 
I used a sturdy purple card as my base and cut four heart die cuts, two scalloped in the same size and two smaller hearts of slightly different sizes to allow me to construct a box where the lid fitted over the base. I used WOW Metallic Brass EP for the image and the edging on the lid and base, using a Versamark pen to work around the edge of the scalloped top and base to add that embossing.
 
 
I wanted to add some pattern to the sides of the box and I used one of the lovely Lace Fragment stamps that also has a heart motif in the design.
 
Glenda suggested this style of box would make a nice wedding favour box filled with sugared almonds. I really like this idea, although I am not sure I would want to make too many of them! Maybe ideal for a wedding with a small, but select guest list!
 
Elaine


Saturday, 22 December 2012

Tree baubles (posted by Elaine)

I love the little trees from Terrific Treescapes and when I bought this bauble die I realised they were just the right size for adding as a feature. I wanted to make my baubles glow with colour, so used a selection of yellow, orange and red inks to build up the depth of colour I wanted. I finished off with a dusting of mica powder, although it doesn'y show in this pic!


I added some die cut pine branches and finished off with one of the new clear sentiments embossed in a copper embossing powder. This is all mounted on an 8 x 8 cream card blank as I wanted to give some space to let the baubles speak for themselves!

Hope all your Christmas preparations are going well and you are not being washed away in all this rain.

Keep safe and dry and enjoy your festivities.

Elaine

Friday, 5 October 2012

Special Delivery (posted by Claire )

Hi there, Claire here with another sample using the new clear stamps, I love the oriental themed stamps but I thought it would be fun to use the stork image from Moonlit Waterfall for a baby card.


The clouds were made by sponging pink brilliance ink onto white pearlescent card. The stork was stamped with the same ink and embossed with pink EP. I made the 'nappy' with a scrap of white cotton fabric (no sewing involved lol, I used matte multi medium to hold it together and added a dinky little pink safety pin)

The nappy is hanging from some pink velvet ribbon and I've added some fluffy pink feathers and layered the stork up with silicone glue

Thanks for visiting today
Claire xx

Wednesday, 3 October 2012

Spooky gatefold card posted by Claire

Hi there, Claire here with a Halloween gatefold card made using the fab new clear stamps 'Witches Brew' and memento inks For the front of the gatefold I brayered Tangelo memento ink on some glossy card stock and then stamped the fence using Memento Tuxedo Black. These clear stamps are perfect as you can see exactly where to position the stamp to extend the fence. 


I've stamped the cobwebs around the edges and added orange roses and die cut swirls.
Inside I created a little scene using my brayer and the spooky witch and cauldron  image. I stamped the cobwebs around the edges of the black base card and this time I used versamark ink and dusted with mica powders for a spooky shimmer


Thanks for popping by,
Claire xx


Thursday, 27 September 2012

Lantern Easel Card (posted by Claire)

Good morning, Claire here again with a little easel card using one of the clear stamps from 'Chinese Lanterns'
'
I made a little shaped easel card using nestabilities and cut an aperture in the top part of the easel to hold the focal image which is stamped on vellum. I embossed the lantern from the reverse with a ball tool and added a little colour with coloursoft pencils. The sentiment and frame are  from 'Best Relative Ever'. stamped with versamark and embossed with WOW gold detail EP, I used a gold krylon pen around the edges. Glenda has the Krylon pens on offer at the minute (have a look here in special offers)

To prop the easel up I used the die cut shape from cutting out the aperture and added some of the lovely cherry blossoms from Chocolate Baroque and some paper roses. Here's another photo showing the side view, I've popped a little battery tea light in to shine through the lantern


Thanks for popping by
I hope you're enjoying the new clear stamps as much as I am
Claire xx


Tuesday, 25 September 2012

Oriental Crane (posted by Claire)

Good morning, Claire here with another sample using the 'Oriental Crane' set of clear stamps. While I love rubber stamps, clear stamps are perfect for creating a little scene as you can see exactly where you are stamping.


The background was created with distress inks (Tumbled Class, Peeled Paint and Tea Dye), blended on to Southfield White card and then splashed with water to give a mottled effect. I over stamped the background with dragonflies and bamboo stamps from 'Moonlit Waterfall'. 

I stamped the image with versafine ink and coloured with distress markers. I used some black card for matting and layering and added an oriental coin charm attached with some shimmery braid.

Thanks for visiting today
Claire xx

Friday, 21 September 2012

Willow Pattern (posted by Claire)

Hello, Claire here with another project using the beautiful new 'Oriental Crane' stamp sheet


I've used memento inks and glossy card for this project, the focal image made me think of all the lovely old 'Willow Pattern' chine that my grandma used to have in her china cabinet so I took inspiration from that to create this card. I've used various shades of blue memento inks to stamp the images, added a doily from my stash, some faux pearls, ribbon in shades of blue and white and finished off with a button and a tiny little bow.

Thanks for visiting today
Claire xx


Tuesday, 18 September 2012

Moonlit Waterfall (posted by Claire)

Hi there, Claire here with a card using stamps from Moonlit Waterfall, one of the new sets of clear stamps. 


The focal image is coloured with distress markers, they blend so easily and make colouring so quick and easy. I added some highlights with a white inkssentials gel pen.
I stamped and embossed the main image again with WOW Gold detail EP on black card and cut out the frame, layering it up over the image with 3d foam for some depth. I didn't think this beautiful little scene needed a lot of embellishments so I created a background using the delicate dragonfly silhouette stamps from the same stamp sheet. I stamped the dragonflies with versamark and again embossed with gold EP. To finish off I've added some gold braid and a glossy black button from my stash.

Thanks for visiting and for taking the time to comment. I hope you're enjoying these beautiful new stamps as much as I am. 
Claire xx

Saturday, 15 September 2012

Ivy Trails (posted by Claire)

Hi there, Claire here with a card made with some of the new clear stamps, this time I've used 'Ivy Trails' the beautiful new Christmas stamps. 

I stamped the images in black archival ink except for the sentiment which I stamped with versamark and embossed with gold detail WOW embossing powder. I coloured the image with distress markers and lightly inked around the edges with tea dye and pumice stone distress inks. I've used gold mirri card and  ivy green card for matting and layering. 

Thanks for visiting today and for all your lovely comments.
Claire xx

Tuesday, 11 September 2012

Spooky (posted by Claire)

Hi there, Claire here with a little 'Spooky' inspiration using the new clear Halloween stamps 'Witches Brew. I love to create scenes with rubber stamps and clear stamps make it so much easier as you can position your images really easily


I've used all the stamps from the set on this project. I started with the lovely cobweb stamp and created a background by brayering Tangelo Memento ink on to glossy cardstock. I love memento inks for brayering.

The Spooky scene was made using PanPastels. I made a mask for the moon and positioned it where I wanted the image to go and then created the sky with Paynes Grey, Violet and a little black Panpastel. I added the ground using Chromium Oxide green panpastel with a little black. I removed the moon mask and stamped in the images with versamark, as the stamps are clear you can position your moon in exactly the right place. Next came the witch, in the foregroud and I added the sentiment in the sky. They are all embossed with holographic black EP for a little spooky sparkle. Its so easy to create sky effects with PanPastels, I wanted to add some misty clouds around the moon so I used the shading on the stamp as a guide and lightly used a pencil eraser to remove some of the panpastel to create a misty effect. I added some shadows to the foreground with a little black panpastel.

I stamped the fence stamps on acetate, embossed with the same embossing powder and cut them out, leaving the acetate a little longer than the scene panel. I scored and folded the acetate to curve around the scene slighly and then matted the image on black card. As a finishing touch I used an inksentials white pen to add a few stars to the sky.

Thanks for visiting today. Keep popping back as we've got lots more projects using the new stamps to share with you
Claire xx

Thursday, 6 September 2012

Lily Pad Scene


The card above was partly drawn, partly stamped.  It's one of the things I love about stamping - a few hand drawn lines can give you a whole new look and that makes your stamps even more versatile.


In the video below I show you a simpler version of connecting up stamped elements to create a scene.  I coloured it, and the one above, with Aquamarkers.   I also added coloured pencil over the top with a deliberate stylised look of the dark edges against the pale colours.


Aquamarkers contain watercolour paint which means they behave differently to ink based markers which tend to soak into the paper much quicker.  Watercolour blends in a different way and can even be 'lifted' with kitchen towel if you make a mistake.  For scenes like this, I like the Aquamarkers for the way the pigments react to water and create a natural, painterly look, as opposed to the even flat colouring you get with Copics or Promarkers.

Of course, if you are in a hurry or not confident with creating your own scenes, there's a beautiful one all done for you on Moonlit Waterfall - isn't this a gorgeous stamp.


Lesley will be blogging at 4pm with a super little owl project and remember you can chat with us today on the Chocolate Baroque community site.


ONLINE PARTY GIVEAWAY


In celebration of our new product launch, we are giving away an Aquamarker Landscape Painting Set!

Leave us a comment below and it could be your lucky day!

Happy Halloween

I have been playing with our clear Halloween sets, Batty Owls and Witches Brew.   I've gone for a bright colour scheme on all of these using Distress Inks.


Below you'll find instructions for the card on the right and a video which shows how the cards on the left were made.  Even if you're not into Halloween, I hope you find the ideas useful.


Spooky Card

You will need:
  • Onyx Black Versafine
  • Distress Inks: Barn Door, Spiced Marmalade, Mustard Seed, Mowed Grass, Crushed Olive
  • Thick White Card
  • Polychromos pencils (or other waxy pencils such as Coloursoft)
  • Black Glossy Card
  • Black pearlescent card
To make card:
  1. Stamp the witch and the moonlit castle with Onyx Black onto thick white card and blast with a heat tool to dry thoroughly.  If it's not dry, it will smudge in the next step.
  2. Colour the moon with pencils - make sure they are not water soluble pencils, you want waxy pencils as the colouring will act as a resist to the distress inks.
  3. Use a piece of Cut'n'Dry or a blending tool and rub the Mustard Seed around the moon and outward along the middle section of the card.  Blend Spiced Marmalade down from the top and Crushed Olive up from the bottom.  Strengthen the very top with Barn Door and the bottom with Mowed Grass.
  4. Add a few bats (from Spookylicious) if required and stamp the word Spooky above the witch.  Go round the edge with the cobweb corner using Onyx Black.
  5. Cut a piece of black glossy card and sand the edges.  Rub Spiced Marmalade over the sanded areas and polish dry with kitchen towel.
  6. Layer up the stamped image onto the distressed glossy card and stick to a folded black pearlescent card.  Finish with ribbon or trim.

Misty Bats Card


This next card uses the same materials and inking techniques and shows you how you easy it is to line up the clear stamps accurately.


Here's a video (about 9 minutes) showing you how the whole card was built up.  


Thanks for watching and don't forget you can chat live to us throughout today on the Chocolate Baroque community site.


ONLINE PARTY GIVEAWAY


In celebration of our new product launch, we are giving away multi pack of Cut 'n' Dry - one each of the foam and the felt!

Leave us a comment below and it could be your lucky day!


Announcing ....


I'm sure you've all been wondering and speculating about what our new product launch is and finally the wait is over.

I said yesterday on my blog that it wasn't a million miles from what we already do and that's true.  What we are launching is ....

drumroll ..


fanfare...


bagpipes?


ok, maybe not the bagpipes ...


CLEAR STAMPS


Yes that's right, all the deliciousness of Chocolate Baroque, but now in clear photopolymer stamps!

We are trialling a capsule collection of ten sets, each one around A5 in size (approx 19cm x 13cm) and really want to know what you think.  The collection includes Christmas, Halloween and Oriental themed stamps as well as a couple of sentiments sets.  I have loads more ideas and designs in the pipeline so I hope you  like them.

Click here to view the full collection.

We have over ten years experience producing rubber stamps and have always stood by a firm commitment to quality.  We are determined to strive for the highest possible quality with our clear stamps too and Professor Polymer (Adrian's new nickname) is on the case.

We are showcasing some of the stamps today with projects and videos and will begin shipping next week.  Our email subscribers have a pre-order discount on all clear sets so if you're not on the list - sign up here.

Here's a little introductory video.


If the embedded video doesn't work for you, here's the link to view it on YouTube

http://youtu.be/kAxChEmMhq8

I'll be back at 2pm with a project video and remember we're live on the Chocolate Baroque community site several times throughout today.


ONLINE PARTY GIVEAWAY

We have three free sets of our new clear stamps to giveaway today and the winner gets to choose which set they'd like. 

Leave us a comment below and tell us which set you like the look of - it could be your lucky day!

Click on the image to view at full size or visit our Clear Stamp Department on the website to see them all.