Pin It button on image hover
Showing posts with label Reindeer Landscape. Show all posts

Sunday, 24 September 2017

winter (by Veronica)


 I used the lovely house stamp from New England winter, stamped using distress markers to colour the stamp. Thanks to my friend Janet for introducing me to the combination of dusty concord and iced spruce, which i really liked and makes a nice change from the usual Christmas colours
I used the same colours to ink up the pine cones from the same plate to create the background, with some second generation stamping to add interest.
The sentiment from lets get festive was also coloured with the marker pens, and the die cut edged with the same markers. i also coloured the mats with the marker pens to get matching colours


The next two cards use the large stamp from the reindeer landscape plate.
For the first card I stamped with versamrk onto black card and clear embossed it, before adding colour with distress oxide ink pads. I dragged colours across the sky to try to give a northern lights effect. The snow was a white pigment ink sponged on, with a little of the oxide colours added for a reflection of the sky. Some white glitter in the foreground to finish before trimming right down and adding white and pink mounts. The greeting from the same plate was stmaped in a silver grey ink.
I wanted to see if i could make a shaker card using this stamp - I stamped the edges of the stamp onto the base card using hickory smoke distress ink to extend the scene.  I stamped the image onto spare card , colouring the stamp with distress markers, and trimmed this down to a 62 square. I die cut a circle from another piece  of card the same size, backed it with acetate and fixed it over the image using foam pads having first added some sparkly silver snowflakes I found lurking in a drawer.                                   The whole thing was then added to the base card after sponging more grey ink round the edges. The sentiment from lets get festive was stamped and silver embossed  , edged with grey and mounted on top.                     

Friday, 22 September 2017

Christmas Old and New (by Judith)

Hello everyone, I am sharing some Christmas projects with you today that were featured on last month's TV shows on Hochanda. Some of these were old projects that I made a few years ago, but I hope that you do not mind seeing them again.

I will start with a new project, where I created a background, using soft blues and pinks to represent a Winter sky. I added some deeper blue hills using torn paper masks, and stamped the tree from the Frosty Trees stamp set and the sentiment from the Let's Get Festive stamp set, using dark blue ink. Ensuring that the background was completely dry, I added some snowflakes using white embossing powder, and then used some flat-backed gems for added sparkle.

Using another tree from the same stamp set, I created an icy background using metallic paints, and on a smaller scrap of card, I stamped and embossed the tree panel using Versafine Onyx Black Ink and clear embossing powder, for a crisp image. I matted the layers onto black card, and added some small black gems. The sentiment comes from the Let's Get Festive stamp set once again.

 I wanted to create a piece of home decor especially for Christmas using my favourite sentiment from the new stamp set. I painted a chipboard heart in soft blue, adding some crackle medium here and there, and then added a vintage white paint over the top. I then stamped the sentiment in a bold red before adding the fabulous pine cones from the New England Winter stamp set around the edges. I used water based markers to colour the stamps, allowing me to add colour exactly where I wanted. A red ribbon completes the project.

This next card is an adaptation of an old card that I first made several years ago, using the Winter Birds stamp set, but I have made it in a different size. These days, I like to make 8" x 8" cards, and so the card does look slightly different from the original. I have added one of the new sentiments this time around as well.


Finally two golden oldies for you, I remade the first one, which was originally given as a Birthday card to someone. It just goes to show that these beautiful stamps can be used at other times of the year, not just at Christmas, with a change of colour. I have used the large image from the Reindeer Landscape stamp set, embossed with copper embossing powder, and coloured with Distress Inks and a water brush. The background was also created with Distress Inks, and I have then stamped leaves from the Sunny Sunflowers stamp set, and coloured them with pencils. The sentiment comes from the Nature's Peace stamp set.


Finally a luminary, also using the large image from the Reindeer Landscape stamp set. I die cut an aperture from four large printed tags. The images were stamped and embossed onto parchment using white embossing powder, and coloured from behind. I used metal tape to join the tags, which I embossed, and aged with a little bit of black paint.

I hope that my projects have given you some ideas using these fabulous stamps. Thanks for stopping by, Judith xx

Tuesday, 19 September 2017

Roses and Reindeer's (by Brenda)


Hello all, I'm here again to share a few more of my samples from last months Hochanda shows where Lesley inspired us all with more beautiful stamps.

For my first share I gave a piece of watercolour card a watery covering of DI then stamped Crackling Rose with Versafine black and coloured in with sparkle pens. The sentiment is from Loving Sentiments which I cut into several pieces to arrange around the bloom. The edges have been lightly inked, matted onto coordinating cardstock and a organza bow added down the side.


Reindeer Landscape is such a lovely stamp and I decided to keep it fairly simple. I stamped the main image and added some watercolour to the sky using a mask to block out the moon plus a little shading to the hills, then stamped part of the image twice onto a larger piece of card so that I could raise the focal coloured one in the centre to carry the scene either side. I also stamped one of the Deer again, cut it out and decoupaged offsetting it to the left.


My last share is a bit more inky indulgence using die cuts to create the base card which I then inked with Oxide inks and stamped with Harlequin Bouquet and Floribunda Net, coloured in with the same inks and the sentiment from Loving Sentiments stamped with Versafine black. I also added some leaves using leaves using the Useful Leaves stencil. Finally the three pieces were then tied together with seam binding threaded through eyelets.

Happy day all.

Monday, 18 September 2017

Christmas Cards (By Marga)

Hello all, yes it's time again to slowly make some Christmas cards and today I would like to show you some.


Here I stamped the image on kraft paper and coloured it with pencils. I cut it out and put it on brown paper.


Here I used Distress Ink to stamp the image and with a water brush I coloured the image.


Here I also stamped the image with Distress Ink. I used different colours and with a water brush I went over the colours to create a watercolour scene.

Stamps I used are: Reindeer Landscape, Winter Birds, New England Winter and Lets get Festive

Hugs 

Marga


Saturday, 9 September 2017

A few Christmas makes ... (posted by Claire)

Good morning, I really love making Christmas projects so I had lots of fun making samples for Lesley's recent shows on Hochanda. This morning I'm sharing 3 Christmas cards. The first features New England Winter, this is one of my all time favourite sets!


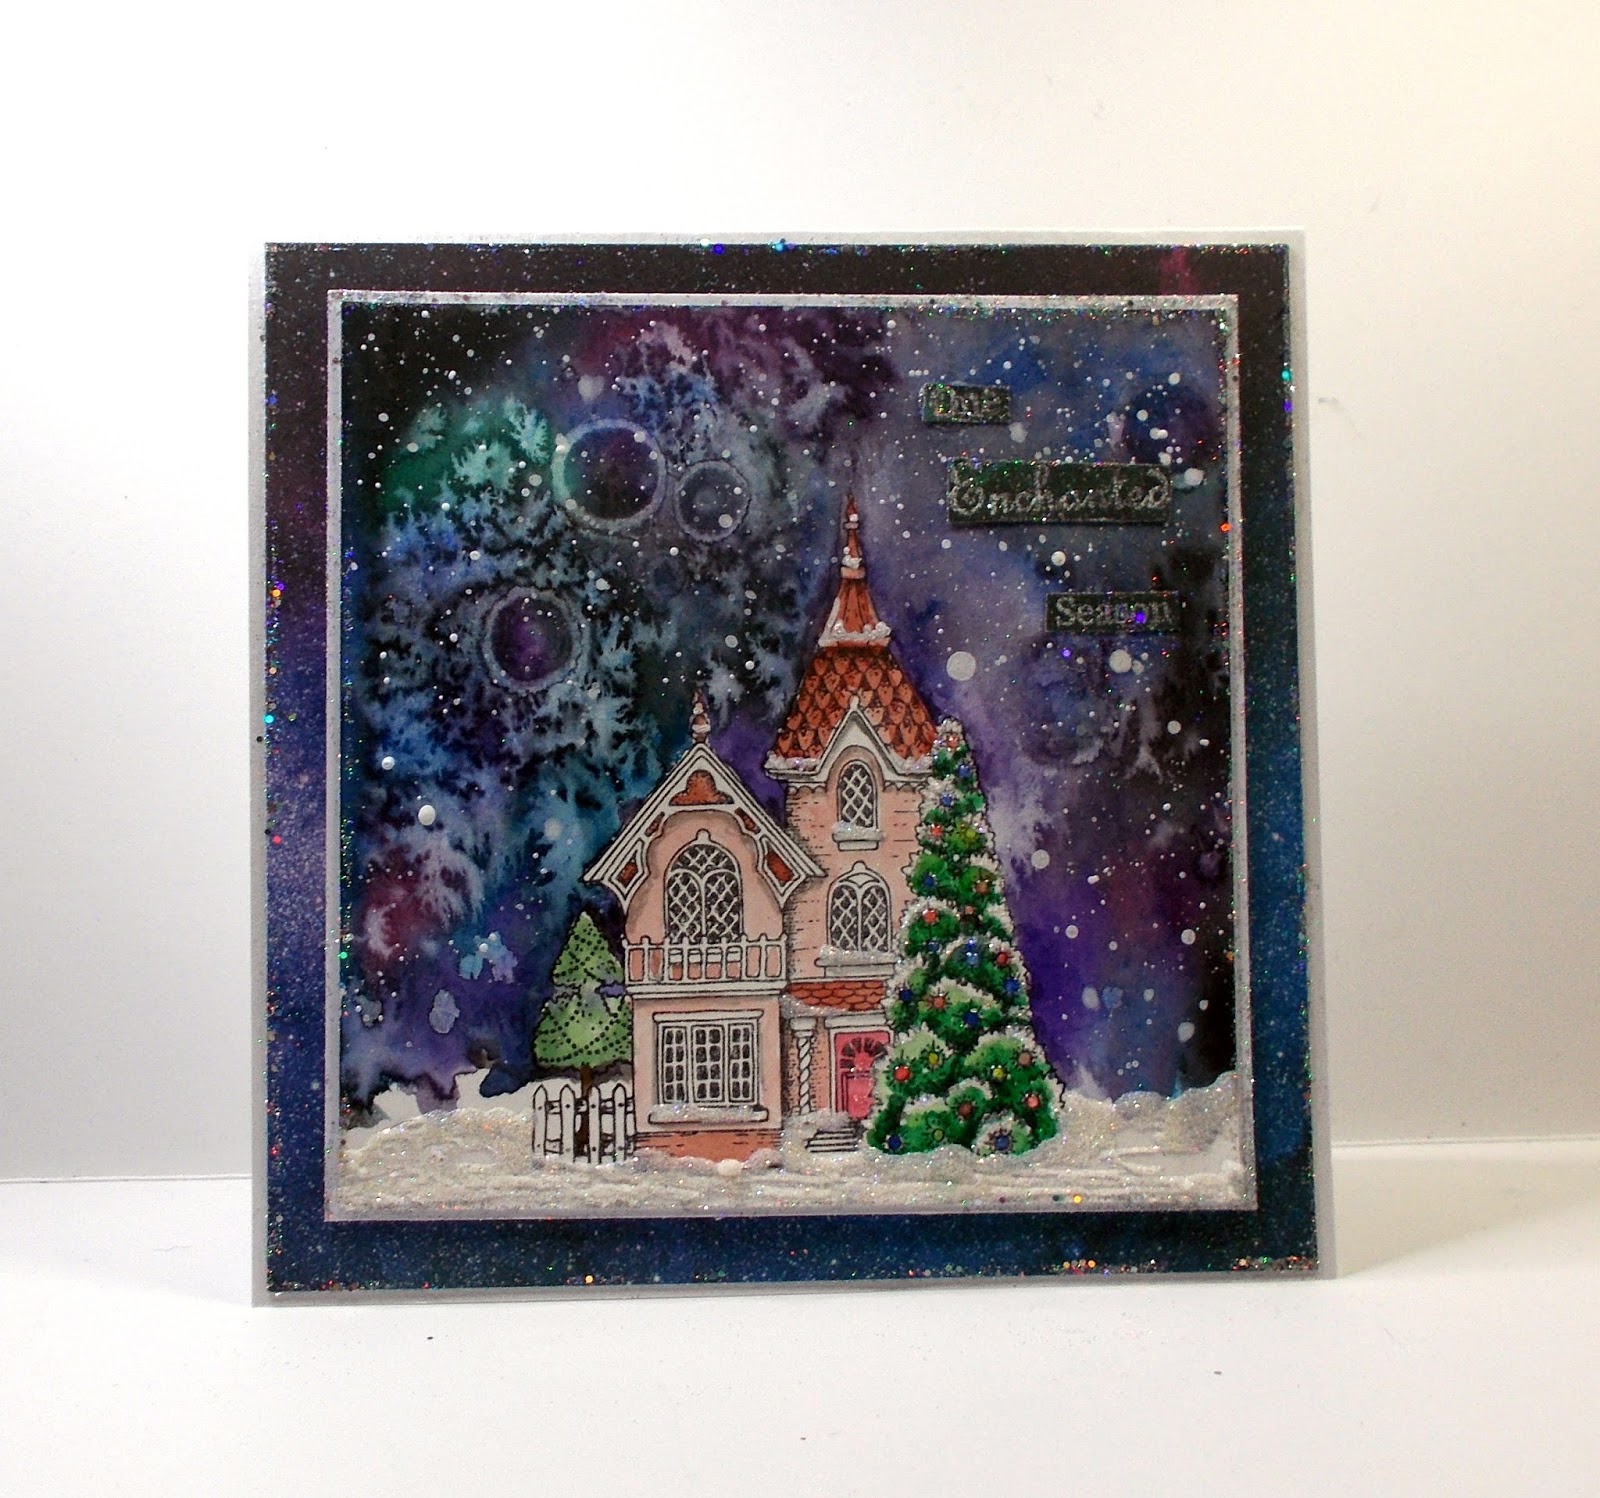
I began by stamping the image onto watercolour paper and painting with masking fluid. I gave it a good coat of the fluid as I was planning on a very messy background lol. Once the masking fluid was dry spritzed the card with plenty of water and set to with my watercolour paints to create a 'galaxy sky' effect. I used shades of blue, green, purple and pink - mixed with plenty of water and added black around the edges. While the paint was wet I sprinkled over some rock salt and then added some drops of rubbing alcohol. I wasn't sure how the alcohol would react with the water but it was on my desk so i had a go. The salt created the feathery effect in the background (I think I added a bit too much lol) and the alcohol created the circles. I left the background to dry and and then splattered everything with watered down white gesso and again left it to dry before adding some even white stars with a white posca pen. Once the background was completely dry I removed the masking fluid and watercoloured the image. I added glossy accents to the tree lights and white pva glue generously sprinkled with glitter to create the snow in the foreground. The sentiment is from Let's Get Festive.

Card number two was made using the beautiful Reindeer Landscape, another favourite (but aren't they all lol) I stamped the focal image with Black Versafine ink and used a black pitt pen to extend the landscape to each side.


I added shadows to the hills with very dilute watercolour paint in shades of blue, purple and pink. I used slightly more intense shades of the same colours to create the sky, masking a little moon. I added some snow with splatters of white gesso and a white posca pen before stamping the sentiment which comes from the lovely new set Let's Get Festive,

For card number 3 I used one of the lovely stamps from New England Winter. This was a bit of an experiment but I'm pleased with the finished card and it was very quick to make.


I stamped the pine bough with white gesso, heat set it and then roughly masked the area with a post it note before stamping the image again a little lower. Once the gesso was thoroughly dry I added some colour with watercolour paints and enhanced the details with coloured pencils. I added a wash of very dilute white gesso around the image, dried it and again splattered with more gesso. The sentiment is another from Let's Get Festive, this time embossed with white EP.

I hope you're feeling festive and are enjoying all the beautiful makes from my teamies
Thanks for visiting today
Claire xx

Saturday, 9 July 2016

Icy Tangled Birch (posted by Claire)

Good morning, Claire here with a wintery themed card using the beautiful new Tangled Birch stamp. This is such a detailed stamp and so versatile, I thought it would be a good opportunity to start my Christmas cards. Have you started yours yet?


I began by stamping the focal image on some stamping card and dusting distress ink (Spun Sugar, Tumbled Glass and Squeezed Lemonade) over with a shaving brush before distressing with Iced Spruce ink. I splashed the background with some water and blotted with some kitchen towel to create a snowy effect. I stamped the image on acetate with versamark, extending the land a little with a versamark pen  and embossed with a silver embossing powder. I layered this over the background, attaching with a couple of silver eyelets. and added some glitter to the moon using a Zig glue pen.

To make the background I used the same colours of distress ink and dusted them over a larger piece of card, trying to follow through the colours from the topper. The snowflakes are from Reindeer Landscape, stamped with Iced Spruce distress ink and then I've added dots of glue and sprinkled with glamour dust.


I've used some silver card from my stash to mat and layer the image and the background and added a silver bow to finish off. 

Thanks so much for visiting, I hope you're enjoying all the inspiration from my lovely teamies. 
Claire xx

Monday, 21 July 2014

Christmas Birds (posted by Judith)

Hi Folks, I have a couple of Christmas samples for you today, using stamps from our Snowy Scenes/Turtle Doves multi-buy offer. Generally, I like to work with bigger cards, but I found myself making some cute 6" x 6" cards with the lovely images.

My first card was created by stamping the owl image down the side of the card, and extending the tree trunk to the bottom of the card with a black pen. I masked over the image, by stamping onto masking paper, and then stamped a tree image from Reindeer Landscape onto the background twice. The sentiment comes from the same set.

I embossed some snowflakes from the multibuy set onto the background using white embossing powder, and then coloured the background, using Distress Inks. I removed the mask from the owl image, and coloured it with pencils. I added a little bit of glitter glue to the hills, and once this was dry, I attached some organza ribbon before I matted the background to some black card.


My second card was created by sponging a piece of white card with green ink, and then stamping around the edges with the end of the swirly bird and pear image, using the same colour green ink. This gives a subtle tone on tone effect. I die cut a pear image from a piece of old book paper, and coloured this with green and orange inks, before sticking it to my background.

I stamped the bird and pear image in black ink over the die cut pear. I stamped the image again onto a piece of white card, and coloured it with pencils, cutting out the bird, leaves and pears. I decoupaged these onto the die cut pear. I added a sentiment from the Pears and Baubles stamp set.

Keep checking back for some lovely samples from my team mates using these stamps. Thanks for stopping by, Judith xx

Tuesday, 3 December 2013

Christmas Farewell (by Clare)

Hello!  It's almost that time of year again!  Christmas!  I cannot believe how fast time is flying by, although having to sit without being able to do much makes time seem to drag by.  I am so sad to say that after having a fourth surgery on my left shoulder, one on my right elbow and right shoulder upcoming, I am stepping down from the design team for a while.  I haven't been able to keep up with all my talented and creative team mates!  I hope you enjoy these few last cards of mine.  I wish each and every one of you Merry Christmas, a blessed holiday, and a prosperous and healthy New Year!  I will miss you all!

This first card was made with two stamps.  The background is from the Winter Edges set, and the main image is from the Reindeer Landscape set.  I used a wood-look embossing folder on the blue base, and placed two rows of glue and blue chunky glitter across the bottom.  The background was stamped in dark blue on white cardstock, then cut in half to fit across the 6" width behind the main image.  The deer landscape was stamped on white and heat embossed in teal blue.  I used a sponge dauber and blue inks in three different shades on the top and bottom.  There is light blue sparkle sheer ribbon 1" wide tied around the top, with a small piece of teal 1/8" wide satin ribbon tied around the center and a plastic snowflake button glued over that. I adhered the main panel over all with dimensional squares.


The card just below was made using the ornament edges from the Christmas Edges stamp set, and a bauble stamp from the Pears and Baubles set.  The white card base background was stamped in dark green with the bauble edge stamp after cutting the card out with a large die. I cut a smaller green panel with a smaller die, then positioned a scalloped-edged die in the middle of the green card cutting it twice to create the desired effect.  A white oval was die cut and lifted off the green panel with dimensional dots.  The beautiful bauble was stamped and heat embossed in white on dark green cardstock, then touched up with a silver marker.  I hand cut this out then positioned it on the white oval with dimensionals.  A piece of 1/8" wide silver ribbon was tied around and rhinestones placed to enhance.  (the green is a dark forest green, not teal as this looks)  The final touch was a thin line of silver marker around the periphery.


The next card is a favorite of mine!  I love the color purple (for royalty) and this turned out so pretty combined with the plum and silver.  My camera shot didn't do it justice!  I made a card base from white cardstock, and covered the front completely with purple/lavender paper.  I heat embossed both the deer image and the trees, using purple and silver, respectively.  Purple and plum ink was daubed onto the top and bottom of the image, as well as on the horizon.  The trees were hand-cut, and positioned with dimensional dots, giving the view some depth.  Some iridescent silver ribbon 1/8" wide was glued around the outside edge of the image, and was very easy to do.  A super CAS card!  The stamp set I used is Reindeer Landscape.


I'm really fond of this next card, because I love Poinsettias, and Chocolate Baroque has really done a great job with these Zentangled ones.  The stark red and black on white is really striking!  I've used two stamp sets on this card - Christmas Edges, and Joyful Christmas.  The card base is white, with dry embossed dots across the top half of the front.  The Christmas Edges poinsettia stamp was used in black across the bottom, and I applied some tiny little shiny red stickers for the centers.  Red was daubed all around the outside edges of the card.  Red 3/8" grosgrain ribbon was glued across the center of the card, with red cording glued over that.  I stamped the larger flowers from the Joyful Christmas set two times, then cut them out and layered them for dimension.  Yellow rhinestones were glued to the centers.  I framed the sentiment with red cardstock after stamping in black, then glued on.  A very easy card to make!
  

This next card is an easel.  It's  4 1/2" wide by 11" total length, scored at the 2" and 4 1/2" marks.  It's folded in half, then the bottom 2" flap is folded up.  I cut a piece of coordinating card stock (red) to 4 1/2" wide and 4" top to bottom, then scored in half widthwise.  Unfolded, I die cut the top edge (inside) with a scalloped edge, the inside the bottom, used another scalloped edge die to make the design through which the white card base is seen.  I stamped the sentiment in black.  With this flap folded down, I glued a little plastic snowflake button in the center for the top front to catch on forming the "easel".  For the top front, I cut a piece of patterned coordinating paper to fit, leaving only 1 3/4" of the white card base showing at the bottom.  Using a scalloped die, I cut the same as on the front in the bottom white edge.  On the bottom right of the patterned paper, I stamped in black the tree grouping from the Winter Edges set.  I placed some red shiny sticker circles on the garlands on the trees.  At the top of the card in the score line, on the left about 1 " in from the left edge, I used a craft knife to cut  a 1/8" cut to thread the yarn through with a needle.  Before tying into a bow, I threaded a plastic tree onto the yarn to finalize the card.


This next card is another favorite of mine, and I love the icy feel of it.  I used an "all-over" punch to make the snowflakes in the white panel which was glued over the white card base, shaded with stamp paints in blue and lavender.  I stamped the three different snowflakes and embossed in silver, tinting the center or the edges with light blue ink and a dauber.  I cut them out by hand.  The snowflakes and trees are from the Reindeer Landscape set.  The trees were stamped on white with silver embossing, then shaded in with markers.  I stamped the sentiment "Winter Wonderland" from the set Bold Christmas Words on blue cardstock then embossed it in white.  I cut it out with a large banner die, and shaded the edges in blue stamp paint.  Before gluing everything down, except for the snowflakes which I adhered with dimensional dots, I tied a piece of 1" wide sheer blue ribbon around the bottom, and tied a bow, gluing a small blue snowflake brad in the center.


This last card is a wonderful image of a winter fairy.  She originally had a fall of roses in her hands, but since I was making her for Christmas, I changed it up with holly boughs.  She was so much fun to color!  Love those wings!  She comes from the new set, February Fairies.  For the top and bottom borders, I used the holly edge stamp from the newly released Christmas Edges. 


Again, I'd like to wish you all a very Merry Christmas, a Happy and Healthy New Year, and I've really enjoyed working with all the wonderful design team ladies!  Please continue to check back for their amazing work!  Here's to better health, healing and getting back into the swing of everything Chocolate!  Yum, yum! 

I'd like to thank Glenda and Adrian for being so generous, and their patience during my learning how to manage a blog entry, working with editing of photos, and computer glitches.  Lesley, I wish you continued healing, and pray that you will be back to "normal" very quickly!  Sue, thank you for drawing up some gorgeous "must-have" stamps!  You're amazing! 

Merry Christmas, with love!

Clare  


Wednesday, 20 November 2013

Frosty Fairy (posted by Judith)

Hi Folks, here is a Wintery sample for you using the Winter Fairy stamp collection. I stamped the main fairy onto a piece of white card, and then created a mask which I placed over the image. I stamped some mushrooms from the Autumn Fairy collection and then created masks for those as well. I made some paper masks for the hills, by tearing some scrap paper, and sponged various shades of green across the background. Fnally, I used some blue ink to create a sky, adding a circle mask to create a sun.

I added some yellow in the circle area for the sun, and embossed some trees using white embossing powder. I then removed the masks and coloured the stamped images using Graph it markers. To finish, I added some glitter glue along the edges of the hills and to highlight the mushrooms.

To create the background, I embossed some snowflakes from the Reindeer Landscape stamp set using white embossing powder, and then covered the background with blue ink. I used a sentiment from the Winter Fairies stamp set, and added some blue organza ribbon and some gems to finish.

Thanks for stopping by, Judith xx

Sunday, 17 November 2013

Winter Fairies for Christmas (by Shirley)

Hello everyone, I hope you are having a great weekend.

I have a couple of designs today featuring stamps from the new beautiful Winter Fairy Collection.  I used images from December Fairy for the card below.


The background was created with Calypso Teal, After Midnight and White Linen Dylusions spray inks and I sprinkled a little salt while wet.   I stencilled a little over the background using Circle Explosion by TCW.   I stamped the angel with Seedless Preserves Distress Ink, embossed with clear, cut it out, matted and coloured with Dylusions inks. 

Next is a beautiful fairy from February Fairy.


I created the background with Festive Berries Distress Ink using an Acrylic Block.   I stamped the trees from Reindeer Landscape with Festive Berries Distress Ink.    I embossed the holly edge from Christmas Edges and Believe from Reindeer Landscape with gold.  The fairy is also embossed with gold, coloured with Tombow markers, cut out and attached.  I added Diamond Stickles to her wings and dress.


I hope you can come back often to see what my talented teammates are creating.

Thanks for visiting and have a great day!
Shirley

Monday, 28 October 2013

Blue Christmas (by Shirley)

Hello everyone, I hope you had a great weekend.

I have two 'Blue' Christmas cards today featuring new stamps along with an older favourite:).   I used the new Reindeer Landscape set for the card below.


I used a favourite Dylusion ink combo (Calypso Teal, After Midnight & White Linen) on the background.  I stamped the trees from Reindeer Landscape with Deep Purple Archival Ink and added lots of glitter.    Believe also from Reindeer Landscape, was stamped with black Versafine Ink.   I used Memory Boxes Dies - Deer Trio & Snowflake Corner (they cut like a charm!) with black cardstock.    The Deer Trio is great as the bottom doesn't cut so you can cut to whatever shape you need for your design.    I added lots of glitter to the trees and snowflakes.


I used the new Fancy Flourishes clear set along with Christmas Flourish  and Bold Christmas Words for the card below.


The above background was created with the same three Dylusion Ink Sprays.    I spritzed a little water to blend, blotted with a paper towel roll and added a little sea salt before it was dry to create 'stars' in the ink.  When dry, I used TCW stencil - Star Fall with Picked Raspberry & Peacock Feathers Distress Inks and white Acrylic Paint.

I stamped the Flourish from the new Fancy Flourishes set with Salty Ocean Distress Ink around the border of the background.    The sentiment from Bold Christmas Words and the Christmas Tree from Christmas Flourish were stamped with Black ink.   I added stickles to the tree. 

Thanks for your visit and have a great day!
Shirley

Friday, 25 October 2013

CAS Christmas Trees (by Shirley)

Hello everyone, I hope you are doing well.

I have a couple of CAS designs using trees from the fabulous new Reindeer Landscape set and a sentiment from Warm Christmas Greetings.   Both of these cards are 'quick makes'.


I embossed the trees and sentiment on the above card with gold, coloured the snow and added stickles on the ornaments.   I matted as shown and it's done! 


For this 2nd card above, I embossed the trees and sentiment with silver holograph embossing powder and added stickles to the 'snow' and ornaments. 

Thanks for your visit and have a great day,
Shirley

Saturday, 19 October 2013

Pink Christmas Trees (posted by Claire)

Good morning, Claire here with a card featuring the funky trees and snowflakes from Reindeer Landscape


I love pink and white for Christmas cards so I set to with an assortment of pink dye inkpads and a water mister and swooshed them around on my ink blending mat to create the background. Next I stamped the trees and the snowflakes with versamark and embossed with whit embossing powder. I added some colour to the trees with Sakura Glaze pens.

The sentiment is from Bold Christmas Words, again embossed with white embossing powder on pink cardstock and die cut with spellbinders dies. I added some little pearls to the snowflakes and a little white bow to the bauble sentiment. 

Thanks for visiting today
Claire xx

Friday, 11 October 2013

Reindeer Landscape (by Shirley)

Hello everyone, I hope you are doing well.

I have a card today featuring stamps from the beautiful new Reindeer Landscape set.

I sprayed Midnight, Teal & Linen Dylusions Inks to created the background.  I over stamped with a snowflake from Reindeer Landscape with Moonlight Brilliance & Peacock Feather Distress Inks.  It's a ltitle difficult to see them in the photo.     I stamped the Reindeer scene on separate smooth water colour paper with black Stazon Ink and coloured with my Tombow markers.   For the sky I added lots of water to create the water marks for clouds.   I also added lots of glitter in the snow, but again it's hard to see in the photo.   I matted it over the background which I edged with a silver leaf pen.

Thanks for stopping by and have a great day !
Shirley 

Monday, 7 October 2013

Reindeer Landscape (posted by Claire)

Good morning, Claire here with a quick and easy card made using stamps from the beautiful new stamps Reindeer Landscape , distress inks and distress markers.

I began by stamping the focal image with Timber Brown Stazon ink, next I stamped the trees to either side of the image. I extended the hills with a dark brown Graph'It Marker and added some depth and shadow with distress markers in Tumbled Glass and Pumice Stone. I added some platinum stickles to the baubles on the tree and once that was dry I used distress inks in Tumbled Glass, Broken Chine and Walnut stain around the edge. I matted the image on white card, then dark brown card and popped it on an 8x8 card blank

Thanks for visiting today, I hope you're enjoying all the gorgeous new stamps
Claire xx

Sunday, 6 October 2013

Snowflake edges (posted by Judith)

Hi Folks, I have a couple of samples to show you today using the Winter Edges stamp set.These stamps are so versatile and can be mixed and matched to make all sorts of cards.

My first card uses the lovely focal stamp from the Reindeer Landscape stamp set, which I have coloured with Splash inks. I have then embossed a few snowflakes over the top, and added some glitter glue to the shaded areas to suggest some fallen snow on the ground.

I have created a long background panel by using one of the snowflake edge stamps, and embossing the image using white embossing powder. I filled the space at the top of the card by turning it around, and just used the top of the stamp again, it fit into the gaps perfectly. I then added several colours of blue Distress Ink to the card, and the white embossing powder acted as a resist, showing through the ink. Once I had assembled my card, I stamped the word 'Believe' in the top corner.


My second card uses the house edge stamp and another of the snowflake edge stampes to create a scene. I stamped these directly onto the front of a square card and filled in the gap between with single snowflake stamps from the same set, using white embossing powder again. I coloured the card using various blue Distress Inks, creating a graduated look. Once I had finished, I spritzed the card with water, to create a mottled effect to add to the snowy feel. I cut a heart shape from the centre of the front of the card, and also from a piece of scrap paper. With the die still in place, and adding the paper mask to the front of the card to protect the card front, I sponged some colour onto the inside of the card through the heart shape. I added a sentiment from the Christmas Sentiments Multibuy stamp set.


I hope that I have given you a couple of ideas for these great stamps and to tackle those Christmas cards. I still have a lot to make! Thanks for stopping by, Judith xx