Hello everyone, Jodie is back with another project for your inspiration, using Brushos to create a bright, bold background.
Jodie writes:
Good morning everyone, this is my second project for Chocolate Baroque. This time I wanted to try Brusho Crystal Colours with Stamping. The results came out better even than I expected.
Supplies:
Stamps- Loving Sentiments, Exquisite Edges
Colour- Brusho Crystal Colour (Set of 24, Yellow & Brilliant Red)
Inks- Versafine Onyx Black inkpad, Versamark
White embossing powder
Paper-A4 white cardstock, watercolour paper, red cardstock
Water spritzer bottles- pack of 2
Double sided foam tape
Heat Tool
Sequins
Die cut
Cut the watercolour paper to 4" x 5 1/4" (10.16cm x 13.34cm)
Using Versamark, ink up the stamp from Exquisite Edges and stamp onto watercolour paper.
Sprinkle white embossing powder, tap off excess and heat set.
Repeat above two steps on other side of watercolour paper.
If using your Brusho colours for the first time, take a thumb tack and pierce a hole in the top. I cannot stress enough that a little goes a long way.
Sprinkle a tiny bit of both Yellow & Brilliant Red onto the watercolour paper.
Next spritz the paper using the water spritzer bottle and watch the crystals explode with colour.
At this point, you can either add more crystals to deepen the colour, or add more water to get more blending, slightly diluting the colour's intensity.
Where you've embossed, this will act as a resist, really popping out the stamp's design.
Once happy with the result, simply dry the paper using your heat tool.
Next, cut the red cardstock to 5 1/2" x 8 1/2" (13.97cm x 21.59cm) and fold in half.
Layer your background onto your card base.
Stamp the saying onto the white cardstock with Versafine Onyx Black ink, and cut out the saying using a die cut.
Attach the saying to the front using foam tape, then adhere the sequins for a bit of added sparkle!
Don't forget to swing by my blog, where I have a few more samples of Brusho Crystals using stencils and embossing folders!
Jodie will be back next week with another dose of inspiration. Thanks Jodie!
Showing posts with label Exquisite Edges. Show all posts
Friday, 15 March 2019
Monday, 18 February 2019
A Walk in the Garden (by Carole)
Hello everyone, our Guest Design Team member Carole is back today, sharing a delightful card which uses a background that she found in her stash. We often make extra backgrounds and 'file' them away for later, why not have a rummage through your left overs, and use Carole's project as inspiration for a project?
Carole writes:
Hello everyone.
Time for my next post. Where does the time go?
When I was tidying my craft stuff, I use this term loosely, I found a beautiful background piece that I had made with my Brushos.
I have teamed it up with an image from one of my other favourite sets, the Mackintosh Beauty.
I have used her in one of my previous Guest Design Team posts, in fact exactly a year ago, but because you can snip away various parts of the design, she can look different each time you use her. I like this versatility in a stamp.
Products used:
Stamps: Exquisite Edges, Mackintosh Beauty, tiny butterflies from Essence of Nature, words from Loving Sentiments.
Brushos, Versamark, clear embossing powder, an Aloe Vera coloured inkpad, Majestic Blue Versafine, black permanent inkpad, parchment paper.
I stamped the background with Versamark and clear embossed it.
I used a paintbrush to wet the inside of all of the flower shapes and then lightly sprinkled a blue Brusho over. The water tends to be contained within the embossed areas so the colour doesn't spread too far and the splatters spread into the sky area.
I left this to dry and then coloured the lower section with the Aloe Vera inkpad.
The lady and the tiny butterflies were stamped with the blue Versafine and clear embossed. Her dress was coloured with the same colours as the background.
The words were stamped with the permanent inkpad onto parchment.
It was a little time consuming to cut the butterflies out but I thought they were cute.
Thank you for visiting today and I hope you enjoyed my card.
It is always a pleasure creating projects with such beautiful stamps as these.
Bye for now and happy crafting,
Carole.
Carole writes:
Hello everyone.
Time for my next post. Where does the time go?
When I was tidying my craft stuff, I use this term loosely, I found a beautiful background piece that I had made with my Brushos.
I have teamed it up with an image from one of my other favourite sets, the Mackintosh Beauty.
I have used her in one of my previous Guest Design Team posts, in fact exactly a year ago, but because you can snip away various parts of the design, she can look different each time you use her. I like this versatility in a stamp.
Products used:
Stamps: Exquisite Edges, Mackintosh Beauty, tiny butterflies from Essence of Nature, words from Loving Sentiments.
Brushos, Versamark, clear embossing powder, an Aloe Vera coloured inkpad, Majestic Blue Versafine, black permanent inkpad, parchment paper.
I stamped the background with Versamark and clear embossed it.
I used a paintbrush to wet the inside of all of the flower shapes and then lightly sprinkled a blue Brusho over. The water tends to be contained within the embossed areas so the colour doesn't spread too far and the splatters spread into the sky area.
I left this to dry and then coloured the lower section with the Aloe Vera inkpad.
The lady and the tiny butterflies were stamped with the blue Versafine and clear embossed. Her dress was coloured with the same colours as the background.
The words were stamped with the permanent inkpad onto parchment.
It was a little time consuming to cut the butterflies out but I thought they were cute.
Thank you for visiting today and I hope you enjoyed my card.
It is always a pleasure creating projects with such beautiful stamps as these.
Bye for now and happy crafting,
Carole.
Wednesday, 21 February 2018
Beautiful Ladies (by Carole)
Hello everyone, we are joined today by Guest Design Team member Carole Cann for the second of her posts this month. Carole is sharing two delightful projects featuring two very feminine designs to inspire you. Here is what Carole has to say:
Good morning everyone.
This is my second project for the Guest Design Team slot and I have used one of my favourite stamp sets, Mackintosh Beauty. I really like the Mackintosh style and also Art Nouveau.
Products used: Mackintosh Beauty stamp set
Baroque Orchid- background
Versafine inkpads- Onyx Black, Satin Red
Versamark inkpad
Grey/blue, pink chalk inkpads
Embossing powder- clear, white
Brushos
Die cut
Light silver grey and red card
Clear mica pen
The background is repeat stamped onto an 18cms x 13 cms (7 1/2 x 5 1/2 inch) piece of white card, with the Baroque Orchid image and red ink.
I swiped over the background with a grey/blue inkpad.
When dry, I went over the whole background with a Versamark inkpad and clear embossed the whole piece. I then die cut the centre.
The die could be positioned further to the left to hide the join too, and then there would be more room on the right hand side for a message.
The large flowers were embossed with white embossing powder, and the small corners stamped with red Versafine.
Both of these elements were coloured with Brushos to give the lovely vibrant colours.
The lady is stamped with Onyx Black Versafine and coloured with the pink inkpad.
The message was stamped with red ink onto grey card.
The elements were layered onto red and grey card.
Judith also asked if I would post my next project too, showing a different lady who is equally lovely.
Stamps used: Summer Fayre, Exquisite Edges, Patchwork Butterfly
Wooden 15cm heart
Versafine Onyx Black ink
Watercolour pencils
Clear mica pen
Blue/grey chalk inkpad
Archival black inkpad
Black card or felt
Small silver bead trim
Permanent inkpad suitable for drying on metal
Silver metal
Border punch
Square wooden base 25.5cms x 25.5 cms (10 1/4 x 10 1/4 inch), painted black
Alcohol ink or markers
Background:
I stamped the border frame first with Versafine and cut it down to a square 24cms x 24cms, (9 1/2 x 9 1/2 inch).
The flowers were then coloured and a damp brush used to pull the colour out.
The corners were cut from a strip which was punched with a border punch.
This was then mounted onto the base board.
Heart:
I stamped the main image onto the heart with an archival type black inkpad, you can use any black inkpad that will not bleed into the wood.
Make sure this is dry before colouring with watercolour pencils. Pull the colour out with the mica pen, but do not put too much moisture on the heart or it will bleed.
Ink around the edge of the heart with the blue/grey chalk inkpad and stamp tiny butterflies with the same colour ink onto the background.
Mount the heart onto a piece of black card or felt and cut around the edge, leaving a thin border.
The bead string was stuck onto the border and around the edge of the heart with a good quality, clear drying glue.
Butterfly Embellishment:
My butterfly was made with silver metal sheet, but it could be made with a piece of card.
I stamped the metal with a permanent inkpad and when it was dry it was embossed and cut out.
A little colour was added with alcohol ink.
Everything was then assembled.
I hope that you have enjoyed my projects. I will be back next week with my final contribution for this month.
Thanks for your visit, and happy crafting.
Carole.
Good morning everyone.
This is my second project for the Guest Design Team slot and I have used one of my favourite stamp sets, Mackintosh Beauty. I really like the Mackintosh style and also Art Nouveau.
Products used: Mackintosh Beauty stamp set
Baroque Orchid- background
Versafine inkpads- Onyx Black, Satin Red
Versamark inkpad
Grey/blue, pink chalk inkpads
Embossing powder- clear, white
Brushos
Die cut
Light silver grey and red card
Clear mica pen
The background is repeat stamped onto an 18cms x 13 cms (7 1/2 x 5 1/2 inch) piece of white card, with the Baroque Orchid image and red ink.
I swiped over the background with a grey/blue inkpad.
When dry, I went over the whole background with a Versamark inkpad and clear embossed the whole piece. I then die cut the centre.
The die could be positioned further to the left to hide the join too, and then there would be more room on the right hand side for a message.
The large flowers were embossed with white embossing powder, and the small corners stamped with red Versafine.
Both of these elements were coloured with Brushos to give the lovely vibrant colours.
The lady is stamped with Onyx Black Versafine and coloured with the pink inkpad.
The message was stamped with red ink onto grey card.
The elements were layered onto red and grey card.
Judith also asked if I would post my next project too, showing a different lady who is equally lovely.
Stamps used: Summer Fayre, Exquisite Edges, Patchwork Butterfly
Wooden 15cm heart
Versafine Onyx Black ink
Watercolour pencils
Clear mica pen
Blue/grey chalk inkpad
Archival black inkpad
Black card or felt
Small silver bead trim
Permanent inkpad suitable for drying on metal
Silver metal
Border punch
Square wooden base 25.5cms x 25.5 cms (10 1/4 x 10 1/4 inch), painted black
Alcohol ink or markers
Background:
I stamped the border frame first with Versafine and cut it down to a square 24cms x 24cms, (9 1/2 x 9 1/2 inch).
The flowers were then coloured and a damp brush used to pull the colour out.
The corners were cut from a strip which was punched with a border punch.
This was then mounted onto the base board.
Heart:
I stamped the main image onto the heart with an archival type black inkpad, you can use any black inkpad that will not bleed into the wood.
Make sure this is dry before colouring with watercolour pencils. Pull the colour out with the mica pen, but do not put too much moisture on the heart or it will bleed.
Ink around the edge of the heart with the blue/grey chalk inkpad and stamp tiny butterflies with the same colour ink onto the background.
Mount the heart onto a piece of black card or felt and cut around the edge, leaving a thin border.
The bead string was stuck onto the border and around the edge of the heart with a good quality, clear drying glue.
Butterfly Embellishment:
My butterfly was made with silver metal sheet, but it could be made with a piece of card.
I stamped the metal with a permanent inkpad and when it was dry it was embossed and cut out.
A little colour was added with alcohol ink.
Everything was then assembled.
I hope that you have enjoyed my projects. I will be back next week with my final contribution for this month.
Thanks for your visit, and happy crafting.
Carole.
Thursday, 3 December 2015
2 or 3 little things
Hello
It is unsual for French people to send cards for Christmas. The tradition is for the new year. So these cards are examples of what I realized for 2016. "Meilleurs vœux" is "All my best wishes".
Ce n'est pas habituel pour les français d'envoyer des cartes pour Noël. Traditionnellement c'est réservé à la Nouvelle Année. Voici quelques exemples de celles que j'ai faites pour 2016.
It is unsual for French people to send cards for Christmas. The tradition is for the new year. So these cards are examples of what I realized for 2016. "Meilleurs vœux" is "All my best wishes".
Ce n'est pas habituel pour les français d'envoyer des cartes pour Noël. Traditionnellement c'est réservé à la Nouvelle Année. Voici quelques exemples de celles que j'ai faites pour 2016.
This one is made on a glossy paper. I apply 2 colors, yellow and red, on paper and pull the colors to obtain the effects. Then I apply the stamp.
Celle-ci a été réalisée sur du papier glossy. J'applique 2 couleurs, jaune et rouge, directement sur le papier et je tire pour obtenir l'effet souhaité. Puis je tamponne.
This one is made on a piece of paper painted with acrylic. I paint the branches and the light with Zig.
Celle-ci a été faite sur un morceau de papier peint à l'acrylique. Les branches et la lumière sont peintes au feutre Zig.
And the last one is made with a piece of Canson paper painted with acrylic.
Le dernière est faite sur un morceau de Canson peint à l'acrylic.
I hope you like. Thanks for your comments which give me a great pleasure. Kind regards.
J'espère que vous aimez. Merci pour vos commentaires qui font toujours plaisir. A très bientôt.
Dominike
Saturday, 31 October 2015
It's all about exquisity.........(by Miranda)
Hello crafty people,
Today I have a lovely combination to show you made with the Exquisite edges and one of the Fabulous Flapper ladies. I think they are a good match......
I had this background with the deco flowers for quiet a while . The flowers come from the Nouveau lovebirds. There are so many sheets in the CB collection that will combine perfectly with these edges, all elegant and stylish!
And now onto my card.......
The background was made using Distress inks onto watercolor paper. Some shading with color pencils and adding some white highlights. I have embossed the upper edge using Wow embossing powder Ruby Romance and the lower edge was done using one of the new colors, Atlantic seaspray, a turquoise with gold sparkles.
Than I stamped the lady....I used a few Memento colors to ink her up and dabbed the ink on the lower part of her dress to let it fade. Than I extended some lines with color pencils.
Hope to have inspired you, I had fun doing this one.......
Thanks for visiting and always like to read your comments,
Have a lovely weekend,
Labels:
Exquisite Edges,
Fabulous Flappers,
Miranda,
Nouveau lovebirds
Friday, 30 October 2015
Exquisite Edges meet Owl Edges (posted by Claire)
Good morning, Claire here with a couple of cards made using this months new stamps.
For my first card, I've used the beautiful 'Exquisite Edges' and combined it with an old favourite from Elegant Spring Flowers to create a Spring themed card.
I began by making a distress ink background, splodging Peeled Paint, Shabby Shutters,Squeezed Lemonade and a little Scattered Straw distress inks onto my blending mat, spritzing with water and mopping up the in with my card, dabbing up any excess ink and then splashing with water. I stamped the edge stamp with Memento Bamboo Leaves ink and used part of the same stamp to create the corner motifs too.
The primula image was stamped with Memento London Fog ink,coloured with Graph'it markers and inked around the edges with distress ink left on my craft mat. I've added ribbon and pearls to finish off.
My second card today combines both of the new 'edge stamps to create a kind of stepper card. I didn't do any measuring at all to make this card, I just used the stamps as a guide to where to fold my base card. I began by cutting a sheet of A4 card down to the width of the stamps and stamped the owls and branches across the top, colouring them with coloured pencils . I stamped the bullrushes and the pretty floral edge with Memento ink, coloured with pencils and cut them out, leaving a little border around the images.
Next I used my scoring board to fold the card, using the stamped images as a guide, you can see better in this photo.
Thanks so much for visiting today
Claire xx
Monday, 26 October 2015
Exquisite Edges - Card by Florence
Hi everyone
Today I would like to share a card made using the new Exquisite Edges.
All of the stamps in the Edges Range can be seen here.
To make this card
Take a mask and Distress Ink and create a pattern on a piece of white coated card stock.
Stamp the Floral Edge and the Sentiment.
Make up the card as seen.
If you have missed any of the recent posts, do scroll down and check out the fabulous projects made by the team.
Thank you for looking.
Florence x
Florence x
Saturday, 24 October 2015
Framed Exquisitly (by Julie)
Hello and thanks for swinging by. I am so excited to show my creations made with this months Exquisite stamp sets, so I hope you like them.....
My first card is made using the Exquisite Edges and Fresh Blooms stamp sets and is basically two sets of frames setting off the lovely flower from the Fresh Blooms in the centre.
So that the edge stamps do not over stamp each other I created a mitred corner by using copier paper to mask off half of the corner at a 45 degree angle. To make this easier I cut a square of copier paper approx. 10 cm x 10 cm and then cut it in half on the diagonal. I then used the two pieces to mask each corner while I stamped each edge of the card. I repeated this process for the centre panel before stamping and fussy cutting the central flower.
The flower was coloured with Polychromos pencils, the centre frame was stamped using Cornflower Blue Archival Ink and the outside edge frame was stamped in grey Versafine with a few added white highlights. I finished off by edging the card with Worn Lipstick Distress ink and Cornflower Blue Archival Ink.
I decided to use the cute Owl Edges for my second project and started by inking up the floral edge with Sepia Versafine and stamping each edge of the base card. I then covered the base card with Shabby Shutters and Worn Lipstick Distress inks and highlighted the bulrushes with a white highlighter pen. I then die cut a 12 cm and 7 cm circles for the centre panels and stamped them with the single flower. The smaller circle was coloured with the same Distress Ink as before but I added Tea Dye to darken it slightly, before stamping the twig and adding the stamped owl that I cut from separate card.
The larger circle was coloured with Polychormos pencils along with Shabby Shutters and Worn Lipstick Distress ink over the top.
To tie in the teal colour from the owl I added dots of Evergreen Bough Distress Paint to the outer edges of the larger circle and dabbed the same paint around each corner of the base card.
Dabs of Crystal Stickles were added around the card for a final touch of bling.
Thanks so much for stopping by and hope to see you again soon.
Julie x
Tuesday, 20 October 2015
Exquisite Celebrations (by Asha)
Good morning, fellow Chocoholics. It's my turn to show you the October release stamps in action. My projects today feature stamps from the Exquisite Edges A5 sheet.
First up is a Christmas card in silver and green. I inked the edges of the card with Cracked Pistachio Distress Ink and stamped a border stamp from Exquisite Edges on opposite sides of the card. The focal image is the 3 bells from A Child Is Born. I added some glitter and bling to embellish the card-
My second card is an explosion of colour. This time I've gone for bold and sumptuous colours by heat embossing a stamp from Exquisite Edges in gold. Then I blended several Distress Inks to create a rich and vibrant background. The peacock is from the Indian Textiles stamp set, coloured with Faber Castell Polychromos.
Thank you for taking a peek. The Design Team has loads more projects lined up for you. Don't forget to drop by again ... soon. As usual, more pictures and details of supplies used to make these projects are available over at my blog.
Have a beautiful day!
First up is a Christmas card in silver and green. I inked the edges of the card with Cracked Pistachio Distress Ink and stamped a border stamp from Exquisite Edges on opposite sides of the card. The focal image is the 3 bells from A Child Is Born. I added some glitter and bling to embellish the card-
My second card is an explosion of colour. This time I've gone for bold and sumptuous colours by heat embossing a stamp from Exquisite Edges in gold. Then I blended several Distress Inks to create a rich and vibrant background. The peacock is from the Indian Textiles stamp set, coloured with Faber Castell Polychromos.
Thank you for taking a peek. The Design Team has loads more projects lined up for you. Don't forget to drop by again ... soon. As usual, more pictures and details of supplies used to make these projects are available over at my blog.
Have a beautiful day!
Beijinhos,
Asha
Sunday, 18 October 2015
Butterfly Stepper Card using Exquisite and Owl Edges (by Anne)
The new Edge stamp sets are gorgeous – they are so versatile and can be used
in so many different projects and mixed & matched with other stamps in your
collection. I have combined mine with some patterned paper and stamped
butterflies. I hope that you like it.
Materials:
- Exquisite Edges, Owl Edges, Mackintosh Sentiments and Just Butterflies stamp sets
- A5 stepper card blank with main panel approx. 6 X 6 inches
- 6 x6 decorative butterfly paper from Crafty Individuals Background Papers ‘Book 3’ Springtime
- Multicoloured dye based inkpad (blue, purple, green)
- Alcohol ink pens (blue, pink, yellow, green, purple), fine tipped marker (purple), Polychromos coloured pencils (pinks, turquoise, green)
- Clear glitter glue (crystal), Glossy Accents
- Decorative die cuts (from white card) and adhesive
How to make it:
- Stamp the border along the top and bottom edges of the decorative paper.
- Stamp the sentiment and small floral motif. Extend the stems by drawing with fine liner pen. Colour the floral motifs with pencil.
- Trim the paper slightly to fit onto the card base and give a fine border of the white card showing. Enhance the edges with green ink and glue on the die cuts.
- Stamp the steps masking the card where needed using a sheet of scrap paper. Glue on the card front.
- Stamp the butterflies and colour with alcohol ink pens. Glue to the card.
- Add Glossy Accents to the butterfly bodies. Finish by adding sparkle with glitter glue.
Saturday, 17 October 2015
Exquisite edges (by Miranda)
Hello crafty people,
Today I have another sample to show you. I've been playing with fluid inks(like Ecoline), a Joggles stencil (Secret garden) and the beautiful Exquisite edges.
I wanted to keep it simple and I have just stamped the edges using Versafine Imperial purple and coloured afterwards with some color pencils. And as finishing touch a lot of white accents with an acrylic marker.
I have added the sentiment from the Artistic Expressions.
And here is the card......
So if you don't have the time to create an inky background you can also use some beautiful pattern paper and use the same stamping and coloring technique. Or one of Lesley's lovely download papers?
Hope to see your creations too with these beautiful stamps!
Labels:
Artistic Affirmations,
Exquisite Edges,
Miranda
Friday, 16 October 2015
A couple of cards (posted by Claire)
Good morning, Claire here with a couple of cards made with some of this month's new releases. As always Lesley has released some beautiful stamps and this first card is made using stamps from both Gingerbread Christmas and Exquisite Edges.
I love these ornate edge stamps and I thought this one had a look of mistletoe so I decided to create a Christmas card. I stamped the edge four times on kraft card with Versamark and embossed with white embossing powder. I cut them out and layered them up with 3d foam pads to create a frame. The focal image is from Gingerbread Christmas, again stamped with versamark on kraft card and embossed with white EP. I stamped the sentiment with Festive Berries distress ink and used the same ink with a waterbrush to add a little colour to the rest of the image. I stamped snowflakes from the same stamp set into the corners and again embossed them with white. Once my frame was in position, I added little red pearls and created faux stitching with a white pen. I made some little candy cane 'kisses' by stamping the candy canes onto kraft card with red ink and using a white pen to colour the open areas.
My second card is made using stamps from Owl Edges and Walnut Stain distress ink.
I began by very lightly applying distress ink to the top 1/3 of the card with a shaving brush, then I masked the moon and hills using copier paper masks and intensified the colour. I inked in a couple more hills, making each slightly lighter.
I stamped the bullrushes stamp across the foreground using both first and second generation stamping. Next I stamped the branches and the owl and used a waterbrush to colour the owl. I inked around the edges and added some string and a little brass owl charm.
These are such lovely stamps to use, I hope you're enjoying all the inspiration from my teamies this month, keep popping back as they've got lots more beautiful projects lined up too.
Claire xx
Sunday, 11 October 2015
Exquisite, Elegant Edges (by Debbie)
Good morning.
I was lucky to see the Owl and Exquisite Edges in the early stages of production and I must say Lesley has done a marvellous job of putting them together. They are going to feature regularly in my cards.
For both cards I chose to stamp the Exquisite Edges with Versafine and embossed with black powder as I wanted them to stand out from the Brusho backgrounds. I had made a few A4 backgrounds so had ample for stamping the Sunny Sunflowers and Waterlily Mandala. For the first card I added a little colour with pens to edge.
There are many more projects from the girls to come with lots of inspiration. Many thanks for visiting and don't forget to leave a comment for the chance to win a £15.00 gift voucher from Lesley.
Debbie
Saturday, 10 October 2015
Exquisite Cards (by Julie)
Hello Crafters, hope your weekend is going well. Today is my turn to show you what I have been making with the fantastic new Exquisite stamps that have just been released by Chocolate Baroque.
My first card has been created using the new Owl Edges, along with Artistic Expressions for the sentiment.
I cut a mask for the moon using a circle die and created the background with Spiced Marmalade, Mustard Seed and Hickory Smoke Distress inks. I blended them together with Cut n Dry foam and a few touches from a water brush. The sentiment and the bulrushes were stamped with Onyx Black Versafine and the card was finished off by adding white highlights to all of the stamped images.
My second card comes courtesy of the lovely Exquisite Edges set. This set is so versatile and doesn't have to be used just for edges.
I started by stamping the decorative edges with Grey Versafine and then covered the entire background with Squeezed Lemonade Distress ink.
I inked up the Art Deco style, flower edge with Watering Can Archival ink and stamped it a few times onto plain white stamping card. Next take three different sized circle dies and select which parts of the flowers you want to cut and then put them through your die cut machine.
I have coloured the flowers with Polychromos pencils, glittered them with a Hologram Viva glitter pen and finished the card off by edging everything with Weathered Wood Distress ink.
Thanks so much for stopping by and hope to see you here again soon.
Julie x
Sunday, 4 October 2015
Ruby Wedding Card using the new Exquisite Edges Stamp Set (by Anne)
I love the new Exquisite Edges stamp set. It is so versatile
and useable on a multitude of projects.
How it was made:
I have used one of the lovely borders to create an Art Deco
style Ruby Wedding Card for my friend’s anniversary. They don’t do computers so
I am sure that they won’t mind my sharing.
Materials:
- Exquisite Edges stamp set
- A5 white card blank, pearlescent white card for stamping
- Versafine Inkpad (Onyx Black)
- Clear embossing powder
- Alcohol ink pens (black and red)
- Adhesive, sticky foam pads and 3D glue gel
- Dies for decorative mat and heart, and personalised sentiment printed from computer
- Stamped the border with black ink three times onto pearlescent card, and embossed with clear powder. Coloured the image with red alcohol pen.
- Cut out the various elements, enhanced the edges with black pen, layered and glued to the card front.
I printed a personalised sentiment from my computer but you
could stamp any message to suit your own project.
I hope that you like it my first project with the new edges
set, Anne xxx.
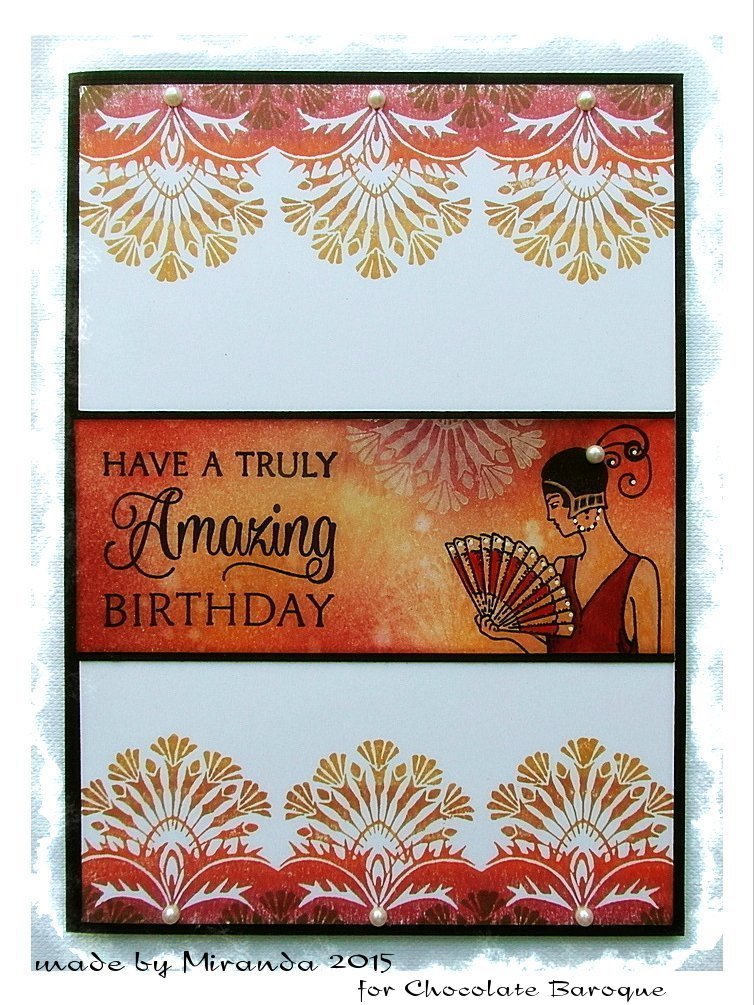
Saturday, 3 October 2015
Have a truly amazing Birthday......(by Miranda)
Hi there lovely people,
Today I will show you my first take on the new stamps. I have played with the new beautiful Exquisite edges. They combine so beautiful with all the Art Deco/Nouveau style stamps which Chocolate Baroque has in their collection.
I have combined them with the Fabulous Flappers and a sentiment from the Amazing Birthday wishes.
Well now onto my card.........
I have stamped the edges with several Memento colors; Peanut Brittle,Morocco, Potters Clay, Rhubarb stalk and Rich Cacao. The center piece was blended with matching Distress inks. I stamped a part of the edge with white ink. I stamped a part of one of the ladies of the fabulous flappers and coloured her with color pencil and some white acrylic marker accents.
I really love this style of stamps and I will be happy to play more with them, so next time more art deco style from me.
Thanks for watching and always enjoy to read your comments!
Labels:
Amazing Birthday,
Exquisite Edges,
Fabulous Flappers,
Miranda
Thursday, 24 September 2015
Stamping on the Edge (by Lesley)
Welcome to the launch of our October stamp sets, which this month sees two additions to our Edges series. Our previous edge sets have proved very popular, so here we have two new A5 sets which are bound to become a favourite in your crafty stash.
First we have the loveable Owl Edges
followed by the elaborate Exquisite Edges
Both these sets are available as individuals or as our normal money saving multi-buy.
The Design Team ladies are in full creative mood with these designs and I know you are in for some eye catching ideas next month. Here is a card made by Zoe which shows how you can combine the gorgeous edges with that sweet little owl.
Also released today are the last of this year's Christmas stamps, both of which are clear sets.
I just know that kids will love making cards with the Gingerbread family, whilst the baubles and flourishes would be fabulous for batch making.
Here is a card I have made using papers from A Weekend in Seville, a different to look to the traditional Christmas don't you think?
Once again Sue had designed some unusual and amazing stamps that are full of fun and versatility and will give you hours of pleasure.
Subscribe to:
Posts (Atom)