Pin It button on image hover
Showing posts with label Eccentric Edwardian. Show all posts

Sunday, 14 November 2021

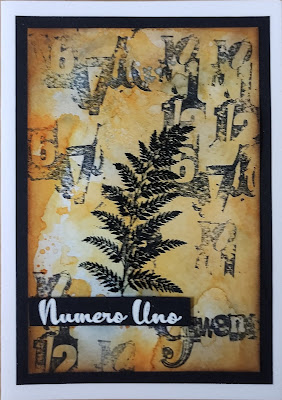
Numero Uno by Sandra

Hello, I'm sharing some more cards from the October show on The Craft Store.
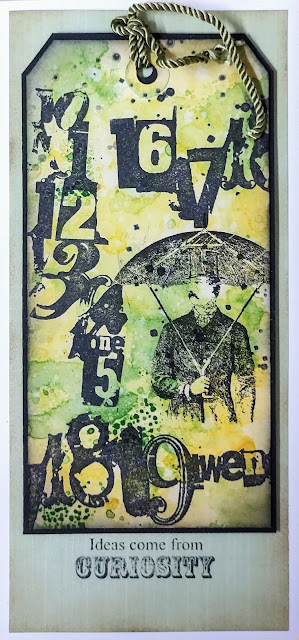
These cards use the Numerology stamp set, a really useful set for main images and backgrounds.

For my first card I made an inky background with Distress Inks and water. When it was dry I stamped over the background using the 2 larger number stamps with Archival Ink. I realised that I had picked up an old ink pad which was a bit dry, but I carried on and quite liked the distressed look! I stamped  and embossed the fern from Wild Meadow as a focal point and added the Numero Uno onto a piece of card to finish. I layered onto some black card and then onto a 7x5 card.


For my second card I made an inky background again and cut out a tag shape. I  stamped the numbers randomly over the background and then stamped some splatters. I added the man with his umbrella from Eccentric Edwardian stamp set.  I then layered the tag onto some black card and onto a DL card. I added a sentiment from  Punky Expressions.


Thanks for looking
Sandra x

http://isthatthetime.blogspot.com/
 

Wednesday, 13 May 2020

Four Fold Cards (by Carole)

Hello everyone, today sees the first of three posts this month from our Guest Design Team member Carole Cann. Carole has designed a series of beautiful folded cards for your inspiration. 

Carole writes:

Hello everyone.
It is my turn again to show some samples as a guest designer. I always look forward to this and hope you like my three, very different projects.
I have used stamps that were highlighted last year as it is very easy to put them away in your stash and forget about them.
I have started off with a lovely four fold design. I really like this folded card as you can get an interesting finished project.
I decided to do a men's card, using the Eccentric Edwardian set, Steampunk Travel and Punky Expressions. Very good standbys for a men's card.


Make a master sheet for the background paper. Mine was made by just pressing Distress Inkpads onto the card, I usually use two colours, in this case Pumice and Wild Honey.
Spritz the background with water and leave to dry. The inks will bleed slightly and blend with each other.
The elements were stamped with Versafine black and one of the other colours.
The gentleman was stamped onto the card, but the very top of his head was masked so that the hat would sit properly. The hat was on a separate piece of card and cut out.
Finally I used a piece of metal, stamped with Stazon and embossed it to create an embelishment on the front.
Below are two other cards that I have done using this design. One was shown on Hochanda many months ago, but I thought it was worth another viewing for those of you who may not have seen it. The other was a birthday card for a friend using blue as the background.


Love this colour combination.
See you next week with something different.
Thank you for visiting and happy crafting.
Carole

Over on my blog cchotchpotch.blogspot.com there is another sample that I made for my daughter, using Chocolate Baroque stamps and stamps from an Alice in Wonderland range from another company. The flowers went so well with the other stamps I thought to have them as soon as I saw them. I hope you agree.

Thursday, 7 November 2019

Beachside Memories and Bright and Grungy by Penny


Hello everyone, I hope you are all well and not too soggy lol!  Yes it's still raining here in the West country so I've brought you a couple of bright and cheerful cards using the beautiful stamps from the October shows. 


Beachside Memories.

For the first card I have used stamps from the Baroque Ephemera 1, Baroque Ephemera 2, Eccentric Edwardian, and Seashore Scenes sets, Distress Inks, and sepia Versafine ink.


I took a piece of copier paper and stamped various images randomly all over it using DIs.  I then spritzed the paper with water and scrunched it up to create a distressed vintage look.  When it was dry I blended ink around the edges and over the ridges in the paper to add to the effect.  I then attached the background paper to an ivory base card.


I took some smooth white stamping card and stamped the post card image and the ticket images a couple of times in Versafine ink and coloured them with DIs.  I stamped a seaside scene onto one of the post cards and coloured it.  I cut out all the images then scuffed, rolled and blended ink around the edges to distress them.  I then stamped a couple more images and treated them in the same way before arranging all of them on the front of the card.  When I was happy with the design I attached them to the card.


Bright and Grungy.

For this card I have used stamps from the Floral Grunge, Baroque Ephemera 1 and Baroque Ephemera 2 sets, Distress Inks, matt spray inks, sepia Versafine ink.


On a piece of smooth white card I stamped the Floral Grunge image in the center and masked it.  I then used two colours of spray inks and spritzed the card.  When the background was dry I stamped several ephemera images using sepia ink.  On a spare piece of card I stamped the floral image again then painted and cut out the flower.     


I attached the spare flower in 3D onto the panel then blended DI around the edges.  I added gold pen around the edges then matted the panel onto brown card.  I took a white base card and blended yellow ink around the edges then attached the focal panel.  I stamped a word onto white card, cut it out and added ink around the edges before attaching it to the card.


Thank you for popping in today, I hope you have enjoyed this post and that I have inspired your crafty mojo a little bit.

Keep well and stay warm till next time,


                                                xx  Penny  xx

Wednesday, 5 December 2018

Gothic ( By Marga)

Hello everyone, today it's my turn to show you something. 


Today I show you a Gothic card I made. I used Distress Ink for the background I used Fossilized Amber, Abandoned Coral and Twisted Citron.
I stamped all the images with Versafine Onyx Black and then I used a brush and bleach to make the white parts of the card. At last I stamped the clocks and cut them out and put them on the card.

I used the stamp sets: Gothic Fragments and Eccentric Edwardian

Hugs Marga

Thursday, 30 November 2017

cyclist (by Veronica)

A slightly more cheerful card than my last post, using the same stencil and die cut, but this time with a distress ink and brusho background. I sprinkled grey brusho powder over a square of card and spritzed with water before sponging hickory smoke distress ink through the stencil.
The larger cyclist from eccentric edwardian was stamped in black versafine and the smmaller one from curiosities in grey versafine. I added a corner die cut in black card and a sentiment from steampunk travel before inking round the edges with black versafine and adding to a white card blank

Wednesday, 29 November 2017

A couple of cards (posted by Claire)

Good morning, Claire here with a couple of cards that would fit the bill for male cards, something I always struggle with! The first card was made using stamps from Steampunk Travel.


I began by stamping the words and the two images with versamark on black card and embossed with white embossing powder. Next I used the soft white coal from the Ko-I-Noor White Coals set to create the clouds, just scribbling with the coals and then blending with my finger. I used one of the harder coals to add some whispy clouds and to add faux stitching around the edge. I also added a little colour to to images with the coals.

For this next card I stamped the focal image, from Eccentric Edwardian with black versafine ink, masked it and stamped the script background. I layered it up on red and then black card and added a little twine bow tie and some lace and ric-rac trim.


To make the background I took lots of stamps from the same set and just stamped and masked until I'd filled the card. Again I layered on red and black card. The sentiment is from Punky Expressions I inked up the stamp with bright red ink and then carefully inked with black ink, trying to miss out the word punky so that would be highlighted with red.

Thanks for visiting today
Claire xx

Tuesday, 28 November 2017

Cycling Steampunk Style (by Judith)

Hello everyone, I have a couple of cycling themed cards to share with you today, using the stamps featured on last month's Steampunk shows on Hochanda.

To create my first card, I stamped the penny farthing image from the Steampunkery stamp set, and then masked the image using masking tissue. I created a series of hills using Distress Ink, and added some trees from the Tall Trees stamp set, using dark green Versafine Ink. I added a bit of pencil shading to 'ground' the smaller trees. I used blue Distress Ink to create the sky, masking off a circle for the sun. I stamped the sentiment from the Punky Expressions stamp set, and added some birds from the Landscape Edges stamp set.

I removed the mask and coloured the penny farthing with pencils. Finally, I matted the background onto a large black card blank.


For my second card, I wanted to create a collaged feel, using lots of stamping to build up backgrounds. I started by using a patterned Crafty Individuals tag, and added some images from the Eccentric Edwardian stamp set in muted colours. I also added the gentleman on the bike as the focal image, using darker ink.

I made a larger background in toning colours on a piece of kraft card, picking the same images that I had used on the tag to create the background. I picked a grey card to mat the background, as it was a colour running through the tag. I added a cheery tan ribbon to the tag, and stamped a sentiment from the Punky Expressions stamp set onto a small piece of scrap card.

I hope that you have enjoyed my Steampunk inspiration this month, and that you will try some of the ideas for yourselves. Thanks for stopping by, Judith xx

Saturday, 25 November 2017

Old car ( By Marga)


For this card I used watercolour paper and Distress Ink.
I first stamped the sentiment background with Versamark Ink and embossed it with a gold embossing powder.
Then I made the background paper with Distress Ink.
The car was also embossed with gold embossing powder. And then I cut it out and put it on the card.

I used the stamp sheet Eccentric Edwardian .

Hugs Marga

Friday, 17 November 2017

edwardian (by Veronica)


Today I am sharing a couple of samples using the e
ccentric edwardian stamps.
The first is a rather grungy card.
Background used a cog stencil and a very elderly walnut stain ink spray that I was given ages ago and had never used, I added another lighter layer of spray after removing the stencil. The car was stamped in black versafine ink, then the man alsoin black versafine but clear embossed to make him stand out a bit more.
A few diecut cogs from dark brown card were added in the corners, then a mat of the same brown card before adding to a square white card blank


I  also recycled an empty instant coffee tin, these are so useful as a pen/brush holder.
This time the strip of white card cut to fit round the can with a lsight overlap was coloured with grey brusho powder, then randomly stmaped with the large crackle stamp using a grey ink pad. I used a die cut as a stencil and brushed more grey ink over it.
The man was stamped using black versafine ink and clear embossing powder before using the cyclist stamp and the small cyclist from the curiosities set to fill in the gaps.
I stuck the card to the can using redline tape stuck onto the can first along the edges with one vertical strip, then a final vertical strip onto the slightly overlapping edge of the card.

Wednesday, 15 November 2017

A Punky Baroque Chest (by Penny)

I hope you enjoyed last week's post from Penny with her fabulous steampunk airship card.  This week sees her continuing on the theme with a fabulous piece of home decor. Sit back and be inspired.


Hello everyone, Penny here with the second of my Guest Designer posts.  This is a little chest of drawers that I created for the recent CB Steampunk Shows, and as I LOVE Steampunk this was a joy to make!  


I used stamps from the Eccentric Edwardian, Steampunkery and Key to My Dreams sets; gilding waxes, black gesso, Aztec Paints, embossing powders, an embossing folder, paper clay and wooden embellishments from my stash.


I painted a small chest of drawers with black gesso and added gilding waxes to the edges of the drawer fronts and the handles.  I then embossed two sheets of black card in a folder and added gilding waxes to create a sheet metal effect.  I stamped and embossed some more black card for the drawer fronts, having cut each piece to fit first.  I then painted the panels and cut holes in the centers to put the handles through. I cut the sheet metal card into panels to fit the outside of the frame, leaving enough of a margin to fold over each side, making them look neat.  I added some waste from die cutting cogs as 'rivets', having gilded them first for a metallic effect.  


I created the embellishments for the top; some were stamped and embossed onto card, some were made with paper clay, and I painted a wooden frame from my stash.  I arranged the embellishments on the top of the chest and attached them with strong glue.


These little chests are great for keeping all sorts of bits and bobs in on a desk or side table, and they make great presents!  Thank you for taking the time to read my post, I'll be back next week with my third and last project.


Penny  xx  


Having seen this beautiful box in real life I know it would be so admired and would make a fantastic gift to treasure. 

Thank you once again Penny for your stunning creation and if you want to see more amazingprojects from one of our talented DT then please drop back again tomorrow.
 

Monday, 13 November 2017

Punky Expressions CAS Style (by Judith)

Hello everyone, I am back to share some more projects featured on last month's Steampunk shows on Hochanda. For these three projects, I wanted to focus on the new word plate, Punky Expressions, and the different ways that the stamps could be used.

I created a gelli plate background on a large white card blank, by brayering Distress Ink in shades of blue and brown across the round gelli plate. I used an image from the Steampunk Travel stamp set, stamping straight onto the plate, to take colour away, and not cleaning the stamp in between stamping, so it added colour in various areas as well. I pressed the plate onto the card to ensure that I printed the background exactly where I wanted it to go. I added a few more of the little airships onto the background, using Distress Ink.

I stamped the large gentleman from the Eccentric Edwardian stamp plate using black ink. I added the Eureka! sentiment around the edges, starting at the top and bottom, moving left and right, then simply filling in the gaps.

For my second card, I created another gelli plate background, using blue and green ink, and pressing a dotty tool onto the plate to create a textured pattern. I added some images from the Silhouette Grasses stamp set, using various coloured inks, a little butterfly from the Baroque Meadow stamp plate, and finally, combined two of the stamps from the Punky Expressions stamp set. These new words and phrases are so versatile, and will be very useful for lots of occasions.

Finally, a really quick card, using more of the grasses as before in a different colour option, straight onto a card blank. The butterflies as before, and a variation on the stamp sentiment. This was such a quick card to make using first and second generation stamping to build up depth to the flower field.

I hope that my cards have given you some ideas for these fabulous stamps. I will be back later in the month with a few more ideas to share with you. Thanks for stopping by,


Friday, 10 November 2017

Steampunk (By Marga)

Hello everyone, great to work with this lovely team. And I love to watch the shows on Hochanda every time. Here is a card I made for one of the shows.


For this card I used photo paper and Distress Ink. I also used a background that I stamped with Distress Ink and finally I stamped the images with black ink.

The background stamp is from the Dusky Damask sheet.
The other stamps are from the Eccentric Edwardian sheet.

Hugs Marga

Thursday, 9 November 2017

Steam Punk Eccentricities (by Julie)


Hi there, I hope you managed to catch one of Lesley's recent Steam Punk shows on Hochanda. If you did you may have seen these cards on the show. 
I have to confess to loving all things Steam Punk. I love the surreal feel Steam Punk gives as well as the stamps being very useful to make male cards, which lets face it we all tend to struggle with.


My first card is created with the Eccentric Edwardian. I love these stamps and would buy the set just for the very useful script stamps.
The background to my card is coloured with Antique Linen, Old Paper and Walnut Stain Distress inks and then over-stamped with the male images using Sepia Versafine. The large script design to the top left of the card was stamped and then embossed with a copper embossing powder and I inked up the smaller script stamp with Sepia Versafine to fill the gaps. The cyclist was stamped onto separate card and coloured with Distress inks as before. I cut around the wheel slightly and then placed my metal, circular die underneath the wheel to cut out the rest of the design before mounting onto the centre of the card with foam pads. The sentiment is from Punky Expressions.


My second project is a gift box and frame card. I have cut both the box and frame on my electric cutting machine, however templates for similar boxes and frames can be found in an internet search.
The gift box is coloured with Squeezed Lemonade Distress ink and then over-stamped with the Air Ship and Boat from Steampunkery. I darkened the edges with Hickory Smoke Distress ink and dry brushed white Gesso over the top to create the clouds. Once the image was dry I glued the box into place.
For the frame I coloured the background with Squeezed Lemonade Distress ink and then overs-stamped with images from Steampunk Travel. I then sponged on Hickory Smoke Distress ink and then dabbed the excess off with a wet wipe.
The central panel of the frame is coloured with Brusho inks and once dry I sponged on Hickory Smoke Distress ink. 
The winged clock is from Steampunkery as before. Here I pressed the stamp into white clay and cut out using a craft knife. I then baked it according to the instructions before colouring with alcohol inks and gold gilding wax. 
Once everything was dry I glued the frame into place and added wire and beads to the back of the clock before gluing into place with 3d glue gel.

Many thanks for looking and please call back soon to see daily inspiration from the Design Team.

Julie xx

Friday, 3 November 2017

script box and candle (by Veronica)


Apart from the obvious cards, I was a bit stumped for ideas how to use the eccentric edwardian set of stamps, and then a friend came to the rescue with a set of dies to create hexagonal boxes. My first idea didn't work as I had cut the pieces for a shallower box than I should have done, but then I realised that the initial from the larger script stamp would just fit on the side pieces..................


I stamped the image in black versafine and repeated the inital on all 6 sides, and stamped on the lid too, burt this time with as much of the script as possible. I also sponged round the edges with black soot distress ink before gluing onto the lid.


Once the box was assembled, it needed something to go in it, so I opted for a candle, which did have to go in on it's side as it was slightly too tall.

I stamped the script image onto white tissue paper using black versafine ink, tore it out and heat set it onto the candle.

I added a keyring, tag and card to complete the set


Wednesday, 1 November 2017

Pretty Steampunk (by Judith)

Hello everyone, I hope you caught Lesley's fabulous Steampunk shows last week on Hochanda, featuring an eclectic mixture of Steampunk images. I love working with this genre of stamps, because you can use the images in so many different ways; very grungy, adding lots of texture, or more feminine in style, altogether prettier, using brighter colours.

I have created a floral card, which could be for a friend's Birthday, or just to show that you care, using a sentiment from the brand new Punky Expressions stamp set which will be available on the website in the next few days.

I started to create my card by blending several colours of Distress Ink onto a piece of smooth Cartridge paper. I spritzed the background with water, to create a mottled effect, blotting the background here and there with a piece of tissue. I stamped the large script stamp from the Eccentric Edwardian stamp set over the background, using blue ink. On a spare piece of card, I stamped the small clock three times, and cut it out. I added a bit of yellow ink to age the images slightly.

I die cut some flowers from some Crafty Individuals paper, and scrunched them to give them a bit of texture and movement. To complete the flowers, I stamped three stems using an image from the Diamante Delights stamp set onto the background, and some leaves from the Bold Blooms stamp set onto some scrapbook paper, which I cut out. I added the clock faces to the centre of the paper flowers, and used some 3D foam behind the central flower.

You may have caught sight of one of my old samples on the show created using images from some of our Steampunk stamp sets, featuring the fabulous beetle from the Steampunkery stamp set as a focal point. I have again used paper flowers to create this design, but added cogs in the centre, dropping beads into the middle of each one, and stamping onto the leaves this time.

I will be back later in the month with more ideas to share with you, do keep checking in to see more fabulous ideas from my Design Team mates. Thanks for stopping by,

Saturday, 30 April 2016

An old rose (by Miranda)


Hello there,

Happy to be here again and show you my play with one of the older CB stamps called Rose Set.
 It's a very detailed rose but it is gorgeous I think...it took me some while but as I love to color it was not a punishment.......

I made the background again with a favorite technique I am using quit a lot these day, fluid inks.....like Ecoline and used also white to get that soft coloured finish. Some parts are coloured using Distress inks and some are coloured using pencils. It's tricky to use water based mediums over the top because the background stays reactive........

Randomly I stamped partial the small text fragment from Eccentric Edwardian sheet using Memento Toffee Crunch.

The next step was stamping several ornament stamps from the Fancy Flourishes clear stamp sheet. I have embossed them using clear mat embossing powder and blended afterwards with Distress inks to let them pop......

Than just some plain stamping with these ornaments and adding some crackle effects using the crackle fragment from the Echoes of Italy.
Well, enough text for now, onto the card......


Hope you did enjoyed it and hope to see you next time!
Thanks for your visit and I always like to read your comments, any questions....feel free to ask!


Saturday, 4 July 2015

A Little Bird Told Me and As Free As A Bird - Gift and Card By Florence

Hi everyone

I hope you are enjoying the weekend.

Happy 4th of July to our friends over in America.

Today I would like to share a gift and a card made using the new "A Little Bird Told Me" and "As Free As A Bird" rubber stamp sets.  The two new sets are absolutely gorgeous.  The multi-buy option can be seen here.

The birds are so beautiful in both sets and after using the two new sets it struck me that the bird cages make such a fabulous combination and compliment the birds so well.

I know you are going to love these sets.

I decorated the covers of a blank note book for my first project.


My next project is a little card which I made to accompany the note book.

Both projects have been made in the same way.

I used a little mdf bird cage on the book but on the card (below) I stamped and cut out the larger bird cage and used that as part of the embellishments.


The projects have been made as follows

Base coat the surface (the base book cover or thick card) with 2 coats of Gesso.
Apply 1 to 2 coats (depending on coverage) of greyish blue colored craft paint and leave to dry.
Apply a coat of Weathered Wood Crackling Medium and leave to dry.
Apply one coat of white craft paint and leave it to dry and crackle.
Use a light blue ink and stamp the bird cages.
Use a slightly darker blue ink and stamp the script.

Chocolate Baroque script stamps Eccentric Edwardian and Mini Scripts.

Tip:  If decorating a cover of a note book, place a piece of A4 copier paper between the inside cover and the pages.  This will stop any paint from straying onto the nice clean pages of your book.

The embellishments

Stamp the bird onto white card stock, color it and cut it out.
Stamp the bird cage onto white card stock, cut it out and add a little shading to the outside edges using a sponge and ink.
Cut out some flowers, add a little ink to color the petals and attach the buttons.
Attach the embellishments to your project using silicon or hot glue.

 I have used die cuts for this project but there are many flower stamps in the Chocolate Baroque range that would work equally as well ie., Sunny Sunflowers, Diamante Delights and Sketchy Doodle Landscape are just a few ideas.

Larger photos of these projects can be seen on my own craft blog here.


If you have any questions please use the comments box below.

Thank you for looking.
Happy Stamping

Florence x

Saturday, 20 June 2015

Rustic Fragments - Simple cards by Florence

Hi everyone

I hope you are enjoying the weekend.

Today I would like to share with you two simple cards made using the new Rustic Fragments Set.  

For my first card I have made a masculine card and I would like to dedicate this to all crafting Fathers and Grandfathers out there.  I hope you have a wonderful Fathers Day.


For the background stamping I stamped the image using brown Archival Ink but then added a little bit of embossing to give it a little bit more depth and to give it an abstract feel.  
I used an embossing pen for this and just applied the ink to the card in a brush stroke fashion.
I stamped the Eccentric Edwardian onto a separate piece of card stock, cut him out and attached him using foam pads.  I used a 350 gm board for this because I wanted him to be a chunky embellishment.

For my second card I have used the same stamp as above to make a basket of flowers. 


I embossed the image on card stock and cut out the basket shape.
For the flowers in the basket, I have used the Sunny Sunflower set of stamps. The flowers are stamped and then fussy cut out. To color them, I used a sponge and some Distress Ink.

Little baskets would look beautiful stamped in pastel colors for Easter projects.  Maybe with some chicks from the Steampunk Birds or maybe a basket of Daffodils from the Spring Bird Daffodil Set.  Or, what about a basket of Poinsettias for Christmas cards!   This is a really versatile stamp set to have in your stash. 

These are only a few suggestions for the basket idea.  Maybe you have some of your own that you would like to share with us using the comments box below?? 
Don't forget that if you do leave a comment, on any of the posts, during the current month, your name goes into the monthly comments draw.
Thank you for looking.

Happy Stamping
Florence x