Pin It button on image hover
Showing posts with label Brushos. Show all posts

Tuesday, 20 September 2022

Tree of Knowledge ( by Doreen)

 Tree of Knowledge

Hello everyone, welcome to the second blog of the month for me, which gave me the opportunity to use one of my favourite dies in conjunction with this beautiful stamp set. If you were not already aware I love trees no matter of size shape etc I am just fascinated by all of them !!

   The Tree of Knowledge I feel lends itself to this die not that I can remember where I purchased it from it just lives on a magnetic sheet waiting for me to put it to use.


I have used the largest of the dies for a base and the next size for the image. I stamped the image using Versafine Clair Morning Mist, then coloured the edges with Distress Inkpad Olive applied using a blending brush. The sentiments were also stamped in the Versafine Clair Morning Mist ( I really do like this grey) and then I coloured the image using
 Derwent Chromaflow Pencils.

I made my own stand for the back of the card as I didn't want to mount this on a blank and wanted it as a stand alone card in its own right. I simply scored a piece of card applied it to the back of the card and cut off an angle at the bottom to make it stand with a bit of a tilt.

Below is another sample made on watercolour card using Brushos and stamped in Black.


Thank you for looking in today

Love Doreen


Sunday, 8 May 2022

Super Sunflowers by Doreen

Super Sunflowers


Hello all, here we are into May, hopefully heading for bright and sunny days, hence my first card for this month.

A bit of fussy cutting with this make but it is simple they are clean and easy lines to follow.
The ribbon which is white and from my stash is dyed using the Brushos too.

I took one piece of the A4 Drawing Cartridge and stamped 5 of the images in a zig-zag fashion to be sure to make the best of the A4 sheet using a Tuxedo Black Memento Inkpad.
Leave to dry or heat set with your heat gun. 
With three colours of your own choice from the Brusho range sprinkle over the page and spritz with water, set aside to dry naturally which will help retain the colour.

For the Ribbon I used two small pots to dilute some red and yellow Brushos then using a wide paintbrush soaked the ribbon allowing the colours to bleed into one another. ( This is best done on a cellophane bag as it makes it easy to put to one side to dry and won't stain anything else.) 

When everything is dry fussy cut your flower heads and shape them slightly with either a large ball tool if you have one or a bone folder but even with your fingers if you have neither of these. Take care to remember Brushos will stain your fingers so you may wish to wear some gloves to do this. 

Once cut out using a 9" x 7" Card Blank apply to card using a Glue Gel of choice. To apply the Ribbon I have used wide Red Liner Double Sided Tape.

Then to finish off I used a Gold Gel Pen to add some sparkle to the centres of the sunflowers and a White Gel Pen to enhance the detail of the petals.

Thank you for looking in today

Love Doreen


Saturday, 8 January 2022

The Versatility of Damask by Doreen

The Versatility of Damask 

Firstly I would like to wish everyone a Happy New Year, I do hope you all enjoyed a good Christmas too.

My first projects today use the Damask Panel perfect for using in its own right or as a background which is how I chose to use this background which I have taken from my stash of Brusho pieces. I also used one of the many beautiful butterflies from the Chocolate Baroque selection.

I stamped the butterfly using a Versafine Clair Nocturne inkpad and then covered the whole of the stamp in Versamark the colour comes from Salvaged Patina and Kitsch Flamingo embossing glazes sprinkled onto the Versamark and heat embossed.


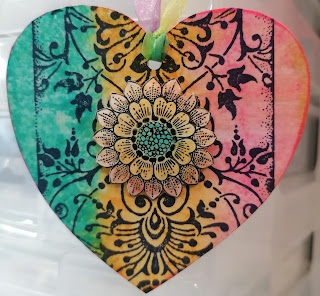
The second is a heart shaped sample using Distress Inkpads on an acrylic block which is spritzed with a little water and a swiping action straight across the Damask Panel onto the  background. Then I stamped the Song Thrush onto  a piece of card and painted using the same Distress Inkpad colours used for the background, then I fussy cut the large flower to decorate the Panel. Shape the flower and apply using Silicone Glue Gel to apply to the heart. Use a light varnish or spray to give a sheen and then put ribbon through hole to hang.


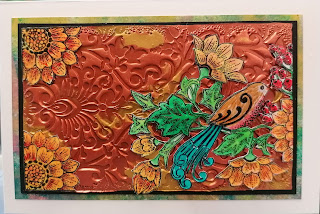
The final sample shows a background using a Soft Form Copper and a Gold Relief Paste applied directly to the stamp and left to dry overnight. I also used the Song Thrush to decorate this card just cutting out desired elements and applying to the background using a strong PVA glue.


Thank you for looking in today

Love Doreen

Monday, 11 November 2019

Vintage Ephemera by Debbie

Gosh don't the weeks just whiz by, can't believe Christmas is almost upon us again. It's my turn on the blog today and a chance to share my samples from the October show with all the lovely vintage themed stamps.

My first thought when I saw the plethora of labels, tickets and old postcards was to make a mini scrapbook so I began by making a "masterboard" in 2 complimenting colours. I took most of the small stamps from Baroque Ephemera1 and Baroque Ephemera 2 and placed them randomly on a large acrylic block. I used Distress Inks Wild Honey, Tea Dye, Weathered Wood, Frayed Burlap and Hickory Smoke to sponge over 2 A4 sheets of card. I then over stamped with the stamps on my block using Versafine Vintage Sepia to form a great background.


I die cut the 2 sheets then and stuck the 2 colourways back to back to form my mini scrapbook. I used old family photos to compliment the general look and added lace, paper flowers, buttons, pearls, washi tape etc before putting all together with a book ring.


 Also featured in the October shows on Hochanda  was Movie Strip and I was really pleased how well this went with the Ephemera stamps.
For the next sample I simply white embossed the flower onto white card and added some black Brushos before spraying with water and letting the Brushos do their thing. I just love the fact that you never know what you're going to end up with! I stamped a few of the vintage stamps randomly using Versafine Onyx Black.


 I then took a 7 x 7  ivory card blank and stamped with  Versafine Vintage Sepia before layering the image onto orange card and attaching to the card blank.

 A closer look


For my final sample for this time I've used another lovely floral stamp Floral Grunge.
I took a white A4 card blank and masked the top and bottom with masking tape leaving a band in the centre approx. 3" wide. I then sponged Distress inks Wild honey, Peeled Paint and Rusty Hinge over this band and when the inks were dry I carefully removed the tape.
I used Floral Grunge to stamp  in 3 areas partly over the inked area using Versafine Onyx Black. I like the clean simplicity of this design.

That's all for this time but I'll be back later in the month with more samples. 
Bye for now Debbie

Wednesday, 30 October 2019

Happy Flower Day Part 2 by Debbie

Hello everyone it's my turn on the blog again and here are the rest of my samples from the September Hochanda shows. I'll start with one of my favourites and a favourite technique too- Intaglio enamelling. 


For this design I've used  Artist Trading Heart & Happy Flower Day. I stamped the heart onto thick card and cut out. I then covered the entire surface with Versamark and then applied chunky bronze embossing powder before heating to melt. I repeated this process twice more and while the enamelling was still molten after the third application I stamped the butterfly from Happy Flower Day into it having inked the stamp first with a black inkpad. You will need to allow the enamelling to cool before removing the stamp.
I mounted the heart onto a piece of Kraft card  which had been passed through an embossing folder and given a light coating of gilding wax. To finish I added some narrow organza ribbon and attached to a 6 x 6 white card blank.  

Next we have the pretty butterfly from Happy Flower Day which I've embossed onto navy card using pink, green, lilac and blue embossing powders. I sprinkled a little embossing powder randomly and heated from below. I also stamped the butterfly onto the 7 x 7 white card blank using a grey inkpad. 

Above and below we have 2 different looks to the gorgeous Celebration Bouquet. Above I've used Brushos to make a vibrant background and then stamped over the top using a black inkpad. I then coloured using water based pens. I stamped the A5 card blank using Open Weave and a brown inkpad. To finish I mounted onto some Kraft card and added some string for a natural look.


It's amazing how many different looks you can achieve using the same stamp. For the above design I stamped onto self adhesive stationery labels using a black inkpad. I coloured softly with pencils and then peeled the labels off the backing sheet and repositioned them onto pink card layered onto white card and finally grey. I then attached to a white A5 card blank.

Here are the rest of my samples and some which didn't appear on the show. 

An MDF tag using Geometric Heart 

An MDF door hanger using Happy Flower Day

Embossed in gold using Geometric Hearts.

Onto a background made from inks and rock salt the pretty
 butterfly from Happy Flower Day

Geometric Hearts again simply chopped up and reformed onto a randomly stamped background embossed in gold.

This background was made with Distress inks onto a Gel plate. 
Celebration Bouquet has been stamped with a black inkpad and coloured with pencils.

Here I've inked inside a masked oval and stamped the lovely magnolia
 from Happy Flower Day. I coloured with pencils for this one before layering onto 
white card. 

Finally we have a simple bookmark from Happy Flower Day.


Thanks for visiting the blog today. Don't forget to watch out for 
the Chocolate Baroque show on Hochanda in November.
Bye for now. Debbie