Pin It button on image hover
Showing posts with label A Heart Full of Love. Show all posts

Tuesday, 21 December 2021

Have a Heart

 Have a Heart

Hello everyone, I hope today finds you all fit and well. Today I would like to share with you all some of the samples I made for the November shows using A Heart Full Of Love stamp set.

This first card is simply stamped and framed with the broken heart which is in the set which really gives a random look to the frame. For the stamen I have used a black fine liner pen. I chose not to colour the flowers as I didn't want to spoil the classic feel that I felt the frame had given to the card.  


All the cards I have made using this set are easily achievable and would look lovely in a variety of colour ways.  This card simply uses embossing powders to achieve a simple but attractive card. Both have been stamped using a Versamark inkpad plus gold and white embossing powders. 


This next card is more about the sentiment of the verse than anything else, gentle blending with inks and using a white gel pen, a red marker and some floral embellishments to finish the look.


Thank you for popping in today many good wishes for a Very Happy Christmas,

Love Doreen


Thursday, 9 December 2021

Hearts and flowers by Rachel

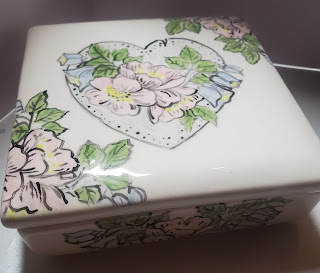
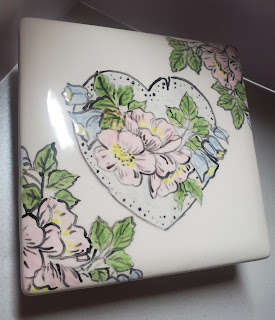
 Hello there! Rachel here today with the first of my monthly visits. These are samples made for the November shows although my ceramic piece never made it to the show - I decided to keep this one! 

To make this I used the stamp set A heart full of love and overpainted the stamped image in glaze before adding to the kiln and firing.  


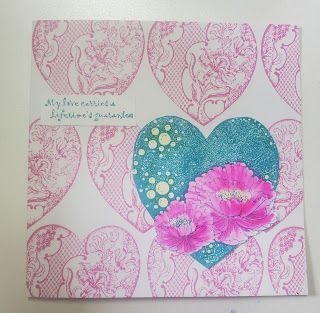
I used the same stamp set in this second piece - a card that I made by repeat stamping in the background and adding a coloured image on top - I coloured the image using watercolour pens.


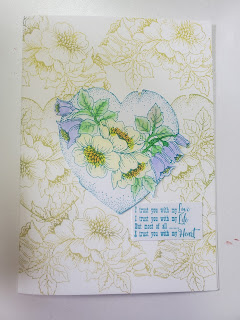
In this final sample I used the same ideas but different stamps from the same set in the background and as the main image.


It really is a beautiful stamp set and I hope I have given you some inspiration in using your set.
Have a great day!
Hugs
Rachel x


Friday, 3 December 2021

Hearts and Flowers (by Sandra)

Hello, I'm sharing some of my cards from the November show on The Craft Store.

My first card uses the beautiful Magnolia stamp from Happy Flower's Day. I stamped the magnolia in Memento ink onto smooth white cardstock and coloured with alcohol markers. I added a sentiment from the same set and some splatters from Numerology. 


My next card uses the Artist Trading Heart stamp set.  I stamped the heart with archival ink and carefully cut it out. I then stamped the butterfly from Happy Flower's Day into the heart and coloured with pencils. I blended some Distress Ink around the edges of the heart, going lighter towards the centre. I made a few light pencil marks on the card base where the heart would be placed and used the small leafy stamps from Filigree Trading Hearts to create a border around the heart. I added the number stamp and sentiment and then adhered the heart to the card with foam pads.

My next card uses A Heart Full of Love stamp set. I stamped this pretty image in Memento Ink and coloured with alcohol markers. I added a sentiment from Artist Trading Heart as I thought it very apt.


My last card to share today. I stamped this corner stamp from A Heart Full of Love using my stamping platform and Archival Ink. I then coloured with water colour pencils. I stamped the sentiment onto a die cut and mat and layered all pieces onto a 8x8 card base.

Thanks for looking

Sandra x

Wednesday, 1 December 2021

Happy December (by Judith)

Hello everyone, I hope you are keeping well. Many of you have been experiencing the cold weather lately, and it really feels like Winter has set in, doesn't it? I have just come back from a trip to Mexico, where it was lovely and warm, and the sunshine was very uplifting. I wanted to share a feeling of that sunshine with you with the colours that I have used in some of my projects today. I cannot promise to make you feel any warmer, but perhaps the cheery colours will brighten your day.

My first project was created by blending some Distress Ink onto a piece of Drawing Cartridge. I chose shades of blue and yellow throughout the whole project for continuity. I added some stencilling and stamped segments of the Small Graph Paper stamp using the stamp in my hand, not on an acrylic block, so that I could curve the stamp, to get smaller sections on the background. I also stamped the butterfly definition from the Happy Flower's Day stamp set on the background.

I stamped the large butterfly from the same stamp set first onto the background twice, and then again onto a piece of spare smooth white card. I coloured the images on the spare card using pencils, cut them out, and attached them to the background.

For my second project, I chose a piece of patterned paper and stamped the magnolia from Happy Flower's Day twice, masking the image as I went along. I added the flower definition and the main sentiment in the background. I coloured the image with pencils. I attached the panel to a chipboard panel using matte medium. When the adhesive was dry, I sanded the edges to give a white edge. 

My third project was created by placing Distress Oxides onto a craft mat and spritzing them with water. I placed the Drawing Cartridge onto the mat and picked up the colour. I used a whiteboard heart to do the same with the remaining colour on the craft mat, giving a paler version.

I stamped the flower definition over the background, and the fritillary flower and sentiment onto the heart. I picked up a bit of the Distress Oxide colour from the craft mat and painted the flower with a water brush.

For my final project, I chose to use grey card for a completely different look. I stamped the floral sprig from A Heart Full of Love around the edge of the background, and then added the floral heart in the middle. I coloured the images with pencils. I used white pencil first on the flowers, and added the other colours afterwards, this really helps on darker coloured card.

It's actually my Birthday today, and I would like to wish you all the best of days today. I will be back later in the month with more projects to share with you, take care, and thanks for stopping by,

Judith xx

Friday, 22 May 2020

Feeling Gratitude (by Magda)

Hello,
my second post of this month is a layered Journaling Page, that brings in evidence two Chocolate Baroque stamps.
You can hardly see the first pink-brown background with the blue flowers and orange dots, the second layer of gesso with green swirls will give a nice light under the craft tag.


I stenciled the tag with light green flowers, scored the tag and blended with Distress Ink pad Walnut Stain , at last I stenciled again with white.


The decoupage "A Heart full of love" is coloured with watercolored pencils.
The sentiment on the project is in the plate Words of Gratitude  is stamped with Archival Black jet on a white cardstock coloured with Distresss Ink Pad Mustard Seed 
Glue all the pieces on the page.


As a quick idea here two ATC changing the colour but using with the same stamp Essence of Nature Words to Dazzle and Sparkle and stencil 


I hope you enjoyed my projects this time too,  hugs
Magda  

Sunday, 9 February 2020

Valentine's Day (by Magda)

Hello girls,
We can't miss the appointment with our Valentine's Day without making appropriate projects.
I have for you some ideas :

Layered Tag :  stencil, Distress Ink Pad, Archival Jet Black,  Fluttering Hearts, A Heart full of Love


            Aquarelle Pencils, embellishment


Journaling Page :  stencil, Distress Ink Pad, Archival Jet Black, Floral Heart, Nouveau Lovebirds, Amazing Mackintosh Words


Thank you for reading my post today and Happy Valentine's Day
Magda

Monday, 28 October 2019

Music For Halloween - by Magda

Hello girls,
in few days it will be Halloween and this time I have combined music with bats and spiders.

For the first Journaling page " Music for Halloween "   I used  
Stencils, Clear Gesso, Gelli Plate, Acrylic Paints, Archival Jet Black , Distress Ink Pad  and            the stamps of Chocolate Baroque
Music Fanfare, Twilight Zone and Put a Spell on You.


The second journaling page has nothing to do with Halloween, it is a "Doodling around Watercolor".
I used the Pareidolia Art Technique for discovering and outlining the figures in the watercolor stains.
The items for this project are  :  
Brusho, Stencils, Black Charcoal Pencil, Archival Jet Black, Distress Ink Pad, and two stamps plates


Have a nice Halloween Party and see you in November again, hugs
Magda


Wednesday, 3 July 2019

To Have and To Hold and Purple Sunshine by Penny

Hello everyone, I hope you are all enjoying the lovely weather - if you have any in your area lol!  This is my first post of the month, and I have a couple of 'golden oldies' to share with you today.  

To Have and To Hold Heart.


I have used stamps from the A Heart Full of Love set; Versamark ink, silver EP, pearlescent paints, silver Brilliance ink, CB Masking Tissue, a die cut, some gems and some paper flowers from my stash.  


I started with an A4 piece of white pearl card which I scored and folded to create my base card.  I then stamped the large floral heart with Versamark and embossed it with silver EP.  I then masked the image and stamped another heart image randomly with silver Brilliance ink.  I removed the mask and painted the floral images.


On another piece of pearl card I stamped and embossed the floral image again, painted it and added glitter to the centers of the flowers.  I cut the image out and decoupaged it  in 3D onto the focal image.  I stamped and embossed a sentiment in silver onto another piece of pearl card then die cut it with a heart shaped die from my stash.  I attached the heart to the card with 3D foam then added some paper flowers from my stash.  I added some gems to the sentiment heart and added another sentiment with die cut letters from my stash, cut from silver card.  I added a couple of blue gems from my stash to accentuate the die cut sentiment and complete this simple and lovely design.


Purple Sunshine.


This is a bright cheerful design that could be used for many occasions.  I have used stamps from the Mushroom House, The Toadstool Garden and May Fairy sets; grey Archival ink, alcohol markers, Distress inks, CB Masking Tissue, and some shrink plastic from my stash. 


On a piece of matt silk card I stamped the Mushroom House image centrally and masked it.  I then stamped it twice more either side of the first image.  I removed the masking tissue and coloured all the images with my pens.  I matted the focal panel onto some colour co-ordinated card.


On a white base card I stamped one of the worker stamps from the Toadstool Garden set repeatedly around the edges of the card, I then attached the focal panel.  I stamped a couple of silhouette fairies onto some white shrink plastic using DIs, and cut them out.  I then shrunk them using my heat gun and attached them to the card.  On a spare piece of card I stamped a sentiment in DI and partially stamped the worker image  around the edges.  I matted the panel to coloured card and attached it with 3D foam.


Thank you for stopping by today, I hope you have enjoyed this post, and that I might have tickled your crafty fancy and inspired you to have a go.

I shall be back later in the month with more crafty fun, until then I hope you will keep checking out the DT blog to see what my teamies are up to.

Take care peeps,


                                xx   Penny  xx 

Monday, 29 April 2019

Bubbles and Butterflies (by Judith)

Hello everyone, I have a couple of projects to share with you today, showcasing stamps featured in last month's TV shows on Hochanda.


For my first project, I wanted to compare the card that we brought to the show, a mixture of gloss and matt card, and to see how each surface worked with ink. I embossed an image from Punky Romance on both pieces of card using Versamark and white embossing powder, before creating a background, blending Versafine Clair Ink on the surface. I stamped another image from the same stamp set using Memento Ink in a deep purple shade over the top, taking care to rub away any ink that covered the white embossing.

It is not very easy from the photograph to tell the difference between the two surfaces. The glossy card (on the right) really shines, and takes the ink really well. The matt card (on the left), apart from the embossing, looks printed, it is so smooth. It depends which effect you prefer, I like them both. This card will be a staple product on the website in the future, just like our Drawing Cartridge and Textured Art card.

I embossed three butterflies onto vellum using the white embossing powder, and cut them out, adding them to the background to complete the card.

To create my second card, I created a wash over a piece of drawing cartridge, using blue watercolour ink. I added a bit of sea salt and left the background to dry. I stamped the heart image from A Heart Full of Love onto another piece of card using dark blue ink. I coloured the image using water based markers and added a bit of sparkle using a silver sparkle pen. Once the background was dry, I removed the salt and stamped around the edge with a bubble image from Floral Heart, adding highlights with the silver sparkle pen.

I hope that you have enjoyed our romantic inspiration this month, and we look forward to sharing our house and tree projects with you next month. Don't forget to look out for more TV shows in May too! Thanks for stopping by, Judith xx


Saturday, 27 April 2019

Amber Butterfly by Brenda


Hello Peeps, Brenda here again with my last post for April and today I have another collection of Steampunkery hearts and flowers starting with a rich amber offering. My starting point was an Oxide base piece over which I randomly stamped the harlequin from Punky Hearts using Verafine Clair, followed by Punky Romance using Versafinre black and around the edges the little accent worker stamp from Punky Hearts. Finally I stamped, coloured and cut out the Butterfly from Fluttering Hearts and placed focally.


I used a sun ray stencil and several colours of Distress Inks to create the background, rotating the stencil from a central point until I achieved a full circle around the page, it takes a little while but worth the effort for the finishes effect. I the stamped the heart from  Punky Hearts in the middle and a sentiment from A Heart Full of Love.


Using a brayer and Distress Inks I created a random background onto which I stamped the floral image from a A Heart Full of Love, stamping some off the page too balance out the piece. I then coloured in with pencils, if you don't use too much colour on the background there is no need to bleach out the colour before colouring in the flowers.


This one was quite time consuming but fun, I stamped various hearts from Floral Heart, Fluttering Hearts and Hearts Full of Love with Versafine and embossed with various colours of EP, cut out and fixed at an angle and placed a small twine bow on each. The sentiment is from Punky Romance and embossed with one of the EP's.

As always many thanks for your visit and I hope you have a lovely weekend.

Tuesday, 23 April 2019

Birthday Mail ( By Marga)

Hello everyone, here is Marga with two new cards I have made.


The first card I have made with Distress Ink and I used the stamp set Punky Romance. I made the background with Distress Ink and I used silver embossing powder. The edges I made with a black gel pen.


The second card I made is from the stampset A Heart Full of Love. I stamped the image and coloured it with Distress Ink and cut it out. The background is a scrapbook paper.

Hugs Marga

Saturday, 20 April 2019

A heart full of love by Rachel

Hello there! Rachel here today with some more makes from the March shows! I have mostly used stamps from A Heart full of love stamp set but will indicate others where they crop up.


This first card uses stamps from a heart full of love - colouring  is in pencil. 


In this one I stamped the background first using versamark and heat setting with white embossing powder ... I added distress inks onto the background using stencil brushes then added some same colour stamping with stamps from a floral heart stamp set. Lastly I stamped the focal image and added it having fussy cut it first.


In this card stamped one image from a heart full of love 4 times to create a wreath. The colouring was in pencil and the bubbles from the floral heart set. 


This final one comes from the punky romance set - I love these timepiece flowers and couldn't resist making a meadow with them.

I hope this has given you some inspiration today!

Big hugs

Rachel x


Tuesday, 16 April 2019

bleach and brusho (by Veronica)


The first card  the heart was stamped in black versafine onto a brusho background and clear embossed.  The heart, leaves and small flowers were coloured using more brusho applied with a water brush. Once it was all dry, I bleached the colour out of  the larger flowers- it did take a couple of applications of bleach to get rid of all the colour.
Sentiment added in black, and a mat to match the heart to finish off.

Same technique for the second card, this time using the matching flower spray stamp and just bleaching the flowers out, before edging with a marker pen.

Friday, 12 April 2019

Hearts and Flowers (by Judith)

Hello everyone, I have a few projects to share with you from last month's TV shows on Hochanda, featuring the lovely heart stamps.

My first projects are three very quick cards, 4" square, using images from the Floral Heart stamp set. I stamped straight onto the card blanks to create a set of clean and simple cards that could be used as little notelets.


The first card uses three different colours of blue Memento ink and the bubble heart, around one of the sentiments which was stamped in black ink. I covered the card very quickly, simply stamping the heart in the different colours to create an all over background.


The second card was created by stamping the large heart, and then stamping the flower cluster down the side using four different colours. I then painted the flowers in the large heart using the four colours and added white highlights.


The third card was created by stamping the heart in second generation randomly over the background with red ink. I stamped the sentiment in black ink as before. Using a small white board circle from the Hearts and Circles pack, I added red ink before coating the circle with UTEE, heating it with my heat gun and stamping the same heart image into the hot embossing powder. I brushed some gold mica powder over the image to pick out the detail.

The following cards were shown as a demonstration on one of the TV shows last month. I created a Toile de Jouy background using the flower sprig from the A Heart Full of Love stamp set, stamping onto 160gsm Luxury Smooth paper I cut a smaller square of the paper to stamp the corresponding heart image. I coloured the heart with pencils, before matting both layers with coordinating card. I coloured a piece of ribbon with Distress Ink to get the ribbon to match the project exactly. I created a couple of colour options for the show, one pale, and one much brighter, to show that by changing the colours, you can create a very different effect. Apologies for the photo of the paler card, it has been given away now, so I cannot photograph it again.

I will be back later in the month with more projects to share with you, thanks for stopping by,

Judith xx