Pin It button on image hover
Showing posts with label Hocus Pocus. Show all posts

Monday, 3 October 2016

Halloween Magic (by Julie)

Hello, thanks for popping in. I can't believe that we are now in October and of course with October comes Halloween, so I have two Halloween themed cards to get you in the mood.


This spooky lady has been stamped with the fantastic Put A Spell On You. The base card was covered with cream PanPastel and over stamped with Put A Spell On You sentiment. Weathered Wood Distress ink has been added along with black liquid 3d dots. The spooky lady stamp was inked up with black Memento ink and stamped onto glossy card and coloured with Alcohol markers. The cute little ghost was stamped onto distressed green cardstock before the topper was assembled and glued into place with double sided tape.
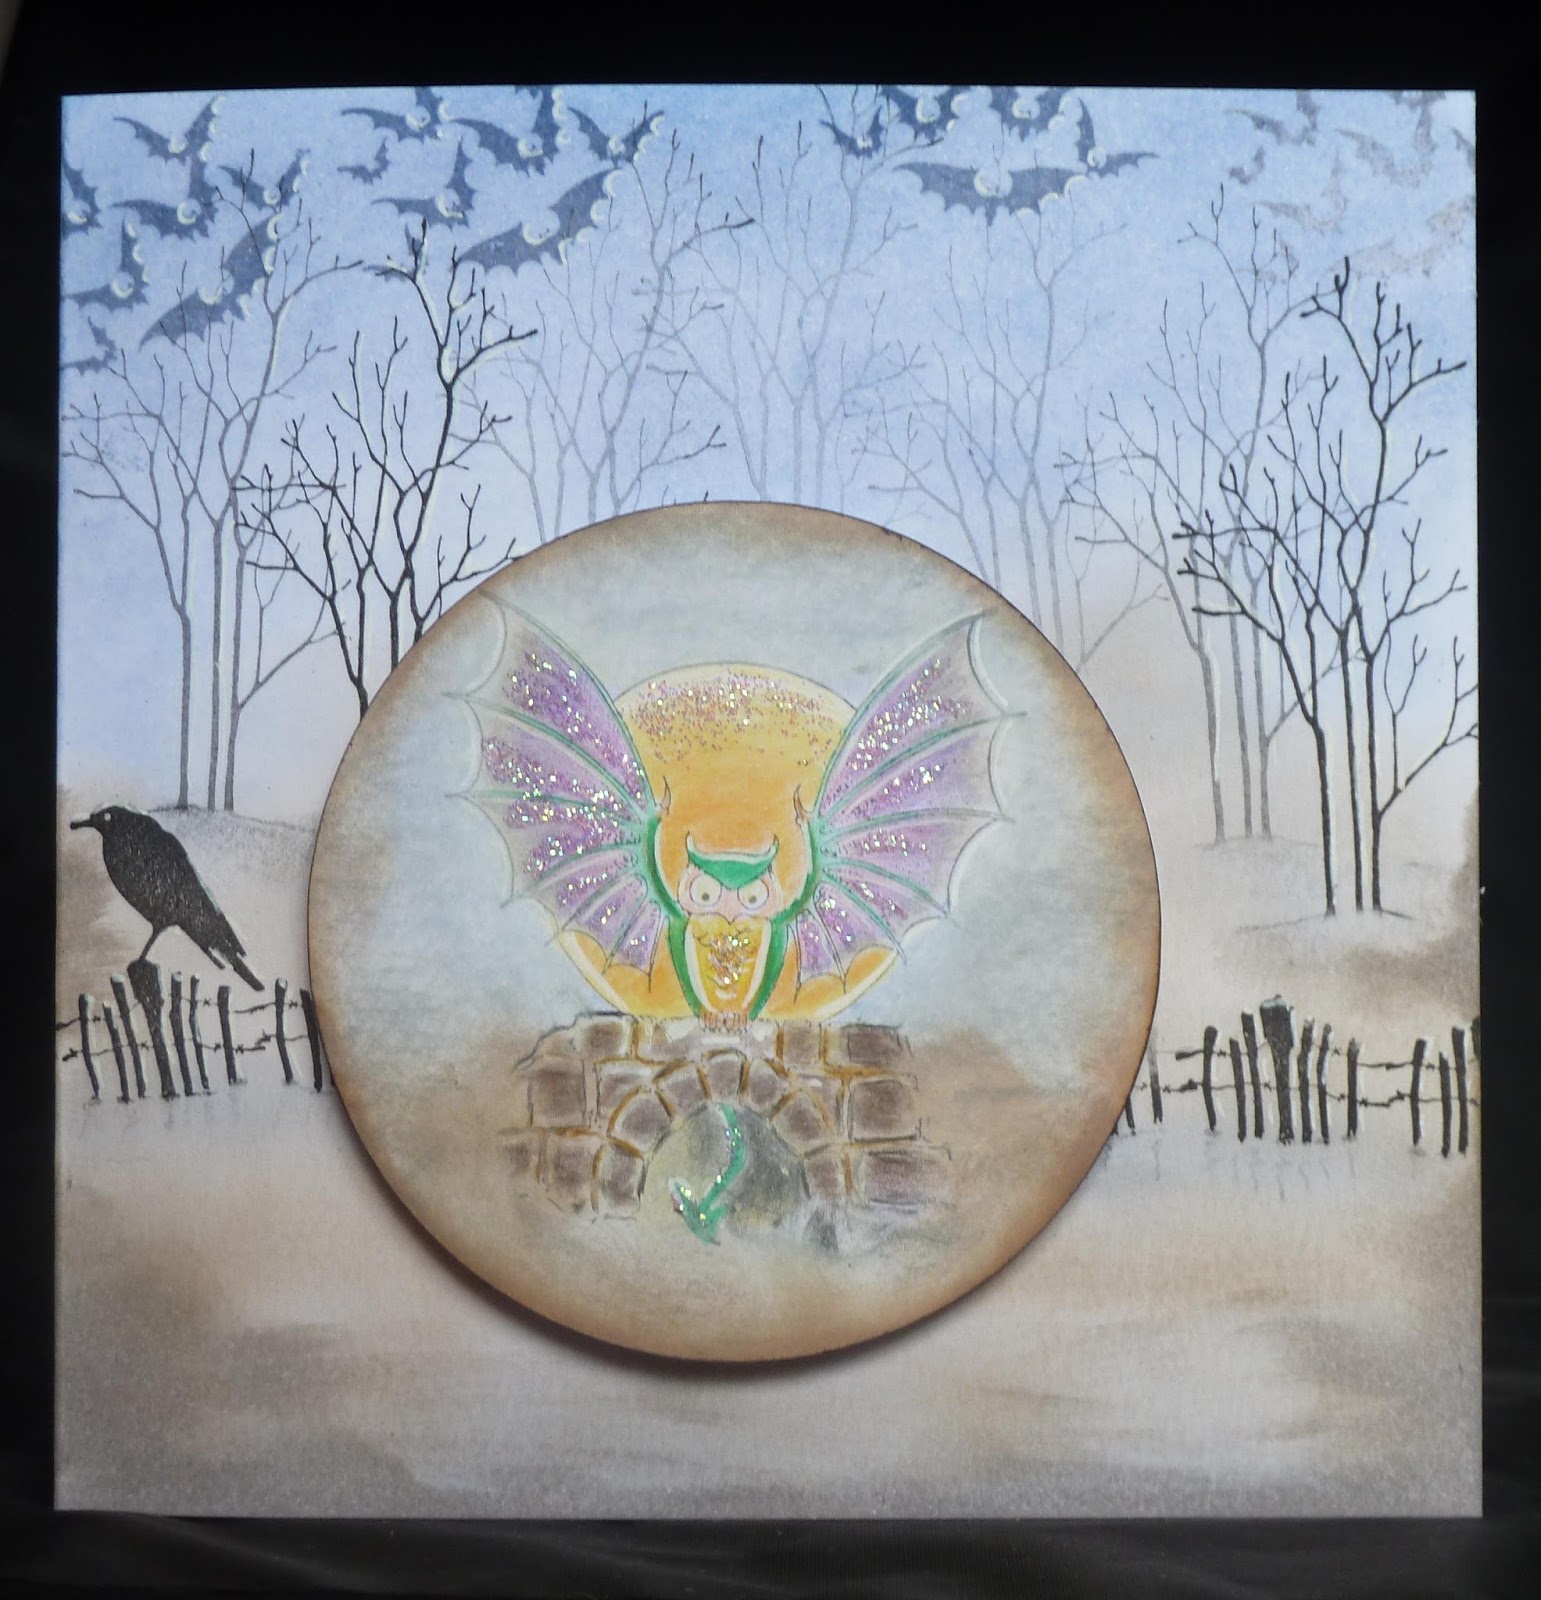

My second spooky card was created with the very fun Hocus Pocus set. To start with the base card was stamped with the naked tree. I stamped the tree three or four times before re-inking so that the trees look like they are fading into the background. 
The crow on the fence was used in front of the trees. I just inked up the fence part of the stamp to continue across the card and then the bats were stamped across the top of the card. Dark blue Pan pastel was sponged over the trees for the nights sky and a mixture of greys and browns for the foreground.
The main image is the curious bat creature that I stamped and then coloured with Polychromos pencils and Distress inks. The image was cut out with a circle die and mounted onto the front of the card with 3d foam.

Thank you for your visit and hope to see you again soon.

Julie xx

Tuesday, 29 September 2015

Hocus Pocus Card by Florence

Morning everyone


Today I am using the new Hocus Pocus stamp set. 

Although these are Halloween stamps they can easily be used for other occasions.

I would like to share with you an idea for a little persons birthday card.

This would also work as child's party invitation just by changing the sentiment.


 Please click on the image enlarge.

To make this card

Stamp the creature onto a piece of white card, color the image and cut it out.
Stamp just the tail onto a piece of white card and cut it out but include an extra piece at the one end of the tail for attaching purposes.
Die cut or cut out by hand the number.
Stamp a pattern onto the number and add a little Distress Ink to the edges
Glue the tail onto the back of the number so that just the front of tail shows.
Stamp and emboss the sentiment onto a piece of pretty paper or card.
Mat and layer the card.
Attach the number (with the tail attached) using foam pads.
Attach the creature also using foam pads.

Do check out all of the amazing creations from the team.

Thank you for looking

Happy Stamping
Florence x

Monday, 28 September 2015

Boo!!! in a Pop up Box (by Debbie)

 
Hi.
I wanted a small project that would showcase many of the Halloween stamps together.
Fortunately I have a die that cuts the pop up box so the measuring was taken out of the making.

 
The white decorating panels were stamped with Memento Black ink and coloured with alcohol pens. For the edges a little distress ink was rubbed. The ghosts in clusters were stamped and cut out then glued onto the strips of card that are in the centre of the box. I adore our little owl bat so sat him at the top.
 
 
For the card I wanted to show how the open book stamp looks great with the ghosts floating above them. Other stamps from the sets work well too.


Many thanks for visiting
Debbie

Sunday, 27 September 2015

Spells and Spooks (by Julie)


Hello, today I have my last two Halloween projects to show you. I have really loved working with these stamps as they are really fun and lend themselves to all sorts of Halloween craftiness.

I have used both Put a Spell on You and Hocus Pocus stamp sets for my first card. It is all just basic stamping with Black Onyx Versafine and coloured in with coloured pencils. The background is Dusty Concord and Stormy Sky Distress ink with a touch of Mustard Seed around the edge of the moon. (I just cut a circle die as a mask for the moon)
The spooky lady has been mounted onto mirri card and the bat motif was partially cut out with scissors before I placed a circle die around it and under the cut out wings.

My second card is very easy and just a bit of fun. All the stamps come from Put a Spell on You and have been stamped with Black Onyx Versafine.
Using Cut n Dry foam I sponged some Fired Brick and Vintage Photo Distress ink through a brick wall stencil before stamping and colouring the cobweb and pumpkins. The sentiment was stamped onto white card, dusted with Antique Linen, cut out and mounted onto black card and  little dots were added to the corners to try and create faux screws.

Many thanks for looking and please call back soon.

Julie xx

Tuesday, 22 September 2015

Halloween Treats (by Asha)

Hello again, friends! I've got a couple of projects ideas to house your Halloween treats.  The first is in the shape of a grave - complete with tombstone and grassy border! The main design is the Bat-Owl from Hocus Pocus, coloured with Faber-Castell polychromos. The web and mushrooms are from Put A Spell On You. The Trick or Treat sentiment is from Spookilicious.


Here's a closer look at the Bat-Owl. After colouring, I fussy cut and adhered it to the headstone.


The second treat bag is a simpler affair. The Cat is from Hocus Pocus, heat embossed in black, inked the edges and matted on die-cuts. The sentiment is from Halloween Edges. To finish, black baker's twine to tie the box.

That's all from me today. The rest of the Design Team have a few more projects lined up over the next week. Don't forget to drop by again soon. In the meantime, I have more pictures and details of supplies used to make these boxes over at my blog.

Have an awesome day!

Beijinhos,
Asha

Monday, 21 September 2015

Night Flight (by Judith)

Hello everyone, I have another spooky card to share with you today, using the Hocus Pocus stamp sheet. As usual, I have mixed things up a bit using some older stamp sets as well, to create a night time scene.

I stamped the owl, and a dragon from the Here be Dragons stamp set onto a piece of smooth watercolour paper, and then covered them with a mask. I coloured the background with Distress Inks, and spritzed it with water. I added some foliage from the Spring Foliage stamp set. I added some stencilling with a spider's web mask, using the same colour inks as I had used on the original background.

I removed the masks and coloured the images with pencils. Finally, I added some bats randomly over the night sky.

Thanks for stopping by, Judith xx

Sunday, 20 September 2015

Spooky Flip Flop Card by Anne

Good morning. I have another spooky project to share with you using the new Hocus Pocus and Put a Spell On You stamp sets. This time I have made a Flip Flop card where the topper panel flips to reveal the sentiment as you pull the card open. I hope that you like it.


Materials used:
How to make it:
  1. Spray a piece of stamping card approx. A5 in size with inks, drop on dishwasher salt and leave to dry. I used stained salt so it gave more random flecks of colour.
  2. Score and cut the card to create the flip flop opening panel. I used a die set but you could hand score and cut. The flip flop panel is approx. 7cm square. The score lines are approx. 6.5 and 9cm in from the right hand side. You can see where to cut and score in the opened card picture.
  3. Stamp the tree and bats with StazOn and complete the landscape using a fine black marker.
  4. Cut a topper approx. 7cm square. Stamp the cat scene, colour with pencil and brown marker, edge with Distress Ink and draw faux stitching with black marker.
  5. Cut another topper approx. 6cm square. Stamp the sentiment, bats and twigs. Edge with black marker.
  6. Cut a strip approx. 1cm wide and randomly stamp with the spider. Also stamp a mini topper approx. 3.5cm square with the bird. Ink the edges with Distress Ink and black marker.
  7. Mount the toppers (I used foam pads for the cat image), add Glossy Accents to the bird and cat, and finish with some PVA pearls.
I am having so much fun creating these spooky projects. I hope that you are enjoying all the lovely projects from the Design team as much as I am.

Anne x.

Saturday, 19 September 2015

Another Halloween creation (by Miranda)


Hi there,

Today my 2nd take on the Halloween stamps and this time I've used the Crealies Modern Patchwork die no.3 and used several stamps from the two Halloween sheets called, Hocus Pocus and Put a spell on you.
I also used some stamps(bats and spiderweb) to decorate the die cut flowers from Crealies( set of 3 nr.23 and the largest flower is a UNO die no.23)
Again I used my favorite ' in between flower layers' die, Double fun nr.12.
Now onto the rest of the card.........
I have blended all the pieces and stamped the images. Some are coloured with pencils, it's a pretty simple card. 

I have also added some Magic transparant pearl pen to create some dew drops on the petals.........


Well, hope you've enjoyed my take on it! 
Thanks for your visit and till next time,


Friday, 18 September 2015

Spooky Stampbord Domino Book (posted by Claire)

Good morning, Claire here with a little domino book made with Stampbord and this months fabulous new stamps.   I've used stamps from Hocus Pocus and Put a Spell on You, you can find both sets here and even better they are on special offer too!


I began by taking two Stampbord dominos (you can find them here) and applied Distress Inks in Seedless Preserves, Spiced Marmalade, Peeled Pain randomly with cut and dry foam. I stamped the images and added colour with Derwent Colorsoft pencils before triple embossing with clear embossing powder. I used a gold krylon pen to edge the stampbord.

Next I cut a strip of white card from a 12x12 sheet and used my Stampbord to mark the size so that it was just a couple of millimetres smaller than the domino. I coloured the card with the same colours of distress ink and got busy stamping lots of different images from the new stamp sheets and again coloured with my pencils, adding a few white highlights here and there.
Tip: use a little diluted bleach to remove colour from areas you want to be white and if you need to go over the area with a white pen.

 I scored the card strip at 1" intervals and concertina folded it all before attaching the covers. Don't forget to add the ribbon to fasten the little book before you attach the covers to the strip.


Here's another pic of the cover


Thanks so much for visiting today
Claire xx

Thursday, 17 September 2015

Hocus Pocus by Zoe

Good morning Lovelies I hope you're all well. Today it's my turn to share with you my tags I've made using the fabulous new Stamp sets "Hocus Pocus and Put a Spell on you". I'm not a big Halloween fan as such but I do enjoy making tags and cards for it and these new stamp sets are superb, I'm in awe of my teamies projects with them I hope you've been checking them out each day, if not here is the link.
My first tag I stamped using one of the fab background stamps from Tangled Fragments. Using a grey Memento Inkpad, I then used Distress Stain Sprays - Abandoned Coral, Blueprint Sketches and Twisted Citron. I used stamps from both sets to create my spooky scene, the Pumpkins I sprayed Fossilized Amber distress spray onto card and stamped and cut out the pumpkins to create dimension. I used some red glitter glue on the spider.

My second tag I used Distress inkpads - Blueprint Sketches, Mermaid Lagoon and Twisted Citron. I blended them using a blending tool and sprinkled water onto the tag and dabbed with paper towel and dried with my heat tool to create some texture. I then stamped using a background stamp from the same Tangled Fragments set with Blueprint Sketches ink. I dried thoroughly, dusted with an anti static bag and used the little "shooting star" type stamps with a Versamark inkpad and a sparkly embossing powder and heat embossed. I think they could pass for fireworks too, I used a Black Versafine inkpad to stamp the wonderful tree and bats. I stamped the little sentiment onto a die cut circle, a few very tiny dots of glitter glue for the bats eyes and some pretty blue Tulle to finish, voila!

Thank you so much for taking the time to visit today, I love reading your comments, don't forget to pop back tomorrow to see some more fabulous inspiration for these stamps.
Have a fantastic day xx Zoe xx


Monday, 14 September 2015

Spooky, Drink if you Dare (by Debbie)

 
Hi.
My inspiration for todays projects comes from all the bottles that are being decorated by people on pinterest. I thought these would look great sitting on the windowsill where the visiting children will see them.
The bottle were bought from the pound shop and the straws were included.
 
 
I didn't want to add lots of texture but wanted bright colours that couldn't be seen through.
 
The first was the orange bottle and I prepared it with clear gesso, waited for it to dry and applied the Dylusions Squeezed Orange paint. I stamped onto the dry paint with Black Archival with stamps from Put a Spell on You. As I had waited over twenty four hours for the drying process, I decided to try painting the Fresh Lime and Crushed Grape directly to the bottle.  I was delighted to see the paint didn't puddle and gave great coverage.The witch on the green bottle is from the Hocus Pocus stamp set. For the grape coloured bottle I stamped onto a die cut label  and attached with ribbon. A little twine was added to the neck of each bottle and I used stamps from each set to decorate the straws with circles of card.
 
 
For the card I cut a circle as a moon mask and applied the two colours with soft bristle brushes. Both sets of the stamps mix so well together.
 
Many thanks for visiting
Debbie

Sunday, 13 September 2015

Gone Batty (by Julie)


Hello, thanks for stopping by. Today I have two Halloween makes for you to try. The first is this spooky (pretend) candle made using the fabulous Hocus Pocus stamp set.


It is quite simple to make. You will need a battery tea-light and then take a piece of acetate to form a tube around the tea-light. Secure the ends together with heavy duty double sided tape.
I popped a circle die cut onto some copier paper before sponging some red and purple Pan Pastels to create the background. I filled the moon in with a cream coloured Pan Pastel and then sprayed the copier paper with a fixative. Once dry I stamped the bats and crow using Onyx Black Versafine. 
Next cover the entire sheet with Versamark and then sprinkle with clear embossing powder before melting with a heat gun. Secure the embossed image to the acetate tube with double sided tape and then turn on the tea-light.

My second project using the Hocus Pocus set, is a little decorative plaque made from an old CD. The bats have been stamped directly onto the CD using black Staz-on. The cute little owl creature has been stamped onto card, coloured with Polychromos pencils and then cut out using a circle die. I stamped a second owl and fussy cut the owl and his wings so that I could add a 3d element to the design which I glued into place with silicone glue. Chipped Sapphire and Tumbled Glass Distress ink was added around the edge of the die cut before dabbing a generous helping of Crystal Stickles to the CD and the stamped image.
I have displayed this plaque on a die cut stand but holes could be punched through the CD so that it can be hung on a wall.

Thank you for popping in and be sure to call back tomorrow for some more Design Team inspiration.

Saturday, 12 September 2015

Strange creatures.......(by Miranda)

Hi world,

Miranda here showing you a spooky Halloween creation with a strange creature.........I love playing with the Halloween colors and I had fun making this one.......the center image is a special creature, a mix between an owl, bat and dragon........love him! I surrounded him with bats and down below some spiderwebs and toadstools. It's an inky background with a lot of water spatters and I've done some stenciling with a Crafters workshop stencil.(Rebekah Meier-Rosette)
I have coloured everything with color pencils.
The stamps are from the ' Hocus Pocus' sheet from CB. And I used some extra spiderwebs from  Halloween candle and Book of Spells.
The quote is from the Put a Spell on you sheet.


Are you inspired to get your crafting tools out and have a play?
Thanks for your visit and till next time,


Tuesday, 8 September 2015

When Ghouls Come Out To Play (by Asha)

Ghoul Morning, friends! It's almost that time of the year .... when ghouls come out to play. I have a couple of easy projects for you. All you have to do is ink and stamp - that's it. I also want to show you how well Chocolate Baroque's older Halloween stamps coordinate with the latest release.

My first card depicts a dark and creepy night where ghosts wander in the mist. I inked up the background with Distress Inks. The trio of ghosts in the foreground are from the new Put A Spell On You A5 sheet, which I heat embossed on vellum. The ghosts in the background is heat embossed directly on the card. The trees and greeting are from the new Hocus Pocus A5 sheet. The clouds and the single bat are from the older Spookilicious A5 sheet.


The second card is slight more "cheery" ... on account of a few smiling pumpkins. Again, I inked the background with Distress Inks and masked the moon. The pumpkins on the ground and the spider are from the new Put A Spell On You A5 sheet. I coloured the pumpkins with Faber-Castell Polychromos. You could even paper-piece these pumpkins and speed up the process. The flying bats and crow are from the new Hocus Pocus A5 sheet. The scarecrow is from an older A5 sheet called Witching Time. These stamps work so well together!

I hope you enjoyed these cards and will try making them. Be sure to stop by often for more frightfully fabulous projects from the rest of the Design Team. As always, a full description of products and tools will be available from my blog.

Beijinhos, 
Asha

Monday, 7 September 2015

Graduating from Halloween! (by Judith)

Hello everyone, I have a card to share today using this month's Halloween stamps, but in a way that shows how they be used for a purpose other than Halloween.

I have created a clean and simple graduation card using one of the book images and the starburst on a diamond die cut to represent a mortar board. I added a tassel underneath from the Baroque Eggs stamp set. I coloured the images with pencils. I coloured the centres of the starburst image with a gold Wink of Stella pen for a bit of sparkle. I added a flourish in the corners of the card from the Butterfly Daisy Collage stamp set, and finally stamped a sentiment from the Loving Sentiments stamp set onto a small tag.

Keep checking back throughout the month for more great inspiration from my Design team mates. Thanks for stopping by, Judith xx

Friday, 4 September 2015

Halloween Beauty (posted by Claire)

Good morning, Claire here with a card made with some of this months new stamps. We've got  two A5 stamp sets with a Halloween theme and I've used some of them on this card. The stamps are called 'Put a spell on you' and 'Hocus Pocus', you can find them here. 

I've used stamps from both new sets to make this card. I began by blending Distress Inks in Seedless Preserves, Spiced Marmalade and Peeled Paint on to a shaped card blank and then overstamped with the bats from Hocus Pocus using Black Archival Ink


I stamped the beautiful image from 'Put a spell on you' with Memento Tuxedo Black ink and coloured her with Graph'It markers before blending distress inks around the image and stamping on the sentiment. 


I added some embellies and a postcard from Graphic 45 and then got busy colouring a heap of paper flowers with distress inks. I layered all the paper flowers up, misted them with water and scrunched them up. Once they were dry I added a little black enamel accents to the center of each. To finish off I've added a black bow topped with a button and some twine.

My teamies have come up with some beautiful projects to inspire you as always so keep popping back for a peek 
Claire xx

Thursday, 3 September 2015

Having a Spooky Time (by Zoe)


Hi, I'm back with my 3rd, yes 3rd post for Chocolate Baroque, I still need pinching to make sure I'm not dreaming lol.

Today I'm sharing a card and tag I've made using the wonderful Hocus Pocus stamp set, I've loved using these stamps, they are quirky, fun and a tad spooky.

  
My little tag was cut  from 2 layers of a linen texture card and I very simply stamped the cat using a black inkpad. I used watercolour crayons to colour.


For the card I die cut 2 circles, the base being folded to make it stand, all be it a bit rocky.  The top layer was stamped with Versamark ink using the gorgeous Damask background from the Dusky Damask set, I love this set. I then made a mask for the moon, swiped over using PanPastels then removed the mask and placed the negative mask over the moon and used contrasting colours to create a moody atmospheric effect. 

I used a very slightly larger mask to create an outline and used a pencil eraser to make a misty effect around the moon and a few wispy clouds.  I always use my pans on linen card, it gives such a luxurious finish I feel and, once I happy with the colouring, I use very cheap hairspray to seal the PanPastels. 

The witch was stamped with black ink and the little mushrooms and cauldron were coloured with pencils.

Thank you so much for all the lovely comments I've received on previous posts, I really love reading them. I hope I've inspired you to want these fab stamps. Please don't forget to pop back each day to see what the rest of my very talented teamies have created for you.

Bye for now, have a great day xx Zoe xx