Pin It button on image hover
Showing posts with label April Fairy. Show all posts

Wednesday, 19 December 2018

Butterfly frame by Brenda


Good morning to you all, Brenda here and I hope you are almost prepared for Christmas, only 6 sleeps now!!

My first share this time is a little frame which I stamped with Distress Ink and the lovely Fern from the Wild Meadow set, I used two colours to ink the stamp to give a variegated look and then distress the edges with the same colours. Inside the frame I used one of the Designer papers and stamped a sentiment from Shared beauty and stamped, coloured and cut out three Butterflies from April Fairy and Just Butterflies.


Here I have a tent card using Movie strip collage which I stamped once, masked and stamped a second time, coloured with with pencils and added some Distress Ink around the blooms.


I loved the colour of this particular sheet from the Designer papers and followed the colourway stamping images from Wild Meadow and Floral grunge with Versafine Clair inks. I made the base shape with the Tagtastic stamp stamping three times with Versamark and embossing with detail white, then cutting out the three tag shapes slightly larger to create a black frame. I fixed the thee together with card hinges in the back, fixed the stamped papers, some cord and embellies. I also stamped sentiments from Be Kind and Shared beauty.

This is my last post before Christmas so I would like to wish everyone a peaceful Christmas season.


Saturday, 27 May 2017

Magical Fairies (by Julie)

Hi there! Today I have my last two cards for this month and they are both Fairy designs.


My first card is stamped with  April Fairy and to start off I stamped Pegasus towards the top of the card with Onyx Black Versafine and then with a mask I created from a circle die cut, coloured in the moon with Distress inks. The background was created with a wide brush and water colour inks, so I blotted out the colour with a wet wipe where I wanted to stamp the fairy and once dried stamped her with grey permanent ink, before colouring with brush markers. I inked up the leaves of the little bird design with Olympia Green Versafine and stamped around the edge and then finished off with acrylic pen dots and Crystal Stickles.


This second card is stamped with the March Fairy designs. I stamped the fairy with grey permanent ink onto watercolour card and also stamped a second image onto copier paper to create a mask. Cut the mask out and place over the fairy. Once in place spritz the card with green and yellow spray inks and then remove the mask. Once dry colour the fairy with brush markers. I have used the butterflies from both the March and April Fairies to create the background. Just stamp a few of the butterflies onto spare card, colour with Distress inks then cut out and adhere with 3d glue gel. The edge of the design has been sponged with white gesso and once dry, coloured with Distress inks. To finish off I mounted the panel onto a white card base.

Thank you for stopping by and please call back tomorrow for some more Design Team inspiration.

Julie xx

Tuesday, 23 May 2017

Mystic Night (by Anne)

Good morning. Here is another of my samples for the recent TV shows on Hochanda featuring the Spring Fairies stamp sets. I had so much fun with these.

Materials:
  • Spring Fairies Collection (March Fairy, Butterflies from March, April and May)
  • Floral/foliage stencil and circle template
  • 13.5 X 18cm card blank, card (black, turquoise glitter and white stamping)
  • Watercolours with mica (green, pink)
  • Watercolour pencils (flesh, blue, green, pink)
  • Clear sparkle pen
  • Stickles glitter glue (Star Dust)
  • Glitter paste (turquoise)
  • Versafine (Onyx Black)
How to make it:
  1. Apply glitter paste through the stencil onto black card using a palette knife. Leave to dry.
  2. Paint the background and moon using sparkly mica paints. Use a circle template to help (I used a circle die to draw around). Glue mats and layers to the card front.
  3. Stamp the fairy and butterflies onto white stamping card and cut out. Colour with pencils and paints with mica. Shape and glue to the card front with 3D glue gel.
  4. Finish with Stickles for added sparkle.

Monday, 8 May 2017

dreaming (by Veronica)


Despite fairies not being my favourite themes, I had fun with the stamps featured in the last show on Hochanda - I hope you saw some of the shows and Lesley's super demos.
My inspiration for these came from being allowed to play with my friend Janet's set of the new distress oxide ink pads and black card - I tried to recreate the effect by using white pigment ink and ordinary distress inks, not quite the same but near enough.
I usd the larger silhouette palace stencil for the buildings, and sponged the white pigment ink in streaks to create the base of the sky. Once it was dry, I sponged streaks of purple and green distress inks to create a sort of northern lights sky.
The winged horse and fairy silhouettes were stamped with versamark ink and embossed using a sparkly black powder. A glitter black card matt and a white base card to finish.

The second version has the stencil lower down the card, and a rather heavier application of the white ink first. I added an outline to the stencil using white marker pen, and the sentiment from the clear see beauty set embossed with white.

Sunday, 7 May 2017

Welcome to Fairyland (posted by Claire)

Good morning folks, today I'm sharing one of the samples I made for Lesley's Spring Fairy shows on Hochanda. I love all the gorgeous stamps in the Chocolate Baroque range but I have to confess that the fairy stamps are a particular favourite so I really enjoyed making this project.


I began with some corrugated card, misted with water to remove the top laer and then applied white gesso roughly to the surface. Once that was dry I dripped acrylic paint in shades of blue and green here and there. To make the scene I stamped the two castles with black Stazon (the top one is from Magical Landscapes and the bottom one from Fantasy Castles). Next I painted in the background quite loosely using watered down acrylic paint, blotting the sky with a tissue to life some paint and create a cloudy effect. To make the waterfall I just continued straight down where the stamped image ends and added a mix of blue and green paint. Once that was all dry I added detail to the scene with coloured pencils and used a white pen to add detail to the waterfall. 


Next I stamped the fairy (from May Fairy and Pegasus (from April Fairy) and glittered the wings with some glamour dust. I glued the scene to the card and added some ribbon and embellishments to finish off. 

I hope you're enjoying the Spring Fairies as much as we are. Thanks for visiting today
Claire xx

Thursday, 27 February 2014

New stamps: Fantasy Castles and Magical Landscapes (by Glenda)

If you've checked the New Stamps section of the website this week, you may already have spotted our gorgeous new stamps.

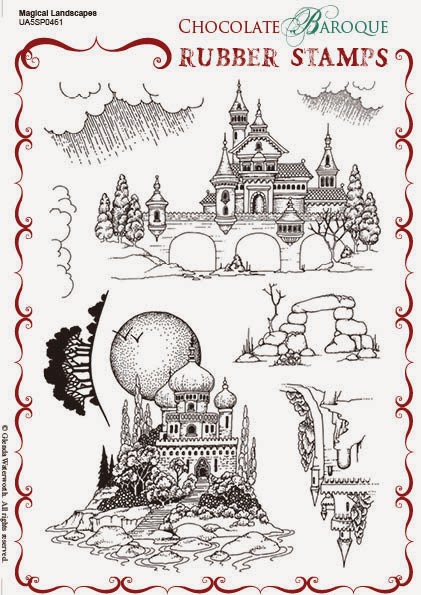
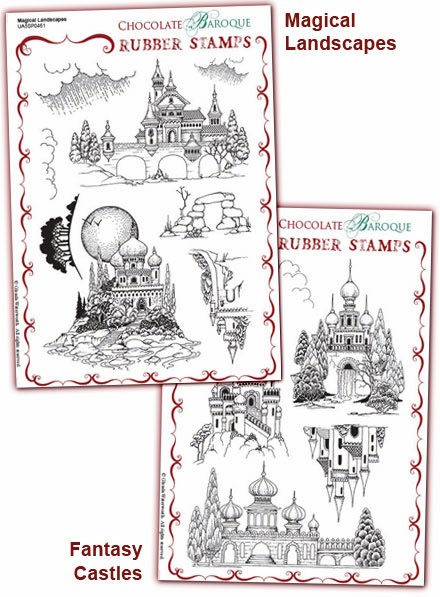
Firstly we have Magical Landscapes

http://www.chocolatebaroque.com/Magical-Landscapes-Unmounted-Rubber-stamp-sheet--A5-_p_5873.html

which go perfectly with Fantasy Castles

http://www.chocolatebaroque.com/Fantasy-Castles-Unmounted-Rubber-stamp-sheet--A5_p_5874.html

and of course we have a multibuy

http://www.chocolatebaroque.com/Magical-LandscapesFantasy-Castles-Unmounted-Rubber-stamps-Multi-buy--A5-_p_5875.html


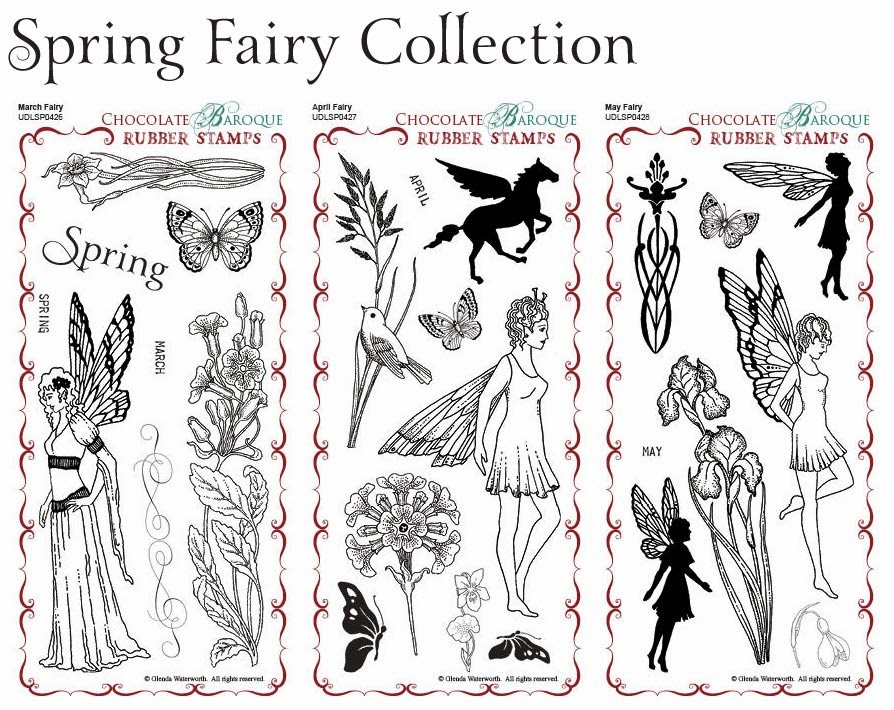
We are also launching our Spring fairy stamps comprising March, April and May, available individually or as a multi-buy.  

http://www.chocolatebaroque.com/Spring-Fairy-Collection-Unmounted-Rubber-Stamps-Multi-buy--DL-_p_5553.html


As with our previous Autumn and Winter fairy collections, we've put together a Fairy Inspirations Leaflet which is free for a limited time when you purchase the Spring Fairy Collection.


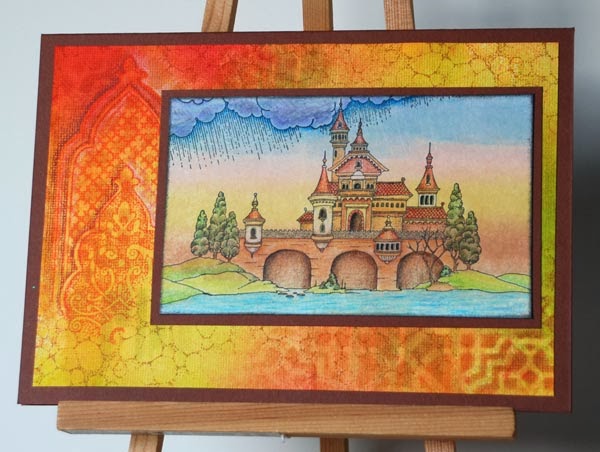
The card above has been stamped onto a brayered background using a home made kaleidacolour inkpad (I inked the strips with Distress Reinkers) and I brayered onto a matte card rather than the usual glossy or silk.  After stamping the image, I continued some of the lines of the hills out to the edge of the card, then masked off the roof and stamped the clouds.

There are two sets of clouds on Magical Landscapes with rain going in different directions, so I simply rotated the small one and stamped it so the angle of the rain is the same as the large.  The scene is coloured with Coloursoft pencils.

The background is Dylusions sprays with a little stencilling and stamping and I've used a nutmeg brown card for the base and layer.

At the moment you can find all these stamps in our New Stamps department and until the end of March, they are all at fantastic introductory prices.

I can see lots of possibilities for these stamps and you'll be delighted with what the DT come up with over the next month so stay tuned.

And if you don't already know, we reward our loyal commenters each month with a Chocolate Baroque gift voucher, and the more often you comment, the more chances you have of winning, so why not leave a kind word or two for the girls - it means a lot.


PS - talking of Design Team, yes we have selected our new team members and we will be introducing them in a couple of weeks once they've settled in!