Pin It button on image hover
Showing posts with label Fancy Flourishes. Show all posts

Saturday, 30 April 2016

An old rose (by Miranda)


Hello there,

Happy to be here again and show you my play with one of the older CB stamps called Rose Set.
 It's a very detailed rose but it is gorgeous I think...it took me some while but as I love to color it was not a punishment.......

I made the background again with a favorite technique I am using quit a lot these day, fluid inks.....like Ecoline and used also white to get that soft coloured finish. Some parts are coloured using Distress inks and some are coloured using pencils. It's tricky to use water based mediums over the top because the background stays reactive........

Randomly I stamped partial the small text fragment from Eccentric Edwardian sheet using Memento Toffee Crunch.

The next step was stamping several ornament stamps from the Fancy Flourishes clear stamp sheet. I have embossed them using clear mat embossing powder and blended afterwards with Distress inks to let them pop......

Than just some plain stamping with these ornaments and adding some crackle effects using the crackle fragment from the Echoes of Italy.
Well, enough text for now, onto the card......


Hope you did enjoyed it and hope to see you next time!
Thanks for your visit and I always like to read your comments, any questions....feel free to ask!


Sunday, 29 March 2015

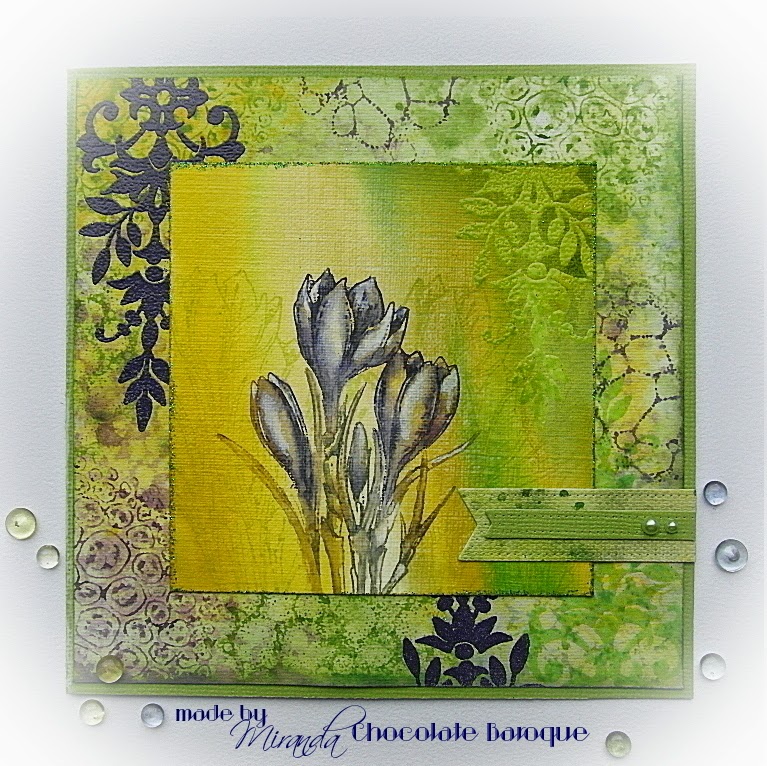
A lovely little Crocus.........by Miranda


Hi there,

It's my turn again to show you something made with the lovely Spring bird stamps. This time I've used the Spring bird Crocus. I have worked on paper suitable for working with acrylic paints, with a canvas structure. It worked also fine for inks and water. On this paper I have used some fluid inks which are a more bright than the Distress inks.
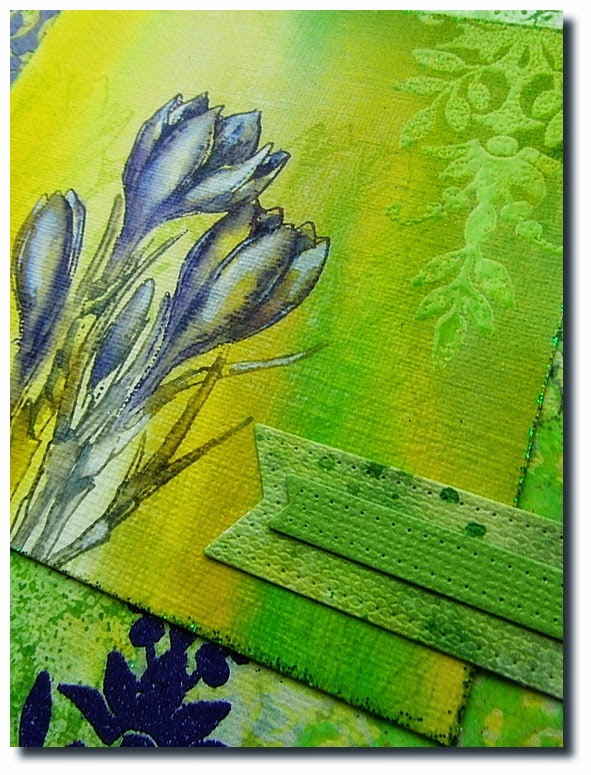
I have inked directly on the crocus rubber stamp with water based markers, spritzed some water and after stamping I blended the colors with a water brush for a water color effect.

On the background you can see lots of layers. First I have made a background using Distress stains and water.(Mustard Seed/Mowed Lawn and Dusty Concord). Than I have stamped( also with Distress stains)several stamps of the Textured Fragments and finally embossed some ornaments from the Fancy Flourishes clear set using Wow Earthone Grape and Wow Luscious Lime.
The edge of the small card is embossed with Wow Mint Mojito, a sparkling powder.


If you have any questions, feel free to ask! Thanks for visiting and till next time,


Sunday, 24 August 2014

Partridges, Turtle Doves, Pears and an Elegant Tree (by Shirley)

Hello everyone,  I hope you are doing well.

I had great fun last month creating Christmas cards and have two designs to show you today that feature stamps from the new Turtle Doves set.


The background above was created with Raspberry & Persimmon Distress Inks using the acrylic block technique.   I stamped a flourish from Fancy Flourishes with Raspberry DI.

The pear tree branches & turtle doves from Turtle Doves and pear from Pears and Baubles were stamped with Imperial Purple Versafine ink.   I coloured the background branches with Prisma pencils.  The pear and birds were coloured with distress inks (using a mat, water & brush), decoupaged and popped up over the background.  I also added glitter paint to the larger birds and outlined with a white Gelly Roll pen.   Merry Christmas is from Warm Christmas Greetings.

And the card below is in a clean style:


I embossed a tree from the Turtle Doves set with gold and embellished with lots of little half pearls.  I added gold embossing to the edge of the background.  The die is from Spellbinder - Elegant Labels 4.


This will be my last post here for a couple of months as my husband and I are moving into a new home.   We found it was time for us to downsize (or 'rightsize').   We had a lot of work with purging and digging to move garden plants.   It's been a very busy time for us and I am very appreciative and thank Glenda & Lesley for allowing me a break while we get settled.   I can't wait to be back again working with Chocolate Baroque's gorgeous stamps again this Fall.

Thanks for your visit and have a great day,
Shirley

Monday, 5 May 2014

Fabulous Flappers (posted by Claire)

Good morning folks, just a quick post to share another card made with this months new release stamps, Fabulous Flappers 


The first background is made with distress inks in shades of green and my ink blending mat, spritzed with water and then mopped up with white card. The next layer was made using Fancy Flourish stamps with shades of Green Memento ink.

The flapper, vase and flowers (all from the sampe set) have been stamped with Memento Tuxedo Black and coloured with Graph'It Markers. I stamped some of the flowers around the edge and distressed with some green ink. I added some stickles to the centre of the flowers and layered up over a spellbinders border die cut. I've used Tea Dye distress ink to tone the card I used for matting with the image. To finish off  I've made some little roses and added some punched leaves

Thanks for popping by
Claire xx

Friday, 25 April 2014

All dressed up (posted by Claire)

Good morning Claire here with my first sample using this months new stamps Fabulous Flappers (you can find them here). I've had a wonderful time with them as they are such versatile stamps, great for lots of different techniques from colouring to paper piecing to dusting off the angelina fibres to create outfits for these lovely ladies.


I've coloured this glamorous lady with my Graph'It markers and added some faux pearls to her collar and her hair. I've lightly distressed the edges with Black Soot distress ink.


The background was made using Ladybug memento ink and one of the stamps from Fancy Flourishes, these are clear stamps which are perfect for pattern building. Again I've distressed the edges with a little black soot. I've added some black lace, red ribbon and a little resin flower. the sentiment is from Mackintosh sentiments

Thanks for visiting today, keep popping back as my teamies have got some really beautiful projects to share using this months gorgeous new stamps
Claire xx

Wednesday, 18 December 2013

More Beautiful Florals (by Shirley)

Hello everyone, I hope you are doing well and enjoying this busy time of year. 

I have two more floral designs using the new beautiful Floral clear stamps.


For the card above, I stamped the Big Bold Background - Wildflower on an orange/yellow sheet of designer paper with brown dye ink.  I also stamped the Peony with the brown ink and coloured both the background and main image with my Prisma pencils.  Joy is from Artistic Expressions.

And below is another design using the gorgeous Magnolia in a different colour combo.


The background was created with Seedless Preserves Distress Inks using the Acrylic Block technique.    All stamping was done with black Versafine Ink.   I coloured the Magnolia with Prisma pencils.  The corner flourishes are from the beautiful Fancy Flourishes clear set which I highlighted with a Gelly Roll pen and turquoise Pencil.


Thanks for your visit and enjoy the Season !
Shirley

Sunday, 3 November 2013

Fall Colours with Texture (by Shirley)

Hello everyone, I hope you are doing well.

It's hard to believe but here we are into November already.    I made this card when the Fall colours were in their prime,  which inspired this design.     I used the new fabulous Abstract Fragments together with several other stamp sets.


Stamps sets used:    Abstract Fragments, Gothic Fragments, Fancy Flourishes, Butterfly Daisy Collage and Artistic Expressions.

I also used Crealie- CL CS 24 die cuts and TCW Stencil - Cubist.

The background is Marmalade, Mustard and Wild Honey Distress Inks using the Acrylic Block technique.   I added the cube design with the TCW Cubist Stencil and Wild Honey Distress Ink.   I stamped 'Art' and the Flourish from Fancy Flourishes at the bottom with Walnut Distress Ink.    I stamped the bricks from Abstract Fragments and Window from Gothic Fragments with Rusty Hinge Distress Ink.

Next I embossed the flowers from Butterfly Daisy Collage with Copper on purple designer paper, cut them out, attached them to the background with the Crealie die cuts and added metal medallions that were hanging out in my stash.


Thanks for stopping by.  I hope you can visit often to see what my talented teammates have created.

Have a great day!
Shirley

Wednesday, 30 October 2013

Flutterby Flourishes (posted by Claire)

Good morning folks, Claire here with a quick and easy card using the gorgeous Fancy Flourishes stamps and a little topper made from Tim Holz tissue wrap (you can find it here)

I made the background by blending Dusty Concorde and  Milled Lavender distress inks onto some white cardstock. I stamped the flourish using Imperial Purple Versafine ink, its so easy to position these clear stamps. I made the topped by wrapping a little piece of card with tissue wrap, and adding some colour with more distress inks. I coloured the butterflies with Graph'It Markers and added some tiny dots of stickles to the wings before edging the topper with a gold krylon pen. I've just added a little bow and a die cut butterfly to finish off.

Thanks for visiting today
Claire xx

Tuesday, 29 October 2013

Purple and Gold (posted by Judith)

Hi folks, I have another sample showcasing the Fancy Flourishes clear stamp set for you today. I have created a background by colouring a piece of glossy card with alcohol inks. I then stamped one of the flourish stamps diagonally across the card using gold embossing powder. I used two pieces of mountboard which I cut into oval shapes and coloured with Distress Inks. I stamped these with the crackle stamp from the Echoes of Italy stamp set to give them an aged feel. I stamped the large flourish onto the bigger oval, and a sentiment from the Loving Sentiments stamp set onto the smaller oval.

I punched a hole into each piece of mountboard at this point. I then added three layers of ultra thick embossing enamel to each piece, so that they looked like glazed tiles. I added some jump rings between them, and stuck some gems onto the large flourish.


Thanks for stopping by, Judith xx

Monday, 28 October 2013

Blue Christmas (by Shirley)

Hello everyone, I hope you had a great weekend.

I have two 'Blue' Christmas cards today featuring new stamps along with an older favourite:).   I used the new Reindeer Landscape set for the card below.


I used a favourite Dylusion ink combo (Calypso Teal, After Midnight & White Linen) on the background.  I stamped the trees from Reindeer Landscape with Deep Purple Archival Ink and added lots of glitter.    Believe also from Reindeer Landscape, was stamped with black Versafine Ink.   I used Memory Boxes Dies - Deer Trio & Snowflake Corner (they cut like a charm!) with black cardstock.    The Deer Trio is great as the bottom doesn't cut so you can cut to whatever shape you need for your design.    I added lots of glitter to the trees and snowflakes.


I used the new Fancy Flourishes clear set along with Christmas Flourish  and Bold Christmas Words for the card below.


The above background was created with the same three Dylusion Ink Sprays.    I spritzed a little water to blend, blotted with a paper towel roll and added a little sea salt before it was dry to create 'stars' in the ink.  When dry, I used TCW stencil - Star Fall with Picked Raspberry & Peacock Feathers Distress Inks and white Acrylic Paint.

I stamped the Flourish from the new Fancy Flourishes set with Salty Ocean Distress Ink around the border of the background.    The sentiment from Bold Christmas Words and the Christmas Tree from Christmas Flourish were stamped with Black ink.   I added stickles to the tree. 

Thanks for your visit and have a great day!
Shirley

Saturday, 26 October 2013

Doily look alike (by Debbie)

Hello. The card I have today shows how the small stamp from the Fancy Flourish Clear stamp set can be used to make a look like doily.
I started by cutting a 14cm square and with French Ultramarine Archival ink placed the stamp on each four sides. Next, I stamped in between the first four then stamped from the centre to where the stamps meet. I stamped the sentiment from Birthday Words which is great for the inside or front of a card. The sentiment was die cut and added. I mounted on to a pale blue then attached to the card. Once I had worked out the placing of the stamps they are quick to make. Hopefully the UK weather will be kind this week as the schools are off. Have a good day. Debbie

Thursday, 24 October 2013

Holly Flourishes (posted by Judith)

Hi Folks, here is a quick little Christmas card using the new Fancy Flourishes clear stamp set. I used the holly flourish to create the impression of a tree branch, by repeatedly stamping the image along one edge of a piece of kraft card. I used a white pen to add a 'shadow' to look like snow on the branches. I stamped the word 'Joy' from the Bold Christmas Words clear stamp set in the top corner, using red ink.

I made a robin by die cutting a bird from dark brown foil and colouring the stomach area with red alcohol ink. I added a little gem for the eye. Finally, I added a red and green layer of card behind the design.


Thanks for stopping by, Judith xx

Wednesday, 23 October 2013

Merry Christmas (posted by Claire)

Good morning, Claire here with a very quick and easy Christmas card using the beautiful new clear stamps, Fancy Flourishes


We always have so many cards to make for Christmas, so its nice to be able to get stamping and have a bit of a 'production line going with some simple but effective designs. The new Fancy Flourishes are fab for creating borders, backgrounds and frames so I thought they would be just the job for a a pretty Christmas design. I stamped the flourishes in Ladybug Memento Ink to create the frame, its so easy to line the clear stamps up. I added the sentiment from Bold Christmas Words and matted on some red card. To finish off I added a little red bow

Thanks for visiting today
Claire xx

Monday, 21 October 2013

Blue & Green Fancy Flourish (by Shirley)

Hello everyone, I hope you had a great weekend.

I've used one of the large designs from the new elegant Clear Stamp set  Fancy Flourishes to create this card.


I stamped the beautiful large Flourish with brown Dye ink on green designer paper that has a slight pattern.   I coloured the image with Prisma Pencils and added lots of bling.      I die cut the paper and layered onto white card stock that I embossed and edged with a gold leaf pen.  I used the same designer paper as one of the mats.

Spellbinder:   S5-160 Opulent Ovals
Embossing Folder:  Cuttlebug Acanthus


Thanks for stopping by and don't forget that Glenda is giving away a Fancy Flourishes set, please visit her Blog Post here to leave a comment for a chance to win, Good Luck!

Have a great day,
Shirley

Sunday, 20 October 2013

Fairy Flourishes (posted by Judith)

Hi Folks, I have a sample to show you today using the new Fancy Flourishes clear stamp set. I created a background by colouring a piece of white card with Mustard Seed Distress Ink, and then stamped the large flourish stamp across the card with black ink. I used the feisty angel from the Gothic Angels stamp set, masking off the areas that I did not want to appear before I inked the stamp, and then peeled the masking tape away before I stamped the image. I was then just left with the head part of the image. I coloured the image with pencils, and added Glossy Accents to the ivy leaves. I added a sentiment from the Fairyland Words clear stamp set.

I made a flower using handmade paper which was sprayed with yellow ink, and cut from Nestability dies. I edged the shapes with black ink for definition. I scrunched each layer, and attached them together with a brad. I glued a cog into the centre, and dropped seed beads into the glue. Finally, I die cut some ivy leaves from green card.

The background reminds me of expensive wallpaper, it would look lovely in a living room or bedroom, wouldn't it? Keep popping back for more samples from my Team mates. Thanks for stopping by, Judith xx

Friday, 18 October 2013

Introducing our Flourish clear stamp set


I'm delighted to announce we have a new set of clear stamps just out - Fancy Flourishes. Read on for details of a giveaway!


I think this is one of those very versatile sets that you can use in conjunction with many other stamps - they're great for edging die cuts and adding detail to corners behind your matting and layering.

In the card below I've used 'second generation' stamping to create a background.  That simply means I've inked my stamp and stamped onto scrap paper, then stamped onto the card without re-inking.  I vary the pressure when I stamp the fully inked stamp on the scrap paper, which means the second stamping has some areas darker and some lighter, which gives it more of an antique, faded look.


 The card below is another very simple card - I stamped the bold flourish with Versamark and rubbed PanPastel over the card to create a tone-on-tone effect.  I stamped the sentiment from Fairyland Words  in Archival (Deep Purple) over the top.


And if you thought corners were just for corners, think again.  Here I've taken the two large corners and stamped them together to make a butterfly.  I hand cut the body then overstamped that with one of the smaller flourishes too.   I stamped with Versamark and embossed with gold sparkle embossing powder then sprinkled a few purple gems around.  The wire antennae help finish off the butterfly illusion.


I have a set to give away, so if you'd like to win this set, please leave a comment below.  So that I don't forget, I've put it in the diary to pick a winner on November 1st which gives you a couple of weeks.
