Pin It button on image hover
Showing posts with label Tangled Birch. Show all posts

Saturday, 25 December 2021

I'm Grateful (by Judith)

Hello everyone, I'm popping in with a Christmas wish for you all today. Normally Lesley would be here today wishing you all the best for the festive season. As you probably know, our lovely Lesley has very recently been ill, and is currently at home recovering, being looked after by David. Lesley will need to take things slowly for a while. I am sure like myself, you wish her a speedy recovery.

I spoke to Lesley yesterday morning, and a thought for this post had already formed in my mind, two words, 'I'm grateful', grateful that Lesley made it through her heart attacks, and that she is still here with us. We have a lot to be grateful for, don't we? We might moan about the state of the world right now, with Coronavirus, lockdowns, rising food prices, etc., but we still have friends, family, crafting, a smile, our pets, there is always something that we can be grateful for. 

I have not made anything new to share with you for this blog post, but I looked through my old blog posts, and found these projects to share with you:
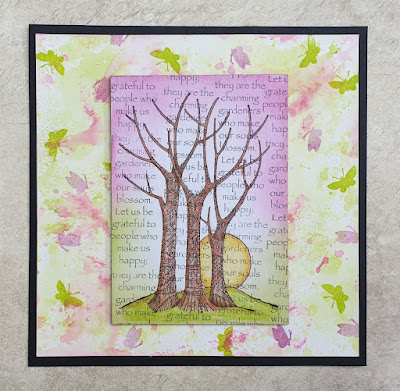
I have used a sentiment from the Words of Gratitude stamp set to create a background, (very apt on this occasion), for the Tangled Birch tree. I used soft pinks and greens on the whiteboard panel and the larger background behind. The little butterflies are from the Baroque Meadow stamp set.
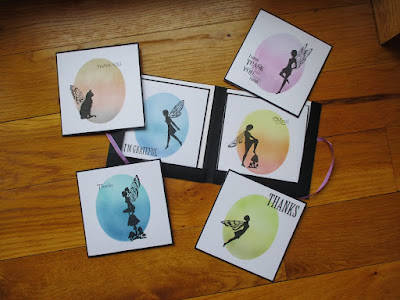
Here is a very quick set of thank you cards using the same Words of Gratitude stamp set of sentiments, plus a variety of fairies across the whole range of fairy stamp sets from Chocolate Baroque. These are perfect for any time of year but great for sending out after Christmas.

Thank you to all of you, our customers, for supporting us this year, for visiting the blog and Facebook Group, buying our stamps and other products, watching the TV shows, and leaving so many friendly supportive comments. We appreciate every single one of them.

Thank you to the rest of the Design Team for your hard work over the past year, your beautiful samples and support, you help make Chocolate Baroque shine. 

Finally because I can, I want to commend David and Lesley on their hard work this year, ensuring that the stamps have been top quality and the service to you the customer has been first class. They work so hard to make Chocolate Baroque an outstanding business, but they make us feel part of the family too.

Wishing all of you health and happiness over the coming season and for the year ahead. Sending lots of love to Lesley as she rests and starts to recover.

 

Thursday, 23 July 2020

Rainbow Tree (by Judith)

Hello everyone, I have a project to share using stamps from last month's TV Shows from Hochanda. I have created a cheery card using the Tangled Birch stamp and a sentiment from the Words of Wisdom stamp set.

I stamped the Tangled Birch image using Versafine Onyx Black ink, and extended the landscape using a fineliner pen. I coloured the image using Koh-I-Noor pencils, and then covered the coloured image with Acrylic Wax. You could use masking fluid and rub it off afterwards, but the acrylic wax is so quick. (Or you could use bleach to take the colour out of the tree if you apply the background colour first, and then colour the image afterwards). I added shading over the background with Distress Inks, and buffed the image with a piece of paper towel.

Rainbows are a symbol of hope and unity right now, I felt that this background would be so uplifting for someone who is feeling down, or for a special person that needs a card sending to them during this time.

I will be back next month with more projects to share with you. Look after yourselves, and stay safe. Thanks for stopping by,

Judith xx

Monday, 20 July 2020

Words, Trees and Katya (by Zoe)

Good morning Lovelies and welcome to my second post this month.
Here are the rest of my samples from last month.

My first card is Yupo paper which I used Alcohol inks and blending solution, then used Archival ink pads to stamp Tangled Birch on.

I used Distress Oxides ink pads to create the background and Inktense pencils to colour in the beautiful Katya.

I used a whiteboard tag from the website, I coloured and stamped the background with Distress Oxides, a little splatter with a marker pen to finish it off. I used:
Words of Inspiration, Shaded Baubles, I Shall Be Your Wings.

Thank you so much for spending your time visiting.
Have a wonderful day, stay safe and keep well.
Big hugs
Zoe xx

Monday, 6 July 2020

Looking at Backgrounds (by Judith)

Hello everyone, I hope that you are all keeping well. Even in times like these, I hope that you have been able to find some enjoyment in your crafting, in whatever form that has taken. A lot of you have been saying that your mojo has taken a walk, but hopefully the inspiration here on the blog, on the Facebook Group, and Lesley's daily Facebook live posts are continuing to provide you with lots of ideas.

I have created a card for you using the lovely Katya, and stamps from the Timeless stamp set. I used a piece of card from my stash that had been washed with a tea bag dipped in warm water. This gives the card a lovely aged feel, perfect for the look I wanted. It's a very quick way of colouring a background.

I stamped Katya using dark brown Archival ink, and covered the image with masking tissue, before adding the large image from the Timeless stamp set a couple of times. I then added lots of the smaller images using second generation stamping to fill the rest of the space, and overstamping the other image as well. I used sepia tones, keeping in with the general colour palette.

I removed the mask, and coloured Katya with Koh-I-Noor Polycolour pencils, these blend really well, and add a pop of colour to the main image. I felt that the main decorative piece on Katya's headdress reminded me of a cog, and so she fitted so well with the 'Timeless' theme, a lady from a bygone era.


To create my second card, I added Distress Inks to a piece of Drawing Cartridge with some water, and then stamped the little butterflies from Baroque Meadow across the background using toning colours of Versafine Clair inks. I used a whiteboard postcard, and stamped a sentiment from Words of Gratitude across the background using grey Archival Ink. I added some shading around the edge of the postcard using Distress Ink and stamped the Tangled Birch over the top, which I coloured with pencils as before.


My final card, which I shared at the time of the TV shows was a really quick card, a simple Brusho background with the same wording added. I then stamped the images from Baroque Meadow in black ink, and added a piece of black ribbon, before mounting the project onto black card.


These lovely stamps are so versatile, always a pleasure to create with. I will be back later in the month with more ideas to share with you. Take care for now, and stay safe,

Judith xx

Sunday, 5 July 2020

Two Bookmarks (by Zoe)

Good morning Lovelies and welcome to my first post this month.
I hope you managed to catch the amazing shows last month on Hochanda featuring these amazing stamps.

I used Chocolate Baroque's Strip Stencils to create both backgrounds.
The first using the fabulous Tangled Birch stamp.
My second bookmark I used the words from the show as my background and diecuts to create the focal point, I do love verses and words to create backgrounds. https://www.chocolatebaroque.com/words-of-unmounted-rubber-stamp-multi-buy-a6.html

Thank you so much for visiting, I do hope I have given you some inspiration.
I'll be back later in the month with a couple more samples from the show.
Until then, stay safe and keep well.
Big hugs xx Zoe

Saturday, 22 October 2016

Christmas Birches card (by Anne)


Good morning. I have had some little Xmas bauble stickers in my stash for years and thought that they would be perfect hanging from the Tangled Birch for a Christmas card. Think that I will make a few more of these and get my stickers used up.

Unfortunately I had a little trouble photographing this one. It is mounted on shiny mirror card and has lots of sparkly glitter texture which is very difficult to see in the photo. It looks lovely in real life. It would still work without the baubles, or perhaps with some gems of die cut snowflakes. I hope that you like it.

Materials:
  • Tangled Birch stamp and sentiment from Christmas Candlelight
  • 12 X 17cm black card blank, silver mirror card and white stamping card
  • Ink sprays (blue, yellow, orange, opaque white and clear mica)
  • Inkpads: Versamark and Memento (Tuxedo Black)
  • Heat embossing powder (silver with glitter)
  • Alcohol markers (black, mid and light grey)
  • Watercolour pen (yellow)
  • Glitter pens (red and green)
  • Christmas bauble peel off stickers
  • Fine crystal glitter
How to make it:
  1. Stamp the tree and heat emboss with sparkly powder.
  2. Cut a small circle to act as a mask and spritz the background with sprays. Remove the mask and colour the moon with yellow watercolour pen.
  3. Add touches of colour to the stamped image with glitter pens. Add some shading around the outside of the trees and at the base of the scene with grey alcohol marker.
  4. Trim the card, outline with black marker, mount onto mirror card and glue to the card front. Stick down the baubles.
  5. Stamp the Christmas banner with Memento ink. Colour with alcohol and glitter pens. Cut out and glue to the card front.
  6. Finish with fine crystal glitter on the foreground and tree branches.

Sunday, 4 September 2016

Textured Book Covers using the Tangled Birch (by Anne)

I hope that you like my texture project for the blog today. I got the idea from one of Lesley Wharton’s demos on The Craft Channel where she used Brushos to make lovely background papers and book covers.


Materials:
  • Tangled Birch stamp
  • A6 (approx. 10.5 X 15cm) hard backed note books, scrap acetate, kitchen towel and cartridge paper
  • Brusho’s and Ink Sprays (pinks and blues, some with mica)
  • Starlight paints (with crushed gilding flakes) or metallic acrylic (gold and pink)
  • White Gesso
  • Mod Podge (Matte finish)
  • Tacky acrylic glue
  • Glitter glue (pink and gold)
  • Alcohol marker (black or dark grey)
  • StazOn Inkpad (Black)
  • Microbeads (pink and turquoise mixes)
Summary of techniques:
  1. The blue textured paper was created from waste kitchen towel initially used to mop up waste diluted Brushos from my craft mat. I spritzed on a bit more colour. When dry the towel was scrunched up and the layers separated.
  2. The pink textured paper was created with thin cartridge sketching paper and ink spritzers, some with mica.
  3. The papers were applied to the book covers using Matte Mod Podge. The wrinkles created a lovely texture. I sealed the blue tissue with Mod Podge on the outside too, and used both layers as it was quite translucent with just one layer. I left the pink textured paper unsealed.
  4. When dry I rubbed over the surface with metallic acrylics to pick up and highlight the textures (using a little on my finger).
  5. The Tangled Birch was stamped onto acetate with StazOn Ink. The back was then coloured with metallic acrylics.
  6. When dry I added a layer of white Gesso. This made the translucent acrylic more solid and opaque. The image was cut out and glued to the book front with tacky glue.
  7. Glitter glue was added to the image front. I used Pinflair glitter wands which work well on acetate. You may want to test this as some glitter glues may not stick well to acetate.
  8. Microbeads were dropped into a thick layer of tacky glue for added texture.

Tuesday, 23 August 2016

It's summer, read more (by Dominike)

Hello everyone, remember at the beginning of this month, I introduced a new Art Journal with coffee filters.
The filters are just a part of my journal. I made tags too.
Summer is the time of our grandchildren. Last month, I bought a new book for my grandson Louis, 5 years old, Heu-reux ! by Christian Voltz. The beautiful story of Grobull, the king who wants to mary his son Jean-Georges with the most beautiful cow of the kingdom. But the prince does not want to be married to any cow, he preferes Hubert, the ram. The most important thing for him is to be HAPPY!

There are beautiful illustrations and I decided to make them with Louis. He is still little so I cut the bodies and Louis chose the eyes, the jewels and all the décorations. The horns are cherry stalks.

The backgrounds of the tags are made with brushos, the stamps are Chocolate Baroque : Summer Fair, Tangled Birch, Exquisite Owls.

 here is Shy
 Charmer
 Coquette
Delightful

Funny is not it ?
Kind regards.

Souvenez-vous en début de mois, je vous présentai mon nouvel Art journal réalisé avec des filtres à café. Mais ceux-ci n'étaient qu'un élément du journal, le reste étant réalisé avec des tags.

L'été est souvent consacré aux petits-enfants. Le mois dernier j'ai acheté pour mon petit fils Louis, 5 ans, le magnifique livre de Christian Voltz, Heu-reux ! C'est l'histoire de Grobull, le roi qui veut marier son fils Jean-Georges à la plus belle vache du royaume. Or le Prince refuse toutes les prétendantes et veut épouser Hubert, le bélier.
Les illustrations sont très belles et très inspirantes. J'ai donc décidé de les réaliser avec Louis. Comme il est encore petit, j'ai coupé les corps et il s'est chargé des yeux, des bijoux et des décorations. Ainsi les cornes sont faites avec des queues de cerise.

Les fonds sont réalisés avec les brushos et les tampons sont des Chocolate Baroque : Summer Fair, Tangled Birch and Exquisite Owls.

Amusant non ?
J'espère que vous aimez. A très vite.


Monday, 11 July 2016

Autumn's Smile (by Judith)

Hello everyone, I am sharing a project or two today, using our current stamps of the month. Along with the rest of the Design team, I have been enjoying working with these stunning stamps from Sue, and hopefully, I can add my piece of inspiration to the daily treats that the team have been giving you.

My first card uses the Autumn Medley rubber stamp to create a seasonal card. I stamped the image, and masked it before creating a leafy background, using leaves from my garden and Fossilized Amber and Rusty Hinge Distress Ink.  I coloured the image with water based markers, and added extra detail with pencils afterwards. I added one of my all time favourite sentiments, taken from the Nature's Peace stamp set. I matted the background onto green card, before adding it to a black card blank.

For my second card, I have created a wrinkle free Distress background, and combined the Tangled Birch individual stamp with stamps from Patchwork Landscape and Seasonal Fragments, to create a scene. I coloured the images with water based pencils.

My last card uses the lovely Autum Medley stamp once again, and I have created a border around the image, using stamps from the Autumn Poppy stamp set. I stamped the foliage using various colours of Archival Ink, and then coloured everything with Polychromos pencils. I decoupaged some of the leaves on the main image.
Thanks for stopping by, Judith xx

Sunday, 10 July 2016

tangled birch

 This beautiful new stamp is very addictive - so much so that I haven't got as far as playing with the equally lovely ladies yet!
Both these cards are on 7" square white card blanks.
For the first one I sed masking fluid to cover the trees before brushing with a mix of distress inks in blues and purples, with some wild honey for the moon.
Once it was all dry, I rubbed the masking fluid off, tore round the edges and added a black mat. I sued the same stamp to add the bbackground, using broken china ink to stamp with and to sponge the edges.


For the second card I masked the trees again before adding a sunset sky with distress inks, then coloured the trees with brown watercolour pencil.
Background card was created using spray starch and mica powders

Thanks for looking, and do keep checking to see what everyone else has done with this stamp (and the ladies!)

Veronica

Saturday, 9 July 2016

Icy Tangled Birch (posted by Claire)

Good morning, Claire here with a wintery themed card using the beautiful new Tangled Birch stamp. This is such a detailed stamp and so versatile, I thought it would be a good opportunity to start my Christmas cards. Have you started yours yet?


I began by stamping the focal image on some stamping card and dusting distress ink (Spun Sugar, Tumbled Glass and Squeezed Lemonade) over with a shaving brush before distressing with Iced Spruce ink. I splashed the background with some water and blotted with some kitchen towel to create a snowy effect. I stamped the image on acetate with versamark, extending the land a little with a versamark pen  and embossed with a silver embossing powder. I layered this over the background, attaching with a couple of silver eyelets. and added some glitter to the moon using a Zig glue pen.

To make the background I used the same colours of distress ink and dusted them over a larger piece of card, trying to follow through the colours from the topper. The snowflakes are from Reindeer Landscape, stamped with Iced Spruce distress ink and then I've added dots of glue and sprinkled with glamour dust.


I've used some silver card from my stash to mat and layer the image and the background and added a silver bow to finish off. 

Thanks so much for visiting, I hope you're enjoying all the inspiration from my lovely teamies. 
Claire xx

Sunday, 3 July 2016

Tangled Birch (by Magda)

In those nice summer days, I enjoy drawing outside and not only in my garden. Therefore I decided to personalize the drawing box I use to carry with me.

The new Tangled Birch stamp is really lovely and is the right size for my project.

1. Paint all the metal box with black marble Dylusion Paint and let it dry
2. Stamp in the inside of the lid, Tangled Birch with Versamark and white embossing powder, and heat emboss.
3. Cut a piece of Tando Creative Cotton Canvas bigger than the outside of the lid and prime it with
    gesso
4. Alternate Distress Inkpad colors with a coat of watered down white Dina Wakley gesso and always let each coat dry well
5. Use Texturised Stencil with Distress Inkpad on the canvas where you like and stamp with Versafine 
    Onyx Black some stamps of Wild Meadow for finishing the background
6.  Stamp Tangled Birch and some birds of Landscape Edges set with Versafine Onyx Black, small
     flowers of Orchard Design a Tree with Versafine Habanero.
7.  Colour with the brush the Tangled Birch using brown and green shades of Distress Inkpad.
8.  Fix well with Glue n Seal matte the Canvas on the lid of the metal box and cut all around the
     excess
9. Put some highlights on Tangled Birch using Stickles Star Dust

I hope you will have fun in using the new stamp and the canvas as a background too.

Magda


Friday, 1 July 2016

Tree Of Love (by Asha)

Good morning, friends! We are starting the month of July with one of our brand new stamps. Today I'm featuring the Tangled Birch stamp on a fun and playful Art Journal page. For this project I grabbed bright colours, used some of my favourite dies for cardmaking and created this whimsical piece.

I started by applying a gesso and acrylic paint in the background. Next, I added interest with the wavy woodgrainy stamp from Harlequin Fragments.

I stamped the Tangled Birch and water coloured it before fussy cutting. Ooops! I accidentally cut out the moon from the original stamped image.  I fixed it by die cutting a circle and adding the moon behind the branches. A different look but at least I saved the trees!

Don't forget to swing by often to see more lovely work from the rest of the team. You'll find details of tools and products used in this project over at my blog.

Beijinhos.
Asha

Thursday, 23 June 2016

Absolutely Fabulous new stamps launch today (by Lesley)

I am almost bursting with excitement as I am so proud to be bringing you five new designs from Sue that will blow your socks off!  

Today we are launching our Four Seasons Collection, plus a new tangled style stamp, and boy are these something.  They are all A6 size individual unmounted stamps, although they are available as part of our cling and cut service for a small additional charge. Anyway enough of the boring stuff here are the images you are waiting for.

The Four Seasons starts with Spring Awakening


followed by Summer Fair


then Autumn Medley


and finally Winter Dawn


I am sure you will agree that Sue has created something really unique with these stunning images and for all colourists, in any medium, they will be an absolute dream to play with. You can purchase these individually or we also have our usual money saving multi-buy available.

The fifth new release is entitled Tangled Birch and is another outstanding design.


All five of these stamps are so new we don't even have any finished artwork yet, but I really didn't want to keep these hidden any longer so I have released them ahead of time. Please watch out for loads of inspirational artwork to come from the Design Team who, I might add, have all nearly fainted with excitement at being able to work with these glorious images. 

Looking at these I am not sure which I would purchase first, but suffice to say that I remain in envy of Sue. Being able to draw this kind of beauty and quality of image is a wondeful talent to have and we are lucky enough to be able to share that in these exquisite new stamps. I am sure you will all agree.

In the meantime please don't forget to keep dropping by to see tons of inspirational and colourful artwork from our equally talented Design Team.  Now which one should I play with first!