Pin It button on image hover
Showing posts with label Useful Leaves Stencil/Mask. Show all posts

Friday, 25 October 2019

Heart of the Garden and Butterfly Bouquet by Penny


Good morning peeps, I hope you are all keeping well and dry!  What's with all this rain?  My garden has gone from parched to swamp in such a short time!  
It's my last post of the month today and I've got a piece of home decor and a card to share with you.

Heart of the Garden.

For this Home Decor piece I have used stamps from the Filigree Trading hearts and Celebration Bouquet sets; Distress Inks, texture paint, chalk paint, black Versafine ink, clear EP, CB stencils  Seasonal Elements and Useful Leaves, a gold pen and Koh-I-Noor paints.  


I stamped and embossed the filigree heart image in black Versafine and clear EP three times onto white card then cut them out.  I painted them and added dots with a gold pen.  I did the same with the bouquet.


I took a canvas board and painted a background with chalk paint, then used stencils with DIs and texture paint to add some foliage and flowers.   I attached the hearts to the board then attached the bouquet on top.


Butterfly Bouquet.

This is a quick and pretty piece of artwork that would suit many occasions.  I have used stamps from the Celebration Bouquet and Happy Flowers Day sets; grey Versafine ink, alcohol pens and DIs.  


I took a piece of CB Luxury Smooth White Paper and stamped the bouquet in grey ink.  I coloured the image with pens and added a shadow line.  I then took a spare piece of the paper and stamped a butterfly in grey ink.  I coloured it with the pens then cut it out.  I matted and layered the focal panel onto a white base card, then I stamped a sentiment along the bottom of the card and added a couple of foliage stamps.


I really like this quick card, it is ideal for when you need a hand made card in a hurry!  


Thank you for dropping by today, I hope to see you next month when I'll be back with some more crafty fun.  

In the meantime take care everyone,


                            xx  Penny  xx 


Tuesday, 8 October 2019

Bouquet of Sunshine and Smiles and Pink Magnolia by Penny


Bouquet of Sunshine and Smiles.

Morning Peeps!  I hope you are all well and enjoying the lovely Autumnal colours that are starting to come through!  I'm back to share my first post with you this month featuring stamps from the Celebration Bouquet, Happy Flowers Day and Filigree Trading Hearts sets, CB Mask/ Stencil   Useful Leaves and Kaleidoscope of Butterflies, Distress inks, black Versafine ink and alcohol markers.  


I began by stamping the bouquet image onto a piece of CB Luxury SmoothWhite Paper using Versafine ink and coloured it with pens.  I did the same with a butterfly then fussy cut both images.    


On a plain piece of CB's Designer Papers I added DIs through a couple of stencils to create a background, then added gold pen around the edges.    I took a white base card and stamped one of the worker images around two edges.  I attached the background panel to the base card, off setting it to the side.  I then attached the bouquet and butterfly with 3D glue, stamped and die cut a sentement then attached it to the card with 3D glue.


Pink Magnolia.

This project uses stamps from the Happy Flowers Day, alcohol pens, Distress Inks, CB Stencil Kaleidoscope of Butterflies, black Versafine ink, clear embossing powder and an embossing folder from my stash.


I stamped and embossed the Magnolia image onto smooth white paper, then coloured it with pens.  I added a few stencilled butterflies using DIs then blended ink around the edges of the panel.  I took a piece of Kraft card and embossed it through a folder, then attached it to a white base card.


To complete the card I stamped a sentement along the bottom edge of the base card.


Thank you for popping in today, I hope that you have enjoyed this post and that I've encouraged and inspired you to have a go!  I'll be back later in the month with some more crafty fun!

In the meantime take care,


                        xx  Penny  xx


Sunday, 10 February 2019

floral perfumery (by Veronica)


Today I have a couple of canvas boards to share instead of cards.
The first one has a greeny background using distress oxides and a leafy mask. I stamped the butterfly border from butterfly perfumery twice onto white tissue paper using an elderly multicolour ink pad, painted round the dges with clean water and tore carefully round them.
I used modge podge to fix the tissue paper strips onto the board, trying not to smudge the dye inks, not always successfully.....but the smudges gave an appearance of depth.....
The main image from floral perfumery was stamped onto white card using black versafine and coloured with watercolour pencils, fussy cut out and glued on.


The second board has a  different colour background, mostly using distress oxides again, although it had so many layers I can't remember how I did it! I also used crackle medium, although I think the temperature was too low for it to work well, as it took hours to dry and crackle and didn't really self level as it should have. I also mamanged to chip a bit off when putting it in the scanner, so not one of my better ideas!
The main image from floral perfumery was stamped onto white card and coloured with watercolour pencils. The flowers on this stamp are also on the sheet as a separate image, which is very useful - I stamped them, onto tissue paper and coloured them with alcohol markers before tearing them out and adding to the board with modge podge behind the main image.

Saturday, 5 January 2019

Imagine That! by Penny


Morning peeps, this is my first post of 2019 so Happy New Year to you all!  I hope you all had a great Festive Season and that you're looking forward to lots of crafty fun this year.  I'm kicking off with a lovely tag  today that features stamps from the Sing Your Song  and Words of Inspiration sets;   blue Versafine ink, clear and copper EP, Distress Inks, gold glitter texture paste, CB Useful Leaves Mask/Stencil, Versamark ink, gold pen.


I painted a greyboard tag with white gesso and when it was dry I blended Distress inks over it.  I stamped a swirly bird image from the Fly Away With Me set all over the tag using one of the DIs.  I applied Versamark ink around the edges of the tag and embossed it with a gold sparkle EP.


On some white card I stamped and embossed a bird and a bird house, coloured them with DIs and cut them both out.  I took the stencil and applied the texture paste to the top of the tag to add foliage.  I then attached a die cut branch from my stash and attached the bird to the branch.  I attached the birdhouse in the same way, as though it's hanging from the branch.


I stamped and embossed the word 'Imagine' in copper onto another piece of white card.  I cut it into a label shape and coloured it with DI.  I edged the label with a copper pen, then added some lines and dots with a gold pen before attaching the label to the tag.  I added some fibres and ribbons to complete the design.  


Golden Song  by Penny


For my second project today I have another sample from December's shows, with stamps from the Sing Your Song and the Live Out Loud sets, red Soft Form Relief Paste, red Versafine ink, clear EP, gold gilding wax, and a gold pen.


I spread the red paste over the large negative image from the Live Out Loud set.  I left it to set overnight.  When it was ready I peeled it off the stamp and added some gilding wax as a highlight.


On a white base card I stamped and embossed a bird in a tree image and the sentiment from the Sing Your Song set using red ink and clear powder.  I added some gold dots around the words and coloured the flowers on the bird.


I coloured a piece of paper with a gold pen, then attached the paste panel to it and matted that onto black card.  I attached the panel to the card to complete this stylish design.

Thank you for dropping by today.  I hope these projects have given you some crafty ideas, I'll be back again later in the month with more crafty fun!


Take care,


                               xx  Penny  xx 


Sunday, 11 March 2018

Tags ( by Magda)

Continuing with the series of houses from Chocolate Baroque, I propose you today three Tags made with the beautiful English Cottages Rubber Stamp


Heartfelt Thanks tag :

Background coloured with acrylic colours
Gesso applied randomly on it
Stenciled the leaves of Useful Leaves, using Distress Inkpad
Stamped on White Cardstock the images with Versafine Onyx Black
Coloured the stamps with Aquarelle Pencils,  cut the images and glued
The sentiment is from the "Words to Dazzle & Sparkle" rubber plate


Sending Hugs tag:

Stamped on a kraft tag the images with Versafine Onyx Black
Coloured with white pencil the image
Stenciled with the white pencil the snowflakes of Seasonal Elements
Stickles  Stardust for some highlights
Sending Hugs sentiment as last touch.


On your Birthday tag :

On a black Tag I stamped at first the trees with Versamark
Blended on the tree Pan Pastel pink
Stamped on White Cardstock the images with Versafine Onyx Black
Coloured the stamps with Aquarelle Pencils,  cut the images and glued
Stickles  Stardust for some highlights on the windows and on imaginary clouds
The sentiment is from the "Words to Dazzle & Sparkle" rubber plate


See you in few days again with another "houses" project.  Thank you.
Magda


Thursday, 14 December 2017

Imagination Meets Reality (by Anne)


Good morning. This one is another of my recent samples for the Steampunk shows. I used Soft Form Relief Paste to create the 3D embellishment, the lovely lace with cogs stamp to create the border and stamped onto a pretty floral paper from Crafty Individuals. I thought that the sentiment ‘imagination meets reality’ was fitting.

I mounted everything onto a ‘recycled’ 8 X 8 inch card which was a previous sample that had gone badly wrong. Rather than throw it away I just covered up what was originally there. No-one would ever know – ooops I just told you – tee hee hee.

Materials:
How it was done:
  1. The background paper on my ‘recycled’ card was created using the shaving foam technique. This is a fun method for making pretty marble effect papers. Shaving foam is spread onto a shallow tray and inks dropped onto the surface. Paper is then lowered onto the surface to pick up the ink. Versamark was then sponged through the leaf stencil and heat embossed with pearl powder. Distress Ink was then blended over the top, the embossed areas repelling the colour. A ribbon band was drawn on with pen. This was then mounted onto and 8 X 8 card. Faux stitching was added around the edges using a piercing tool and drawing with a fine tipped black pen. PVA pearls were then added to the corners.
  2. The lacy border and sentiment were stamped with Versafine onto the decorative floral paper, then mounted onto black card to frame. I had a spare scrap of this paper from another project so cut out the daisy and shaped it to add dimension and decoupaged it up onto the background.
  3. The beetle stamp was coated with StazOn Ink, then a thin layer of Relief Paste and left to dry overnight before peeling away. It was then trimmed to neaten up and glued to the card.

Sunday, 3 December 2017

Stillness (by Magda)

Hello everybody, this morning I am sharing three pages with you that I hope will inspire you.

Front page : coloured with Distress Ink Pad

1. first, colour 3/4 of the A4 White Cardstock. The upper section in blue shades and the lower  
    section in green/brown shades blending Distress Ink Pad
2. stamp with Versafine Onyx Black on a piece of stash paper the clouds of the set Landscape Edges 
    and cut the outline.
3. place the "stencil" on the cardstock of point 1 and colour the sky section blending
    blue shades of Distress Ink Pad as shown below


4.  create the landscape using Chocolate Baroque Mask and Stencil - Useful Leaves blending
    green shades of Distress Ink Pad and stamp the grass of Wild Meadow stamp sheet
5. stamp the sentiment of Words of Inspiration stamp sheet with  Versafine Onyx Black


Flower page on the left : coloured with Brusho
1. colour the background with diluted Brusho colours and spritz some crystals on it.
2. stamp the flower of Fresh Blooms A5 sheet with Versafine Onyx Black, colour it and cut the  
    outline
3. stamp the sentiment of the same Fresh Blooms A5 sheet with Versafine Onyx Black on a matching 
    coloured brusho piece of cardstock
4. Glue flower, sentiment and string on your page using Inkssentials Glue n Seal

Butterfly page on the right : coloured  with Distress Paint and  Aquarelle Pencils
1. apply White Gesso on your page, colour it with Distress Paint using the colours you like, apply 
    again White Gesso  and darken some areas with the same Distress Paint you used previously
2. stamp a butterfly from the Tangled Garden A4 sheet on a piece of A4 White Cardstock, colour it with 
    Aquarelle Pencils, and cut out it for decoupage
3. Glue the butterfly and the sentiment on your page using Inkssentials Glue n Seal 
4. stamp some little butterflies randomly around the pages with Versafine using the colour you most 
    like, and don't forget to use some embellishments to complete the project.


I hope you enjoyed reading this step by step and thank you for passing by.
Magda


Tuesday, 26 September 2017

Harlequin Bouquet Canvas (by Anne)


Good morning. Today I am sharing a small canvas created with the lovely floral collage stamp - Harlequin Bouquet.

Materials:
How to make it:
  1. Stamp the image onto stamping card with Versafine and heat emboss with clear powder. Colour with water based pens.
  2. Randomly Spritz the canvas background and cover with UTEE while wet. Heat to melt. I wanted a bit of a random texture rather than smooth glass effect. If you want more texture pour a bit more powder onto the hot UTEE and melt. Ink the sentiment with StazOn and press into the molten UTEE. Leave until it sets before peeling away. I found the image was a little feint so darkened using an alcohol pen – drawing into the impressed lettering.
  3. Apply the glitter paste with a palette knife onto the background using the leaf stencil. Apply modelling paste through the butterfly stencil. Leave to dry.
  4. Lightly spritz the watercolour card with inks (you want it to be lighter than the canvas background so that it stands out). Cut out the frame with the decorative die and apply some ink to the edges with a sponge to define. Trim the main image to fit behind the frame and glue together. Mount onto the canvas with 3D foam.
  5. Finish with touches of glitter glue.

Tuesday, 19 September 2017

Roses and Reindeer's (by Brenda)


Hello all, I'm here again to share a few more of my samples from last months Hochanda shows where Lesley inspired us all with more beautiful stamps.

For my first share I gave a piece of watercolour card a watery covering of DI then stamped Crackling Rose with Versafine black and coloured in with sparkle pens. The sentiment is from Loving Sentiments which I cut into several pieces to arrange around the bloom. The edges have been lightly inked, matted onto coordinating cardstock and a organza bow added down the side.


Reindeer Landscape is such a lovely stamp and I decided to keep it fairly simple. I stamped the main image and added some watercolour to the sky using a mask to block out the moon plus a little shading to the hills, then stamped part of the image twice onto a larger piece of card so that I could raise the focal coloured one in the centre to carry the scene either side. I also stamped one of the Deer again, cut it out and decoupaged offsetting it to the left.


My last share is a bit more inky indulgence using die cuts to create the base card which I then inked with Oxide inks and stamped with Harlequin Bouquet and Floribunda Net, coloured in with the same inks and the sentiment from Loving Sentiments stamped with Versafine black. I also added some leaves using leaves using the Useful Leaves stencil. Finally the three pieces were then tied together with seam binding threaded through eyelets.

Happy day all.

Sunday, 27 August 2017

A Mixed Bunch (by Judith)

Hello everyone, I have more projects to share with you using the fabulous new stamps featured on last month's shows on Hochanda.

I was very taken with the Floral Harmony stamp, and love the flower head image part of the design in particular. I decided to use this as the focal point for a couple of my projects.

I applied texture paste through the Useful Leaves Stencil onto a large Tando Tag, and allowed this to dry completely. I covered the tag with gesso, and once this was dry, applied a combination of pale pink and turquoise paint to the background.

I stamped the leafy spray stamps from the Take It or Leaf It stamp set, using teal coloured ink onto the background. I stamped several of the floral images onto to some spare white card, and coloured them using water based markers. I added a bit of Stickles to the centres for added bling. I coloured a piece of white card with water based marker that I had scribbled onto an acrylic block and spritzed with water. I then die cut a small rectangle and stamped a sentiment from the Amazing Mackintosh Words stamp set. I edged the rectangle using Distress Ink.

I added the flowers and sentiment to the tag, and finally coloured some ribbon using the same paints as I had used for the background, to give a coordinated feel to the project.


For my next project, I rummaged through my stash, and found some brightly coloured backgrounds, and cut out some squares of orange card, I then inked up the flower head part of the stamp, and pressed the squares of card onto the stamp to obtain the image. I also stampd several of the large leaves from the Take it or Leaf It stamp set, and then cut all of the images out. I arranged them onto a large black card blank, to create a wreath shape. I added some Stickles to the centre of the flowers once again, for a bit of sparkle.

I die cut a circle from another piece of the orange card, and stamped a sentiment from the Amazing Mackintosh Words stamp set.


For my final project, I decided to work within my favourite colour palette, and created a soft background of turquoise and purple, using Distress Ink. I stamped the Baroque Corners using Archival Ink, and added a sentiment from the Amazing Words stamp set. I edged the background with a toning Distress Ink.


I have thoroughly enjoyed working with these lovely stamps, and hope that you have been inspired to try out some of the ideas that you have seen shared by myself and the rest of the Design Team. Thanks for stopping by, xx

Friday, 25 August 2017

Make a Wish (by Brenda)


Morning Peeps, I am back again with a few more shares using the lovely new stamps Lesley launched on Hochanda a few weeks ago.

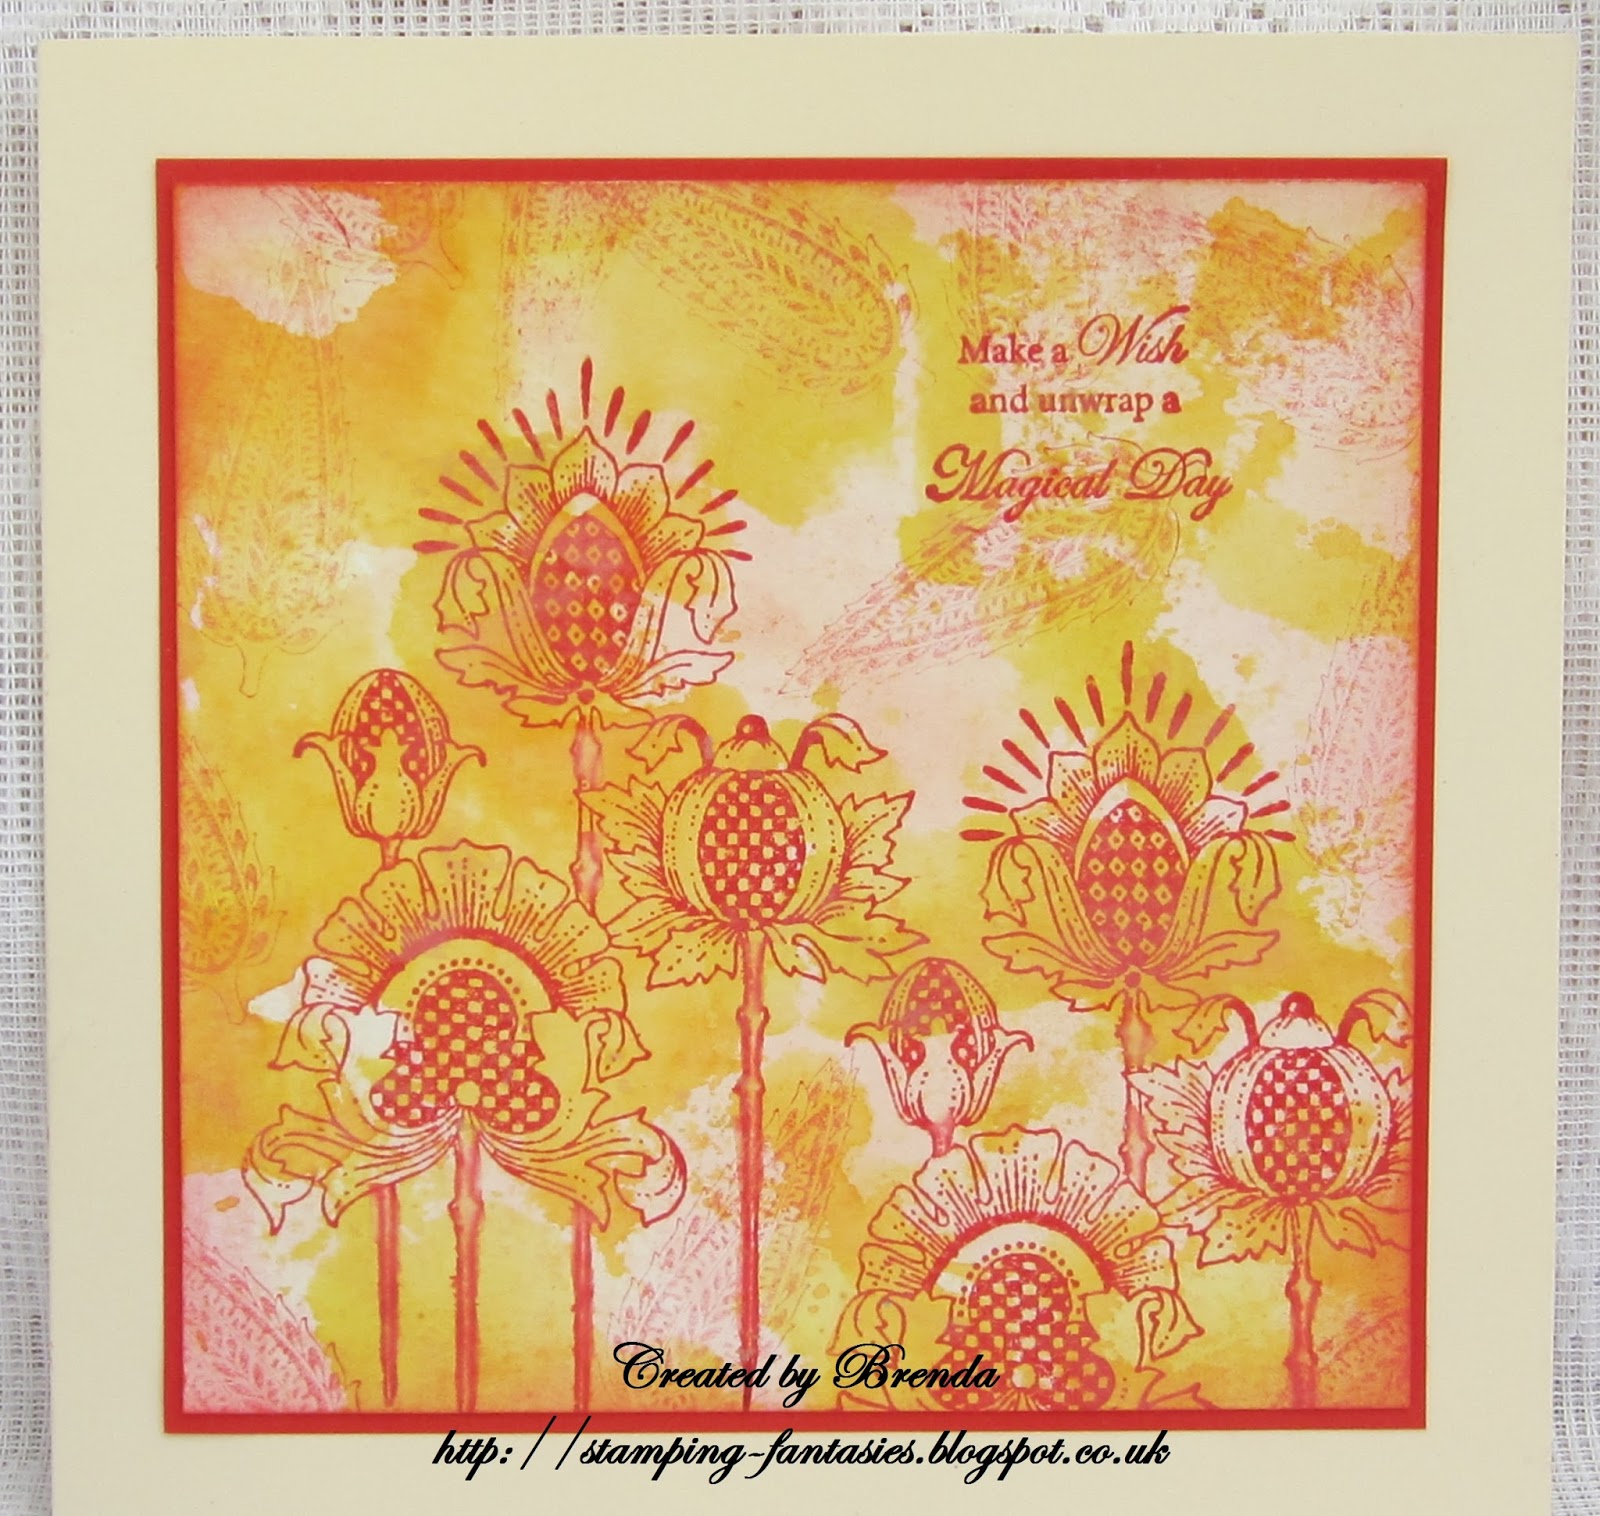
The background of the above card is actually the leftover from another one which I mopped up from my craft mat and rather likes the the muted colours. Using the small leaf from the Take It Or Leaf It set I randomly stamped the background with second generation stamping and a red Distress Ink, I then used the first generation ink to stamp the Chequered Flowers which I have to say I just love, they remind me of Thistles but with so much more interest going on. Finally I added a sentiment from Words to Dazzle and Sparkle.


A canvas now which I primed with Gesso, then acrylic paint and crackle glaze before adding leaves and 'spots' using Useful Leaves and Seasonal Elements stencils and texture paste. When dry I placed the stencils back in place and coloured with acrylic pain, then using the same paint coloured some elements from one of the colouring pages from the Colouring Collection which I then cut out and added to the canvas. I added three chipboard Butterflies painted with the same colour and stenciled some leaves onto the largest. Finally some gold Gilding Wax here are there and a sentiment from Amazing Mackintosh Words.

My thanks for popping in today and I hope you have a lovely weekend.


Friday, 18 August 2017

Glow! (by Asha)

Hello again, friends! Time my monthly Art Journal post featuring Chocolate Baroque stamps. Today I'm featuring 2 new products: the Chequered Flowers Single A6 stamp and the Useful Leaves Mask / Stencil.

I've gone with bold colours for the background: intense shades of red and gold, and to add contrast I chose deep blue.

The glittery swirling leaves are texture paste coloured with metallic gold acrylic paint, spread over the Useful Leaves Mask / Stencil and sprinkled with fine gold glitter dust. I also used the same paint to splatter the background. To add depth to the stencilled leaves I added shading with a gold glitter pen.

The main attraction is the Chequered Flowers Single A6 stamp. I kept it very simple by heat embossing it in white ... and left it at that.

These new floral singles are so versatile. They work so well for all sorts of projects.

As always, I have details of the tools and products used on my blog. Thank you for stopping by and drop in soon for more designs by the team.

Beijinhos,
Asha


Friday, 4 August 2017

Floral Harmony (by Asha)

Hello, friends. It's my turn to share a project with you - a light and airy all purpose card. I'm showcasing the new Floral Harmony stamp.

I started by stamping the image onto watercolour paper using Archival Shadow Grey ink for that almost no-line look. Then I coloured it with watercolour. When dry, I added a wash of blue in the background. Next, I gave the edges a light dusting of Distress Ink and went over the Useful Leaves Stencil & Mask with the same ink. To finish, stickles and liquid pearls ... and voila!

I hope you have fun with these new floral singles. They are a joy to colour and you can create elegant works of art on the go. I plan to stamp out a few of these and take them on holiday with me!

As always, I have details of the tools and products used on my blog. Thank you for stopping by and drop in soon for more designs by the team.

Beijinhos,
Asha


Friday, 21 July 2017

seasonal ladies

 I have three of my sample cards for last month's tv shows to show you today. It was hard to have favourite ladies, but I think these two stamps are well in the running!
For both cards the summer fayre stamp was stmaped using black versafine ink and coloured with watercolour pencils, masked with masking fluid, and brusho backgrounds added.
For the first card I partially diecut the lady out, leaving the butterfly and poppies outside the die. The base card was coloured with distress oxide inks, leaves added using the useful leaves stencil and overstamped with the large crackle stamp. The poppies in the foreground are from the floral notes plate, stamped onto leftover paper coloured with brushos and fussy cut out.


The base card was done in the same way for the second version, but the lady was cut down to a rectangle and matted onto gold card. I  sprinkled red brusho over the green background to try to create a poppy field effect, but it didn't quite work....


For the autumn medley stamp I tried to create a wood effect with the brushos, using my version of a  technique found on Youtube. I started with a piece of white card, sprinkled brown and red powder at the top, and used a damp sponge to drag the colour down the page. The colours are more blended together than the original, which used acrylic paints to blend the powders, but i was quite pleased with the result. back ground mounted onto black and gold, then onto white base card blank.
The lady was stamped with black versafine ink,  coloured with pencils and fussy cut out. I stamped the hair part again several times onto a spare piece of card coloured with orange, yellow and brown brushos, and fussy cut out the best leaves and decoupaged them onto the original.


Thursday, 6 July 2017

Spring (by Judith)

Hello everyone, I have a couple of projects to share with you today, showcasing some of the fabulous products featured on last month's second show on Hochanda.

For my first project, I used a piece of background watercolour paper from my stash, already coloured with Distress Inks, and added some stencilling, using the Useful Leaves Stencil and two different colours of green ink. I coloured some texture paste with green ink, and spread it through the Seasonal Journey Stencil, choosing the word 'Spring'. Once the paste was dry, I added some green gilding wax to darken the colour slightly, and add some shimmer.

I stamped two butterflies from the Just Butterflies stamp set onto acetate using Versafine Onyx Black Ink, and embossed them with clear embossing powder. I coloured the reverse of the images with alcohol markers,and cut the images out, before attaching them to the background. I chose a bright green card to mat the background.

For my second card, I stamped the lovely Spring Awakening image onto a piece of smooth watercolour paper, and masked the image. I coloured the background with Distress Inks, and added some stencilling with a honeycomb stencil in two opposite corners.

I drew through the twig section of the Seasonal Elements Stencil, using a water based marker, and then added some leaves, using a bright green marker. I used the same green to add the word Spring from the Seasonal Journey Stencil. I added some detail to the leaves with a darker green pencil.

I stamped a bee and butterfly from the Patchwotk Butterfly and The Rose Tree stamp sets onto acetate, embossing and colouring them exactly as I did in my first card. I removed the mask, and coloured the main image with pencils. I added some deeper shading around the edge of the card, and matted the background onto some purple card.

Thanks for stopping by, Judith xx