Pin It button on image hover
Showing posts with label Chocolate Baroque Strip Stencil- Collection 1. Show all posts

Wednesday, 13 April 2022

Black and White with Added Colour (by Christine)

Hello everyone, today sees the first of three posts from our Guest Design Team member Christine Patch. Christine has created a couple of pretty floral projects for your inspiration. 


Christine writes:


Hello everyone,

I am very pleased to be back from a bout of ill health to contribute to the Blog and am sharing two projects. 

The first is a set of note cards which I have been planning for a while. I used a die to give me a decorative background for all six, three using black and three white card. For the white version I used a lovely stamp from the Rose and Thistle set, fussy cut it out three times and then used shimmer watercolour paints as my colouring medium.

For the next three, I chose one of the stamps from the Sunny Sunflowers set and then used coloured pencils as my colouring option. I chose a light and dark orange, a light and dark blue, and a light and dark red.


My second project is for my art journal. It is watercolour card, A4 in size, and started life out as a clean-up from a piece started last year! (They do say crafters never throw anything out?)

It was a mix of shades of blue so I added some Worn Lipstick and Spiced Marmalade Distress Inks through two of the Chocolate Baroque Strip Stencils to add a little more colour. The stamps I chose for this project are some of the latest that were shown on Create and Craft recently, the Floral Paraphernalia Slim Strip and the Phenomenal Butterfly Slim Strip.


I stamped them directly on to the page, then twice on to plain card, cut out each stamp in its entirety and placed it over the relevant image, then fussy cut out selected areas from the second card. These I coloured using the shimmer watercolour paints again as a contrast to the rest of the stamped image. Finally, I edged the entire page in Black Soot Distress Ink and then used a black watercolour pencil around the edge of both stamps, followed by a water brush to bring out the black. This acts as a shadow that makes the images stand out a little more from the background. I thought the main areas of the stamps needed a little more colour so added some coloured pencil here and there.

I hope you like the projects and that they inspire you to do some of your own.

Happy Crafting!


Wednesday, 31 March 2021

Kaleidoscope of Spring Butterflies by Brenda


Morning to you all, the final collection of samples from last month's Hochand shows. 

A Brusho background with a die cut trellis as a base for a kaleidoscope of Butterflies using Butterfly Blush, silhouette stamps are a favourite with me so these Butterflies tick all the right boxes and I make no excuse they are coming up again in the card below.

I used Versafine Clair inks and kiss stamped the Butterflies onto various CB backgroind stamps and fixed into place over he trellis.


For this one I used the circles from Strip Stencil set using DI's to shade the edges then with the stencil still in place stamped worker stamps from Eastern Grasses and Fresh Florals and placed a butterfly over each using the same set and kiss technique as the card above.


Thistle Butterfly takes centre stage in my final card stamped using Distress Markers direct to stamp onto a panel created by masking, inking and stencilling then dragging some of the colour from the image.

Thanks for your visit and kind works of encouragement which are always appreciated.


Wednesday, 28 October 2020

Keeping it Simple (by Christine)


Hello everyone. This is my final turn on the blog for this year.

The cards in my first two blog posts took some time to create so this time, I decided on a simple but elegant example. I also wanted to use some of the lovely dies I have in my stash to enhance the stamping.

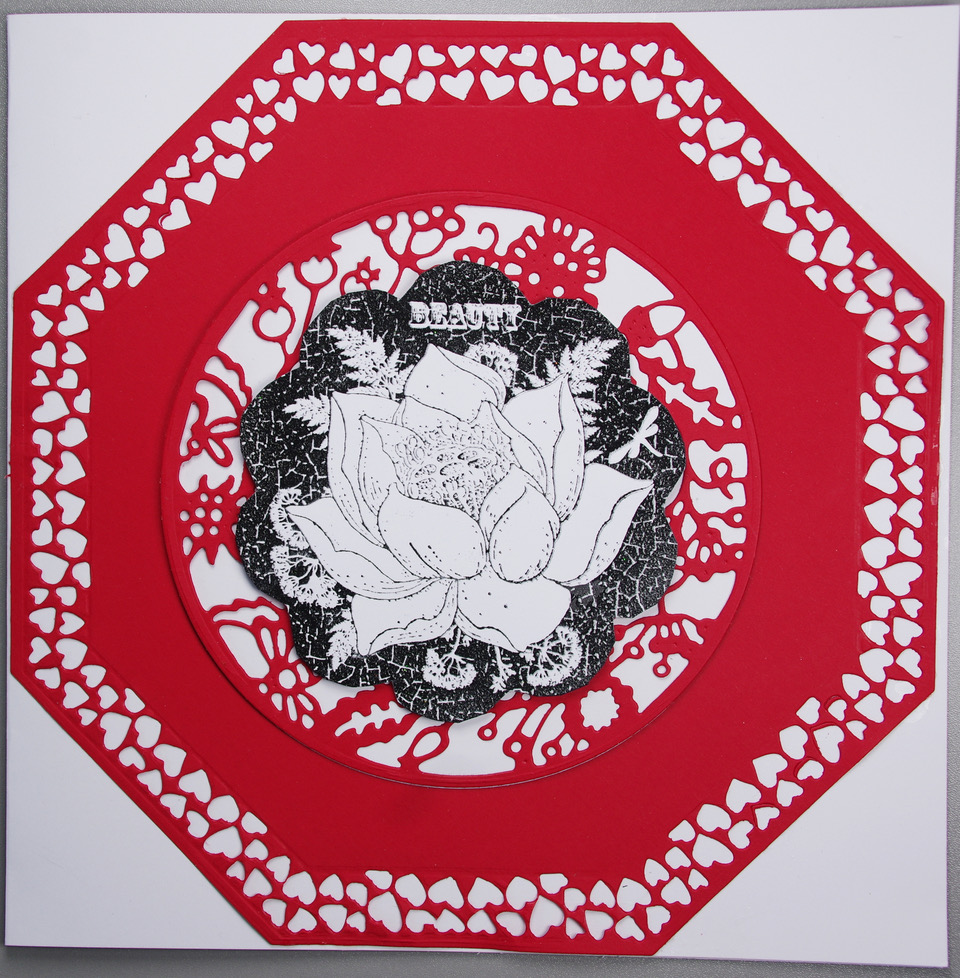
The stamps I am using are from the beautiful Shared Beauty set.

I used octagonal dies to create my first layer. I had just received some red cardstock and thought the colour perfect for what I wanted to achieve.

Two circular dies, one very decorative, created my next layer. I then stamped the image with Versafine Clair Nocturne and used clear embossing powder to give it shine and impact against the matt red card. I used adhesive foam to attach it to give the card depth. I decided against adding a sentiment, but it would be easy to add an appropriate one when the need arises.

Originally, I had stamped the image in red and then embossed it but the shade of red just didn't work with the red card, so I had a spare image to use. I also had a circular frame cut in white card from the original piece of work, so it was obvious to use the two together. On the theme of keeping it simple, I added some white pigment ink to black card using the circles stencil from the Chocolate Baroque Strip Stencil - Collection 1 set and then positioned the stamped image in the centre. I added one of the sentiments to the card as a finishing touch.

Quick, simple, but I think effective.

Take care, stay well and see you the next time.

Happy crafting!

Christine.


Saturday, 22 August 2020

Hold on to your Dreams and Rainbow Soul by Penny.

Good morning peeps, I hope you are all safe and well.  I'm here with my last blog post, not only of the month but also with the Design Team.  I have left the DT after over four wonderful years with Lesley and David of Chocolate Baroque, and working with the best Design Team.  I shall still pop in on the CB facebook page from time to time though!  I would just like to say a big 'Thank You' to all of you who have liked my artwork and/or left a comment, your support has meant a lot.


Hold on to Your Dreams.

I have used stamps from the Catching Dreams, Hold On and Katya sets; acrylic paints, Kraft card, alcohol pens, Distress Inks, sepia Versafine ink, gold gilding wax, a wooden circular plaque, a piece of mountboard from my stash, a leather cord and some beads from my stash.          


On a piece of white card I stamped the Katya, feathers and Cacti images in sepia ink.  I then coloured some of the images with pens and some with DIs.  I had stamped several feather images and when they were all coloured I cut out all the images.  I did not need the Russian headress for Katya in this project so I cut it off and replaced it with the feathers.  I painted the wooden plaque and added gilding wax to the edge.  I then attached the Katya and Cacti images to it in 3D. On a piece of Kraft card I stamped the poem by Chief Dan George in sepia ink, cut around it then attached it to the plaque.  I threaded a leather cord through the plaque to hang it by added a couple of wooden beads. 


On another piece of Kraft card I stamped the Dreamcatcher image in sepia ink.  I painted the image with DIs and cut it out.  I die cut a circle of greyboard, the same size as the stamped image, then attached the board to the image.  I threaded another piece of leather cord through the dreamcatcher and through the bottom of the wooden plaque, joining the two together,


Rainbow Soul.

For this card I have used stamps from the Do Right Always and Hold On sets; pearlescent sprays, black Versafine ink, white gesso, Distress Inks and CB Strip Stencils.


I began this project by creating the background.  I took a piece of white card and sprayed it with three colours of pearlescent sprays. When it was dry I stencilled some circles down one side using white gesso.  I then stamped a sentiment in black into one of the circles.  I matted the background onto black card.          


On another piece of white card I stamped and embossed the Totem Pole and Tomahawk images.  I used DIs to colour the images before cutting them out.  On a white base card I stamped feather and plant images using DIs around the edges of the card, creating a border.  I attached the background panel to the card and then attached the embellishments in 3D.   


We would also like to wish Penny well, and to say that we will miss her on the Design Team. Her bright bubbly personality, and vibrant designs have brightened up our day on many occasions. All the very best Penny, 


Saturday, 25 July 2020

Incredible Time and Inspiring Katya by Penny

Good morning peeps, I hope you are all happy and well.  For my last DT post of the month I have a couple of cards to share with you.  

Incredible Time.

For this card I have used stamps from the Timeless set, Versamark ink, gold EP, Distress inks and some Glossy Accents.  


On a piece of smooth white card I blended three colours of Distress inks and dried the card.  I then stamped the large collage image using Versamark ink then embossed it in gold.  I used a gold pen to edge the panel then added some Glossy Accents to a few of the clock faces and set the panel aside to dry naturally.  


I took a piece of blue paper and stamped the collage image in a pale DI randomly.  I then stamped some of the lovely worker stamps randomly around the edges of a white base card, using the same colours as I used for the background panel.  I attached the stamped blue paper to the card then added the focal panel when it was dry. 


I had already stamped and embossed the single clockface image onto white card, cut it out and added Glossy Accents as before.  As a final touch I attached the clockface in 3D onto the card.


Inspiring Katya.

This card is really quick and easy, the sentiment can be changed to suit any occasion.  I have used stamps from the Katya and Words of Inspiration sets; grey Versafine ink, Distress Inks, CB Strip Stencils - circles, alcohol pens, a gold pen and some gems from my stash.  


On a piece of smooth white paper ( actually the back of an old calendar) I stamped Katya in grey Versafine.  I coloured her in with alcohol markers and added gold pen to enrich the look of her headdress.  I masked off the image and used DI through a stencil for the background, then removed the mask. 


I had left the perforated edge of the calendar on the artwork for a bit of interest and texture.  I stamped a couple of words onto spare pieces of smooth white paper and used DI and the circle stencil as a background for the sentiment panels.  I then matted all the panels onto a contrasting colour of card and attached them to a white basecard.  To complete the design I added a few gems to the headdress.  


I shall be back next month with some more samples to share with you, so until then please stay safe, keep well and respect each other,


                            x x  Penny  x x   

Sunday, 5 July 2020

Two Bookmarks (by Zoe)

Good morning Lovelies and welcome to my first post this month.
I hope you managed to catch the amazing shows last month on Hochanda featuring these amazing stamps.

I used Chocolate Baroque's Strip Stencils to create both backgrounds.
The first using the fabulous Tangled Birch stamp.
My second bookmark I used the words from the show as my background and diecuts to create the focal point, I do love verses and words to create backgrounds. https://www.chocolatebaroque.com/words-of-unmounted-rubber-stamp-multi-buy-a6.html

Thank you so much for visiting, I do hope I have given you some inspiration.
I'll be back later in the month with a couple more samples from the show.
Until then, stay safe and keep well.
Big hugs xx Zoe

Sunday, 28 June 2020

Birthday Mail and Peaceful Dreams

Hello everyone, I hope you are all safe and well.  For my last post of this month I have a couple of quick cards featuring the lovely stamps from last month's shows on tv.

Birthday Mail.


I have used stamps from the Kingfisher Song, Sticks and Stones and Birthday Words sets, Versamark ink, gold EP, pearlescent paints, gold glitter paste, CB Strip Stencil, blue Versaclaire ink and clear EP.  


I used a Gelli plate plate background that I had in my stash of backgrounds and added some gold glitter paste through a stencil.  When it was dry I trimmed the background card , added a border with a gold pen and blended some gold gilding wax along the edges of the card.  


I stamped and embossed the large Kingfisher image on a piece of black card, using Versamark ink and gold EP.  I then painted the image and cut it out. 


I took a white base card and stamped a sentiment and a small image in blue Versaclaire ink.  I used a blue Distress ink to colour the small image.  


I attached the focal panel to the base card to complete the project.  This is a nice quick card that would be suitable for both male and female recipients.

Peaceful Dreams.

I have used stamps from the Kingfisher Song and Trees a Crowd sets, black Versaclaire ink, alcohol pens and a few die cuts from my stash.


I wanted to create my own twist on a black and white card with a splash of added colour, so I opted for a selection of grey tones with bright spots of green.  I took a piece of white card and stamped the stone bridge image in black ink, then added the tall tree scene to one side.  I positioned the images to create scene and perspective and I used a black fineliner pen to add and extend the lines of the scenery.  I then coloured the whole focal panel with my pens.  


When that was done I stamped a sentiment in black then I matted the panel onto black card.  I took a white base card and stamped one of the tree images repeatedly along the top and bottom edges of the card front.  I attached the focal panel and added a few die cuts. 


Thank you for dropping in today, I hope that you have enjoyed this post.  I shall be back next month with some more crafty fun to share with you. 

Until then stay safe and well,


                                     x x Penny x x


Friday, 19 June 2020

Vintage Iris

Hello
I am sharing a couple more cards from the May Hochanda show.

The first one uses the pretty Iris stamp which is found on the Kingfisher Song stamp set.  I stamped the image and coloured with alcohol markers. I then aged it with a crackle stamp and Distress inks. I die cut a frame and used a variety of acrylic paints in blue, grey and gold to give a tarnished look. I layered it onto some pretty paper and some card which I also tarnished the edges. I added some of the ephemera from Baroque Ephemera 1 and Baroque Ephemera 2.


My next card uses the large tree stamp from Trees a Crowd set . I took a piece of card and sponged inks through the Squarely Stencil.  I used different inks and kept turning the stencil until I was happy with the background. I inked over the whole card with Distress Ink Antique Linen.  I then stamped and embossed the tree and sentiment.


Thanks for looking
Sandra x

Sunday, 19 April 2020

Book Making and Making Marks (by Judith)

Hello everyone, I have a few more projects to share with you today showcasing the fabulous stamps that we brought to last month's TV shows on Hochanda. The collection of stamps had a little bit of something for everyone, and I enjoyed working with them so much. I am sure that you will love them too!


My first project is a handmade book, I love books, and used to buy so many of them. Nowadays, I like to make my own, from simple accordian books, to fabric covered books that I have stitched together and used more complicated bookbinding techniques. This project uses a corrugated cardboard envelope that I received from a mail order company, and I have simply taken advantage of the fold of the envelope to create the spine of the book. I folded twelve pieces of drawing cartridge in half, splitting them into three groups, and these became the signatures of my book. I popped the pieces inside each other, so that I had four pieces of drawing cartridge sitting neatly inside each other, in groups of three. I made three holes up the fold of each group of paper.

I cut the cardboard envelope to make a cover so that it was slightly larger than the drawing cartridge, and made three lots of three holes in the spine, which would enable me to sew each signature into the cover in a simple bookbinding method. There are lots of You Tube tutorials for this, just do a search online for 'simple bookbinding', and you will find lots of help. If I were to make another one of these books, I do think that I would put washi tape on the spine for added strengthening, but I am not intending to put this book through a lot of tough use, so it will probably be okay.

I used bookbinding thread to sew the signatures into the book, but you can used dental floss if you do not have any specialist supplies.


I used black card as a matting layer, this really sets off the zingy colours that I chose for my masterboard background. I used Distress Inks to blend across some drawing cartridge, and added tone on tone stamping using the bubble wrap effect stamp from Make Your Mark stamp set. I added the cracked stamp and circles in grey ink, and some of the word clusters to build up the background. To finish, I stamped the large circle using black ink onto a piece of scrap card, added the words once more, and matted it onto black card, to create a topper. I felt that these words were perfect for a journal, and especially in these uncertain times, they can remind us that life is not so bad after all.

You could create lots of these masterboard backgrounds and cut them up to make cards, bookmarks, book covers, all sorts of projects, it just goes to show that these mark making stamps can be the stars of the show and not just for backgrounds.


For my next project, I created a background of soft greens, and added leaves and a word cluster from the Glorious stamp set using a darker green ink. I stamped the Floral Study onto a smaller piece of card, and coloured the image using watercolour pencils. I edged both pieces of card with Seedless Preserves Distress Ink.


The background on this card contains a bit of everything! I coloured the drawing cartridge using Distress Ink, and added some stamping using the Large Crackle Background stamp. The circles,words and bubble wrap image are from the Glorious stamp set, and I have used the Chocolate Baroque Strip Stencil set. I have stamped and embossed the Poppy Ledger image onto kraft card using white embossing powder, and coloured it using Koh-I-Noor paints.

Finally, a super quick little masculine card using kraft card once more. I used the tape image from Make Your Mark and three different colours of ink; red, brown and white. I then stamped the sentiment onto one of the strips, which is something that Lesley had always envisaged with this strip image. You could change the colours, as some of the other Team members have done, and make really colourful versions of this type of design.


Thanks for stopping by,

Judith xx


Tuesday, 7 April 2020

Glorious Circles and Kraft Poppies

Good morning peeps, I hope this finds you all healthy and happy.  This is my first post this month and I have two very different cards to share with you.   


Glorious Circles.

For this project I have used stamps from the Glorious and Make your Mark sets;                   Chocolate Baroque Strip Stencil, acrylic paints, Distress Inks, black Versafine ink, clear EP.


I had some backgrounds already made from the second CB Craftalong so I took one of them to use for this project.   I used  one of the CB stencils to apply white gesso randomly over the background.  I then stamped the two circle images in black ink and embossed them with clear EP.  I stamped and embossed the floral sprig in the same way in the center of the larger circle.  I then painted the flowers with DI, stamped and embossed a couple of leaves then painted and cut them out.  I attached them to the background with 3D glue.     


On a white base card I stamped the dotty image around the edges in  one colour and then the smaller circle image in another.  I trimmed the background panel and added ink around the edges and attached it to the base card.  I added a sentiment panel to complete the project.


Kraft Poppies.


For this project I have used stamps from the Make Your Mark and Poppy Ledger stamp sets; CB Kraft Card, Distress Inks, sepia Versafine, black Versafine, clear EP, and a black pen from my stash.


I began by taking a piece of Kraft card and stamping the Poppy Ledger image in black then embossing it with clear EP.  I used  DIs to paint and colour the image. 


I then used the crackle and smaller ring images around the edges of the card, stamping them in sepia ink repeatedly and in first and second generation ink.  I added a border with black pen around the edges of the Kraft card, then attached it to a white base card.  I created a sentiment panel in the same way and attached it to the card.


Thank you for stopping by today, I hope you have found this post inspiring and enjoyable.  I shall be back later in the month with more crafty fun to share!

Until then take care and stay safe,


                                  xx  Penny  xx


Sunday, 5 April 2020

Glorious Flowers (by Judith)

Hello everyone, I have a few projects to share with you today showcasing the fabulous new stamps that we brought to last month's TV shows on Hochanda. Myself and the Design Team had great fun creating some samples with these stamps, and hopefully you will be inspired to make something yourselves when you see what the Team have been up to.

My first two cards use the same stamp as the focal point, but show what very different looks you can achieve with the same stamp. For my first card, I created a bold background, adding texture paste through a Chocolate Baroque Strip Stencil, and then stamped images from Make your Mark using coordinating colours, plus black ink for the circles. I chose to stamp the words in grey ink for a softer effect. The circles are just the right size to add these word collections, and I will be using this effect a lot for backgrounds, as I really like how it looks.

I took a smaller piece of card and stamped the seed pods and masked them with Masking Tissue. I then stamped the Square Bubbles and added colour as before. I took away the Masking Tissue and coloured the image with pencils, and added some grey shading along the edge of the image with a pencil for dimension.


For my second card, I coloured a piece of book paper with pale coloured Distress Ink and stamped the seed pod again several times up one side, masking it each time to create  a cluster of pods. I added the small flower sprigs from the same Glorious stamp set, and coloured everything with pencils. I edged the book paper with Seedless Preserves Distress Ink.

I stamped the single leaf and flower sprig randomly across a larger piece of kraft card, using green and purple Versafine Clair inks, and also stamped the sentiment onto a small piece of kraft card. These pieces of card were also edged with Seedless Preserves Distress Ink.


My final card uses the large fantasy flower from the Glorious stamp set. I stamped the image onto a piece of cotton fabric using Archival Ink. I coloured the image with Inktense pencils, and blended them with a waterbrush. I frayed the edges of the fabric and adhered it to a layer of dark card using strong double sided tape.

I created the background using a piece of drawing cartridge stained with tea, but you could use Distress Ink, or any other water based medium, it's up to you. I like the speed of running a wet tea bag over the drawing cartridge, and tend to colour several pieces in one go, as I make a jug of tea especially for this purpose. I then have lots of backgrounds ready for future projects.

I stamped a couple of images from Make Your Mark randomly over the background, giving the loose impression of cracked plaster, by sticking to a warm brown colour palette.


I will be back later in the month with more projects to share with you, thanks for stopping by,

Judith xx