Pin It button on image hover
Showing posts with label Amazing Mackintosh Words. Show all posts

Friday, 22 July 2022

One Stamp Two Ways (by Judith)

Hello everyone, I hope that you are keeping well. I have a couple of projects to share with you today showcasing some of the retired stamps that we brought to the TV shows on Create and Craft last month.

I always love to show the versatility of a stamp and this lovely leafy stamp from Brocade Backgrounds, an all time favourite of mine, is no exception, I have used it a lot over the years. You can find plenty of fabulous stamps in the current range of Chocolate Baroque stamps that would work equally as well for these techniques.

For my first card, I used a piece of grey card, and stamped the leaf using black ink all over the background. I used Koh-I-Noor colouring pencils to colour the images, and added a touch of green ink around the edge of the card. I added a sentiment from Amazing Mackintosh Words and a piece of green velvet ribbon to finish.

For my second card, I stamped the leafy image with Versamark and clear embossing powder over a piece of Drawing Cartridge before colouring the background with Distress Ink. I covered the background with paper and ironed off the embossing powder, creating a faux batik finish. I then stamped the second image over the top using a dark blue Versfine Clair ink. I added a sentiment from another of the retiring sets.


I have thoroughly enjoyed revisiting some of these old favourites, but there are so many more exciting things to come! Thanks so much for stopping by, take care,


Judith xx

Friday, 1 July 2022

Retired Birds (by Judith)

Hello everyone, I hope that you are keeping well. I have some projects to share with you featuring some of the fabulous retired stamps that we brought to last month's TV shows on Create and Craft. These stamps are no longer available on the website, but if you were lucky enough to purchase these stamps in our whirlwind shows, or from the website itself, then hopefully you will be inspired this month with the projects from the Design Team.

 My first two projects we created in much the same way, I placed two colours of Distress Oxide onto a large square acrylic block and spritzed this with water. I pressed the block onto a piece of textured card to colour the background. Once the card was dry, I added images from Dawn Chorus, Wise Owl and Let Your Heart Sing.

On the first card I added a sentiment from Amazing Mackintosh Words:


To complete the second card, I used a fineliner pen to lengthen the stalks and add more berries and flowers. Do not be afraid to embellish your images and create a picture. Silhouettes are a great way to do this, as all you need is a black pen. The sentiment is from Sing Your Song.


Finally here is an older card that I made some time ago which is in keeping with the general theme of my two previous cards. I made a Distress ink background for both layers, used brown ink for the stamping. I added some white charcoal to create a dreamy feel to the top layer. The image is from Let Your Heart Sing and the sentiment is from Fly Away With Me.

Thanks so much for stopping by, I will be back later in the month with more projects to share with you.

Take care,


Judith xx

Monday, 23 May 2022

Floral CAS Cards (by Judith)

Hello everyone, I hope that you are keeping well. I have some clean and simple cards to share with you today for my final post this month. I demonstrated these designs on Create and Craft last month, and I hope that you managed to catch the TV shows.

My first two cards are similar in design; I used a round gelli plate to create a background, inking up the plate, and for the first design, I stamped the Open Weave stamp onto the gelli plate before I stamped the gelli plate straight onto my card blank. I then stamped one of the large flowers and a leaf three times from the Sunny Sunflowers stamp set onto the card using Veesafine ink. I used a fineliner pen to draw some little stems for the leaves. I could have used Masking Tissue to mask the flower, then stamp the leaves, but these cards are all about making life simple. I coloured the image with pencils and added a sentiment from the Amazing Mackintosh Words stamp set.

For the second card, I again inked up the gelli plate and then stamped the Floral Weave stamp onto the gelli plate before stamping the gelli plate straight onto the card blank. I stamped a couple of sunflowers onto the background and coloured them with pencils. I added some black dots with a fineliner pen and some glitter glue in the centre of each flower for a bit of sparkle.

For my final card, I stamped Studded Lattice onto an 8" x 8" card blank using Distress Oxide ink. I added a couple of sunflowers and some leaves in opposite corners. Using a fineliner pen, I drew some lines and curls to link the flowers and leaves together. Do not be aftraid to draw things freehand yourself to add to the stamps. I could see elements within the stamps that I could use to embellish the images and extend the design, you can try this youself. Practise on a piece of paper until you feel confident, and then just go for it! Be brave and do not hesitate, that would be my best advice.

I hope that you will try some of my suggestions, thanks for stopping by,


Judith xx

Saturday, 12 June 2021

Cloudy Skies (by Judith)

Hello everyone, here are a couple of projects that I created for last month's TV shows on The Craft Store, using the fabulous new house stamps from Kim Moody.

 I created a background using Distress Inks in shades of blue and green. I stamped Luv Shack onto a smaller piece of Drawing Cartridge and masked the image. I stamped a couple of trees from Woodland Design a Tree and extended the hedge using a fineliner pen. I coloured the background using Distress Inks and a blending brush, I used a stencil over the top with more Distress Inks to add the clouds. I added foliage to the trees and grass using stamps from Glade Design a Tree stamp set. The image was coloured with pencils. I edged both pieces of card with ink to create more definition before I adhered them to the base card. Finally, I added a sentiment from Say it Vertically.

To create my second card, I chose three of the houses - Luv Shack, Cotswold Stone, Urban Chic, and stamped them on a piece of Drawing Cartridge, masking them as I went along. I coloured the background with Distress Ink, and coloured the images with pencils. I added a sentiment from Amazing Mackintosh Words. I stamped some foliage from Silhouette Grasses along the front.


I will be back later in the month with another project to share with you. Take care and stay safe,

Judith xx

Wednesday, 14 April 2021

Spring Primroses (by Carole)

Hello everyone, today sees the first of three posts this month by our regular Guest Design Team member Carole. She has created a beautiful Spring themed project for your inspiration.

Carole writes:


Hello everyone.

I'm delighted to be doing a GDT session again.

I have revisited some older stamps as these are often neglected and it's not until I start using them again that I realise how much I enjoyed them the last time I used them.

So many ideas buzz around and no time to do them!!!

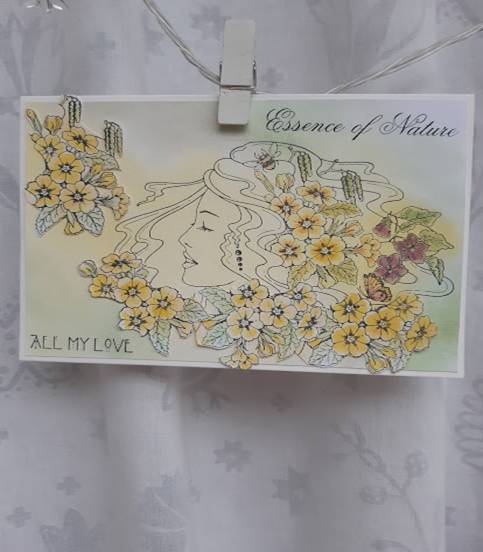
As the weather has been gorgeous here for a little while, and the garden is bursting with life, my first sample is using Spring Awakening. This is a lovely stamp for Spring birthdays and Mother's Day cards. 

The colours look a bit washed out in my photo unfortunately.

Stamps used: Spring Awakening, Amazing Mackintosh Words, Essence of Nature

I stamped the face onto a piece of backing paper that had been coloured with different yellows and sage Distress Inks. This was then spritzed to was the colour out a little.

The primroses were stamped a few more times, cut out and coloured.

The main image was coloured with watercolour pencils, still one of my favourite ways to add colour.

The loose primroses were then added to the areas required.


Hope you are enjoying some lovely Springtime weather where you are too.

See you next time for another of my samples.

Happy Crafting

Carole 😊


Saturday, 27 March 2021

Really Useful Cards (by Judith)

Hello everyone, I wanted to show you some really useful ideas for cards. We often need a card in a hurry, and need to rustle up some thing in next to no time. Lots of these cards could be made in different colour options, you could make a set of them and give them as a gift to someone.

My first two cards were made using textured linen card, and I blended three colours of Distress Ink over the background first. I used a circle mask to create a sun in the sky. I then stamped the foliage from Eastern Grasses across the top using Versafine Clair ink in a couple of colours. I used first and second generation stamping to create a bit of depth. I added a sentiment from the stamp set using the same inks as before.


 You could make lots of these and just choose your favourite colours, they are quite quick to make, just vary the sentiment to suit the occasion.

I have left the sentiment off the next card, it could be used for any occasion. I chose a large bloom from Fresh Florals and inked it up with two different colours of red Versafine Clair. I stamped the image randomly over a piece of kraft card to create a background. I stamped the poppy image onto an oval of drawing cartridge and coloured the image with Koh-I-Noor watercolour paints. I added a touch of Distress Ink around the edge.

This last card is an older card that I made some time ago, but I thought that I would share it with you again. I used some very thin masking tape across the background and then added Distress Ink inbetween each section. I removed the masking tape and stamped the image onto the panel using black ink. I backed the panel onto black card. I coloured some ribbon with the green Distress Ink, and once it was dry, I stamped the ribbon with the words from the Amazing Mackintosh Words stamp set using black Archival ink.

I hope that you will try some of these ideas for quick cards. Thanks for stopping by, stay safe and take care,


Judith xx


Sunday, 21 February 2021

Two cards (by Magda)

 Hello girls,                                                                                                                                                  today I propose to you two cards thinking about spring

For my friend card   is an ochre wiped mat, on which I stamped Mackintosh Beauty, stretched                      the lines with a black marker and coloured the flower with watercolour pencils. For the stenciled  background I blended a very light Pine Needles Distress Ink Pad.  You can find the sentiment stamp in Amazing Mackintosh Words 


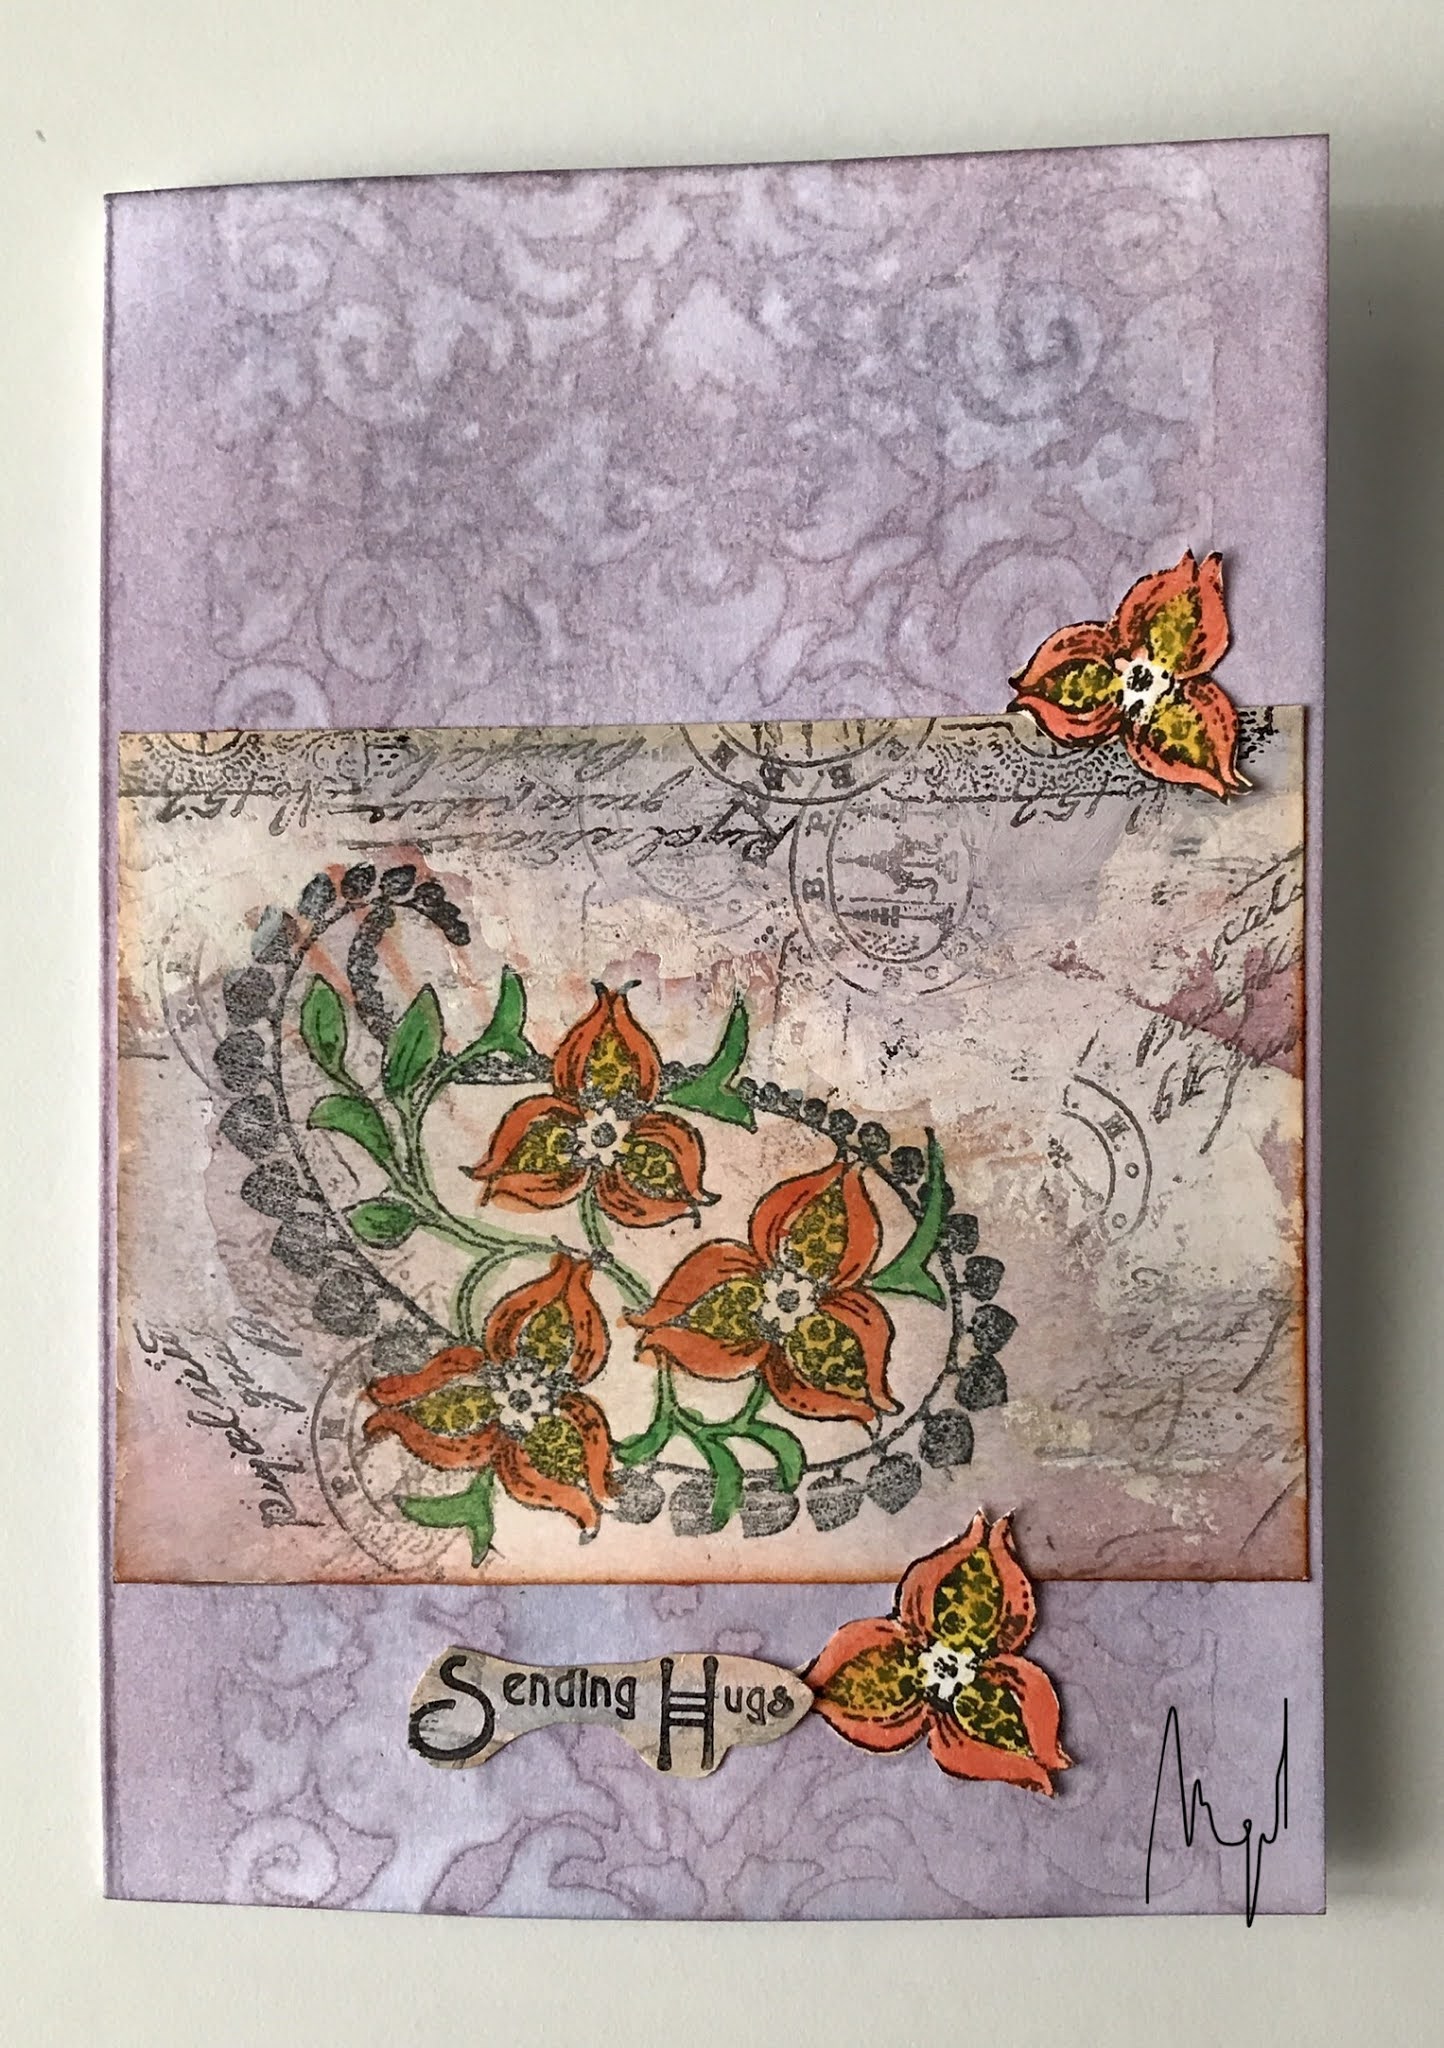
Sending Hugs card   the background is blendend with Distress Ink Pad  and stenciled with                        a baby wipe. The mat is a left over piece, on with is stamped the paisley of Nature's Paisley                       and the decoupage flowers, and all is coloured with watercolour pencils.  For the sentiment I used               Amazing Mackintosh Words 


Thank you for passing by, hugs
Magda


Sunday, 31 January 2021

Sending Hugs (by Judith)

Hello everyone, I am sharing my last post for this month, and once again, hoping that you are all safe and well. 


My first card was created using a stamp from last month's TV shows on Hochanda, Floral Grunge, and I have mixed it with a few other images to create a card that could be used for lots of different occasions. The sentiment I felt was particularly apt for now when lots of people could do with a hug, but we cannot give them one.


I started my card by stamping the main image onto Drawing Cartridge using Versafine Clair ink. I masked the flower head and then stamped and embossed the film strip from Butterfly Mind. I used the same colour ink, but added clear embossing powder over the top. I added a few extra splodges with a stamp from the same stamp set around the flower head and then removed the mask. I coloured the image using Polycolour pencils, before replacing the mask, and adding more splodges of colour with Distress Oxides to tone in with the colours that I chose to colour the flower head. The sentiment is from Amazing Mackintosh Words.

I am also sharing some older cards that I made using some of Kim Moody's stamps, that were also featured on last month's shows. Sadly I did not have a chance to make any fresh samples with these fabulous stamps, but I thought you might like to see some of these again...

A street made from all of the houses, using a bit of masking, and I added some treees from Trees a Crowd in the background. This was such fun to make!

A moving day, who would not like to get away from it all and live in such a picturesque spot? We live near the forest and love taking long walks in the woods.

White embossing on kraft always looks so effective, especially painted with Koh-I-Noor paints.

This almost spooky version of the Posh House was another favourite sample that I enjoyed putting together with the trees.

I will be back next month with some projects from our One Day Special shows. Thanks so much for stopping by. Take care and stay safe,


Judith xx

Sunday, 9 February 2020

Valentine's Day (by Magda)

Hello girls,
We can't miss the appointment with our Valentine's Day without making appropriate projects.
I have for you some ideas :

Layered Tag :  stencil, Distress Ink Pad, Archival Jet Black,  Fluttering Hearts, A Heart full of Love


            Aquarelle Pencils, embellishment


Journaling Page :  stencil, Distress Ink Pad, Archival Jet Black, Floral Heart, Nouveau Lovebirds, Amazing Mackintosh Words


Thank you for reading my post today and Happy Valentine's Day
Magda

Monday, 23 December 2019

F is For...By Debbie

It's time for my second visit to the Chocolate Baroque blog and more of my samples from the November Hochanda show. Chocolate Baroque launched 2 decorated initial stamps this month and here's the second one F is For and 3 samples with different looks and techniques.
This one has been stamped onto a mica sprayed background using Versafine black and I've added some colour to the flowers with water based pens. The image has been mounted onto black card and the 7 x 7 white card blank has been stamped with one of the butterflies from Butterfly Mind using grey ink.


 This one has been embossed with gold powder onto navy card and the flowers coloured with metallic pens. The A5 white card blank has been stamped with a worker stamp from Freedom Flower. 

The 3rd sample has been stamped onto white vellum with Brilliance Graphite Black and then the flowers coloured on the back with metallic pens. I have used clear foam pads and transfer foils to mask the pads which I have used to attach the vellum to some white card. To finish mount onto grey card, an embossed lilac piece and finally onto a white 5 x 7 card blank.

Here are the rest of my samples some of which didn't make it onto the show.


Butterfly Mind embossed with white powder on ivory vellum.


Butterfly Mind on a sprayed acrylic background


Butterfly Mind on a inked background 


 Butterfly Mind gold embossed on a card front and cut away on one side


Freedom Flower, Butterfly Mind and 


That's all from me for this time and my last time on the Chocolate Baroque Design team as I've made the decision to concentrate on my own workshops and craft projects. I'll still be keeping up to date with Lesley and all the team so from me, bye for now! Debbie


Wednesday, 24 July 2019

Pearly Grunge (by Doreen)

Hello everyone, Guest Design Team member Doreen is back for her final post this month. She has created a lovely pastel card for your inspiration. Doreen writes:


This is my first play with Pearlescent Alcohol Inks and I have to say I am really impressed with them.

Products used in this project:

A selection of Pearlescent Alcohol Inks
Black Stazon
Silk Card pieces cut at 6" x 4"
Black Cartridge paper
Floral Grunge stamp
Amazing Mackintosh Words for sentiment
Blending Solution

To make this card it really could not be any simpler, add your inks randomly over one piece of your silk card, and then using the blending solution to help the inks to blend, drip this over your inks in the centre of your spots of ink. Whilst the ink is still wet, using your second piece of card silk side face down, place this on top of the wet ink pressing down firmly and without taking too long over the process, peel the two apart. You then have two pieces of inked card, choose which one you prefer for your stamped image and keep the other one to cut a small piece for your sentiment.

Stamp your main image onto your pearlised silk card. Then stamp your sentiment and mat both of these onto black card and mount onto a card of choice.

I love the way the texture is added to the image simply in the way you pull your card apart after sandwiching the two together....so very effective and perfect for a quick last minute make.

Thank you for looking

Love Doreen

Tuesday, 16 July 2019

A Bit of Romance (by Judith)

Hello everyone, I have a couple of projects to share with you today, both with a slightly romantic feel, showcasing stamps used from last month's shows on Hochanda.

My first project features a beautiful image from the Harlequin Rose stamp set. I love this image, and it has proved so useful for Weddings and Anniversaries. It can be used on its own, or linked with another one, as I have done on this card.

I chose a piece of patterned paper designed by Lesley, and stamped and embossed the image twice, using white embossing powder. I fussy cut the images, and cut one of the hearts where I needed to join them together. I simply slipped the 'broken' heart through the gap in the other heart. I used a piece of the same paper as a background, and cut a slightly smaller piece of kraft card as the forground. (If you are trying to stretch your papers as far as possible, you can use what would be hidden underneath for the hearts). I embossed the sentiment using white embossing powder once more, and added faux stitching using a white gel pen.

The addition of the kraft card makes this a great Anniversary or Valentine's card for a man.

To create my second card, I coloured some Drawing Cartridge using Distress Ink on a craft mat, spritzing it with water, and patting the Drawing Cartridge into the ink. I dried the paper with a heat gun, and then blotted up some of the remaining ink before drying the background once more. I stamped the Tagtastic stamp at one end of the background and cut this out, the remainder of the background was sufficient to create a background for the card.

I used words from the Amazing Mackintosh Words stamp set to create a random background on the tag, stamping them in black ink. I stamped some horizontally and some vertically, making sure that they were straight, whichever direction I was stamping. I stamped a rose from the Rose and Thistle stamp set onto a spare piece of Drawing Cartridge, coloured it in and fussy cut it out. I attached this to the tag, and added some bright red ribbon to the tag. I attached the tag to the larger background, added a Birthday sentiment, and used some black card as a matting layer. You could add some of the tiny rosebuds from the Rose and Thistle set to the background if you feel that the background is too plain, but I did not mind it like this. I had added some red spatters to the tag as a contrast anyway.

I hope that you will try some of my ideas out for yourselves, thanks for stopping by,

Judith xx

Sunday, 7 July 2019

Introducing Debbie Frost a New Design team Member

Hello everyone, we are pleased to introduce the first of two new Design Team members to our Design Team today, Debbie Frost. We asked Debbie to tell us a little bit about herself, and this is what she had to say:

Hi I'm Debbie Frost and I live in sunny Exmouth, Devon. I've been a card maker and paper crafter for many years. I regularly run my own workshops in Exmouth which are very popular. I would describe myself as a paper crafter as I love all aspects of card making especially. My favourite thing is stamping but love mixed media too, canvases especially. My first Chocolate Baroque stamp was Mosaic Flower.... followed by many, many more. I just love the detail and vintage look of Chocolate Baroque designs and am thrilled and honoured to have been asked to join their Design Team.

Debbie has created some beutiful projects for her first blog post with us, and here is what she wrote:

Hi everyone, I'm Debbie and this is my first blog post as a Chocolate Baroque team member, so I'm just a bit excited!
I was recently asked what was the first Chocolate Baroque stamp that I bought? What better way to introduce myself to you all!

So let's start off with Medici Flower stamped onto a Brusho background with a black inkpad and simply coloured with water based pens. The image was then mounted onto black card and I've added thin strips of black card to the background to add interest. The background has been created with Studded Lattice which I have embossed with white powder and sponged with Distress Inks Worn Lipstick and Spun Sugar. The sentiment comes from Amazing Mackintosh Words. I've mounted the design onto an A5 white card blank.

 
For my second design I've used French Heart which has also been stamped onto a Brusho background and water coloured using Brusho powders. I have used Chocolate Baroque White Silk Board which is a great quality card especially for this technique.
I have used a 7" x 7" ivory card blank and this has been stamped with Open Weave using a brown inkpad and I've also sponged lightly around the edges of the card blank.
The sentiment also comes from Amazing Mackintosh Words and both stamped pieces have been mounted onto orange and then brown card before attaching to the card blank.


For my third and last design I've used one of my favourites Lords and Ladies. I've embossed in white onto a circle of Kraft card a coloured with watercolour pencils which have not been activated with water. I find that you get a stronger colour when using kraft card than with ordinary pencils.
I've used a 7" x 7" white card blank which I've stamped with Square Bubbles using Distress Ink Seedless Preserves. I've also softly sponged around the edges using the same inkpad. As before the sentiments which I've randomly stamped around the edges of the card blank come from the very versatile Amazing Mackintosh Words. To finish I've addeed some faux stitching around the edge of the circle using a white gel pen before attaching to the card blank.


I hope you've enjoyed my designs. See you again next time, Debbie.


Friday, 5 July 2019

Roses in July, part 1 (by Magda)

Hello,
the subject of this month are "Roses" and I have really a great choice among all the "Roses" stamps from Chocolate Baroque. For this post I used the same sentiment and tried to create a monochromatic atmosphere.

1. Birthday Wishes Card:
This card has a soft colourful Distress Ink Pad, layered stenciled background on which I glued a decoupage.  I stamped  on a white cardstock the rose composition from Rose and Thistle  with a mix of Distress Black Soot and Brushed Corduroy,  blended the stamp with a watercolour brushed and fussy cut the shape. The sentiment of Amazing Mackintosh Words  is stamped with Archival Jet Black on a left over piece of the background.


2. Birthday Wishes Tag:
Stamp on a craft Tag with Distress Ink Pad Walnut Stain the big Rose stamp of the Rose Set.
Use white and brown charcoal pencil to highlight and to darken roses and leaves. Stamp the sentiment of Amazing Mackintosh Words with Archival Carnation  Red the sentiment to give a contrast to the tag.


3. Birthday Wishes Bookmark :
Blend lightly a white bookmark with Distress Ink Pad Brushed Corduroy.  Stamp the 4x4 cm rose of the Rose Set in several brown Distress Ink Pad, and the sentiment of Amazing Mackintosh Words  with the same colour used for the roses. Assemble all the cuts as shown in the picture.


I will meet you soon with "Roses in July part 2 " and have a nice rest of July,
Magda

Wednesday, 28 November 2018

Stamping on Fabric (by Judith)

Hello everyone, I am here for my final post this month, sharing two projects using the stamps that we showcased on last month's TV shows on Hochanda. This time, I have created my projects using fabric, showing how you can create a quick card, and a decorative panel.

For my first project, I painted a piece of spotty fabric with yellow and green paint, blending the two where they met. I used coloured Archival inks to stamp all of the images, creating a meadow scene in first and second generation stamping, just as I would when creating a card. I added a couple of Butterflies, and then painted the images with Koh-I-Noor paints and a waterbrush.

For the larger panel, I used the large corner stamp from the Butterfly Daisy Collage stamp set, and stamped around the edge of a piece of patterned fabric, overlapping the image as I went along. Again, I used coloured Archival Ink. I used iron on interfacing on the back of both pieces of fabric, fraying the edges of the top panel, and adding rust coloured ink to the bottom panel. I used a thick piece of greyboard as a base.

I had a piece of the spotty material left over from my first project, and stamped two of the large butterflies from the Butterfly Daisy Collage stamp set onto the fabric, adding shading with the Koh-I-Noor paints. I also stamped some words from the Amazing Mackintosh Words stamp set, and frayed the edges of the little panels.

I created a wrinkle free distress panel using tones of green and yellow on a piece of watercolour card for a background. I stamped a leafy sprig in second generation stamping randomly over the background. To complete the card, I used a small piece of eco printed fabric, with a lovely leaf printed in the centre.

Thanks for stopping by,

Judith xx

Saturday, 3 November 2018

Butterfly Masking (by Judith)

Hello everyone, I am sharing two cards with you today created for last month TV shows on Hochanda. If you caught the shows, you will have seen me demoing the first card, and showing the second card as an alternative option for the technique that I used.

To create my card, I drew a circle with a pencil onto a piece of smooth white card using a circle die, but anything the right size will do. I then stamped three butterflies into the card using Versafine Onyx Black Ink, and masked the images using masking tissue. I stamped six daisies from the Butterfly Daisy Collage stamp set around the circle, three close to the butterflies, and masked those as well. I used a foliage stamp from the Thistle Butterfly stamp set to create the background leaves for the wreath, using an olive green dye based ink. Once I had finished, I removed the masks, and coloured the images with pencil. I added a sentiment from the Words to Dazzle and Sparkle stamp set.

My second card was created in much the same way, but I based the colours on my background, which I had found in my stash box. I stamped the butterflies first, masking them as before, then adding the daisies behind. Finally, I added the same foliage stamp to fill in the background, using a lovely plum coloured dye based ink. I coloured the images with pencils as before. I added a bit of shading around the edges of both pieces of card with Distress Ink, and used a purple card to mat both layers. The sentiment comes from Amazing Mackintosh Words.

To help me plan both cards, I placed my masking tissue images onto my pieces of card first, moving them around to see how they would fit, this helps to visualise what the card will look like. I also stamped my wreath onto a piece of copy paper first, trying out the design, and various colour options for the flowers. I would always advise you to do this if you are unsure about a design, copy paper is very cheap, and you can have several attempts at something, without worrying about your mistakes, before moving onto card.


I will be back later in the month with more designs to share with you. Thanks for stopping by,

Judith xx

Tuesday, 30 October 2018

Edged Perfectly (by Julie)

Hello, my cards for today are created with Decorative Edges, Floral Edges , Amazing Mackintosh Words and Butterfly Lady


I love Chocolate Baroque's Edge collection as they have so many uses. You can use them as the main feature of a design or as the name suggests, edge your finished design.
To start with I inked up the harlequin diamond design from Decorative Edges with a blue dye based ink and stamped it top and bottom of my card. Don't worry about the middle looking messy as that is covered by the black card-stock strip and stamped sentiment from Amazing Mackintosh Words. Once you have your background, ink up the leaf design from Floral Edges with Onyx Black Versafine and stamp over the top of harlequin background. Then do the same for the grass edging at the bottom of the design. 
Trim the card, mount onto black card-stock, before attaching to the front of your card blank.


The flower border from Floral Edges which has been stamped top and bottom on this DL card, matches really well with the Butterfly Dress. I stamped the Butterfly Dress onto spare card-stock before colouring with Polychromus pencils. Once coloured I buffed the design with a soft cloth to blend the colours and create the soft edging that surrounds the Butterfly Dress lady. The design was then cut out and matted onto black card-stock before attaching to the front of the DL card. The sentiment is from Amazing Mackintosh Words which was stamped with Onyx Black Versafine before being cut out and mounted onto black card-stock.

Thank you for taking a peek. Please call back for daily Design Team inspiration

Julie xx