Pin It button on image hover
Showing posts with label Landscape Edges. Show all posts

Friday, 7 February 2020

Natural Reflection and a selection of Hearts by Penny

Good morning everyone, I hope you are all well, warm and prepared for storm Ciara.  I didn't make any samples for the January shows so I have a few  samples from some of the other shows.  


Natural Reflection.


For this card I have used stamps from the Harmony Tree, Sunburst Scenes and Landscape Edges sets; Versamark ink, white EP, Koh-I-Nor watercolour paints, Distress Ink - Vintage Photo, white paint pen.


On a piece of Kraft card I stamped the Harmony Tree, windmill and tiny tree using Versamark and embossed them with white EP.  I used a white pen to link the images and create a scene.  I then stamped and embossed some birds and words in the sky.  On another piece of card I stamped and embossed the stone wall image twice, then painted them.  I painted the whole scene then blended DI around the edges.  I cut out the walls and attached them with 3D glue along the bottom edge of the panel. 


I took a white base card and stamped the stone wall around the edges using DI,  then used water to move the ink on the stamped images.  Finally I attached the focal panel to the base card. 


Artists Trading Hearts.


Here are a few of the ATHs that I have created as samples.


Thank you for popping in today, I hope that you have enjoyed my first post of this month,  I'll be back later with some more inspiration for you.


In the meantime take care,


                                  x x  Penny  x x

Sunday, 17 March 2019

Folk Art Inspired Garden (by Judith)

Hello everyone, I have two projects to share with you today, featuring The Folk Art Garden stamp set, which we shared on one of last month's TV shows on Hochanda. This beautiful stamp set features a wonderful intricate stamp, along with some delightful smaller images all hand drawn by our designer Sue Page, and some fabulous little sentiments added by Lesley.

I created my first project by stamping the main image onto some 160 gsm Luxury Smooth White Paper which is perfect for this kind of project. This paper is the same paper that the colouring pages, and the designer papers are printed on. You can colour with pencils, add inks, or watercolour on the paper, it is very versatile. I used Versafine Clair ink in a dark blue, rather than going for a stronger black colour. I partially masked the image using Masking tissue, and added some of the little worker stamps around the edges, to create the effect of a garden running along the bottom of the page.

I added some Distress Ink along the top of the card, masking off a circle for a sun, and using torn paper to create hills. I used a mixture of blue and pink to create the sky. I added yellow for the sun, and stamped a sentiment. I added two little birds from the Landscape Edges stamp set. I used pencils to colour the flowers and butterflies. It may seem like it would take ages, but I sit in front of the TV, and the time passes without me noticing!

For the purposes of a TV demo, I needed to create a quicker version of this card. I used the big acrylic block that we sold with the stamp, and covered it with two different colours of Distress Oxide Ink, one blue, and one green, and spritzed them with water. I smooshed the block across a piece of drawing cartridge, (that had a circle mask already added), covering the background in one go. Once the background was dry, I stamped the large image in a dark colour at the bottom of the page, as before, but towards the middle this time. I used the large image to stamp around the edges, filling in the gaps, so that the image was not floating by itself.

I coloured the image with Koh-I-Noor paints, as these cover the Distress Oxide Ink really well. I stamped a sentiment from the same stamp set to complete the card.

By varying the amount of Distress Ink that you add to the block, you can alter how vibrant your background will be. If you do not want such a strong background, add less ink to the acrylic block.

I will be back later in the month with more projects to share with you. Thanks for stopping by, Judith xx

Saturday, 29 September 2018

Eastern Skies (by Judith)

Hello everyone, I am sharing more cards with a touch of Eastern promise, using stamps featured on last month's TV shows on Hochanda.

My first two cards came about when I made the backgrounds, which were a mixture of Red, Yellow and Orange Brushos sprinkled onto drawing cartridge and spritzed with water. I also added some Gold shimmer for some added bling. I like to create one piece, and use a second piece of the drawing cartridge to blot the excess liquid off the first, creating a second background for later. Both pieces end up a bit less vibrant, but I do not mind this effect.

When I looked at the backgrounds, they looked as if they had a sandy foreground, and a sunset sky, which made me think about creating some sort of scene with the backgrounds. Every background turns out differently when you are using Brushos, and it was just luck, that these two made me think of making this sort of card.

I cut a square of copy paper, and placed it in the middle of the background, then stamped the paisley image from the Paisley Elephant stamp set all around the edge, using purple ink, to create a border. I used the same ink to add the sentiment from the same stamp set. On my first card, I used the Chocolate Baroque Mask- Silhouette Palace 1, with Seedless Preserves Distress Ink.

On the second version, the card that I demoed for the TV shows, I simply stamped an image from the Indian Textiles stamp set, using a deep plum ink.


These one layered cards will be cheap to send through the post, even though they are a bit larger in size. If you vary the colours, they would be great masculine cards. I have kept them fairly monochrome, if you made them in blues or greens, they would look equally effective.

I am sharing a much older card with you as well, which uses this same image. Long time followers will have seen this card, but I thought that some of our newer viewers would like to see the card as well. I stamped and embossed the building using white embossing powder, and then created the background with inks. I used masks for one side of the background and then the other. I stamped a tree image from the Landscape Edges stamp set along the horizon, and a flower stamp from the Floral Edges stamp in the foreground.

The elephants were stamped onto a spare piece of card, coloured with water based markers, and then decoupaged onto the background.


Thanks for stopping by, Judith xx

Tuesday, 10 July 2018

A Burst of Colour (by Judith)

Hello everyone, I am back to share more of my prickly projects with you today, featuring the stamps from last month's TV shows on Hochanda.

To create my first card, I trimmed two pieces of drawing cartridge slightly smaller than A5 in size. I sprinkled Brushos over one piece of card and spritzed the card with water. I then placed the second piece of card over the first, to create two coloured backgrounds. I left both backgrounds to dry. The second background will be useful for a project at a later date.

I stamped three of the images from the Scrumptious Succulents stamp set onto the background, then covered the images with masks that I had already stamped and cut out. I stamped two more images in between the masked images and then drew a line between all of the images to create a landscape, using a fineliner pen. Using the Square Bubbles stamp, I stamped below the landscape line using second generation stamping. The stamp creates a stone effect, which is perfect for the cacti to stand upon.

I used the same colours of Brusho powders to colour the cacti images, adding a couple of additional colours, (red, orange and yellow). I sprinkled a little bit of each colour onto a large acrylic block, but you could use your craft mat, and added a bit of water to them, so that I could use them like watercolours. More water creates a paler colour, but you can then go over the images with a bit of stronger colour to add shading. You can be as creative as you like with the colours, I had a lot of fun creating a vibrant fantasy collection of cacti. I then painted the little stones in the same colours, being completely random. I added a sentiment from the Blossom and Grow stamp set.

My second project is full of colour too. I wanted to create a lovely sunset, and stamped the tall leafy image from the Blossom and Grow stamp set a couple of times first of all. I masked the images and masked an area for the sun, then coloured the background with Distress Inks. I chose vibrant pinks, oranges and yellows, blending them, and adding a spritz of water.

I stamped some foliage from the Wild Meadow and Silhouette Grasses stamp sets, using coloured dye based inks. I added the little birds from Landscape Edges and a sentiment from Scrumptious Succulents. I removed the masks and coloured the foliage with pencils.

I hope that you will be inspired by my projects to try out some of these ideas. Thanks for stopping by,

Judith xx


Friday, 27 April 2018

Eastern Sunrise - by Penny


Morning lovely peeps, it's my turn and my pleasure to bring you today's blog post.  It's a mixed media card that I created for last months 'Eastern' shows, and I've used stamps from the Serenity, Eastern Grasses, Landscape Edges and Artistic Affirmations sets, Distress Inks, black Versafine ink, clear EP, stencils from my stash.


On a piece of white card I stamped and embossed the lady and two lamp images in black, then masked them.  I created the background with Distress Inks, and using a stencil I made a sunrise for the sky then I stamped some trees on the horizon.  The lady is meditating at the edge of a stream or lake so the bottom of the panel is blue and I added some clear paste through a stencil to add texture and movement in the water.


When the paste was dry I removed the masks and coloured the images with pens.  I then added glitter glue to the paste to give a shimmer to the water.


I stamped some floral images and a sentiment onto white card in black ink and embossed them.  I coloured them all in with DIs and cut them out. After matting the background panel onto black card and attaching it to the card I added the florals and the sentiment in 3D. 


This mixed media card is such fun to create, I hope I've inspired you to have a go yourselves.  Just look at your own crafty stash and see what mixed media artwork you can create! 
Thanks for dropping in today, I hope everyone has a great weekend.  You can see more details and pictures on my blog  https://ladypenelopesfabcraftyblogspot.blogspot.com

See you soon,

                                                        Penny

Tuesday, 27 March 2018

The sun (By Marga)

Hello everyone, today it's my turn to show you something.


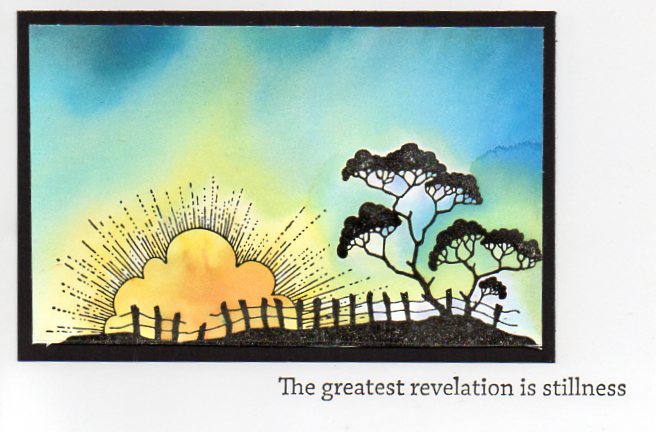
This time I have worked with spray ink. I first made the background with different colours. Then I stamped the images with Archival black ink. I sprayed a little yellow ink on my craftsheet and painted the sun a little bit more yellow.

On the edges of the card I used a black gel pen to make the stiches.

Stamp set I used is: Landscape Edges

Hugs Marga

Monday, 26 March 2018

Faux Candle (by Julie)

Hello, today I have a faux candle to show you. Although the design is easy, trying to get a decent photograph with it lit was quite difficult!


This project is created using Landscape Edges and really couldn't be simpler. Take some ordinary A4 copy paper and stamp along the bottom edge (shortest side) with the silhouette trees, using Onyx Black Versafine. Stamp the birds in flight, two or three times along your design, followed by the cloud design. (I have used blue Versafine for the clouds) Cut your design off of the bottom of you A4 page and dust over some pale blue Pan Pastel, then rub in some yellow Pan Pastel around the trees. Take a tissue and rub off the excess.

Next you need to cover the whole design with clear embossing ink followed by clear embossing powder and then heat with a heat gun. You will need to do this two or three times to get a smooth finish.
Once you are happy with your clear embossing, cut some acetate to match the size of your stamped design and bend into a cylinder shape. Secure with double sided tape and staples. You will then need to attach your stamped design onto the outside of your acetate cylinder with just a seam of double sided tape.
Dab the edges, top and bottom with silver acrylic paint and then place over an artificial, battery operated tea light.
As I mentioned earlier it was quite hard to get a photograph showing the candle lit...The first picture clearly shows the design without a candle and the second shows a slight glow behind the trees...if you squint and look carefully lol!

Thanks for stopping by and please call back for daily Design Team inspiration.

Julie xx

Friday, 23 March 2018

Village Street Scene (by Anne)

Good morning. Today I am sharing a village street scene created with various scene building stamps from Chocolate Baroque. I have included a step by step of how I stamped and masked to build up the scene from the various stamped elements.

Materials:

How to build the scene:
The first thing that I do with scene building stamps is to stamp them all out onto copy paper, trim around and lay them out to decide on placement of the elements.
Once I have chosen which elements I want to use I then carefully trim around the images to create masks. I add just a couple of dots of temporary adhesive onto the back and leave to dry to give a tacky surface to hold down the elements while masking and stamping. If you have masking tissue this is already self-cling/tacky so you don’t need glue.

Next the foreground images are stamped.

Next the foreground images are covered up with the masks and the images that you want to sit behind are stamped.

Further masks are added to cover the stamped images while working backwards through the scene.
Here I left the foreground tree and bush masks in place while stamping the houses. Then I covered the houses while stamping the background. It is not necessary to mask the background silhouette trees as they are solid stamps.
The masks were then removed and a fine tipped marker used to draw in extra elements such as texture on the street and to fill in and extend the solid background trees (i.e. coloured in between the houses).
Extra trees were stamped onto spare card to decoupage onto the foreground.

Wax crayons were used to add a little texture to the roof tops and brickwork. The wax will resist subsequent watercolour.
The scene was then coloured with watercolour pens and a damp brush used to drag out colour and add shading. Extra colour was also painted on by picking up pen colour scribbled onto a craft mat or palette.
The additional trees stamped onto spare card were trimmed and lightly shaped with a ball tool to create foreground bushes and more depth to the scene.


Thursday, 22 March 2018

landscape edges by Veronica

 Landscape edges is my favourite of all the edges series of stamps, and this particular stamp is top of the list! It works beautifully with my favourite brusho powders too.

For my first card I wanted to get a darker sky than usual, but not a night sky.  I was very happy with the rather stormy appearance here - using my favourite brusho powders (mostly the grey) to create the sky after stamping and embossing the trees.
Trimmed down and matted on black card, then glued to the top of a 7"square white card blank, with the sentiment from the see beauty clear stamp set stamped at the bottom right.
 My second card has the more usual sunrise/sunset sky, again created with brusho powders, this time turquoise, yellow and orange.
Again a black matt, this time a 5"x7" card blank, with the sentiment from words of inspiration

Tuesday, 20 March 2018

A Distant Folly by Penny


Good morning lovelies, I am so pleased to be back again to bring you this project.  I hope I find you warm and well - and hopefully not snowed in! If you are snowed in then grab a cuppa and a biscuit and join me for a few minutes of crafty inspiration.

This card was one of my samples for the tv shows last month featuring the beautiful Scenic Countryside stamps.  I have used stamps from the Sunburst Scenes, Country Views, Landscape Edges and    Words to Dazzle and Sparkle sets.  I have also used black Versafine ink for stamping and alcohol pens, Brushos and Distress Inks for colouring.


I began this project with a piece of whitecolouring card and stamped the wall image at the bottom of the card.  I used stamping tissue to mask the image then stamped it again to extend it the full width if the card.  I stamped several other images to create a scene and coloured them all in.  I added some hills and slopes with a black liner pen, to connect the separate images.


I used white charcoal to add some clouds to the sky, and some highlights on the river to give the effect of ripples.


I removed the masks from the wall and used a paintbrush to add water to each stone.  I then sprinkled black Brusho over the wet stones, I wanted the random colour burst of Brushos but with a bit more control.  There are so many lovely tones and colours in the black Brusho paint and I think they give a realistic look to the wall.  I wanted the wall to pop a bit more to give the scene perspective so I stamped it again onto acetate in black and embossed it with clear powder.  I then fussy cut it and attached it to the scene.


Using a large white base card I stamped several smaller worker images around the edges in different Distress Inks.  I then blended one of the colours around the outer edges of the card.  To complete this design I stamped a sentiment in black ink on the focal panel, edged the panel with black ink and matted it onto black card before attaching it to the base card.

  
Thank you all for joining me today, I hope that you have enjoyed this project and that it might inspire you to try something similar or at least get your crafty mojo going!

Take care until next time,

  Penny

Monday, 19 March 2018

Moonlit Trees (by Judith)

Hello everyone,

I have a simple project to share with you today, using the Landscape Edges stamp set. I wanted to create a quick scene, and this treeline image was perfect for the effect that I wanted to achieve.

I started by placing a circle mask onto a piece of smooth cartridge card, and adding some dots of masking fluid across the area of sky. I placed a piece of torn paper along the lower part of the background to cover the portion of the card that was going to be the hills, and then started to add some colour for the sky. I chose a series of Distress Ink colours, graduating out from the moon, getting darker as I moved further out.

I added some green Distress Ink underneath the sky for the hills, and stamped the tree image over the top, using Versafine Ink. I added some detail to the trees with a white pen to give the impression of moonlight falling on the trees. I rubbed the masking fluid away from the sky area, revealing the 'stars', and added a sentiment from the Amazing Mackintosh Words stamp set


Thanks for stopping by, Judith xx

Saturday, 10 March 2018

Country Cottage Scene (by Anne)

Good morning. This is one of my recent show samples with the scene building stamps. I have created a step by step for you, ‘warts & all’ as I made a bit of a mistake with masking! I think that I disguised it reasonably well – tee hee.
Materials:
  • Stamps: Landscape edges (wall and background skyline), Village Life (trees), Townhouses (trees & bushes), English Cottages (cottage, trees & bushes, post box)
  • 8 X 8 inch card blank and stamping card (smooth white)
  • Scrap copy paper (needs to be thin) and temporary glue adhesive (such as zig 2 way glue) or masking tissue
  • Watercolour pens and inks (yellow, orange, brown, turquoise, bright green, olive green, red, pink, grey and black)
  • Fine tipped water resistant pen (black and opaque white)
  • Alcohol marker (black)
  • Versafine (Onyx Black)
  • Pebeo Drawing Gum (masking fluid)
Step by Step:

Planning a rough layout.
The first thing that I do with a set of scene building stamps is to stamp all the elements onto scrap copy paper and roughly cut them out. I then use these to plan a scene, laying them out onto my project to decide on placement. Individual elements that may be needed to create masks (e.g. buildings, trees, bushes etc.) I cut around carefully. Any elements that are silhouette stamps (e.g. solid black trees, branches and foliage) don’t need to be masked so I just cut around roughly. I keep all these cut out elements to use again for future projects.

Stamp the post box and cover with the mask before stamping the wall. Using masking you work progressively from foreground to background. Masking ensures that element sits in front of the one behind. Don’t worry too much if you get a few gaps in the image around the masked elements, these are easily corrected with a fine tipped pen.
I put a couple of dots of zig glue onto the back of my masking pieces. It goes on blue and dries clear, and is then a tacky temporary adhesive for holding elements in place while stamping. If you are using masking tissue this already has a tacky backing.

Next stamp foreground trees and bushes. The foreground bush on the left was masked before stamping the ones behind. Cover the trees with masks.

Continue stamping and masking trees and bushes as you work backwards through the scene.

Continue stamping and masking as you work backwards through the scene.

Continue building the scene using masks as needed. Now can you see where I went wrong? I forgot to mask the bushes on the right hand side of the cottage! You can see the base of the house through the bushes. Eeek! I decided to leave it and try and cover up the mistake with the colouring.

Stamp the clouds along the top and the birds into the sky.  Mask the foreground tree and stamp the silhouette tree on the right.
Use the fine tipped pen to draw in elements and extend the background. Try to ‘go with the flow’ and just quickly draw. Rather than solid lines try and be a bit sketchy with light touches, dots & dashes. To give the illusion of perspective draw the path wider as it gets nearer the front of the scene. Draw a letterbox and scribble text onto the post box.
Next cover the cottage and trees using the Drawing Gum. This masking fluid is brilliant. I had always been used to the older stinky rubbery style masking fluid that ruins your brushes. This fluid is fabulous, it paints on easily and washes out instantly with water (treat it as you would an acrylic paint and wash brushes immediately – it will ruin your brush if you let it dry on).
It is not essential to mask before colouring but this makes it much easier to slap colour across the background and leave the elements protected.


Apply ink colours (or watercolour washes) across the background. Work freely working ‘wet in wet’. I used intense coloured inks to create a vibrant scene.

When the background is fully dry rub away the masking fluid.

Now colour the rest of the scene. I used watercolour pens and a damp brush, picking up colour scribbled onto my palette.
Use the fine tipped pen to draw in a few extra details, adding grasses and texture to the path. To keep perspective draw them slightly larger towards the front and reducing in size as you go back. Use the opaque white pen to add a few highlights.
Finally edge the scene with black marker to frame and mount onto the card front.

Thursday, 8 March 2018

A Walk in the Moonlight by Penny


Goodly morning to you all!  I hope everyone has survived the 'Beast from the East' and storm Emma, and that you will join me for a few creative moments.  Today it is my pleasure to bring you a project that will hopefully inspire and encourage your crafty mojo.  This atmospheric card is one of my tv samples from the February shows.  I have used stamps from the Landscape Edges, Silhouette Grasses and Words to Dazzle and Sparkle sets: Versamark and black Versafine inks, white charcoal, clear and silver embossing powders, silver pen and some dies from my stash.

On a piece of black card I stamped the trees and fence image in Versamark and embossed it with clear powder.  I used white charcoal to create the Moonscape background, giving the piece a moody, atmospheric feel.  I die cut some branches and foliage from another piece of black card and added silver gilding wax to them.


I then took a white base card and stamped several images repeatedly around the edges in black ink, using first, second and third generation ink to create a frame.


I edged the focal panel with silver pen, matted it onto more black card and attached it to the base card.  I stamped a sentiment onto a spare piece of black card and embossed it in silver.  I then cut the card into a banner  and attached it to the card.


This is a card that will suit any occasion and any recipient, and it could be adapted to create a piece of home decor.

Thank you all so much for popping by, I hope that you have enjoyed your visit - pop in again soon!

Take care until next time


Penny   xx