Pin It button on image hover
Showing posts with label Fabulous Flappers. Show all posts

Thursday, 11 February 2021

Daffodils (by Magda)

 Hi and welcome everyone

I have a special feeling to Daffodils and the post of today want to be a contribution                                 and a remind page to a lovely handsome Daffodils bouquet I received years ago. 

From the wide range of Chocolate Baroque stamps, I chose  Fabulous Flappers for the vase                     and  Spring Bird Daffodil for the bouquet                                                                                                    The other items are : white gesso, Archival,  Distress Ink Pad , stencil, colour pencils


I hope you like Daffodils flower too, hugs

Magda


Monday, 24 February 2020

My Reading of the Year (by Magda)

Hello,
Do you think bookmarks are still popular and useful ? I was wondering if you were still reading paper books or you prefer only e-books.
Bookmarks are really funny to do and it is also a way to use left over of paper pieces . I show you the here the traditional shape and a different one, where you can write on it notes, sentences, words, whatever you liked in reading the book and save all in a folder.


For my projects I used :
- White cardstock
- Distress Ink Pad
- stencil
- Archival Jet Black
- Spring Foliage
- Spring Bird Daffodils
- Fabulous Flappers
- Mackintosh Beauty
- Aquarelle Pencils


Thanks for passing by,  hugs
Magda


Wednesday, 15 June 2016

See Beauty (by Rachel)


It's the second week of Rachel guest designer spot and today she is treating us to a beautful twenties design.

Hi everyone, this week is a simple make for those times when we need a card in a flash!


  • I stamped the lady from the gorgeous Fabulous Flappers, masked the image and then used distress and stencils to create the circle and sunburst. 
  • I then coloured the lady and stamped the CB sentiment. 
  • This layer was then added to a larger card where I had used the same colour of distress and another stencil.

I really enjoyed making this and am really looking forward sharing with you again next week.


Rachel x

Once again thank you for another wonderful design Rachel, just love that sunburst behind our Flapper lady.  And of course we will have more projects for you from our Design Team, so please keep tuning in to catch all the latest inspiration.

Saturday, 31 October 2015

It's all about exquisity.........(by Miranda)


Hello crafty people,

Today I have a lovely combination to show you made with the Exquisite edges and one of  the Fabulous Flapper ladies. I think they are a good match......
I had this background with the deco flowers for quiet a while . The flowers come from the Nouveau lovebirds. There are so many sheets in the CB collection that will combine perfectly with these edges, all elegant and stylish!

And now onto my card.......

The background was made using Distress inks onto watercolor paper. Some shading with color pencils and adding some white highlights. I have embossed the upper edge using Wow embossing powder Ruby Romance and the lower edge was done using one of the new colors, Atlantic seaspray, a turquoise with gold sparkles.


Than I stamped the lady....I used a few Memento colors to ink her up and dabbed the ink on the lower part of her dress to let it fade. Than I extended some lines with color pencils.

Hope to have inspired you, I had fun doing this one.......
Thanks for visiting and always like to read your comments,

Have a lovely weekend,

Saturday, 3 October 2015

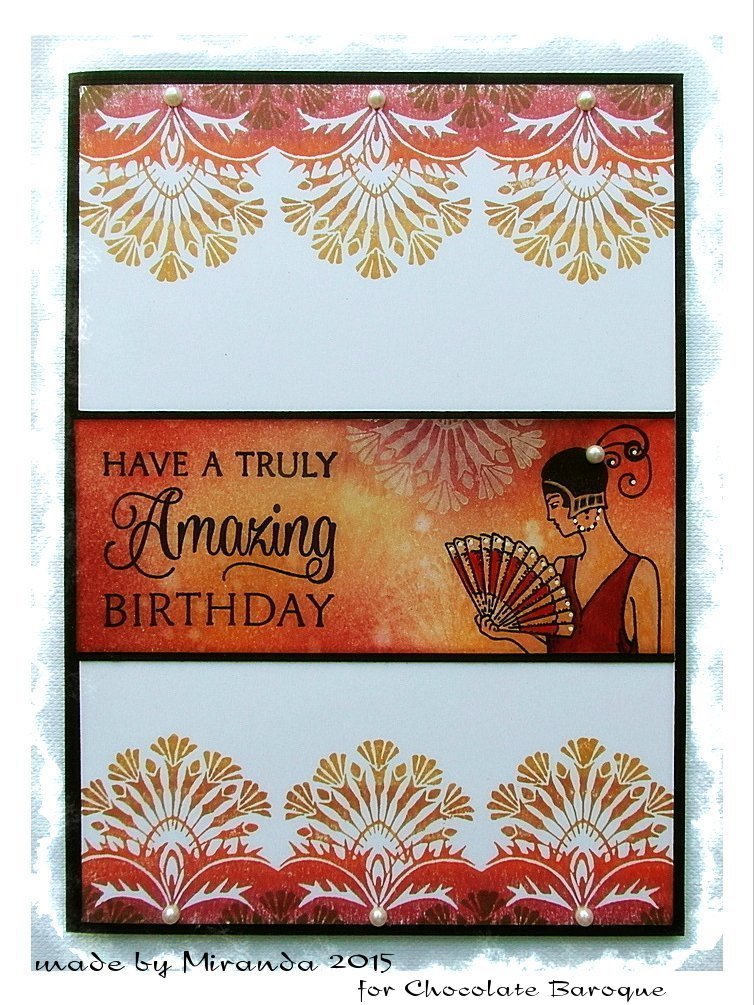
Have a truly amazing Birthday......(by Miranda)


Hi there lovely people,

Today I will show you my first take on the new stamps. I have played with the new beautiful Exquisite edges. They combine so beautiful with all the Art Deco/Nouveau style stamps which Chocolate Baroque has in their collection.
I have combined them with the Fabulous Flappers and a sentiment from the Amazing Birthday wishes.

Well now onto my card.........
I have stamped the edges with several Memento colors; Peanut Brittle,Morocco, Potters Clay, Rhubarb stalk and Rich Cacao. The center piece was blended with matching Distress inks. I stamped a part of the edge with white ink. I stamped a part of one of the ladies of the fabulous flappers and coloured her with color pencil and some white acrylic marker accents.


I really love this style of stamps and I will be happy to play more with them, so next time more art deco style from me. 

Thanks for watching and always enjoy to read your comments! 


Sunday, 18 January 2015

Garden Lace Scene By Florence

Hi everyone

I hope you are all enjoying the weekend.

Today I would like to share with you some cards made using the new Garden Lace Scene Stamp.  This is such a gorgeous image.  As you would expect from Chocolate Baroque stamps, the image stamps perfectly every time.  Lovely crisp lines and detail.


As this is such a beautiful image I decide to keep the first three cards simple in design with only the addition of sentiments from the Mackintosh Sentiments Rubber Stamp Set which go perfectly with this image.


I have just changed the colors of the ink I have used to stamp the image and the colors used to color the image in.


When I first looked at this stamp The Great Gatsby Sprang to mind.  The thought of elegant parties with guests dressed in their finery and sipping cocktails on the terrace resulted in the idea of combining the Garden Lace Scene image with one of the Fabulous Flapper Ladies.


These cards were easy to make.
I stamped my images with Archival Ink and colored them.
Card 1 and 2 I used ink and a damp paint brush to color the image.
Cards 3 and 4 I used water color crayons and a damp paint brush.
On card 4 I stamped the Flapper Lady onto a separate piece of white card, colored the image and attached it to the card using foam tabs.

Thank you for looking
Florence x

Tuesday, 20 May 2014

Twenties Tags (posted by Judith)

Hi Folks, I have a couple of tags to show you today, using the stamp of the month stamp sets. I wanted to create a peice of artwork reflecting the fashions of the twenties, when the dresses were often beautiful ombre shades, with fringing and feathers, with lots of decorative elements. So my first tag tries to reflect these style features, using a background of Distress Inks, ranging from pale green to dark blue. I have spritzed the background with a shimmer spray to give the impression of a chiffon overlay.

I stamped a portion of the background with one of the slihouette flower stamps from the Nouveau Lovebirds stamp set, and added some fringing and a large feather. I used a tiny portion of one of the flapper ladies dresses from the Fabulous Flappers stamp set, which I coloured with pencils, and encapsulated it into a Nautical Frame with Dome charm.

My next tag was made using Gelatos on the background. I had this tag lurking in my stash from a while ago, and decided to try and make something with it.I used a mask, and some stamping with gold embossing using a stamp from the Texture Fragments stamp set. I stamped the flowers taken from both of the A5 stamp sets onto self-adhesive labels , and coloured them with alcohol based markers, adding some leaves from the Tangled Garden stamp set. Some funky crackle gems and ribbon complete the tag.

Thanks for stopping by, Judith xx

Monday, 19 May 2014

Fancy Cards!!


Hello everyone,

The new stamps of CB are so beautiful , don't you think? the designer-team just fell in love with them!
For this time, I have made some glitter cards, the CB stamps Fleurs Nouveau just fit. I only used Versamark, embossingpowder (different colours), my heat tool and black cardstock, don't they look fancy???

Have a magical stamping time!!
Greetings
Maria

Friday, 16 May 2014

Fleurs Nouveau - By Florence

 Hi everyone

Apologies for being missing in action for the last few weeks.  I have been partying, crafting, shopping and holidaying with my two blogging friends Marie and Kylie.  They flew over to see me.   It has been my first holiday (well taking time out) for nearly 20 years!!  Wonderful time.  Mind you, I know you wont tell anyone, they didn't half hog the remote for the tv and the computers!! he he.

I have been popping in now and again, when I have had chance to have a quick peek at the fabulous projects made by the DT and the Guest Designers.  Amazing work ladies.

 Right down to crafting and less of my chat.


For my projects today I have made some cards which are quick and simple in style and not much fru fru.  I hope you like them.


please click on the image to see the detail


I have made all of the cards the same way but used different card stock and colors.

For my first card I used a piece of A5 coated card stock.

I masked off a thin strip using post it notes and then applied some Distressing Inks using a piece of cut n dry foam.

I then used some masks, some builders plastering tape and ink to make some pretty patterns.

*I have used some masks from my own stash but I know that there are so many great masks on the Chocolate Baroque website HERE.

When the ink was dry and leaving the masks on, I used the leaf stamp from the Fleurs Nouveau stamp set and stamped the leaf pattern using black archival ink.

To finish the card, I removed the post-it notes,  stamped the Happy Birthday (from Birthday words A5 Stamp set) sentiment and added some bling.


please click on the image to see the detail

For my second card I used some mat white card from my stash.

I masked and added color in the same way as above and stamped my leaf pattern.

To be honest, when I first added the color to the card stock, it absorbed quite a lot of ink and it looked dark and I wasn't to keen on it but then.....I thought maybe I can take some color out, just where the leaf patterns are.  

All I did to removed the color was to brush on the tiniest (just damp really) amount of water with a small paint brush, just here and there, and then press down onto the damp area with a piece of kitchen paper.  To cut a long story short, this was the result.  A bit of a happy accident really.  I quite like the tie die effect it created.


Please click on image to see the detail


For this card, again I have made it in exactly the same way as the two above, just changing the colors and I used the small little leaf pattern from the Fabulous Flappers.


So for my sentiment, I just stamped Birthday Greetings onto a small square piece of card and attached it to my card using foam pads.

Well I think that is all from me today.

Thank you for calling in.  It is always great to have your company.

Thank you also to everyone for leaving such lovely comments.  We always love to here from you and they are very much appreciated.

Happy Crafting

Florence x

Thursday, 15 May 2014

A spotlight on the Twenties

It's been some time since I contributed one of my designs to the DT blog, however I intend to blog on here every month from now on; so let's start with May's offering.

When I first saw these Fabulous Flapper stamps I knew exactly how I wanted to use this particular image. During the art deco period it was all about shapes and angles and I liked the idea of using a circle to spotlight this lovely lady.

To create the spotlight illusion I stamped the upper part of the image with Tuxedo Black Memento ink onto a self adhesive circular label. I happened to have some in my stash but you could die cut a circle from an A4 single label sheet. I then coloured the image with my alochol markers and set aside to dry.

The card itself is a piece of A4 dark grey pearlised cardstock folded in half from which I trimmed off 1.5" down the side edge. I found a twenties advert amongst my ephemera stash which I glued to a piece of plain card to give it some strength. This was then attached to the front, overhanging the trimmed edge.

The image of the flapper was stamped onto another item from my stash (a Whist scorecard). Once dry I stuck the self adhesive circle over the top, ensuring the images were matched up. This was then matted onto a piece of Old Gold pearlised card and attached as illustrated with 3d foam.

Finally I stamped the words 'Just a Note' from the Mackintosh Sentiments clear stamp set and finished it off with the ribbon.

I have been using self adhesive labels for many years now and find them useful for all sorts of crafty projects. However when it comes to stamping they are an easy way to add an image to a background without having to create a mask. 

I hope you are inspired by all my fellow DT members' beautiful artwork, there are more gorgeous things to follow so please keep watching.


Sunday, 4 May 2014

Fabulous Flappers - By Florence

Hi everyone

Thank you to everyone for calling in and for your lovely comments on the previous posts.  They are truly appreciated.   It is always great to hear from our CB family.

I am so excited!!!!  The Fabulous Flappers are amazing.  All credit to Sue who designed these stamps.  They are a stampers dream and absolute delight to use.

You don't need to take my word for it, you can tell how wonderful and versatile they are by looking at the incredible projects from the DT. 
I have always loved Art Deco styles and the artwork by people such as Erte and George Barbier so I didn't think twice about taking my inspiration from those artists to make my cards.

I have mixed and matched some other Chocolate Baroque stamps with the Fabulous Flappers.

I hope you like them.


I started off by making masks of all my ladies using some masking tape.
I used white coated card stock and Black Staz-On ink.

I stamped my (yellow) lady and covered her with a mask.

I then stamped the (blue and red) lady so that she appears behind the (yellow) lady.

Leaving the masks on both of the ladies, I stamped the pillar bases (The pillar bases are from the retired Antiquities set) at the top and bottom.

I then drew two lines using a micron pen to create a column connecting the bases.

I masked off the edges of the column and added some distress marks using one of the Abstract Fragments background stamps.

I stamped the decorative corner (from the New England Winter set) and then just added some straight lines, again using the micron pen, to tie everything in and to ground the ladies.

Whilst everything was masked off I added some blue distressing ink to the background.

I removed my masks and colored my images in.

To finish off I just added some bling and a flower flourish which I made using a die.


For my second card I used exactly the same technique as above using lots of masks.

I started by stamping and masking the lady.

I then stamped the pillar and masked it.

With all of the masks in place, I colored my card with Wild Honey distressing ink and stenciled on some patterns using Rusty Hinge distressing ink.

I then stamped my peacock.  Do check out the Peacock Stamps available from Chocolate Baroque. They are one of my hot picks to go with the Flapper Ladies.

I removed all of the masks and colored my images with my jumbo felt pens.

I used some of the little flowers from the flower vase to create a climbing flower around the pillar.
Again I added some bling and a florish.


My third card was the result of some incorrect stamping on my part.

I stamped and masked my ladies as above but then went and smudged the Chinese Lanterns.
So, being a great believer in waste not want not, I cut around my images and used them separately.

I attached a piece of pretty paper to my base card and then added all of the little stamped pieces to create a scene.
It was a case of adding a bit here and there to see what evolved.
The lanterns are from The Chinese Lantern set.
The bush in the Urn is the small tree from the Patchwork Landscape set.
The pattern on the pillar is a stamp from the Abstract Fragments.

That is all from me today. 
Take care and happy stamping.

Florence x


Monday, 28 April 2014

Ladies in Green (posted by Judith)

Hi Folks, I have some samples to show you using the Fabulous Flappers stamp set today. I have really enjoyed working with these lovely stamps, as I am a real fan of the Art Deco/Art Noveau era.

For my first card, I have created a marble background, using shaving foam and Golden acrylic paints. I have stamped the main image onto a piece of white card, and cut out an oval shape, just avoiding the bottom area where her dress overlaps the edge. I hand cut a black mat layer. I stamped some of the flower images onto some spare white card, and coloured all of the images with Distress Markers.

My second lady is resting on a stepper card. I have embossed some linen card, and highlighted the raised areas to show the texture. I have used one of the smaller stamps on the Nouveau Lovebirds stamp plate to create a border along the bottom of the card, and added some black gems for decoration. I have added a sentiment from the Mackintosh Sentiments clear stamp set.

My last sample uses the same lady again, but this time I have used a peacock theme for my card. I created a Distress Ink background, and used a peacock feather mask over the background. I stamped the peacock cluster stamp around the edges, using the corresponding colour inks that I used to create the background.

I stamped the central image, and then used some bleach to take away the colour within the image, before colouring it with pencils. I added some ribbon, and die cuts to finish.

Thanks for stopping by, Judith xx