Pin It button on image hover
Showing posts with label Floribunda Net. Show all posts

Tuesday, 27 April 2021

Imagine triptych by Brenda


Hello Peeps, time to share some more samples from the March Hochanda shows. I recently purchased this new die which lends itself to the shape of these stamp panels perfectly. I started with with a background of oxides in shades of green then stamped Arched Landscape, Garden Lace Scene and a quote from Words of Inspiration, once the ink was dry I covered all three with clear embossing ink and Speckled Egg Distress Glaze which gives a lovely gloss finish but leaves the detail of stamping perfectly clear and sharp.


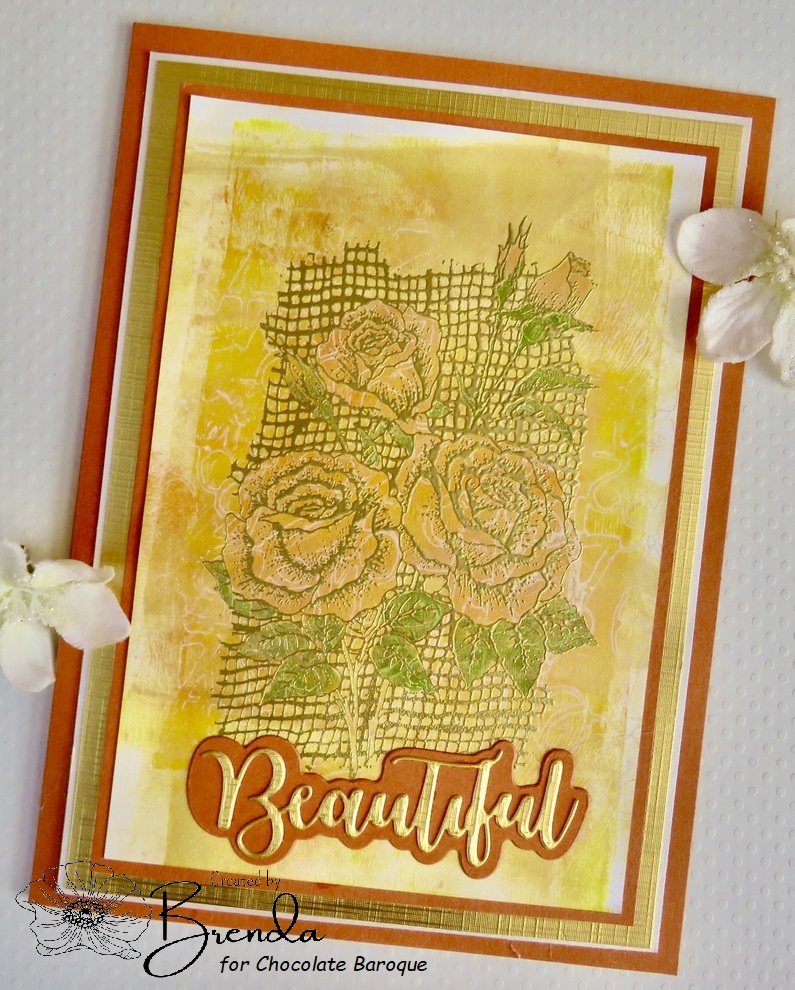
For this one I have used (again) Floribunda Net stamped on to an acrylic background which had some random stamping in white using Just Useful and then the focal images stamped and heat embossed with detail gold EP. Some colouring of the blooms using Distress Markers and a die cut sentiment.

I hope I have given you a little inspiration this month.

Monday, 26 April 2021

brusho flowers (by Veronica)


This was experimental, but I liked the result and decided to repeat it using all the floral stamps from this month's show

.

The first was a card using the crackling rose stamp, just stamped onto white card using black versafine and clear embossed before sprinkling with grey brusho powder and spritzing with water. A black mat, and a base card sponged with grey distress ink and randomly stamped with part of the rose stamp in the same grey.


The base of the concertina was an A3 sheet of gold card cut to give 3 panels 5x7". The four main images were stamped in black and clear embossed before adding the grey brusho powder. On the last two panels the crackling rose was stamped in grey in the corners , and sentiments stamped using black versafine.


Sunday, 25 April 2021

Rosy, Rosy.

Hello. I'm sharing the last of my samples made for the Hochanda (now known as The Craft Store) show in March. Lesley was showcasing some beautiful, individual floral stamps.


My first card uses the Floribunda Net stamp. Such a pretty stamp.
I stamped with VersaMark and embossed with Pink powder, I then used watercolour inks to colour. I used a punch on the corners and mat and layered onto some mirror card.


My next card uses the beautiful Crackling Rose stamp. A lovely stamp, especially if you like to colour.

For this card I stamped in brown archival ink and coloured with watercolour pencils. I added a die cut rose leaf and some pretty pink design papers.


This card uses the Flora Musica stamp. 
I stamped in Memento ink and used alcohol markers to colour. I layered onto an oval die cut. For the background I used a stamp from the Dusky Damask stamp set.


My last piece today is a grey board heart which I covered with some design paper and Brushos. I stamped the Harlequin Bouquet stamp in Archival ink and coloured with watercolour pencils. I then added some crackle glaze, being careful not to move the pencil. When it was dry I added some antiquing cream to highlight the crackles. I finished with a sentiment from Life is So Much Better.

Thanks for looking
Sandra x


Saturday, 17 April 2021

flower power (by Veronica)

One of my favourite stamps was in the shows last month, the lovely flora musica and i have two versions to share today. The first is a very CAS card, simply stamped onto a  square of white card. The stamp was inked with distress marker pens and stamped using a stamping platform. I used a damp brush to draw the cololur out into the flowers and leaves and stamped the sentiment from birthday words in the bottom corner. The card was edged with ablack marker pen before mounting onto a white card blank.
The second version was again stamped using marker pens, this time edged with distress ink and mounted onto a dark red car. The background panel was sponged with matching distress inks, and randomly overstamped using just the flowers and a swirly music stamp from the music fanfare set. The same sentiment was stamped onto spare card and cut out using a punch,

the next cards use the harlequin bouquet  stamp, the first stamped in grey versafine onto white card and then again using black versafine onto spare white card, The first piece of card was coloured using wild honey distress ink and water on a craft mat, and the harlequin part of the stamp stamped randomly using the same distress inkpad to create the background. The flowers and leaves on the second image were coloured with marker pens, cut out and glued over the first images.
The base card was sponged with hickory smoke distress ink, then the image stamped randomly using the wild honey distress ink
The second version is more muted, inked first with distress markers then overstamped qwith black versafine. Background card sponged with hickory smoke and a pink distress oxide 
( probably worn lipstick, but not sure!) then randomly stamped with the harlequin part of the stamp using the grey.
Sentiment from say it vertically


My final card uses the floribunda stamp, stamped in versamark onto kraft card and white embossed. I sprinkled truquoise brusho powders over the flowers and spritzed with water. Mounts were white and turquoise card onto a square card blank , and the sentiment stamped in turquoise ink onto a scrap of white card edged with the same inkpad and matted onto a scrap of kraft card


Tuesday, 13 April 2021

Blue Florals (by Judith)

Hello everyone, I hope that you are all keeping well. I have a couple of projects to share with you today featuring stamps that we brought to the TV shows last month. Both projects share a common theme, I have used blue tones to colour the flowers. You can colour the images however you like, so why not use blue, or whatever colour you prefer? You can match the colours that the recipient loves, a favourite colour scheme, or the gift that you might be giving. 

To create my first card, I created a Brusho background, using green, turquoise and purple, and once this was dry, I inked through a stencil, using the same colours of Distress Ink. I stamped a verical sentiment from the Say It Vertically stamp set over the top.

I die cut an oval and stamped and embossed the Harlequin Bouquet, using Versafine and clear embossing powder. I coloured the image with watercolour pencils and lightly blended the colours with a water brush. I edged the oval with Distress Ink.


Another Brusho background formed the basis for my second card. I stamped the Floribunda Net over the top using Versafine once more. I added some stencilling with a mesh stencil using gilding wax this time, adding a bit of subtle shimmer. I coloured the roses with pencils, and then used a glittery pen over the top for more sparkle. I used a sentiment from Life is so much Better to create a frame.

I will be back later in the month with more projects to share with you. 

Thanks for stopping by, stay safe and take care,


Judith xx


Friday, 9 April 2021

Smiling by Brenda


Good morning, hope everyone is OK and had a good Easter. 

Today I am sharing some of my samplesd from last months Hochanda shows. Starting with the top creation using the beautiful Floribunda Net which I stamped onto an inky Oxide background and bleached out the colour from the blooms. Using gesso as an 'ink' I stamped some circles from Just Useful and numbers from Small Graph. On a panel across the bottom I used one of the images from Life is so much Better which was launched on the show. They are my own and first set of inspirational quotes and I'm still a bit taken back that Lesley and David wanted to make them into a stamp set, thank you both 😊


Following the current trend of long tall cards I used Garden Lace Scene which fits this style so well. After stamping the image I added colour and mated with coordinating colours. The sentiment is another from Life is so much Better.

As always my thanks for popping in today.

Wednesday, 22 November 2017

Roses in Red (by Penny)

Well here we are already at Penny's last week of her current Guest Design Team posts.  And this last project is a veritable feast for the eyes, a real study in red. So without further ado it's over to Penny.


Hello everyone, Penny here for my third and final GDT blog post this month - I've had so much fun bringing you these three projects!  Today's post is a lovely card that features a couple of Chocolate Baroque's many beautiful floral stamps - Floribunda Net, Harlequin Rose, and words from the Loving Sentiments set.  I have also used grey Versafine ink, Candied Apple Distress Ink, clear Sparkle pen, alcohol pens, and a gold marker pen.  

I began by creating the focal panel, stamping the rose in grey ink onto white card then colouring the image with alcohol pens.  I added clear Sparkle pen to the net in the background and die cut the image to create a panel.  I added distress inks through the die, using it like a stencil, then added gold pen around the outer edges of the panel.  To complete the panel I matted it onto black card.  

I stamped a single rose image using distress inks into each corner of a white base card.  I then used water to pull the ink out and paint the roses, and added Sparkle pen. I then stamped a sentiment at the bottom of the card and attached the focal panel. 

This is quite a simple design from me for a change, but it is still as much fun to create as other more complex  projects.  I think this pretty card would be great for many occasions and for any age.

  
Thank you for reading this post, I hope you've enjoyed it.  I know it's early but I'd like to wish you all a Merry Christmas!  

Penny  xxx

You know I think roses are right for any season, including Christmas, so thank you Penny for this beautiful finish on your final week.  We have loved having you as our guest and look forward to what you will bring us in the New Year.

Well that's all from me too but don't foget we have a new piece of inspirational artwork everyday from one of our lovely, and talented, design team. So please do join us again soon.


Tuesday, 19 September 2017

Roses and Reindeer's (by Brenda)


Hello all, I'm here again to share a few more of my samples from last months Hochanda shows where Lesley inspired us all with more beautiful stamps.

For my first share I gave a piece of watercolour card a watery covering of DI then stamped Crackling Rose with Versafine black and coloured in with sparkle pens. The sentiment is from Loving Sentiments which I cut into several pieces to arrange around the bloom. The edges have been lightly inked, matted onto coordinating cardstock and a organza bow added down the side.


Reindeer Landscape is such a lovely stamp and I decided to keep it fairly simple. I stamped the main image and added some watercolour to the sky using a mask to block out the moon plus a little shading to the hills, then stamped part of the image twice onto a larger piece of card so that I could raise the focal coloured one in the centre to carry the scene either side. I also stamped one of the Deer again, cut it out and decoupaged offsetting it to the left.


My last share is a bit more inky indulgence using die cuts to create the base card which I then inked with Oxide inks and stamped with Harlequin Bouquet and Floribunda Net, coloured in with the same inks and the sentiment from Loving Sentiments stamped with Versafine black. I also added some leaves using leaves using the Useful Leaves stencil. Finally the three pieces were then tied together with seam binding threaded through eyelets.

Happy day all.

Sunday, 17 September 2017

Roses (byJulie)


Hello, today I have a couple of cards on a Rose theme.


My first card uses the rather lovely Crackling Rose stamp. To start with I stamped the design onto the centre of the card and then onto spare stamping card. I coloured the design on the spare card with Magic Pencils and then cut it out with a die cutting machine and an oval die. Next I added the extra crackles by partially inking up the Large Crackle Background and then just pressing it onto the card with my finger. (no need to use a stamping block). I then used 3d pads to adhere the oval panel to the front of the card. I then cut a frame from lilac paper and ran it through a die cutting machine with an embossing folder. I finished off with a sentiment from Loving Sentiments


My second card is stamped with Floribunda Net. I cut a couple of tags and stamped the Floribunda Net onto the white card stock tag before colouring with Magic Pencils. I created the Brusho background with just yellow and grey, but also added dabs of gold gilding wax as well. Before mounting the tags onto the card I threaded them with a feathery ribbon that I found in my stash and finished off by stamping the sentiment from Loving Sentiments 

Many thanks for popping in and please call back soon for more Design Team inspiration.

Julie xx

Thursday, 14 September 2017

Trilogy (by Magda) - Floral Backgrounds

In order to complete the projects with the Floral Backgrounds from Chocolate Baroque, I am sharing with you my Trilogy with the following stamps :
Harlequin Bouquet,  Crackling Rose  and  Floribunda Net.

For the backgrounds of all the cards I blended several colours of Distress Ink Pad.  I stamped the images with Versafine Onyx Black, coloured the flowers and leaves with watercolour pencils and
highlighted the petals with Stickles Crystal.
I used the sentiments from the fabulous Loving Sentiments set.

Harlequin Bouquet,


Crackling Rose


For this card, just for having it different, I cut out the shape of the mat and the front of the card, as you can see below.


I hope you enjoyed passing by. Thank you
Magda


Sunday, 10 September 2017

a floral bouquet (by Veronica)

 Today I have several floral cards to share, made for the show on Hochanda last month -  and one card doesn't have brusho on it!
The first uses the lovely flora musica stamp, stamped with versamark on white card and white embossed before adding brusho powders. The dark brown card background was randomly stamped with the rose part of the image and gold embossed,. and the mats are dark brown and gold.
 The second uses the crackling rose stamp, stamped in black versafine ink and clear embossed, rose covered with masking fluid and then sprinkled with black brusho powder. Once dry, die cut using an oval die and mounted onto a white card blank stamped with the gold embossed sentiment from loving sentiments.
I think this would be a suitable card for a lot of times, when you just need a general cheer-up card....
Crackling rose again for this one with masking fluid and brusho, this time torn round the edges befor sticking onto a dark blue background embossed with the crackle stamp and white embossed.
the greeting from loving sentiments was stamped and embossed with gold, die cut and edhes with more gold EP.
 The final brusho one is again crackling rose, stmaped in black and clear embossed before colouring with brusho powders. It was fussy cut out and mounted onto a background using distress oxide inks, with the sentiment in black.
My final card features the floribunda net stamp, and as promised has no brusho!
I stamped with versamark onto craft card, and white embossed it, tore round the edges  and coloured the roses with marker pen, mounted onto black and gold card at an angle onto a base card randomly stamped in wild honey distress ink, with a gold embossed sentiment.
The roses were made from a Tim Holtz die using the same dull gold card used for the mat, with a darker gold for the leaves.

Friday, 8 September 2017

A Quartet of Flowers (by Judith)

Hello everyone, I have some floral projects to share with you today, that were featured on last month's TV shows on Hochanda. These cards were made using the individual floral stamps from the shows, and I used a range of techniques to create the cards.

For my first card, I coloured the background with Distress Ink, and then stamped over the top using a stamp from the Harlequin Fragments stamp set, again using Distress Ink. I stamped the Harlequin Bouquet individual stamp onto a die cut oval, using purple ink, and coloured the image using Distress Inks and a water brush. I added a sentiment to the background from the Loving Sentiments stamp set.


For my second card, I created a background using Brushos and kraft card. I stamped the Floribunda Net individual image onto another piece of kraft card, and embossed it using white embossing powder. I coloured the image using Brushos and a water brush. I stamped the setiment from the Loving Sentiments stamp set onto a smaller piece of kraft card, again using white embossing powder. I have inked the edges of each piece of card using red ink.

For my third card, I coloured the background again using Distress Inks, and used the Large Crackle Background for added texture. I cut a postcard sized piece of card, and stamped the Crackling Rose individual stamp, adding images from the Mail Art stamp set, to create a postcard effect. I created a small sentiment strip using words from the Loving Sentiments stamp set once again.


Long term viewers of the blog will have seen a rendition of this final project, which I remade for the TV show. I hope that you will not mind seeing it again, using the Flora Musica stamp set:

My Team mates have made some beautiful projects using these lovely stamps. Do keep checking back this month to see their designs. Thanks for stopping by, Judith xx

Wednesday, 22 March 2017

Neat storage (by Gerrina)

I can't believe that already we have reached the last week of Gerrina's guest blogging spot, time really has got wings on at the oment. Anyway her final project is a beautiful idea for enhancing your storage, gorgeous.


Already the last of my Guest DesignTeamposts at Chocolate Baroque this month.

This time I made something that can make your craftroom an inspiration place and still is so useful. I have taken a glass jar that I use for markers:


Used materials:
Stamps: Chocolate Baroque Floribunda Net
Ink: Versafine Onyx black,
Other: Glass jar, white linen cardstock and Caran D'Áche crayons

To make:
  • Cut a piece of linen cardstock that fits the glass jar that you want to use.
  • Stamp the Floribunda Net stamp with black ink several times, starting at the left side and each time masking just the big rose on the left side, untill the end of your piece of linnen cardstock. I used a stamping tool to match the net pattern.
  • Colour all the leaves and flowers with crayons.

I hope you have enjoyed my designs and I will see you later in the year. 

Creative greetings,
Gerrina

This is such a great idea and can be applied to any other glassware that you may have. Thank you so much for the last three weeks of inspiration Gerrina, we look forward to your return in the Autumn.

If you have enjoyed this post please drop by again and catch up with our regular Design Team girls' projects and ideas.