Pin It button on image hover
Showing posts with label Indian Elephant. Show all posts

Wednesday, 23 December 2020

More Stamping Delights (by Anne)


Good morning. This is the last of my guest posts for Chocolate Baroque this month. I had planned a completely different set of projects but just had designer block! Horrible when that happens, especially when working to a deadline. This happens to us all at times, particularly this year with all the added stresses.

After several days of wasted effort I just stopped working on my original plan, went away from my desk and tried to clear my head. I then went back and decided to just ‘go for it’ – no plan, no nothing. I just picked up stamps and got started. Finally ideas started to flow – phew. I find that this usually works for me, although it is not always easy to do – ha ha.

I hope that you enjoy my offerings. Everyone take care and enjoy Christmas as best you can. Spring will soon be here and I am hopeful for far better times to come soon. Big hugs Anne xxx.

Blue and White Mandala

This one is a quick and easy make using the lovely mandala style stamp.

Materials Used:

  • 15cm square white card blank, decorative die cut circle in blue card and scrap white stamping card
  • Palm Fan Silhouette stamp (Chocolate Baroque)
  • Versamark Inkpad
  • Dark blue embossing powder (WOW Earthtone Blueberry)
  • White pen

How it was done

  1. Faux stitching was added around the die cut circle to frame it. It was glued to the card front with 3D foam for added depth.
  2. The Mandala was stamped and embossed with blue powder, cut out and glued to the card front with 3D foam.

Dazzling Butterfly

Chocolate Baroque have so many wonderful butterfly stamps – love this one.

Materials used

How it was done

  1. A mix of the Distress Inks were used to blend the outer edges of the card blank (this mix closely matched my blue die cut circle).
  2. The blue card topper was stamped with Versamark and embossed with white powder.
  3. The butterfly was stamped with Memento, coloured with alcohol pens. It was then heat embossed with a layer of clear sparkly powder and cut out.
  4. Everything was stuck down and the card was finally finished with glitter glue and PVA pearls.

Hydrangea Card

When pushed for time I will often use some ready printed papers in the background. They can also help with inspiration at times too.

Materials used

How it was done

  1. The background paper was trimmed and edged with black marker. The base texture was stamped with black Versafine.
  2. The main image was stamped with blue Versafine, the card trimmed to approx. 9 X 13cm and edged with black marker. The floral section was stamped again with black Versafine. The stem was extended by drawing with black pen and the image cut out.
  3. The topper was then spritzed with water and Brusho powder dropped onto the wet card. When dry the monochrome Hydrangea was glued on top, curling the edges up slightly for dimension.

Floral Thank You Card

This one was a super quick make. Ideal if you have a last minute card to do.

Materials used

How it was done

  1. The watercolour card was spritzed with water and stamped using a mix of the Distress Inks. These bled out giving a lovely watercolour effect.
  2. When dry the image was overstamped with Versafine. Versafine was also used to stamp the border and sentiment.

Dreamy Elephant Card

I love the Indian themed stamps from Chocolate Baroque – definitely amongst my faves. To save a bit of time I again used a pre-printed background paper.

Materials used

How it was done

  1. The sentiment and base texture was stamped and embossed with copper powder.
  2. The flowers were stamped with Versafine. The background was then edged and embossed using the embossing pen and copper powder.
  3. The elephant was stamped onto white card with Versamark and embossed with gold powder. The image was then coloured with pencils and pens and cut out. The elephant was lightly shaped and glued down with 3D glue gel for dimension.




Wednesday, 18 September 2019

Indian Archway (by Carole)

Hello everyone, our Guest Design Team member Carole is back with her second post this month, and has created a delightful card with an Eastern theme.

Carole writes:

Hello everyone,
I am delighted to be here again and have a very different sample today from my previous one.
I have chosen to use the beautiful Indian Elephant set of stamps for my sample. This set always conjures up colour to me, so I have used brightly coloured Distress Inks for the background.

The card front has two layers. The top one has a die cut label hole cut into the centre to form an aperture with two labels either side.
The layer behind was coloured and then the tree stamped, so that it was positioned centrally and would fit into the aperture space.
The two elephants were stamped, coloured and cut out.
The top layer and labels were then coloured and the labels stuck onto the base. The front section was over stamped with the top of the tree.
This stamp set is so pretty and it has a variety of lovely images on it.

Thank you for visiting and hope to see you next time.

Bye for now,

Carole.

Sunday, 15 September 2019

Spring into Summer by Penny


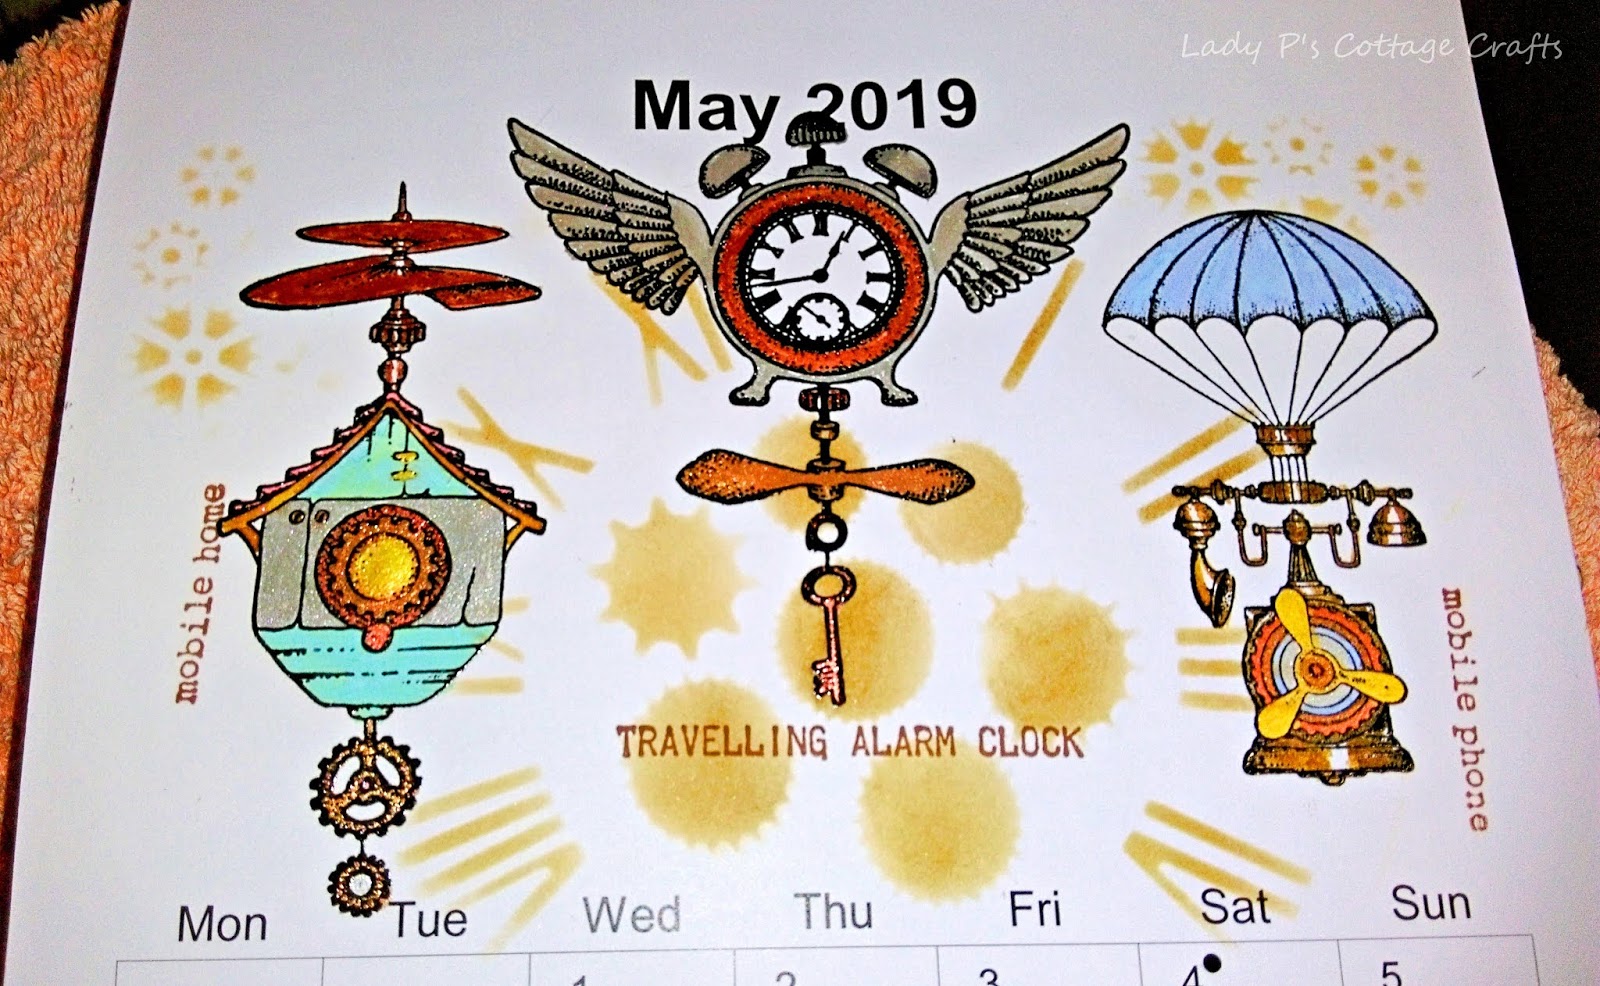
Goodly morning peeps, I hope you are all well.  I'm back again with my second post this month and I've chosen four mini projects to share with you today.  Last year Chocolate Baroque added blank calendars (Blank 2019 Calendar/Planner) to their range and I decorated several for Christmas presents and one for myself.  

For the first project I have used stamps from the ButterflyDaisy Collage set, Distress Ink, purple Versafine ink, alcohol pens and a stencil from my stash.  I stamped a large collage image in the center of the picture area, then stamped a couple of daisies and butterflies.  I used alcohol pens to colour all the images.  I then used a stencil and DI to create the background.


For this one I used stamps from the Steampunk Travel  and Steampunkery sets, metalic paints, Distress Inks, alcohol pens and a couple of masks from my stash.  I stamped several images using black Versafine and embossed them with clear powder.  I used paints, inks and pens to colour them, using metalic paints for the metal parts.  I then used the stencils with a DI to create a back ground.


This project uses stamps from the Underwater Kingdom and Seadragon sets, Distress Ink, Koh-I-Noor paints, black Versafine ink, clear EP and a stencil from my stash.    I began by stamping and embossing all the images and then painting them.  I took a stencil from my stash and applied DI through it to give the picture a watery background.


For this month I decided to go sunny and hot!  (Well I can dream can't I?)  I used stamps from the Indian Elephant and Paisley Elephant sets, Distress inks, black Versafine ink, clear EP and a gold pen.  I stamped and embossed the elephants first then masked them.  I then stamped and embossed the Palace silhouette image between the elephants, and stamped it again in second generation ink.  I then stamped a script image repeatedly across the page and used one of the worker stamps to fill any spaces in the background.  I used a black fine liner pen to ground the Palaces and the elephants then removed the masks and coloured in the elephants.


Thank you for dropping by today, I hope you have found my little collection enjoyable!  I'll be back again next month with more craftiness to share with you  :) 


                                 xx  Penny  xx

Wednesday, 26 June 2019

Indian Vase (by Debs)

Hello everyone, Deborah is here with her last post of the month, a stunning decorative item that will hopefully inspire you to get creative yourselves . Here's how she created her project:

Hello everyone Debs here with the last project for my spot on the blog this time round and I have another home decor piece for you. I love creating items to have around the home and the stamps I've used Indian Elephant and Indian Textiles are just perfect for this kind of project.

I used this vase substrate but you can use a host of other substrates such as photo frames, drinks and place mats, etc. Try not to use anything too circular as it can be difficult to stamp (or it is for me).

So to begin I covered the whole thing in a light coat of crackle glaze, roughly dried it and then sprayed it with a white acrylic paint. It must be an acrylic paint to make the crackles. I gave it three coats drying each one in between. Be careful not to touch until completely dry.

Next I applied a gold embossing powder to the bottom segment all the way round. First using Versamark I covered the area I wanted the powder to stick and heated it with a heat gun, once it's melted sprinkle it with more powder to form a thicker coat. I repeated this around the top of the vase as well.

Once completely dry plan out your design; I wanted mine to have a central design with elements moving away from the centre, but it's just as effective to stamp randomly. I used a dark brown Stazon ink as I wanted a vintage feel. Once the ink was completely dry I cut some string and wound it around the vase to give more interest. You could just as easily add gem stones or pearls, whatever matches your individual style.


Well that's it for me, I'd like to thank David and Lesley for having me and the fabulous Judith for organising me and the posts.
Goodbye for now,
Hugs
Debs xxx


Sunday, 30 September 2018

Festival Elephant - by Penny

Goodly morning peeps!  Well here I am again to share another of my Indian inspired samples from last months shows.  I can't believe we're at the end of September already!  This year has flown by - it's ridiculous!
Anyway - back to business, I have a pretty piece of home decor for you today.  I love creating home decor and I wanted to do something different from a canvas. I have used stamps from the Paisley Elephant, Indian Elephant, and Indian Textiles sets; Distress inks, Versafine ink, clear embossing powder, Crackle Medium and some acrylic paints from my stash.


On a piece of white card I stamped and embossed a large elephant.  I then used several small worker images to decorate the elephant's skin.  I've seen pictures of elephants that are decorated and painted for festivals in India, and I wanted to re-create this in my artwork.  I painted the elephant with Distress inks and a gold pen.  It didn't matter about stamping outside  the lines as I would be painting the background.


I painted the background with a dark acrylic paint, when that was dry I added some crackle medium around the edges of the focal panel and left it to develop.   Then when that was dry I used a dry brush to add a neutral colour chalk paint, giving the piece some texture. To complete the vintage, shabby effect I blended some Distress ink and gold pen along the outer edges.


I created a frame for the focal panel using greyboard and cutting it to size, and cut an aperture in the front.  I then stamped and embossed some floral and paisley images onto black card, painted them and cut them out.  I painted the frame, added the focal panel and attached the embellishments.  And there we have it - a lovely piece of home decor that will cheer up any room.

Thanks for joining me today, I hope you have enjoyed reading this post.  I'll be back next month with more crafty fun and ideas to share, meanwhile my lovely teamies will be here each day with more beautiful projects for you.

So until next time,

                                                             x Penny x

Wednesday, 26 September 2018

Golden Summer by Brenda


Morning to you all, Brenda here with a few more creations using the Eastern inspired stamps and stencils from Lesley's recent Hochanda shows. 

My starting point for the above card was a background of Distress Oxides, I then placed a large circle mask and built up the backdrop to my scene with DI's and Silhouette Palace 1 and Silhouette Palace 2 masks, taking off most of the ink from the sponge to achieve a softer finish. Next I stamped the Palace from Indian Textiles............I find my Timmy stamp platform so helpful with silhouette stamps as my dexterity is non too good, but with the platform I can over stamp to achieve a really deep impression. No idea why I resisted the idea for so long! Finally I stamped some leaves across the top using a stamp from Natures Paisley.


A fairly simple one here, another Distress Oxide background but much softer using only Squeezed Lemonade and a smidgen of Fossilised Amber, again I added some background stencilling with Silhouette Palace 1 and then stamped both of the Elephants from Indian Elephant and some trailing foliage using a stamp from June Fairy and added some dots with Liquid Pearls.


Some inky fun with this one, yet again Distress Oxides for the background followed by some stencilling using Useful Leaves and the word Summer from Seasonal Journey mask set and some random stamping using leaves from Natures Paisley. The large leaves are also from the same set, stamped and heat embossed with detail gold powder, cut out and fixed onto the base along with a opal embellishment. Finally I rubbed some gilding wax over the leaves and word.

Many thanks for your visits and kind comment which are always appreciated.


Tuesday, 25 September 2018

Asian Influences (by Julie)

Hello. Today I have a couple of cards to show you which have been created with Chocolate Baroque's Indian themed stamp sets.


For my first card I started with the card base. I inked the tall floral design from Indian Textiles with a green Versafine ink and stamped in each corner of the card. This was followed by spritzing blue and green spray ink over the entire background and then waiting for it to dry. Once dry I stamped the border around the edge of the card, which also comes from Indian Textiles.
Next you will need a piece of white stamping card and a stamp positioner (I used a Stamping Gear from Inkadinkadoo) to create the circular flower design. Once the circular design is stamped, colour with pencils, cut out with a die and mount onto blue card-stock. Stick the design to the centre of your base card and then ink up the little leaf design with blue dye ink and stamp around the edge of the circle. Both the circle flower and little leaf are from Indian Elephant.
The card was finished off with white, paint pen highlights and a sentiment from Paisley Elephant.


My second card is made entirely from Paisley Elephant and a relatively quick card to make.
For the base card, ink up the decorative square with Onyx Black Versafine and stamp four designs along each side of the base card. To make lining up easier, start with the image that is in the middle of each row and then work your way out. It's much easier than starting from the beginning of a row.
On separate card, stamp out the elephant and colour with pencils. (The soft background around the elephant was created by polishing your pencil colouring with a soft cloth.) Add the sentiment and then cut to size, before mounting onto black card and then sticking to the centre of the base card.
To finish off the card a little flat-backed gem was added to the centre of each little decorative square.

Thank you for taking a peek. Please call again for daily Design Team inspiration.

Julie xx

Sunday, 23 September 2018

More Elephant makes

Hello there! Rachel here today with more makes from the August shows - those beautiful Indian elephant stamp sets. I just adored working with these stamp sets - they are all so fabulous and work so well either alone or together.

This first one uses the indian-elephant rubber stamp sheet and the Paisley Elephant stamp set. I stamped and coloured the elephants before masking them and creating the background using distress inks and overstamping with the script stamp from the Paisley elephant sheet. I also used the silhouette Palace 2 mask. For the border I used a couple of 'worker' stamps from the indian elephant sheet.


This one was a quick one - I used the background from the Paisley elephant stamp set and just stamped it onto purple card. Then I stamped and cut out the elephant. A simple card but I hope you agree it is pretty.


This one uses the paisley single stamp from the Paisley elephant set and the silhouette palace from the indian-textiles stamp plate. I stamped the paisley stamp is disfferent colours before overstamping with the silhouette stamp. 


Finally I used elements from the Indian textiles stamp set and did some pattern building. I enjoyed this and think it produces a different kind of card!

I hope you have enjoyed reading how I put these together and if you have any questions please feel free to ask!

Thanks for your time!

Hugs

Rachel x


Thursday, 20 September 2018

Indian Delights (by Anne)


Good morning, today I am sharing a couple of projects created with the lovely Indian themed stamps.

My first is a shabby chic style card. Think vintage block printed sari silk and old documents.

Materials:
How it was done:
  1. Soft Form Relief Paste was spread over the stamp and left to dry overnight before peeling away. Extra colour was added with glaze pens and gilding wax.
  2. The card blank was repeat stamped with the paisley background and rainbow ink. Alcohol marker was used to emphasise the edges. Textured ribbon was glued down to create a border.
  3. The cartridge paper was stamped using Versafine and trimmed to fit the card front. The edges were distressed and curled using scissors then coloured with alcohol marker. The paper was then spritzed with inks before gluing to the card front.
  4. The embellishment was glued to the card front with 3D glue gel for added depth. Finished with PVA pearls.

My second project is a bright and cheery elephant scene. You know how I love colour and bling. I had a lot of fun with this one.

Materials:
How it was done:
  1. Soft Form Relief Paste was spread over the stamps and left to dry overnight before peeling away. Extra colour was added using pink and gold metallic plus black paints. Glitter glue and PVA pearls were added for extra bling (you know me!).
  2. Watercolour card was spritzed with water and coloured by dropping on pigment powders. Images were stamped with Versafine (third generation stamping was used to faintly stamp the buildings in the background). The flowers were coloured with metallic pen (taking care not to obliterate the stamp detail – the ink was very opaque).
  3. The card was edged with Versamark and embossed with sparkly powder (Yay, more bling).
  4. The embellishments were glued to the card front with 3D glue gel for added depth. Yellow puff paint was applied to the foreground and heated to puff up and add texture.
Sad News
I hope that you like my latest projects. This will be my last regular post for Chocolate Baroque for a while. I have been working with this wonderful Design Team for over 3 years now and I am very sad to be leaving. Nothing to worry about, I just have to give extra priority to other things at the moment. However, you will still see the odd post from me in the guest blogger spot and in the Facebook Group. I simply cannot tear myself away completely.

Thank you all for your support and lovely feedback over the years. Big huggles, Anne xxxx.

I am sure that you will all join us in wishing Anne all the very best in her future adventures, and we hope to see her back here from time to time as a Guest blogger. We will miss her colourful projects, as a regular feature here on the blog, but as she has said, she will keep in touch on the Facebook Group. Good Luck Anne!


Tuesday, 18 September 2018

Floral Script - by Penny

Hello peeps, Penny here again to share another of my Indian samples from the shows last month.  This one features stamps from the Indian Textiles, Indian Elephant and Paisley Elephant sets; Distress Inks, Little Birdy Paint  and a gold pen from my stash.  


I stamped three floral and paisley images in black and embossed them with clear powder.  I then masked the images and painted the background in Muted Teal.  When dry I stamped the script in gold ink and added a worker and a paisley stamp  randomly.    I removed the masks and coloured the images with pens.  I then added gold pen around the edges of the panel


On a white base card I stamped some worker stamps and a paisley image to form a border around the edges of the card, and blended ink on the outer edges.  I then attached the focal panel to the card.  I stamped a sentement on a spare piece of white card, edged it with gold pen then added dots around the words, before attaching it to the card.

Thanks for dropping in today, I hope you've enjoyed reading this post as much as I enjoyed creating this card.

Until next time,


                            x Penny x  

Wednesday, 12 September 2018

Ellie the Elephant by Brenda


Hello Peeps, Brenda here with another selection of my artwork from Lesley's Hochanda shows which featured the beautiful Eastern inspired stamps.

The Elephant shaped card above was cut from a mask I purchased a long while ago to make cards for our youngest Granddaughter who loves anything related to Elephants, she treasures a small pink Elephant she had as a baby named Ellie.......it must be the most travelled Elephant ever as it goes everywhere with her. 

I stencilled the background with Silhouette Palace 1, stamped the Elephant from Indian Elephant and coloured in with pencils, then stamped using Distress Markers direct to stamp flowers from Indian Elephant and Indian Textiles, cut them out and fixed across the top of the Elephant and added some pearl strings.


Here I have used the large Elephant from Paisley Elephant which I stamped and then masked so I could stamp the background with the script stamp from the same stamp set. After removing the mask I coloured the image with sparkle pens and randomly stamped around the edges with Natures Paisley. Finally I added some gold lace to the bottom, gold pearls to the Elephant and mounted into corrugated to which I had added some gold embossing.


I have to confess to really linking the Palace on the Indian Textiles stamp set, this time I used Versafine Toffee and stamped onto cream card which I first stamped with the script from Natures Paisley and added some stencilling using Silhouette Palace 1 using a sponge from which I dabbed off most of the the ink to achieve a soft finish. Then I used the edge of the border stamp from Indian Textiles across the top.

Myself and the team always appreciate your visits and kind comments.


Sunday, 9 September 2018

Elephant Canvas

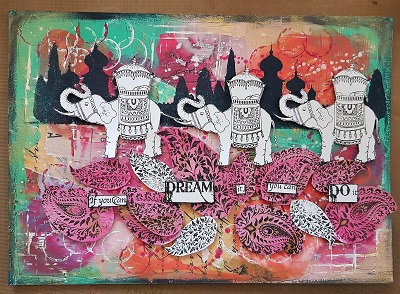
Hello there! Rachel here with the first of my indian elephant projects for September - I have chosen to focus this time on a 'canvas' that I made for the show. Sadly I don't have a step by step for you as the project ran away with me but I can give you details of how I made it!


To start with I covered the board in a variety of papers which were stuck down with glue and then I added acrylic paint using my fingers blending colours as I went along. Next I played with mark marking in one of the paint colours and also white. I made marks using bottle tops and also the side of an old credit card. I also added splatters of white paint. Once dry I got my stencils out and added the black paint through the Silhouette palace 1 stencil. I repeated this then got my indian-elephant-unmounted-rubber-stamp-sheet and my natures-paisleys rubber-stamp-sheet out. I stamped them onto white card and card coloured pink using inks. I cut these items out then placed them on the coloured background and stuck them down before adding words.

I do hope you have enjoyed reading how I made this piece and you have a wonderful day!

Big Hugs

Rachel xx

Saturday, 8 September 2018

Fireworks (by Magda)

Good Morning
Today it's up to me to give you some more ideas about how you could use the stamps of August.
I loved the final result of my "Fireworks" card and want to share with you the way I did it.

Step by step:
1.  Colour a piece of white cardstock with Distress Oxide Squeezed Lemonade, Fired Brick and
     Spiced Marmalade and let it dry
2.  Stamp Taj Mahal from the Indian Textiles set with Versafine Onyx Black
3.  Mask the inside of the peacock stamp with a piece of Masking Tissue
4.  Apply Versafine Onyx Black on the stamp
5.  Remove the masking piece
6.  Position the stamp around the Taj Mahal and stamp firmly
7.  Lighten the fireworks with Stickles Crystal all around as shown
8.  Use two pieces of leftover of the background, one for the sentiment and one as decoration to put
     behind it
9.  Seal the sentiment on the decoration, the strip behind the background and place all of the pieces on a black card.


For this tag I used the  Tree stamp of Indian Elephant which I coloured with Aquarelle Pencils, while the background is blended with Distress Ink Pad blue shades.


See you soon again with other projects for this month and thank you for reading till the end my post.
Magda

Tuesday, 4 September 2018

Tale of Two Palaces - by Penny

Good morning peeps!  I'm back again to share a couple of my  'Indian' samples from the shows last month.  I hope you are all well and still enjoying good weather.  So pop the kettle on, grab a biscuit (or two) and join me for some crafty fun!  

Palace in Moonlight 


My first project today features stamps from the Indian Textiles and Paisley Elephant sets; Distress Inks, Pearl White pearlescent paint, silver pen, black Versafine ink, clear EP,  and a gold pen.

On a piece of black card I stamped the large Palace image in black ink and embossed it with clear EP.  I then drew a large circle in the middle of the card, with only about two thirds of it showing.  This gives the impression of the moon being behind the palace.  I painted the moon silver, then added highlights to the palace with a silver pen.  I added some clouds to the sky and a reflection below the palace using silver paint.  I then edged the focal panel with silver pen.


On a white base card I stamped a border image using Distress Ink along the top and bottom edge of the card front.  I added accents to the pattern with a gold pen, then attached the focal panel to the base card.  On a piece of spare white card I stamped a sentiment in black and embossed it with clear EP.  I added highlights with a gold pen and blended ink around the edges.


Henna Tattoo Palace


My second project for you features stamps from the Indian Elephant Indian Textiles and Paisley Elephant  sets; Versamark ink, Distress Ink, gold pen, and Silhouette Palace 1 Mask

I began by taking a piece of Kraft card and stamping some Paisley images, a border and a floral image around the edges of it to create a border, using Versamark ink.  I like the effect this gives, it reminds me of Henna Tattoos.  I then placed the palace mask in the center of the panel and traced around the edges with a gold pen to create the palace outline.  I used the script image to stamp through the mask  with Versamark again to create a pattern on the palace.  I finished the panel by adding gold pen around the edge. 


I took a white base card and stencilled the palace using Distress Ink.  I then stamped the same border and Paisley images as before around the edges, and used a waterbrush to paint them.  I took a spare piece of Kraft card and stamped a sentiment with Versamark ink, and die cut it.  I then added part of one of the Paisley images around the inner edges of the sentiment panel, and added gold pen around the outer edges.  I used the pen again to add dots around the words to make them pop, then attached the panel to the card with 3D foam pads.

Thank you for dropping by today and spending time with me, I hope I've given your crafty Mojo something to get it's teeth into lol!

Take care all until next time,


                                  xx  Penny  xx


Saturday, 1 September 2018

Eastern Promise by Brenda


Good monring, Brenda here welcoming you to our first post of September. This month myself and the Design Team will be sharing our artwork from the August Hochanda shows which had an Eastern feel to them with lots of colour, Elephants and bold patterns.

My first piece above started with a Distress Oxide background over which I stenciled some sun rays using pearl texture paste. I then stamped the large Palance from Indian Textiles and extended it across the piece by stamping part of the stamp a second time. The flowers across the top are from Indian Elephant, stamped coloured and cut out to decoupage and the stamped some small leaves. The sentiments are from Amazing Mackintosh Words.


Here I have a little book, the base pages are a heavyweight acetate and the stamping mats watercolour card, all coloured with Distress Inks, stenciling using Silhouette Palace 1 and Silhouette Palace 2


Each page stamped with a mixture of images from Indian ElephantIndian TextilesPaisley Elephant and Natures Paisley. The front page also has a sentiment from Amazing Mackintosh Words.


The Elephants have all been coloured in with Sparkle Pens and a littler bit of gold highlighting.


Many thanks for popping by today and keep an eye open for more Eastern Promise from my team mates.

Wednesday, 21 December 2016

The Elephants went in two by two (by Rachel)

This is Rachel's second week as our Guest designer and today she has chosen our fabulous Indian Elephant stamp set as her focus.  Here's another one for you to enjoy.


  • I stamped the elephants first onto a piece of white stamping card and then masked them to created the background. The background was coloured with yellow distress ink and then overstamped in various archival inks using other stamps from the set to create the arc. 
  • Next the masks were removed and I coloured the elephants in co-ordinating colours to the background.
  • The sentiment comes from the See Beauty clear stamp set which I stamped with Jet Black Archival ink.
  • Finally the finished piece was mounted onto black card.
I really enjoyed creating something a little less festive this week but with the big day only four days away now may I wish you a very Merry Christmas and thank you for joining me.

Rachel

Another great design, thank you Rachel and we look forward to seeing your next project. 

Meanwhile our design team girls are still working hard to bring you some brilliant artwork so please come back again tomorrow to see a new and inspiring project.