Pin It button on image hover
Showing posts with label Distress Inks. Show all posts

Friday, 28 August 2020

Very geometric...(by Miranda)


Hi there,

It's me again with another post with some geometric inspirations for you. When I saw these 4 'blueprint' sets, I could almost not choose which one to pick........Because the freesia flower was in my mums bridal bouquet it had to be that one.....she loved freesia's especially in times when they had that lovely scent.

I always love geometric shapes and it's great that some them are separate stamps on the sheet so you can als create your own design!

This is the 1st card....because these cards are not so labour intensive I have made some more.... This time I was inspired by the technique and colors Lesley used in one of her video's although I did not use the ink technique. And I was inspired by the blending background technique from Eileen Godwin.


now onto the 2nd card, same colors same technique......

I did stamp and blend using Distress ink Vintage photo and did some masking too to create my own design......

I took colour out of some  flowers and recolored using some pencils. Some accent lining with fineliner 0.2 mm.


And then I needed more color........so on to the 3rd one....
Here I have used Distress inks Twisted Citrus, Peacock Feathers and Salty ocean. Stamped the images using Versafine black. And some hints of color using colored pencils.


I have used this stamp set;


Well, I did not use much this time but I like the results....sometimes less is more....

Hope to see you next time and thanks for visiting.
Have a crafty day,


Saturday, 22 August 2020

Hold on to your Dreams and Rainbow Soul by Penny.

Good morning peeps, I hope you are all safe and well.  I'm here with my last blog post, not only of the month but also with the Design Team.  I have left the DT after over four wonderful years with Lesley and David of Chocolate Baroque, and working with the best Design Team.  I shall still pop in on the CB facebook page from time to time though!  I would just like to say a big 'Thank You' to all of you who have liked my artwork and/or left a comment, your support has meant a lot.


Hold on to Your Dreams.

I have used stamps from the Catching DreamsHold On and Katya sets; acrylic paints, Kraft card, alcohol pens, Distress Inks, sepia Versafine ink, gold gilding wax, a wooden circular plaque, a piece of mountboard from my stash, a leather cord and some beads from my stash.          


On a piece of white card I stamped the Katya, feathers and Cacti images in sepia ink.  I then coloured some of the images with pens and some with DIs.  I had stamped several feather images and when they were all coloured I cut out all the images.  I did not need the Russian headress for Katya in this project so I cut it off and replaced it with the feathers.  I painted the wooden plaque and added gilding wax to the edge.  I then attached the Katya and Cacti images to it in 3D. On a piece of Kraft card I stamped the poem by Chief Dan George in sepia ink, cut around it then attached it to the plaque.  I threaded a leather cord through the plaque to hang it by added a couple of wooden beads. 


On another piece of Kraft card I stamped the Dreamcatcher image in sepia ink.  I painted the image with DIs and cut it out.  I die cut a circle of greyboard, the same size as the stamped image, then attached the board to the image.  I threaded another piece of leather cord through the dreamcatcher and through the bottom of the wooden plaque, joining the two together,


Rainbow Soul.

For this card I have used stamps from the Do Right Always and Hold On sets; pearlescent sprays, black Versafine ink, white gesso, Distress Inks and CB Strip Stencils.


I began this project by creating the background.  I took a piece of white card and sprayed it with three colours of pearlescent sprays. When it was dry I stencilled some circles down one side using white gesso.  I then stamped a sentiment in black into one of the circles.  I matted the background onto black card.          


On another piece of white card I stamped and embossed the Totem Pole and Tomahawk images.  I used DIs to colour the images before cutting them out.  On a white base card I stamped feather and plant images using DIs around the edges of the card, creating a border.  I attached the background panel to the card and then attached the embellishments in 3D.   


We would also like to wish Penny well, and to say that we will miss her on the Design Team. Her bright bubbly personality, and vibrant designs have brightened up our day on many occasions. All the very best Penny, 


Monday, 13 July 2020

Follow your heart, it knows where it wants to go (by Miranda


Hi crafty people,

Happy to be back again to share some of my crafty moments with you.

A very true quote ' Follow your heart, it knows where it wants to go. How often I do not listen to that? Do you recognize that?

Well, now on to the less serious part.......

I had a play with the The Folk Art Garden Rubber Stamp sheet - A5. This is such a beautiful and large stamp with lots of beautiful designs in it. So you can imagine that it took me a while to colour every element.......
I did stamp using black Versafine ink on a colorful distress background.

Then I started coloring using my color pencils and using Acrylic markers for accents. I also used some gold accents using glitter pens.


On the photos below you can see the shine of the gold much better.....


Thanks for your visit and always enjoy reading your comments. 
Till next week....

Stay safe and stay creative!


Friday, 6 December 2019

O is For.....By Debbie

Hello again and time to show you my samples from the November Chocolate Baroque  show on Hochanda. I really loved this month's launch, really versatile with lots of scope for ideas. Here's my first design featuring O is For.

 For this design I took an 8 x 8 ivory card blank. I started with a square of ivory card and masked a circle at the centre. I then took a circle die just to mark a larger circle around the masked area. I then sponged the entire area using Distress inks Peeled Paint, Wild Honey and then Vintage Photo around the edges. Now remove the mask from the centre. I used the small tree from the set to stamp all around the outer circle at clock number intervals. Next I stamped the "O" from the set into the centre of the masked circle using Versafine Vintage Sepia and sponged the sky and ground using a piece of torn card. I then coloured with water based markers. To finish, layer onto brown and Kraft card before attaching to the card blank.


Here's another look at O is For which I've stamped onto a mica sprayed background using Versafine Onyx Black and added some touches of colour with water based pens. I've used  the small tree again in the corners of the pink layer and then mounted onto a die cut background before attaching to a 7 x 7 white card blank.


For my next design I've used Remembrance Tree and Harmony Tree and I think this has to be my favourite of my samples. I've tried to depict the 4 seasons and I think it's worked out very well. I used backgrounds made with Distress inks with the spray & smooch method and then stamped with Versafine black. I just added a touch of colour with water based pens and the 4 pieces were mounted onto an 8 x 8 white card blank.


Here are a few more looks at those lovely tree stamps and ideas to go with them.


 Here we have 2 Artist Trading Hearts but I decided to turn them into pretty little plaques.

That's all from me for this time I'll be back later in the month to show you the last of my samples. Bye for now Debbie


Friday, 8 February 2019

Serenity and Tranquility by Miranda


Hello there,

Today I have made something using two gorgeous sheets; Serenity and Tranquility.
In time when these sheets were launched I was so happy.....finally some beautiful female Buddha stamps! Still find them so beautiful.......

I've made an inky background using Distress inks and stamped (using same colors) fragments of the background stamp; Studded Lattice.

And then some plain black stamping for the focal image......and some cherry blossom branches....
I did colour her using color pencils.


I made a separate border stamping the beautiful Indian designs from the Indian Elephant sheet which matches perfect with the Buddha designs. I am sure you all understand that I have a lot of favorites at CB!
I have blended with Distress inks and colored on the pattern using gorgeous sparkle pens....you can see the effect on the close-ups......isn't it gorgeous? 
I also gave some sparkles to the Buddha........using a transparant sparkle pen.


and the stunning effect of the Signo Ball glitter pens.........


Well, for now this is my last blogpost but I hope to see you again here on the DT blog......
Thanks for all your kind comments and stay creative, 
let's make the world more beautiful with our ART!


Wednesday, 30 August 2017

Pretty In Pink (by Asha)

Hello again! Here's another card from me featuring one of the gorgeous new singles released in August: Hanging Flowers Single A6 stamp. What can I say? I just love ... absolutely adore this stamp. It stamps beautifully with clean crisp detailed image and a true joy to colour. It's the kind of image that will work well for all occasions.

I decided to keep it simple by stamping the image with VersaFine Vintage Sepia for a softer more natural look. Then I coloured it with Polychromos and did a little off the edge framing. The background was too white, so I knocked it back with shades of grey and matted with the teeniest show of lavender card.

The background is fake bokeh and I used the  Seasonal Elements Stencil and Distress Inks, applied directly onto a deep pink card base. And lastly, I added some twine to wrap up this project.


I've mentioned this before, but these new floral singles truly are versatile. They work so well for all sorts of projects from a simple card above to a more elaborate Art Journal project I posted a few days ago.

As always, I have details of the tools and products used on my blog. Thank you for stopping by and drop in soon for more designs by the team.

Beijinhos,
Asha

Saturday, 25 March 2017

Spring Birthday (by Asha)

Hello, friends! It's finally here ... Spring, I mean. So, my for last Spring themed project for the DT Blog, I made a cheerful Birthday card using bright and zippy colours featuring the silhouette tall plant from Spring Foliage. The greeting is from Words To Dazzle and Sparkle and the butterflies are from Baroque Meadow.


I started by blending Distress Inks on a piece of watercolour paper. Here are the colours I used:
GrassMowed Lawn and Cracked Pistachio
SunMustard Seed and Fossilized Amber. With a stencil, I applied the Wild Honey to suggest rays of the sun.
SkyMermaid Lagoon and Peacock Feathers

Then I splashed some water to get that splodgy effect. Next came the images and greeting  - all stamped with VersaFine Onyx Black. Final touches - little drops of liquid pearls and some Stickles Black Diamond over the silhouette leaves. All of the products linked above are available from the Chocolate Baroque online store.

I've got more details of tools and products over at my blog. My team-mates have a few more vernal beauties with this stamp to inspire you before we move on to the stunning new stamps introduced by Lesley on Hochanda. Curious? Make sure you swing by the DT blog for more project ideas using these new stamps.

Thank you so much for stopping by today.

Beijinhos,
Asha

SaveSave

Tuesday, 24 January 2017

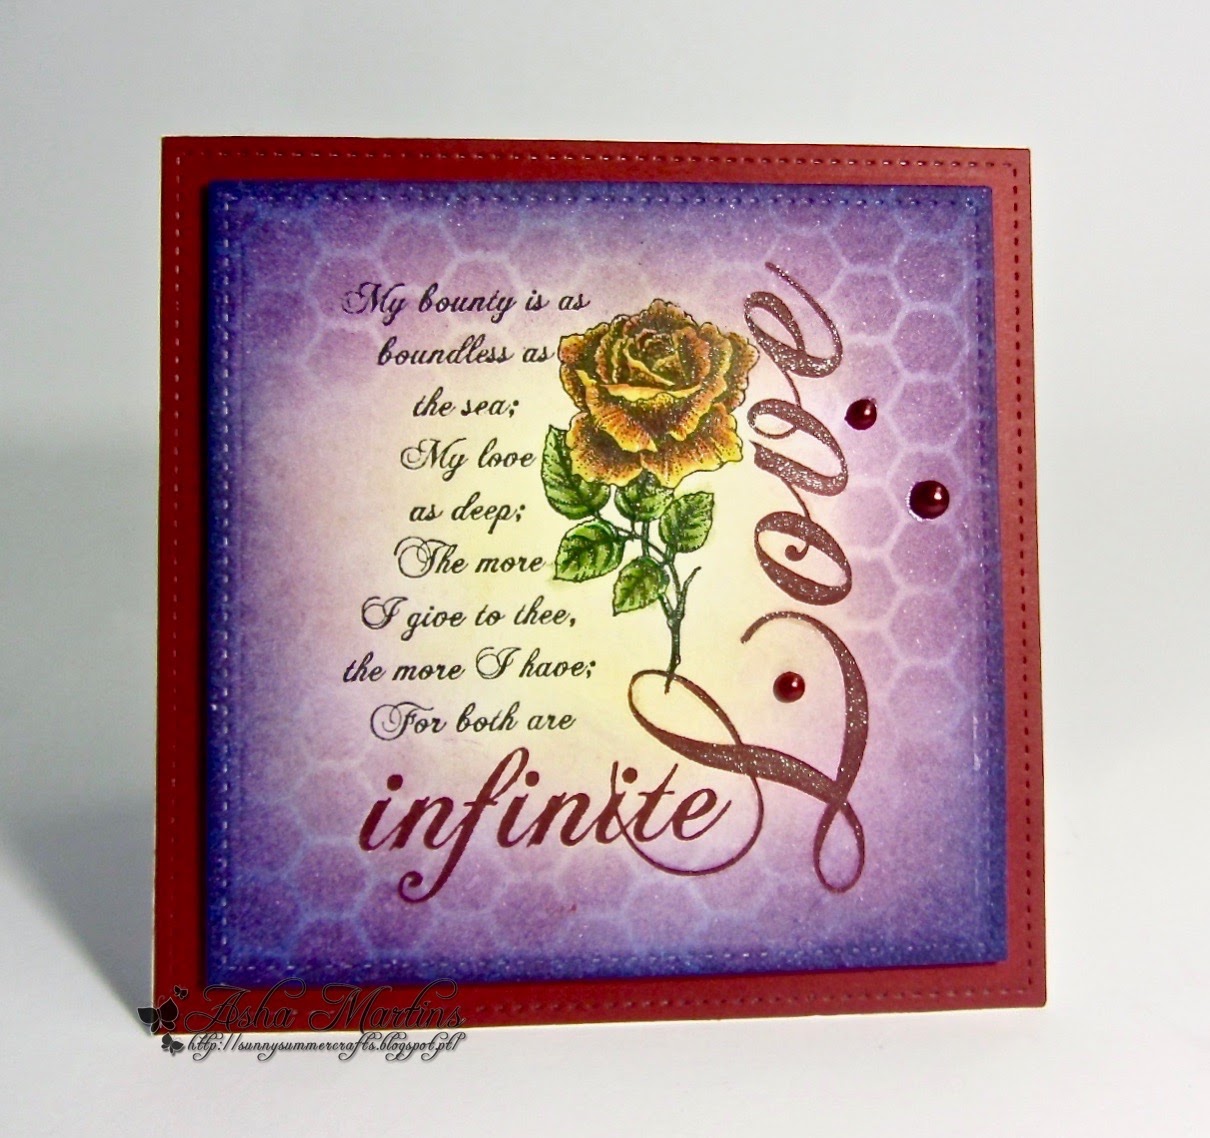
Infinite Love (by Asha)

Good morning, friends.  I'm back with another romantic creation using the lovely Harlequin Rose A4 stamp sheet.

I started by inking the background with Distress Inks: Chipped Sapphire, Dusty Concord, Seedless Preserves and Fossilised Amber and used a chicken wire stencil to add some interest.

Then I stamped the image on the with VersaFine Onyx Black, applying VersaFine Crimson Red on the bold letter. I added colour to the rose with Faber Castell Polychromos and lashings of clear glitter on the word "love". To finish the project - a few burgundy pearls.


This is a simple project but the colours add a touch of drama. I've got more details of tools and products over at my blog.

And make sure you swing by the DT blog often because at the rest of my talented teamies are creating projects that will amaze you. Trust me... I've had a sneak peak!

Have a LOVEly day!

Beijinhos,
Asha

Friday, 21 October 2016

'Tis Near Halloween (by Asha)

Hello again, friends! I'm back with another project for you. Today I want to share with you an easy Halloween card featuring stamps from the Witching Time stamp sheet.

I stamped the image with Archival Ink and used Distress Inks to create the background. Next, I coloured the image with alcohol markers. And to finish the card, I added a few black bling.


I have more pictures and details of tools and products over at my blog. Thank you for stopping by today and come back soon for more amazing creations by the rest of the Design Team.

Beijinhos,
Asha

Monday, 26 September 2016

Wild Roses (by Asha)

Good morning, fellow Chocolate lovers! We are continuing our adventures with textures here on the DT Blog. Today I want to show you that you can have plenty of textural interest on a simple and delicate project.

My card features the beautiful sprig of wild roses from the Pretty Birdcage A5 sheet.

Here's how I put together this card:
  1. With a stamp from the Texture Fragments A5 sheet stamp along the outer edge of a piece of square card stock with VersaMark ink. 
  2. Apply white embossing powder and heat set.
  3. Ink the card with Distress Inks. I used: Mowed Lawn, Cracked Pistachio and Mermaid Lagoon
  4. Stamp the wild rose image from the Pretty Birdcage A5 sheet with Memento Tuxedo Black.
  5. With a stencil apply Texture Paste around the stamped imaged and let it dry. I used Tim Holtz Layering Stencil Flourish.
  6. Colour the image with alcohol markers.
  7. Apply VersaMark on the raised texture paste design, sprinkle with WOW Clear Sparkle embossing powder and heat set.
  8. Back with foam tape and adhere the design panel to the prepared background piece. 

Thank you so much for stopping by today. Please visit the DT blog often for more design inspiration by the rest of the team. I've got more pictures on my blog.

Have a beautiful day!

Beijinhos,
Asha

Saturday, 3 September 2016

Joy To The World (by Asha)

Good morning, fellow Chocoholics. This month we will be sharing projects with "Texture" and that means texture stamps, stencils, pastes, embellishments, powders etc.

I decided to make a card with a textured look but without the bulk. Distress Inks and water are the main players. I started by applying Distress Inks in Dusty ConcordFaded JeansMilled LavenderWorn Lipstick and Spun Sugar for the sky; and Vintage PhotoRusty Hinge and Antique Linen for the desert sand. Then I spritzed some water waited for the inks to react, blotting with a paper towel until I got the desired effect.

The focal image is from the Peace on Earth A5 sheet, stamped with VersaFine Onyx Black.

For added texture. I heat embossed a piece of card with WOW Silver EP and die cut tiny stars and adhered these to the sky. I matted the design onto kraft card to tame the busy background.


I have more pictures and details of tools and products over at my blog. Thank you for stopping by today and come back soon for more amazing creations by the rest of the Design Team.

Beijinhos,
Asha

Sunday, 10 July 2016

tangled birch

 This beautiful new stamp is very addictive - so much so that I haven't got as far as playing with the equally lovely ladies yet!
Both these cards are on 7" square white card blanks.
For the first one I sed masking fluid to cover the trees before brushing with a mix of distress inks in blues and purples, with some wild honey for the moon.
Once it was all dry, I rubbed the masking fluid off, tore round the edges and added a black mat. I sued the same stamp to add the bbackground, using broken china ink to stamp with and to sponge the edges.


For the second card I masked the trees again before adding a sunset sky with distress inks, then coloured the trees with brown watercolour pencil.
Background card was created using spray starch and mica powders

Thanks for looking, and do keep checking to see what everyone else has done with this stamp (and the ladies!)

Veronica

Monday, 6 June 2016

Gilded Ornament (by Asha)

Hello everyone. Are you having fun with the new Baroque Ornament stamps? They are absolutely gorgeous. I've got an easy card project to share with you, featuring the Palm Fan Silhouette Baroque Ornament stamp.  It is a luxurious blend of spice and gold and full of eastern promise.

I prepared the back ground with Distress Inks. Then, I stamped the ornament design 3 times and heat embossed them in gold. After fussy cutting them in one piece, I adhered it over the prepared card base with foam tape.

The greeting is from Loving Sentiments A5 stamp sheet.


I had so much fun with this project. I hope you'll give it a go too. Over at my blog I've got details of tools and products. And don't forget to swing by often for more crafty inspiration from the rest of the team. Thank you for stopping by and have a lovely day!

Beijinhos,
Asha


Sunday, 27 March 2016

trifold babushka (by Veronica)


This was an experiment, which i ended up quite liking....

I started by making a trifold card from a sheet of white A4 card, using my old Groovy card maker, and marked a point 2" up from the bottom of the left hand corner. I marked a  diagonal line  from this point to the top right hand corner of the second fold.

The backing papers were made next, using distress ink onto a blending mat and spraying with water and mopping up with white card.
As far as I remember, I used wild honey, barn door and peeled paint inks.
Once this was dry, I cut it into 3 panels before stamping.

The buildings were stamped in the centre of one panel and at the bottom of another using vintage photo distress ink, which was then used with a waterbrush to add shading - once it was dry, I added a few white highlights with a pen.


the babushka dolls were first stamped onto masking tissue and cut out, then stamped onto the last piece of background towards the bottom of the card in the centre. I stamped the two smaller dolls first, masked them off, stamping the largest doll behind them.
They were coloured with a waterbrush, this time using wild honey, barn door and vintage photo inks.

I cut the panel with the dolls to fir the width of the card front and glued it down, The tricky bit then was to cut the card on the diagonal line whilst  remembering to cut around the dolls - a beheaded mother doll doesn't look good!

I lined the panel with the larger building up behind the dolls before trimming it to fit the second fold of the card, the trimmed the third panel to fit the back of the card.

the colours in the scan of the folded card are the more accurate, the sunlight rather bleached out the colours in the photos.

Thursday, 10 March 2016

Russian Fairytale (by Asha)

Good morning, friends. Are you having fun with the new Babushka A5 stamp set? If you don't want to play with dolls, this set also has 2 Russian churches that you can incorporate in your projects.

I stamped and masked the larger church 3 times. Then I set the scene by blending Distress Inks to create the twilight sky. To ground the churches I blended earth tones, added some grass and coloured the building with Faber Castell Polychromo pencils.

To finish the project, I added some highlights to the buildings with a white gel pen and stickles for twinkling stars.


As always, more details on tools and products used are available on my blog. And be sure to stop by often for more fabulous projects by the rest of the team. Have a brilliant day!

Beijinhos,
Asha


Saturday, 27 February 2016

Canticum Flores (by Asha)

Good morning, friends. It's my turn to share a project with you featuring a stamp from the new floral single stamps collection. You have seen my team-mates create some amazing projects. Each stamp in this set is beautifully drawn with so many delicate details. They are perfect for colouring and they make striking focal images on cards.

Today I bring you a card showcasing the new Flora Musica stamp. I'm calling this the "Canticum Flores" - Singing Flowers.  In keeping with the musical theme, I've paired it with a gramophone from an older set called Music Fanfare.

Just 5 easy steps to make this card:

1. Stamp the images with Versafine Vintage Sepia 
2. Colour the images with Faber Castell Polychromo pencils.
3. Ink the background with Distress Inks
4. Matt and adhere to card base.
5. Add sequins and subtle shimmer with a few strokes of Wink Of Stella Bush Tip marker. 

All these products are available from the Chocolate Baroque on-line store.


As always, more details on tools and products used are available on my blog. And be sure to stop by often for more fabulous projects by the rest of the team. Have a brilliant day!

Beijinhos,
Asha


Sunday, 14 February 2016

Love In Full Bloom (by Asha)

Happy Valentine's Day! On this day dedicated to love I want to show you what I''ve done with the new Crackling Rose individual cling mounted stamp. I stamped it with VersaFine Onyx Black and coloured it with Faber Castell Polychromo pencils.


I trimmed the image, did some fussy cutting and mounted it on to a stencilled background. To finish - sheer cream ribbon for a soft, feminine look.

As always, more details on tools and products used are available on my blog. And be sure to stop by often for more fabulous projects by the rest of the team. Have a brilliant day!

Beijinhos,
Asha

Tuesday, 2 February 2016

Spring Daffodils (by Asha)

Good morning, fellow chocoholics. Are you ready for Spring? To get you in the mood, here's a card I made using stamps from the Spring Bird - Daffodils DL sheet. The colours are fresh and light - the perfect palette for these vernal blooms.

For the background I used a stencil by The Crafters Workshop and Distress Inks. I stamped  the daffodils with Memento Tuxedo Black and coloured them with alcohol markers before fussy cutting and adhering them to the inked background. To finish the project, I applied Glitter Yellow and Glitter Green from the Wink Of Stella Brush Tip Glitter Marker Pretty Garden set and tied a bow with some sheer ribbon. All products linked are available in the Chocolate Baroque store.


That's all from me today. As always, more details on tools and products used are available on my blog. And be sure to stop by often for more fabulous projects by the rest of the team. Have a brilliant day!

Beijinhos,
Asha


Tuesday, 19 January 2016

Girly Gears and Soft Steampunk (by Asha)

Good morning, friends. I'm back with two projects featuring stamps from the Steampunk Butterfly A5 sheet.

First up is this this feminine number with soft colours. I inked up the background with Distress Inks and stamped the gears from Steampunk Butterfly with light grey ink. Then I heat embossed the large butterfly on purple cardstock with gold embossing powder and popped it up with foam tape.  The sentiment is from Patchwork Landscape A4 sheet.

My second card is a striking red-black-white combo. For this card I stamped the quarter lace fragment from the Steampunk Butterfly A5 sheet to form a complete circle and heat embossed it with white embossing powder. And voila - a lace doily! Keeping it simple with a sentiment from the  Pretty Poppies A5 sheet, heat embossed in red onto a piece of vellum. In keeping with the focal image, I also rounded the corners of the card.

There you have it - my feminine take on the steampunk style. I hope you'll have fun playing with these stamps.

Thank you for stopping by today and don't forget to come back for more mind-blowing designs from the rest of the team.

Beijinhos,
Asha