Pin It button on image hover
Showing posts with label Nevermore. Show all posts

Thursday, 22 July 2021

Where Imagination Meets Reality.......by Sandra

 Hello, I am sharing some more of my cards made for the June show on The Craft Store.


The stamps I have used are Steampunk Butterfly and Punky Romance.

For my first card I made a background using watered down blue and brown distress inks onto watercolour cardstock. When it was dry I used the same inks and stamped the cogs from Steampunk Butterfly randomly.  I stamped the corners and the bat wings in black archival ink and coloured with a darker blue. I finished the card by adding the sentiment, some pen nibs that I cut on my silhouette and a few small bats* from the Nevermore stamp set.

*The small bats were also included in last years Comfy Pyjama Online Retreat which was absolutely fabulous and it's happening again this year!


My next card uses the wonderful machinery stamp, pretty and grungy at the same time.

I stamped with archival ink, then used pencils to colour.  Once it was all coloured I used a blending solution to soften the edges of the pencils. I added the sentiment from Punky Expressions.


For my last card I used distress oxides for the background. I then used the large corner stamp to make a "dreamcatcher". I stamped in archival and used glitter gel pens to colour. I then stamped the keys and used a black pen to join the keys to the "dreamcatcher". I added a sentiment from Punky Expressions.


Thanks for looking

Sandra x

Sunday, 30 October 2016

Put a spell on you (posted by Claire)

Good morning. Claire here with a Halloween card made using some of my favourite spooky Chocolate Baroque stamps.  


I began by stamping the images (from Put a Spell on You and Nevermore) using Memento Tuxedo Black in and then masked the images using making fluid. and created the background using distress inks and acrylic paints. Once the background was dry I removed the masking fluid and coloured the images with Graph'It markers. I've added some spooky embellishments to finish the card off.

Thanks for visiting today, 
Claire xx

Thursday, 20 October 2016

brusho halloween

 I watched Lesley demoing a new way of using brusho powders on the Craft Channel last week, and just had to try it out! To a certain extent it is more controllable, but you still get the colour variations.
I used tags, and they were small enough for a trial run but large enough to work on - and Halloween images as it is that time (and I'd managed to find a set!)
Stamp set was nevermore, and I stamped the images first, then added the brusho.
Basically, you sprinkle the powder on very meanly, then use a brush and clean water to activate the brusho, working on a small area at a time and keep wiping the brush clean as you go. I used black brusho, hoping for a varied sky effect, and was quite pleased with the effect I got, even if it was a bit blotchy in places.
I used a window stamp from gothic fragments as a base for the window shape on the top part of the tag, and a much heavier sprinkle of black brusho.

Similar method for the second tag, apart from using the window stamp as a more defined arch, and yellow ochre brusho to colour the stonework.

Thanks Lesley for the idea, will be using this again!
Hope you enjoyed seeing these, more details on my blog
vroncards.blogspot.co.uk
Have a great weekend
Veronica

Friday, 17 October 2014

Spooky fun (posted by Claire)

Good morning, Claire here with some Halloween inspired projects created using this months new stamps (you can find them here). I adore the colours of Halloween so I really enjoyed making these cards.

This project was made using Halloween Edges

I stamped the pumpkin edge and coloured with PanPastels adding some green in the foreground. I added Violet PanPastel and the shade to create the sky and then used a scalloped piece of card as a mask and applied black PanPastel to create the clouds. I stamped in the cobwebs and the spider from Book of Spells and used a pencil eraser to create a misty effect around the smoke.


I adore house stamps and this one is fabulous, there are so many gorgeous little details from the hanging basket pumpkin to the ghosts at the window. I stamped the images from Book of Spells and Things that Go Bump  and then coloured with Distress inks and distress markers. I stamped the cobwebs with versamark and then applied silver mica powder.

My next card was a very quick project made using pearlescent PanPastels for the background, its really shimmery in real life but very difficult to photograph.


I applied the Pan Pastels, masking of the moon and simply blending green, purple and orange pearl PanPastels. I stamped the ruined castle from Things that go Bump with versamark and embossed with Black embossing powder. I then stamped the cobwebs from Book of Spells with versamark and the bats (which are from Nevermore). I was intending to emboss them too but found that the versamark removed the ink and left a great shadow effect so I left them and just dusted orange Mica powder over the sentiment. I left the bloom around the sentiment for a spooky misty effect.

My last Halloween project was a quick make with Stampbord and PanPastels


I stamped the image from Things that go Bump over a background created by applying shades of blue PanPastel to a Stampbord ATC. I love stampbord and have used it with lots of different inks and it gives a beautiful effect with PanPastels too. I used a battery operated pencil eraser to remove the blue from the clouds and the ship. The beauty of stampbord is that you can use a variety of tools to scratch the surface and remove colour, this is great for creating highlights but its also very convenient for removing colour on detailed parts of the image. You can find Stampbord in lots of different sizes here.

Thanks for visiting today,
Claire xx


Saturday, 11 October 2014

Halloween Hall (posted by Judith)

Hello everyone, the colder weather and darker nights are bringing thoughts of the Autumn now. The crispy leaves and blustery winds are a sure sign that we are into October. I have a Halloween make for you today, using a combination of old and new stamps.

I started off by making a crackled background, and then stamped and embossed a tree from the Design a Tree multi-buy stamp set and the ruined building from the Things that go Bump stamp set. I added a couple of birds and some bats from the Nevermore stamp set and some cobweb edging from the Book of Spells stamp set, all using black block printing ink. I painted the windows in the ruin using yellow ink and a water brush.


I added a little bit of Distress Ink underneath the tree and the ruin to ground the images. Finally, I matted the background onto a black card blank.

Keep checking back for more project ideas from my Design Team mates, Judith xx

Friday, 13 September 2013

More Halloween creations by Miranda


Hi there,

Today two other Halloween samples made with the 'Nevermore'sheet. I like to create these Halloween cards because they appeal to my fantasy......I've made a background  blending with Weathered wood, Black Soot and Mustard Seed Distress inks. The Spiderweb is an embossing folder and I sponged some Versamark over it and embossed it with WOW Silver Bells. I did also use a bricks embossingfolder and rubbed some pearl ex on it. The swirl die cut ( Fancy Flourish)is from Dynamics.
The 2nd one is a sort of Concertina fold card. I like the possibilities with this shape of card. I've also used here the clear stampsheet 'Oriental Crane' which has a great 'creepy' weeping willow......The colours I've used; Seedless Preserves, Weathered wood, Black soot and Mustard Seed. I've also used some white Pan Pastel to create a halo around the moon.


Hope you've enjoyed this spooky journey and thanks again for your visit!


Wednesday, 11 September 2013

Halloween by Miranda


Hi there,

I had the idea to create to 3 creations with the Halloween stamps using almost the same lay-out but different difficulty levels.
Here they are, starting with the most easy one...........I've used here some Halloween patterned scrap paper from Graphic 45, Steampunk spells. So with this one no need to make your own background but using the patterns of the scrap paper. I've only stamped the chandelier from the Nevermore Halloween sheet with Black soot Distress ink and sprayed a little with water on the stamp before stamping. Added a bit of blending with Dusty Concord and Spiced Marmelade. I've stamped the text on the label and added some bats. That was the only stamping on this card. Up to nr.2..........

I think this is still an easy card to create also for the beginner. I've used Basic Grey orange scrap paper and stamped the Gothic Fragments with black ink in the right upper corner. On the left bottom corner I've used the text fragment from the Gothic Angels sheet. And some spiderwebs from the Halloween clear sheet 'Witches brew'. I've embossed the chandelier with WOW copper and copper sparkle. I gave some accents here and there on the background with a white pencil. The white spiderweb has been inked with the mixed media ink from Donna Salazar.


And the final one which is more difficult or should I say it is more labour intensive......with this one you make your own background and everything is inked and embossed.....
I've started with a background with the acrylic bloc technique( you can look at the Monday Mojo from Glenda using this technique) using Distress inks Dusty Concord/Spiced Marmelade /Dried Marigold and a bit of Black Soot.  All the same stamps as on the background of card 2 only added the text 31st October from the 'Nevermore' sheet. The chandelier is embossed with WOW Halloween glitter and Black glint. The seam binding is coloured with the Distress stains and I've stamped the spiderweb with Stazon on it.


Well hope to have inspired you to create your Halloween cards with these possibilities,
thanks for visiting and have a lovely day!


Tuesday, 10 September 2013

October 31st (posted by Claire)

Good morning, Claire here with a very quick and easy card made using the fab Nevermore stamps. I thought this design would make a fun invitation for a Halloween Party


I created by background by applying copper paint to black card, embossing it with my cuttlebug and a Halloween embossing folder and then sanding it a little for a distressed look. I staped the sentiment on some more of the painted card and embossed with black embossing powder before die cutting the frame. I've used black card for matting and layering and added some seam binding and a little Halloween charm.

Thanks for visiting today
Claire xx

Saturday, 7 September 2013

Ravens watching over by Debbie

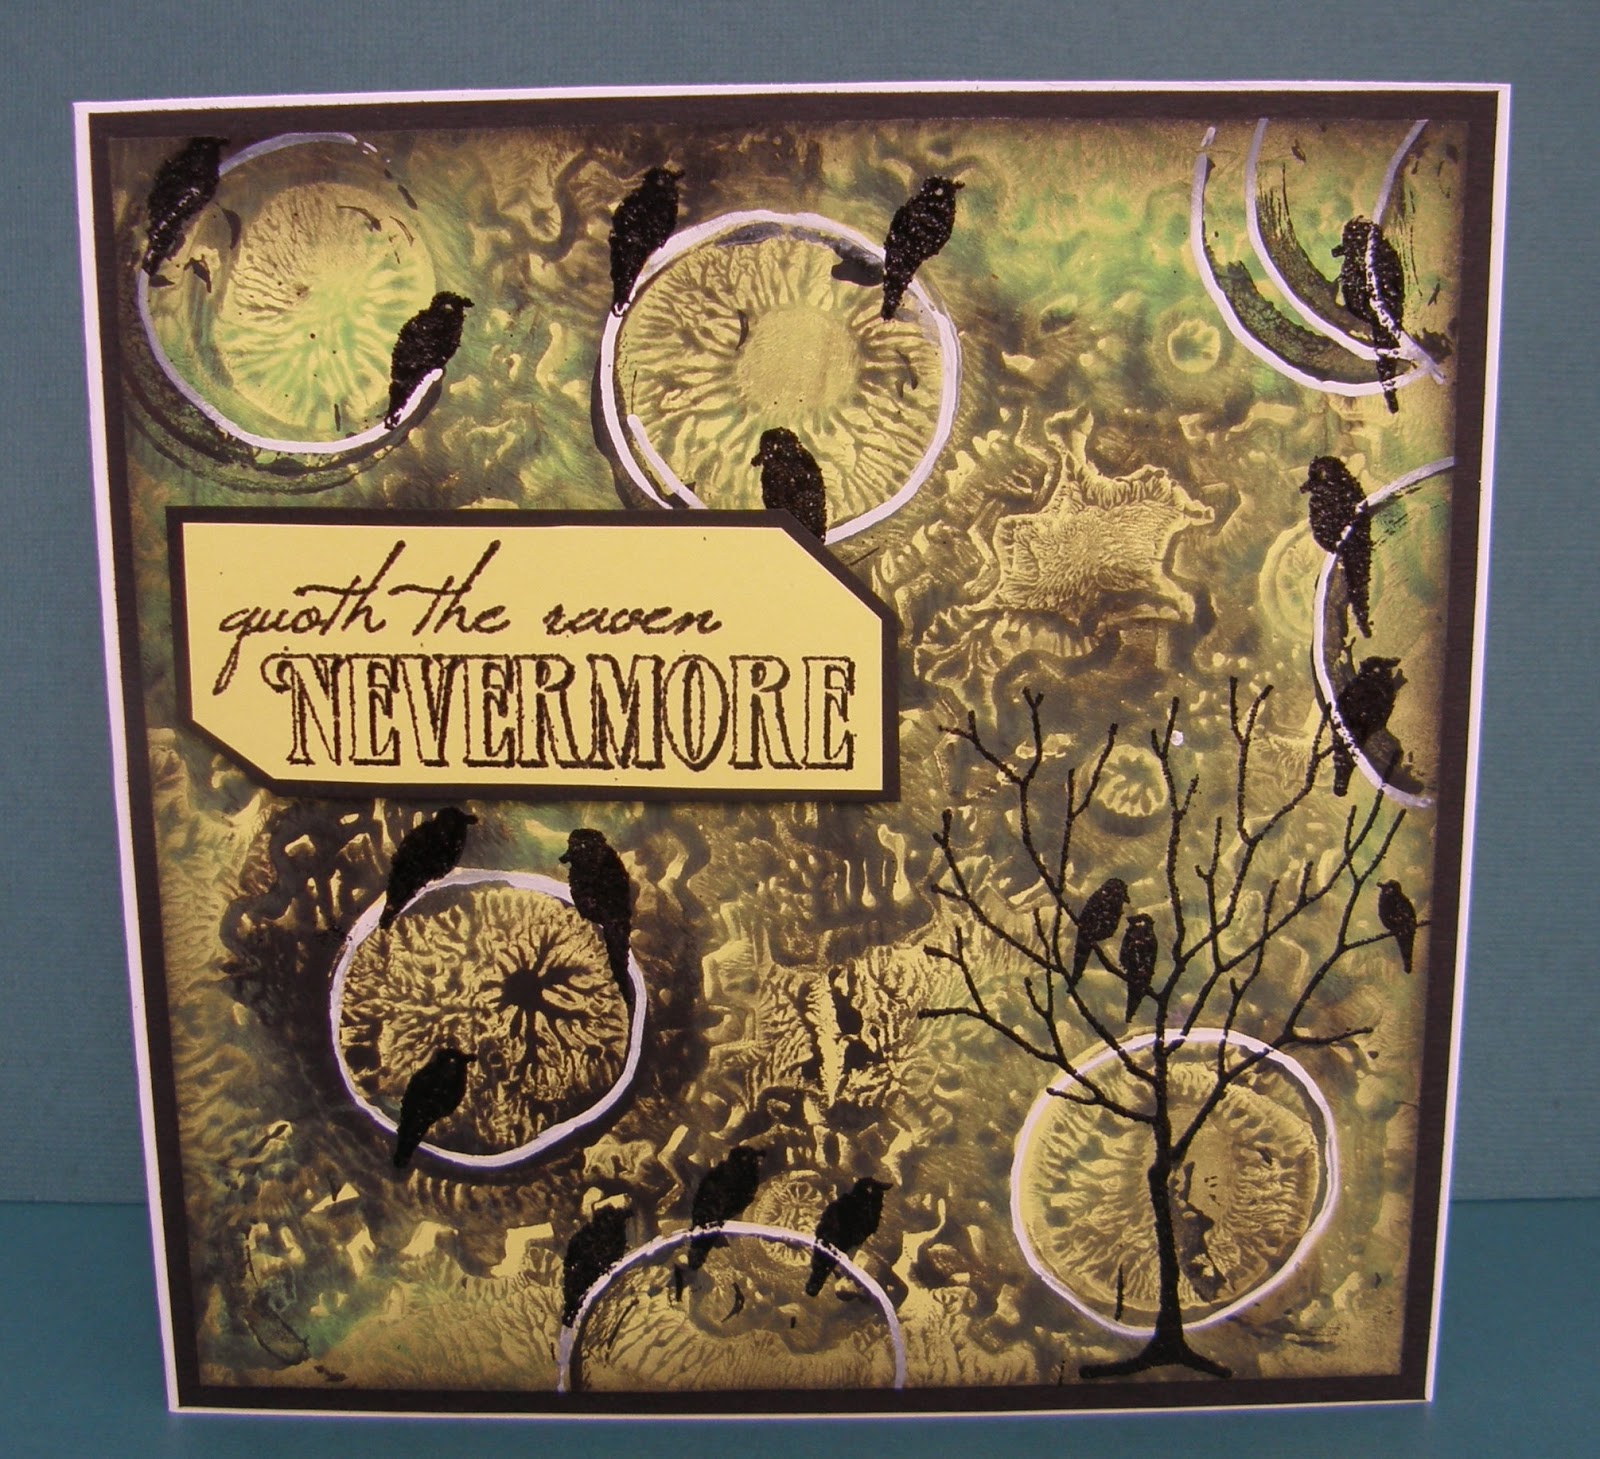
Recently, I was in the company of a few good friends and very talented Ladies who have one interest in common, stamping. We played with inks, rubber stamps, paint, masks and lots of other crafty goodness. I particularly enjoyed working with my Gelli Plate, paints and stencils. So armed with more knowledge and inspiration had a day playing at home. Out came the Nevermore Halloween stamps and I played for hours. For this card, I started with yellow card and added green and black acrylic paint to the Gelli Plate and a large circle mask.
I laid a piece of scrap paper down for the first background (pull). I then placed the yellow card down and was much happier with this one. When dried with a white pen I drew circles where they were most prominent on the card. The ravens in the tree come from the Nevermore stamp sheet and there are a few single ravens which I sat on the circles. I used Versamark clear ink and WOW Black Glint embossing powder and am pleased with the result as I wasn't sure because the paint has an uneven surface. Thank you for stopping by Debbie.

Friday, 6 September 2013

Spooky Shoe by Debbie

A quick post from me today showing a little project I've made.
When I received these stamps I immediately reached for the purple card and stamped the witches hats and shoes to make a background. As you can see it didn't end as a card. I set to and cut out a template for the shoe. Next, I inked the edges of the card and glued together then added the ribbon and a little owl that has been made from air drying clay and a mould I made. At Halloween I'll be adding a couple of spiders and standing it where the it can be seen by the children calling for treats. Thanks for visiting. Debbie

Tuesday, 3 September 2013

Nevermore (posted by Claire)

Good morning, Claire here with my first sample using the fab new Nevermore stamp sheet. I love making Halloween projects so I've had loads of fun with these gorgeous stamps.

I used a Kaisercraft frame (I'm not sure if Glenda has any of these in stock) and painted it with black acrylic paint, adding gilding wax once it was dry. I creaed the backgrounds using distress inks (Peeled Paint, rusty Hinge and seedless preserves) and the spritz and flick technique. I added a moon in the larger panels. Next I stamped all the images using Memento Tuxedi Black Ink. I inked in  a cliff below the castle and drew in some telephone wires to sit the birds on. I added a little colour with Graph'It Markers and some white highights with a white gel pen. To finish off I attached a glass cabochon to the date with some glossy accents and added a little bottle of poison (actually a tiny perfume sample bottle filled with a drop of  distress reinker and a little water)

Thanks for popping by today, 
Claire xx

Monday, 2 September 2013

Spooky Tags with Chocolate by Debbie

We are galloping through the year at an amazing speed and the girls on the Design Team have been creating wonderful samples with the new Halloween stamps. I usually try and give the children who come knocking at the door more than a handful of sweets or money and I am known as the biscuit lady from two years ago when they received a little goody bag of handmade biscuits. This year they will receive a tag with something attached. I found the chocolate shapes in town and set too.
For my first tag I spritzed white card with Dylusions Pure Sunshine and when dry cut to a tag shape. The edges were rubbed with Spiced Marmalade then with the tree and headstone branches stamped around the edges in black ink. To help the bats and wording stand out I used Black Glint WOW powder.
My second and third tags were made from the same piece of card spritzed with Post Box Red and London Blue Dylusions. Again, I embossed the headstone and candle sticks to help them stand out. The candles have white pen added and under the letters of the sentiment.
There's lots more inspiration to follow and don't forget to leave a comment on Glenda's post from the 30th of August for a chance to win a set of the stamps. Debbie

Friday, 30 August 2013

Bewitching new stamps - with a tempting giveaway!

We have just brought out some new stamps including some larger Christmas sentiments and some Halloween stamps.  I'm also doing a giveaway this month - details below.

The Bold Christmas Words are proving to be SO useful - they're big enough to be the focal point for a card which is great if you need to produce a batch of cards in a hurry (which I inevitably will, despite the best of intentions to have a stack of cards made in plenty of time!).


All of the words are available as individual stamps, or you can save money and buy them as a full set.


Here's a super quick card featuring the Big Bold Holly background and one of the new greetings.


This is a super simple card - the holly background is stamped in Versafine Olympia Green and layered onto red card.  The sentiment was stamped onto a die cut with a mix of Versafine Crimson Red and Satin Red.  I swirled the same reds around the edges too with a stencil brush.  A little ribbon and three crystals finish it off - super quick, job done.

For all you Halloween fans, we have two new rubber sets too.


These are both A5 sets and are both our featured Stamps of the Month, on special offer until the end of September.  Again, you can save money when you buy them both together as a multi-buy.


This Halloween card features a background I made with an acrylic block and Splash inks - a technique I covered in Monday Mojo issue 17.  I stamped the tree and bats and embossed with black embossing powder, then drew a horizon line and painted beneath it with black Golden Fluid Acrylic.  I stamped the toadstools and raven along the bottom with orange ink, then sanded the black paint lightly to make it more matte. 

I stamped the sentiment with Brilliance Moonlight white and embossed with white powder.  The witch is an old Martha Stewart punch which actually has a cauldron on, but I cut it into a broomstick shape instead.  There's also a punched railing along the bottom, but the camera struggled to pick up the black on black there so you'll have to take my word for it.

I've got a few of the words and a set each of the Halloween stamps to give away this month, so please leave me a comment here or on Facebook if you'd like to be entered into the draw.  Let me know if you are a fan of Halloween or not, as I'd hate to send out an unwelcome prize to anyone.

I think the girls have been particularly inventive with these Halloween stamps, showing that they can be used for other occasions too.  The Christmas stamps have been rushed out (as so many of you have told us you need them NOW) so most of the DT girls haven't had a chance to work with them yet.  But stay tuned for some glorious artwork heading your way soon.