Pin It button on image hover
Showing posts with label Wish Flower. Show all posts

Friday, 25 March 2022

Flowers, Birds and Butterflies by Sandra

 Hello everyone

I am sharing some more of my cards from the February shows on Create and Craft

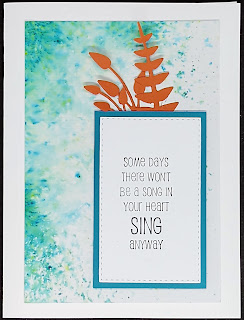
 My first cards use stamps from Words of Comfort and Cheer.  

I started with an A4 sheet of watercolour card and sprinkled Brushos down the centre length ways and width ways. I then spritzed with water and let the magic happen! I left it to dry naturally as I think the colour stays more vibrant. Once it was dry I cut the sheet down into 4 pieces and added one of the sentiments from the set to each piece. I added some orange die cuts as a contrast to the Turquoise Brusho. 


My next card uses the Butterfly Mind stamp set.....one of my favourites. For this card I used some of the element stamps. First I stamped the film strip, butterflies and splatters. I then stamped, coloured and fussy cut some of the butterflies and layered over the stamped ones. I finished by adding a sentiment from the set..


On my next card I stamped some splatters  and the large butterfly from Butterfly Mind. I added some fibres over the butterfly with tacky glue. I then stamped the butterfly again, fussy cut it out and layered over the stamped butterfly.  Adding a cut out butterfly over a stamped image means I don't have to worry about cutting out those fiddly antennae!  I finished by adding a sentiment and some gems and mat and layered onto a 6x6 card base.


I stamped the  Wish Flower in Memento Ink and coloured with alcohol markers. A beautiful stamp that can be coloured in many ways.

I have stamped Bird of Joy with archival ink onto Kraft card. I then used pencils to colour and added some gems. I layered onto some mirror card and then onto an 8x8 card base.


 I stamped Floral Delight onto some black card and embossed with gold powder. I have coloured the flowers with shimmer paints, beautiful to use - difficult to photograph! I then mat and layered onto some gold card and onto a 7x5 card base.


Thanks for looking

Sandra x

Friday, 18 March 2022

Believe, Wish, Poppy... combining blending and painting by Natalie Ballard.


So this one features an intricate die-cut or two but I want to focus on the main panel first. 

This card uses the feature image of the Wish Flower stamp alongside the sentiment from Words of Comfort and Cheer. Stamp your main image onto smooth thick card using a water resistant ink pad in dark grey or black. It is important that your card is smooth to get a clear outline; but, it also needs to not "pill" when water is applied to it.

The image is painted with gouache paints. These dry opaque and with a chalk-like finish; they also take very little water. To keep your shading on your stamped image, add a little extra water to these areas. I used orange, red and an earthy green shade paint; the orange colour should be darker and more opaque towards the bottom of each petal. Once this layer has dried, you can go over with the red to add shading detail. Painting with gouache is very different to painting with watercolour, so the goal isn't perfectly blended shades, but flat, distinct colour areas. The green areas are built up of different opacities of the green shade. Add spatter in each of the colours and set aside to dry.

Once the panel has dried, you can blend Antique Linen Distress Ink or a similar blending dye ink to tone both the paper and the paint. Now, gouache is not water resistant, so don't brush ink over too heavily. Carry out any trimming or cutting before this ink blending step for the best result.

Using a fineliner, doodle a border around the edge. Many people get nervous while doing this, so here's my top tips: do a double line, purposely go wobbly, and watch where your line is heading and not where you are drawing. You can add twiddly bits, little dashes and stitches or zigzag across wider gaps between your lines.

The card assembly starts with a semi-circle intricate die placed to one side of your card and overlapping the fold. Trim this to the fold and retain the cut off piece. Adhere your panel on next and layer up your sentiment onto contrasting card. Cut two corners from the same contrast card and use these as the top and bottom of the sentiment panel to give a scroll like feel. Tuck under two "ribbons" cut from the two card colours along with the panel offcut. 

The card is now finished but if you want to add a further embellishment you can add a doodle border around the edge of the card.


Monday, 14 March 2022

floral delight (by Veronica)

Apologies to Lesley and anyone who checked this morning - no idea what happened, only way i could fix it was to start again!

Two samples using the floral delight stamp from last month's tv show, both pretty simpple.

The first one was simply stamped onto black card in versamark ink and gold embossed, then the flowers painted with some very ancient iridescent paint. A gold mat and mounted onto a 7" square white card blank, with space for a sentiment on the right.

The second has a distress oxide background , sponged in salvaged patina and twisted citron then the image stamped using black versafine ink and clear embossing powder. The flowers were coloured with pencils. The words from wish flower were stamped randomly round the flowers using a clean versamark ink pad - more to add interest rather than to be readable! I rubbed over the background with a tissue to remove some of the background ink, then dragged the edges over the black inkpad. This one was on a 6" square white card blank

Saturday, 5 March 2022

Glorious Floral Delights (By Tracy Thompson)


This is my first post for this month using the fantastic stamps that were shown on one of the February's shows.  So first I would like to show a book I created using the following stamps - Mosaic Flower, Bird Of Joy, Floral Delight, Wish Flower and Glorious.
So all my images were layered onto black card and added to the book, for the front cover I stamped the Mosaic Flower but upside down so it looked like the Chinese lantern plant, I stencilled in the background and coloured the image with pencils.  I added the words and did some highlights with a white gel pen.


The above pages and the ones below were done very much the same as the cover, only when I did my stencilling I masked down each side and only stencilled in the centre.  I wanted to stamp my images to the side for a different look and to get the benefit of the stencilling.  Each image was coloured with pencils in co=ordinating colours to the stencilling.  

For my next creation I made a large tag, using a die I cut the tag set which is a base, top layer and the eyelet covers.  


I coloured the base tag in Distress Oxide in a matching colour to the the colours in the top layer.  The top layer I smooched several colours for the background, then using the Butterfly Mind stamp set I stamped the main image, then stamped again on spare card, coloured the butterflies then cut them out.  On the background I added words from the set and splatters too.  I added the Butterflies, decoupaging onto the main image.  And finally some glitter was added to the Butterflies.

I will be back later in the month with some more creations from the Chocolate Baroque show, thank you for taking a look.

Happy crafting
Tracy x

Friday, 4 March 2022

blue and yellow wishes (by Veronica)

Today I  have two versions of cards using the wish flower stamp,  the first using my favourite brusho powders.

I created the background using yellow and blue brusho powders, sprinkled over the card and spritzed with water. Once dry I stamped the wish flower onto the paler area using black versafine ink and clear embossing powder.  The embossing was because I used bleach to remove the colour from the flowers.

Trimmed to a square, then mounted onto black before adding to a 7" square white card blank


The second version used a similar colour scheme, but his time sponged with distress oxide inks in salvaged patina and twisted citron for a paler  effect. The words wer randomly stamped on the background using versamark for a shadow effect. 

The stamped image was again embossed, coloured with pencils this time and with a narrower black mat
 

Wednesday, 18 December 2019

Believe, Wish, Hope (by Corine)

Hello everyone, here is Corine again with her second post this month:

Hello! Here I am again. This is my second post in December. I will show you today a pink coloured card with flowers.


I used the Wish Flower stamp.

Create a background with Distress Oxide Ink. Choose three colours of Distress Oxide Inks. Apply this on a craft sheet and spray it with water. Also spray your watercolour paper with water. Put your paper in the wet ink and turn over again. Let this dry.
Sponge through various stencils with the same ink colours. Let this dry well again.
Emboss with silver embossing powder, the Wildflower on the coloured paper. Colour this with watercolour markers.
Create a shadow with a charcoal pencil.
Sponge the edges of the paper with Distress Oxide Black Soot.

Success!

Kind regards
Corine van Kuilenburg

Friday, 19 October 2018

Believe, Wish, Dream (by Corine)

Hello everyone, Corine is back with us today to share another beautiful card, and to inspire you with a fabulous colour combination, some clever stamping and combining stamps from different stamp sets.


Hello!

Here I am again. This is my second post in October. I will how you today a blue card with flowers.

I used stamps from the sheets:
Dusky Damask
Wish Flower

Apply Memento dewdrop Danube Blue, Teal Zeal, Toffee, Peanut Brittle to an acrylic block. Spray wet and print on watercolour paper.
Stamp the background stamp with Toffee and Peanut Brittle. Stamp with Danuble Blue the Baroque flower below left, and top right with Memento Luxe White. Stamp Wish Flower with Black on the paper.
Emboss flower with copper embossing powder on watercolour paper. Colour it with markers. Cut out and stick on your background.


Kind regards,
Corine van Kuilenburg

Sunday, 22 July 2018

In the secret garden by Brenda


Hello everyone, Brenda here with some more floral inspiration using the lovely new stamps which featured on Hochanda recently, all of which are now available on the Chocolate Baroque website as well.

The top card was inspired by our own Secret Garden within our grounds, we created it many years ago and although it has seen changes over the years still hosts an abundance of Cottage Garden flowers and shrubs and recently moved into the twenty first century with the addition of a hot tub. The beautiful flowers on the new Blossom and Grow stamp set are to my mind Hollyhocks which I stamped onto a soft Distress Ink background after first stamping a window from Echoes of Italy Using a stencil I added some brickwork with texture paste which I coloured with acylic paint to soften the whiteness and added a sentiment from the same stamp set.


For this one I used black gloss cardstock for the base panels and stamped the images from Captivating Cacti and Scrumptious Succulents using Versamark and brushing over with gold mic powders, leaving to settle for a few moments before brushing off, the assembling the panels along with a bow.


And one from a few months ago that I found lurking unused in my folder. The stamped sets used are Medici Flower in the centre and to the sides Floral Delight and Wish Flower, all were stamped onto Distress Oxide backgrounds, the images bleached out and the glittered.......unfortunately this doesn't show up very well at all in the photo.

I always appreciate you visits and comment and thank you for taking the time to pop in.


Friday, 20 July 2018

Wish flower (by Miranda)


Hi there,

Today my second guest DT post and it was fun to play more........

This time I coloured using alcohol based  markers. And I have stamped the ' Wish flower' onto Crafty Individuals patterned paper. Than I have stamped again onto marker paper, coloured the flowers with alcohol based markers. I have decoupaged the flowers and put them on the patterned paper.

Than put it all on the front of the card and decoupaged again. The open squares are a die cut from Crealies and attached on mica sheet. 

On the inside of the card some lovely patterned paper from Crafty Individuals which I stamped on using the words from the ' Wish flower' and the ' Bird of Joy'. It was a precise job but I cut the words from the bird and the flower stamp so I could use them separately.


And here is my card........


Thank you for your visit and hope you liked it,
till next time,


BewarenBewarenBewarenBewaren

Saturday, 24 February 2018

Words and Pictures (by Judith)

Hello everyone, I have a couple of projects to share featuring the beautiful individual flower stamps that we brought to you on the TV shows last month on Hochanda.

Both projects were demos from the show, but the first project was designed to be finished in two ways, depending on how the sales of the items on the shows were going. Little did Lesley and I know that everything would sell out like crazy on that first show!

I decided to separate the word clouds from the flower images on my stamps, making it easier for me to create a lot of my projects, and I just cut them apart very carefully with some sharp scissors. I then slot them back together whenever I want to, jigsaw fashion, to create something with the design as a whole.

I stamped the words over a piece of tissue paper, and glued this to a small canvas with matte medium. Once the canvas was dry, I added some watered down acrylic paint. I stamped the Floral Delight image onto a whiteboard heart, masking it and adding some paint in the same colours as I had used on the canvas. I coloured the flower image with pencils, and added a single word to the heart to finish. This was the version that was seen on the show.

For the alternate version, I stamped the flower image onto a spare piece of card and coloured it with pencils as before. I stamped the word onto a die cut rectangle and added these to a canvas.

My second project was all about colour matching. I chose a pretty piece of patterned paper by Crafty Individuals, and stuck it to a postcard sized whiteboard piece. I stamped the Wish Flower, and coloured it with woodless pencils, toning the colours to match the background paper.

I painted a larger piece of greyboard with lilac and blue acrylic paint to match the paper, adding hints of green and orange around the edges, again picking up the colours from the paper, before stamping the words from the main image across the background using first and second generation stamping.

I hope that you have enjoyed the projects that I have shared with you today, and will give them a try for yourselves. Thanks for stopping by, Judith xx

Tuesday, 20 February 2018

Wish by Brenda


Morning Peeps, my turn to share some more inspiration from Lesley's Chocolate Baroque Birthday shows on Hochanda using the gorgeous new floral stamps and colouring pages.

My starting place for the above card was to use Distress Inks to colour a piece of Bristol Vellum card stock and then add some stenciling. I stamped Wish Flower with Versafine Black, colour in with glitter pens, cut out and fix onto my background. Using sticky notes as masks I stamped the words individually onto cardstock coloured with the same Distress Inks, cut out and added to my card, then mat and later onto the base card.


This once did take a little time but I really liked the finish result. Using Wish Flower again, but using just the smaller of the two blooms masking the stamp with sticky notes and inking and stamping each flower one by one........make sure you don't forget to remove the mask for each stamping. I then coloured the flowers with pencils, stamped a sentiment from Birthday Words onto a piece of ripped velum and fixed across the stamped panel before matting and layering onto the base card.


This is one of the Colouring Pages which has the lovely Macintosh Beauty image on it, I simply coloured with pencils and framed.


My final piece of artwork today used the focal flower from Mosaic Flower. I started by using Distress inks to add watery colour to a piece of watercolour card the added some random stamping using the harlequins from Decorative Edges and Versafine Black. I cut two die cut circles coluring them with the same DI's as the background, then stamped the flower onto the smaller circle and added some colour again using the same inks. Next I placed some twine onto the base and fixed the circles and also added a few back sequins.

Friday, 16 February 2018

Create Art (by Magda)

I am happy to share with you some projects made with the new stamps from Chocolate Baroque:

Wish Flower
Mosaic Flower
Bird of Joy


I used various products for these projects:

Watercolor Pencils
Distress Ink Pad
Brusho
Stencils
Archival Ink
Stickles Crystal
Mesh wire
Wire
The sentiments  Words to Dazzle and Sparkle and Loving Sentiments

As you see the result of each card is different, which one do you prefer ?
Have a nice day and happy colouring
Magda

Tuesday, 13 February 2018

Wish Flower (by Anne)

Good morning. I created this one with the Wish Flower stamp.


I used Memento dye based ink for stamping which is compatible with alcohol inks that I used for colouring. I used Chameleon pens which make blending of different colours really easy.

After colouring I added some highlights with a silver pen and added a layer of clear sparkle pen overlay for shimmer.

The background was created with Distress Ink (a little water was flicked over the background and blotted off with tissue to create a little texture). I added alcohol ink to the edge to frame before gluing to the card front.

Materials:
  • Wish Flower stamp 
  • 6 X 6 inch white card blank and white stamping card
  • Inkpads: Memento (Tuxedo Black), Distress Ink (Peacock Feathers)
  • Spectrum Noir Sparkle Pen (Clear Overlay)
  • Metallic Glitter Pen (Silver)
  • Chameleon Alcohol Ink Pens (PK3 with BG3 top)
  • Marker pen (black)

Saturday, 10 February 2018

Book of Flowers (by Judith)

Hello everyone, I have a project to share with you today showcasing all of the beautiful stamps featured in the Anniversary shows in January on Hochanda. I hope you managed to catch the shows, they seemed to go in a flash, and Lesley and I were overwhelmed by your enthusiasm for all of the products that we brought to share with you!


My project is a concertina book, made with two pieces of whiteboard for the covers, which I have covered with some lovely patterned paper by Crafty Individuals. I stamped one of the images, minus the words onto the cover, and coloured it with the woodless pencils that we also featured on the show.

I created some pages for the book using smooth watercolour paper, but the cartridge paper that is available on the website would work equally as well. Each page measures 10.5 cms x 14 cms, and I allowed an extra panel to join the sections together each time. I decorated the back of the pages using Distress Ink, and stamped the words from several of the images on top, creating a tone on tone effect.

On each page front, I stamped a different flower image, and coloured these with Distress Inks, keeping to a common colour theme throughout.

As I assembled the book, I added some ribbon, which allowed the book to be tied shut with a bow. This was such a fun project to make, and would be a lovely keepsake for someone special.

Thanks for stopping by,

Judith xx


Thursday, 8 February 2018

Friendship by Brenda


Good morning, today I would like to share a few of my samples from Lesley's Hochanda shows which celebrated Chocolate Baroque's first Birthday with the channel when viewers were treated to some wonderful new floral stamps and colouring pages.

This release was right up my street and I have to say I thoroughly enjoyed making these samples and it was only time that prevented me making more.

So to my first card at the top uses the beautiful Medici Flower. On this occasion I only wanted to use the focal flower so I used sticky notes to cover the areas around the flower, inked it with Versafine Black, removed the masks and followed the same process three times. I then masked the  individual stamped flowers and stamped the Poppy heads from Poppy Meadow along with a inspirational quote from Pretty Poppies. Next I flicked some watery distress ink onto the white space and finally coloured the blooms with sparkle pens.


I really love this image, it's called Mosaic Flower but to me it yells out Chinese Lanterns. I stamped the image with Versamark and heat embossed with detail gold powder, coloured the flower hears with pencils and rubbed some gilding wax around the edges. Some twine and a button tied around before matting onto a pieced of corrugated and then the base card.


I painted this little box with acrylic and shimmer paints, then used a stencil and texture paste to add some flourishes. When dry I used a slightly darker pain to highlight the stenciled patterns and added gilding flakes here are there and along the opening edges. The flowers on the top were cut from one of the colouring pages, coloured in with pencils and fixed to the top along with some die cut leaves.


My final share today used the new Floral Delight stamp which I stamped once, masked and then stamped part of the stamp a second time and coloured in with pencils.  Using a mask I added some sun rays and stamped three of the words from Wish Flower, cut out and added individually to the finished piece.  

Thank you so much for popping in today.