Pin It button on image hover
Showing posts with label Nature Fragments. Show all posts

Monday, 22 October 2018

Sentimental Canvas (by Jodie)

Hello everyone, today sees the final post this month frrom our Guest Design Team member Jodie. She has created an icy blue mixed media project for us this week.

Jodie writes:

Good morning everyone, this is my third project for Chocolate Baroque.
Because the set contained many great images, it was difficult to choose just one to use on my card, so I didn't!

Supplies:
Stamps- Nature Fragments, Loving Sentiments
Ink- Distress Inks: Evergreen Bough, Faded Jeans, Tumbled Glass, Broken China
Stencil- Crafter's Workshop Specimens
Palette knife
Molding paste
Sparkly embossing powder
5" x 7" canvas board

First I taped the stencil to the board and applied a thin layer of the molding paste over the stencil using the palette knife.
Once dry, I blended the ink onto the board. I spritzed the piece with a bit of water to add more texture to this layer and let dry.
Next I chose one of the stamps from the set Nature Fragments, and using the same ink colours, I randomly stamped the canvas.
While the ink was still wet, I sprinkled the embossing powder over the top and heat set the powder.
Then I stamped the sayings from Loving Sentiments and attached them to the canvas.


Jodie will be back in the New Year with more inspirational projects.

Thanks for stopping by,


Saturday, 24 September 2016

Spring Awakening (posted by Claire)

Good morning folks, Claire here with  an 8x8 canvas for our texture theme. I love this gorgeous lady,  and although it's Autumn here I couldn't resist colouring  'Spriing Awakening' for this project. You can find her here.


I added texture to the background using texture paste, I scored some 'rays' for a little spring sunshine with an old credit card and stamped into the texture paste with some of the stamps from Nature Fragments. Once it was dry I added a little stencilling, once it was dry I set to with acrylic paints to add some colour. I distressed the edges with walnut stain distress ink.

I coloured the image with Graph'It markers and cut her out before glueing her to the canvas.


I used my glue gun and acrylic paint to create the word Spring and then added a little gilding wax here and there and lots of embellishments for some more texture.

Thanks for visiting today
Claire xx

Friday, 16 September 2016

Butterfly scene cards (by Anne)

Good morning. For my texture project today I have made 2 variations of a butterfly scene card.


I have used ink spritzing and stamping with texture stamps to create interesting backgrounds. I have used the large gem slice stamp and heat embossing with sparkling pink powder to add a colourful textured foreground for my scene. The butterflies were also stamped and embossed, then coloured and cut out.

Both scenes were created in the same way but I took one of them a step further by mounting on a larger card with a textured embossing powder border (using heat resistant tape to adhere the powder before heating), die cut foliage and floral gems, finishing with another of the lovely stamped butterflies. Of course I just had to add PVA pearls and glitter in there too.

We have all had so much fun creating with this month’s theme of texture.


Materials:
  • Just Butterflies, Nature Fragments, Abstract Fragments and Tall Trees stamp sets
  • 12 X 15cm and 15 X 17cm white card blanks
  • 11 X 14cm watercolour card
  • Ink spritzers (lime green with mica and bright pink)
  • Watercolour pens for colouring and background stamping (green, teal, blue, pink and purple)
  • Glitter pens (blue and green)
  • Heat embossing powders (cerise with glitter, and textured mix of fine and chunky pink, black and white)
  • Inkpad for stamping trees (dark green)
  • Glitter glue (aqua holographic)
  • Alcohol markers for edging card and colouring die cuts (green and pink)
  • Floral shaped faux gems (pink and blue)
  • PVA pearls (purple)
  • Heat resistant double sided tape (Wonder Tape - for heat embossed border)
  • Foliage Dies

Wednesday, 13 July 2016

Butterfly Card (by Corine)

It is guest designer time again and I am so pleased to welcome back Corine with a gorgeous, bright and sunny card.

Hello!

Here I am again. In July I will post three times a card as guest designer which I am very pleased to do. My first project is a Butterfly Card. and I used stamps from Gothic Fragments, Nature Fragments and Tangled Garden. Hope you enjoy this.

  • Create a background with three colours Distress Ink and water. I used Evergreen Bough, Carved Pumpkin, Crushed Olive, Broken China. Dry with heattool.
  • Stamp lace stamp from Gothic Fragments with Memento Tuxedo Black and the leaves from Nature Fragments with Memento Flannel Grey. Dry with heattool.
  • Take a template and an old credit card to spread the modeling paste through the template. Emboss the modeling paste with Gold Pearl embossing powder.
  • Emboss the butterfly from Tangled Garden with Metallic Platinum and colour with Distress ink.
  • Mat and layer background on to black and then blue card and attach butterfly.
Kind regards,
Corine van Kuilenburg


Love the combination of stamping, texture and colour on this card.  Thank you Corine for this lovely project.  Really looking forward to seeing what you have lined up for us next week.

And don’t forget our regular Design Team girls have more new projects waiting in the wings to inspire you.


Saturday, 13 December 2014

Along the Edge of the Sea Bed (posted by Judith)

Hello everyone, I have another watery sample to show you today, using the Steampunk Funk Fish and Steampunk Sea World stamp sets, currently on offer as Stamp of the Month sets.

I started my sample by stamping the seashell edge taken from the Seaside Dreams stamp set near the bottom of my background, but splitting it in half, and stamping a piece on either side of the page. I also created a mask of the image, and covered the original stamped image with the mask. I then stamped the octopus from the Steampunk Funk Fish stamp plate in between the two images, and masked that image as well. I stamped the seaweed edge slightly higher up the page in the middle, and then a piece on each side, to create a continuous run behind the first set of images, and masked these as well. I used some water based acrylic inks, which I diluted and blended to get the colours that I wanted, and then coloured the background, using a turquoise for the sea area, and an ochre colour for the sand. I added extra interest to the sea area by sponging Distress Ink through a stencil to create a bubble effect. I stamped several fish onto adhesive labels and coloured these with water colour pencils, and also stamped a few more directly onto the background. I chose to stamp the background fish with blue ink, so that they appeared to fade into the background slightly, toning the colours down on these fish as well. I removed the masks from the images on the sea bed, and coloured these with watercolour pencils, blending the colours with a waterbrush. I added a stamp from the Nature Fragments stamp set along the edges for a bit of extra funky seaweed.

Thanks for stopping by, Judith xx

Friday, 12 December 2014

Steampunk fish and lots of fragments..........by Miranda


Hi there,

It's my turn today to show some creations made with those cool steampunk fishy stamps! I like them and they are great to match with all of the fragments too.......I've been playing with the Steampunk Funk fish and the Steampunk Sea world and combined them with the Tangled and Harlequin fragments on the first card. The backgrounds were made using Derwent art bars with the acrylic bloc technique, water and aquarel paper. I also used a lot Wink of Stella brush markers (silver and clear ) to add that lovely sparkle. The words are from the Words of Wisdom and I've cut it in 3 pieces.


On the second card I've been using the Nature elements sheet too. As you know by now I love all the fragment sheets, they are so versatile and can be used very often with many occasions. I've created a sea world with beautiful malachite rocks.......one must have a bit of imagination mmm?


I've coloured the fish with twinkling H2O's and Maya Gold silver paint(Viva decor) which has a very rich sparkle! Just gave these two shrimps some other color to get a bit of contrast. The words are from the Words of Inspiration sheet. Both cards are coloured with my old Karisma pencils. They have  a similar quality as Prisma color pencils and Derwent soft color.

Hope to have inspired you with the combination of all these stamps,
thanks for your visit and comments and till next time!


Monday, 11 August 2014

Christmas Magic (posted by Judith)

Hi Folks, I have some Christmas projects for you today, using the lovely selection of seasonal stamps currently on offer.

My first card uses stamps from the Snowy Scenes/Turtle Doves multibuy stamped onto green paper using white embossing powder. I added tiny red gems to the tree and snowflakes for a little bit of Christmas bling. To complete the background, I added a stamp from the Nature Fragments stamp set, stamped in dark green ink. I also stamped a sentiment from the Christmas Magic clear stamp set in the same colour onto a piece of scrap paper. I edged all of the pieces of paper with green ink and then matted them onto dark green card before assembling my project.


My second card was created by stamping a large ornate pear from the Pears and Baubles stamp set onto my background using brown ink. I coloured the pears using a mixture of green and yellow coloured water based marker pens and a waterbrush. I filled in the background between using a blue marker pen and a waterbrush. The main image was stamped onto a die cut piece of card using gold embossing powder, and coloured in with the marker pens in the same way. I edged the background with toning blue ink. I added a large flourish from the Butterfly Dreams stamp set, using gold embossing powder.

Thanks for stopping by, Judith xx

Monday, 7 April 2014

Patchwork Sunrise (posted by Judith)

Hi Folks, I had a lot of fun creating this 'patchwork' sample with the new Patchwork Landscape stamp set. The stamps are such great designs, and just encourage lots of colour.

I stamped the main image, and then masked this off, by stamping the image again onto masking paper, and covering the main areas. I then covered sections of the background with sheets of paper, just leaving a segment uncovered, which I coloured with Pan Pastels. I stamped the section with a stamp from various texture stamp plates, Abstract Fragments Nature Fragments Texture Fragments using Versamark, and then I covered the Versamark with Pan Pastel again. I moved around the page, completing a segment at a time, covering over any finished area to keep it protected. Once I was finished, I added hand drawn pen lines to resemble stitching. I coloured the central image with Inktense pencils, blending the colours with a waterbrush. I added a sentiment from the stamp sheet. Finally, I made some small flowers from handmade paper to resemble the Hollyhocks on the stamp plate, and added some black buttons to the centre. A die cut flourish completes the card.

Thanks for stopping by, Judith xx

Tuesday, 10 December 2013

Baby duck (posted by Judith)

Hi Folks, I have a Steampunk sample of a softer variety to show you today. I wanted to create a congratulations card for a new baby using the paddle duck image from the Steampunk Birds stamp set, and so I chose soft pastel tones to create my card. I created a background using a texture stamp from the Nature Fragments stamp set, which I embossed with white embossing powder. I then covered the card using Squeezed Lemonade and Spun Sugar Distress Inks, before stamping the texture stamp again with Spun Sugar Distress Ink. I decoupaged the duck image, using three layers (the base layer is on the card), and I coloured the image with Distress Markers. I added a sentiment from the Loving Sentiments stamp set.


Some green lace and pink safety pins finish the card.Thanks for stopping by, Judith xx

Saturday, 30 November 2013

Green feathered Fairy by Miranda


Hi there,

Today one of the December fairies I've played with........I've stamped her on a piece of watercolour paper which was worked on with Dylusion inks. I did use a crafters template(peacock feathers) on the background. The fairy was stamped on the same paper and coloured with Derwent Soft Colour pencils. In the background you can see a fragment of the Nature Fragments sheet. These fragments are such fun to work with and so versatile to use.
Only added some gemstones for a subtle sparkle..........and the quote is from the 'Reindeer landscape', one I am going to use a lot! Believe.......


Thanks for visiting and have a sparkling day!

Miranda

Friday, 22 November 2013

Masculine Birthday Greetings (by Shirley)

Hello everyone, I hope you are doing well.  I have a card design today that I think works well for a man.


The background was created with Melted Chocolate (how appropriate) Dylusions Ink.   I stamped using two tree trunk grain fragments from the new Nature Fragments set with Gathered Twigs Distress Ink.     I embossed two trees from Fantasy Woodland and sentiment from Birthday Words with brown powder.   I blended Broken China Distress Ink over the trees and label.   

Die:  Spellbinder - Elegant Labels 4 S6-005

Thanks for your visit and have a great day,
Shirley

Wednesday, 13 November 2013

A Sweet Robin for Christmas (by Shirley)

Hello everyone, I hope you are doing well.

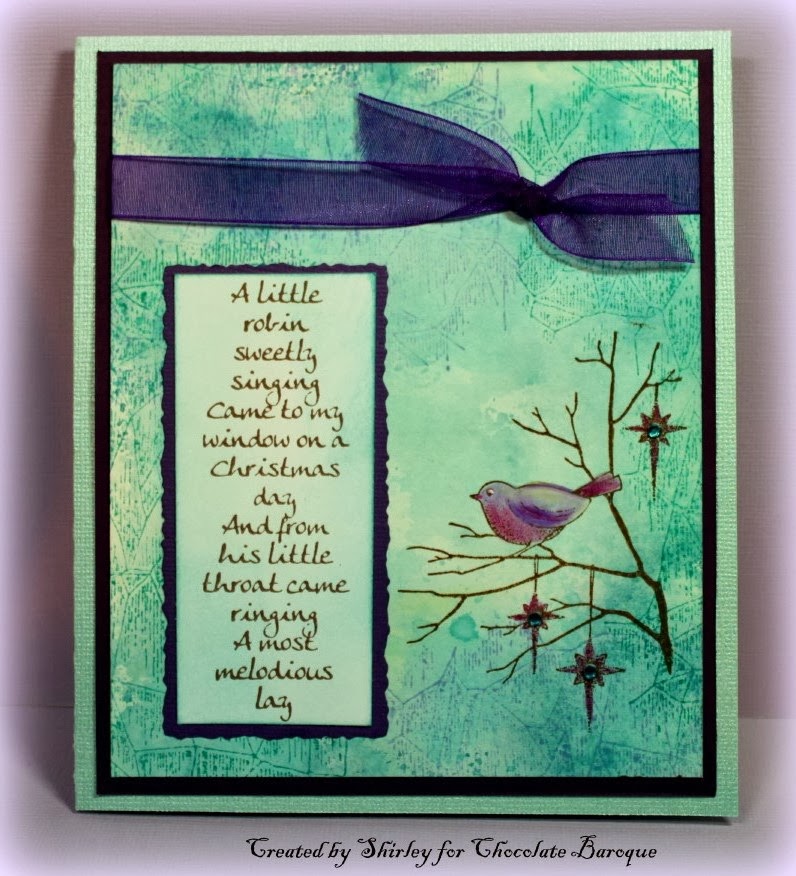
I have a couple of designs today using stamps from the new Nature Fragments set and an another favourite, Christmas Song.   The fragment stamps are wonderful for creating backgrounds, I know I'll use them a lot!


The background was created with Peacock Feathers & Picked Raspberry Distress Inks using the Acrylic Block technique.   I over stamped with the Ice Fragment from Nature Fragments with the same Inks.     The Robin from Christmas Song was stamped with Cocoa Memento Ink and coloured with Inktense Pencils.   I added glitter, rhinestones and died sheer ribbon with Raspberry Ink to match.

And below is a second design also featuring the sweet little Robin:


I used Peacock Feathers Distress Ink and Acrylic block for the background.  I over stamped with the Ice Fragment with both Shaded Lilac and Peacock Feathers Distress Ink.   The poem (also from Christmas Song) and Robin were again stamped with Cocoa Memento Ink.   I coloured the Robin with Prisma Pencils.   


Thanks for stopping by and have a great day!
Shirley

Monday, 11 November 2013

Icy Fragment (posted by Claire)

Good morning, Claire here with a card made using one of the gorgeous images from Gothic Angels on a background made using one of the fab new stamps, Nature Fragments

I've used glossy card for the background and randomly applied tumbled glass, broken chine and a little shaded lilac distress inks and then overstamped with the icy fragment using the same colours. I've edged the background with tea dye distress ink and matted it on some kraft card. The main image was stamped on kraft card and embossed with sparkly white embossing powder. I stamped the image again on smooth white card and coloured with Graph'It Markers.


 Next I cut the image out and layered it up on the kraft card. I layered the image up over some cheesecloth, coloured with distress inks and added a little bow and some die cut snowflakes topped with little pearls.

Thanks for visiting today, keep popping back as my teamies have got some gorgeous samples to share using these lovely new stamps
Claire xx

Saturday, 9 November 2013

Nature Fragment with a Butterfly (by Shirley)

Hello everyone, I hope you are enjoying the weekend.

I have a card design today using the fantastic new Nature Fragment set along with a pretty butterfly from Butterfly Daisy Collage and sentiment from Birthday Words.


The background is watercolour paper that I used to 'mop up' inks from a previous card.    It's actually the watered down version of the Blue cards you saw last month :)   I spritzed a little water and added a little sea salt that created the spots.   When dry I stamped with the flourish fragment from Nature Fragments using Peacock Feathers Distress Ink.

I embossed the Butterfly from Butterfly Daisy Collage with Silver, cut it out and attached.   When the card was finished I added stickles.   The matting and die cuts are in dark brown (hard to tell in the photo) and I stamped the greeting with brown Dye Ink.

Dies used:    Cheery Lynn- Cuties 1 B149 (border which can be made into a flower) and Mini Flourish One B170.


Thanks for your visit !
Shirley

Thursday, 7 November 2013

Stepping Stones (posted by Judith)

Hi Folks, here is another sample using the versatile Nature Fragments/Abstract Fragments multibuy stamp set. I have created a background by covering some watercolour paper with a wash of watercolour ink, and adding some salt while it was still wet. Once the background was dry, I brushed away the salt, and randomly stamped the squiggly texture stamp in Salty Ocean Distress Ink across the paper. I added highlights with a white pencil.

I coloured a piece of glossy card with alcohol inks and then stamped the large and small tree trunk circles several times in black ink. I cut these out, and arranged them across the page. I used another texture stamp and some blue green embossing powder to create a pattern across the wings of a die cut dragonfly.The sentiment was taken from the Words of Multibuy stamp set.


Something along these lines might make a great masculine themed card, which is always hard to design. Keep checking back for more inspiration from my team mates over the coming days. Thanks for stopping by, Judith xx

Tuesday, 5 November 2013

Autumn Fragments (posted by Claire)

Good morning, Claire here with a card made using the lovely new stamps 'Nature Fragments' 


I made a background using distress inks in Peeled Paint, Dried Marigold and Gathered Twigs and splashed it with a little water, blotting it to create a patchy effect, Next I stamped the 'wood' fragments with more Gathered Twigs Distress ink. The sentiment is from  Nature's Peace and is one of my all time favourites. I added some die cut shapes and a flower made by die cutting some tissue wrap that I'd coloured with distress ink. 


I added a little copper brad in the centre and some raffia to finish off.

Thanks for visiting to day
Claire xx

Saturday, 2 November 2013

Nature Fragments meets the Gelli Plate (by Debbie)

Hello. The card I have today is made with Adirondack inks, Distress inks, black embossing powder and my Gelli Plate. I'm not good at tidying up painty mess so when I saw the Gelli Plate being demonstrated at Harrogate show using inks rather than paint I just had to give it a go. I have only used the plate with Adirondack and Distress and must say the Adirondack gives a better effect than the Distress. The distress inks bead even when brayered many times. After a play day on Thursday with Glenda and Lesley other dye ink pads can be used, I think it will be a trial and error technique.
I started by applying Peach Bellini to the Gelli Plate with the brayer as a base coat, it looked as if there was hardly any ink on there but it definitely is. Next, I inked the wood grain stamp from the new Nature Fragments stamp plate with Cranberry and stamped on the Gelli Plate. I repeated with my new favourite colour Stream then placed a square of white card over the plate and rubbed with my hand. I love the reveal when lifting the card away to see what's happened underneath.
The beauty of using the ink rather than paint is that you can over stamp with fine detailed stamps. For the stamping I used the Gothic Angels stamps, the Angel has been coloured with pens using similar colours to the background. I have a few more cards using this technique to post and hope that you'll give it a try. Thanks for visiting, Debbie

Friday, 1 November 2013

Caring Wishes (posted by Judith)

Hi Folks, I have a card to show you today using the Nature Fragments stamp set. I have created a wrinkle free distress background and then stamped the positive ornate flourish in various colours across the card. I coloured a piece of glossy card with alcohol inks, and then embossed the negative version of the flourish with silver embossing powder over the top. I have used a sentiment from the Pretty Poppies stamp set to create a greeting. Finally, I die cut a butterfly from plum coloured metal which I embossed using an embossing folder with a die cutting machine. I then used some alcohol ink to lift the colour from the raised areas.

Some plum ribbon and teal coloured card finish off my project. Please keep checking back for more inspiration from my design Team mates over the coming days. Thanks for stopping by, Judith xx

Thursday, 31 October 2013

New Fragment stamps by Glenda

It's that time of the month again- yes I'm talking about palpitations and chocolate cravings ... it's new stamp time! We have two new A4 sets this month to add to our ever popular fragments range.

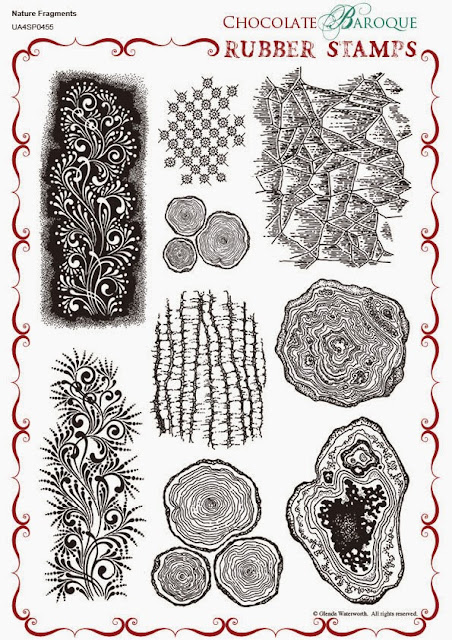
 Here is Nature Fragments


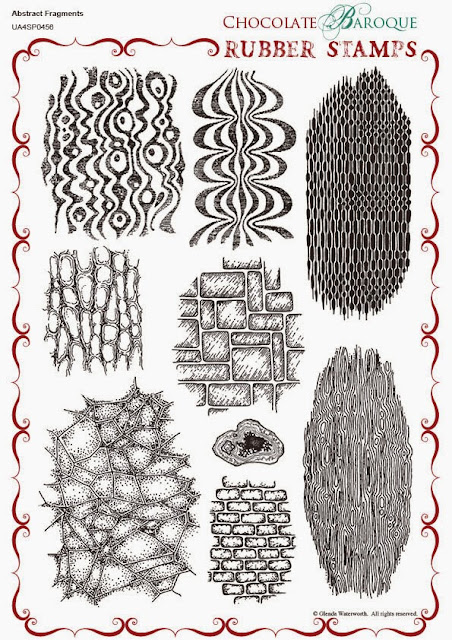
and here is Abstract Fragments.


Both sets are just fabulous for creating interesting backgrounds.  Try stamping over Distress or Dylusion sprayed backgrounds or go for a little embossing.  Try using them for mark making on Gelli plates and of course the paint you pick up can be used to stamp over another project.

They're great to add an extra touch to die cut shapes - think frosty snowflakes, psychedelic flowers, woodgrained trees and brick lined paths. And the abstract, pattern making nature of both of these means if you pick the right colours, you can very easily use them to make Christmas or other seasonal cards.

Because we use high quality deep etched rubber, these really come into their own when you start working with texture.  They will give super results on polymer or air dry clay, shrink plastic, friendly plastic and deep embossing.

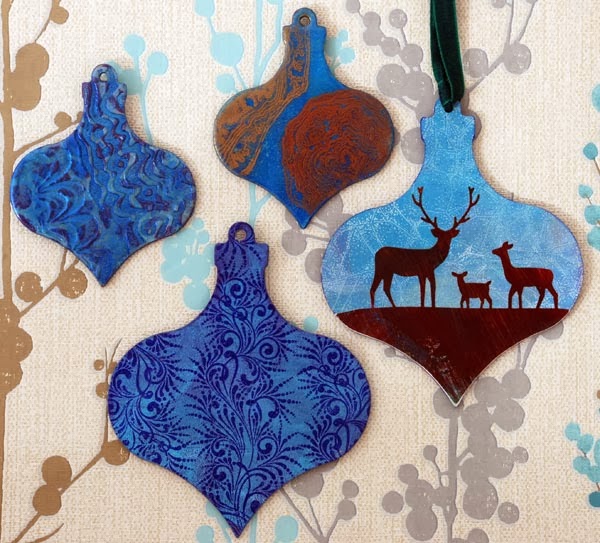
These are the sort of stamps that are surprisingly versatile and they've been a pretty permanent feature on my studio table since we got the first prototypes to test.  I decided to use them on some chipboard baubles which I'd painted in shades of blue.


The deer trio die cut is stuck over one of the frosted crackle backgrounds and the other large bauble is simply stamped with Archival ink, but the two smaller baubles are both done with deep embossing powder.


If you've not tried stamping into deep embossing powder, here's a quick run through of the technique.

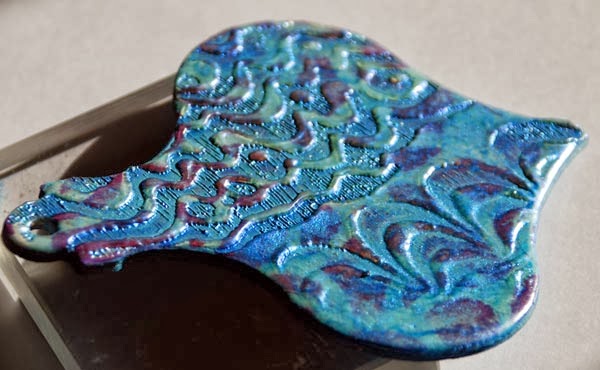
After the paint was dry, I patted Versamark over the whole bauble and covered it with a layer of clear UTEE (ultra thick embossing enamel) and heated to melt. I repeated that twice more so I had three layers of UTEE which is a good depth for creating texture.  I used two of the abstract fragments side by side on one acrylic block and inked them up with Versamark.  After heating the final layer of UTEE, I stamped gently into the warm, molten embossing powder and let it harden for 30 seconds before removing the stamp.

I then dusted a little Perfect Pearls over it and turned it over and rubbed gently on a wet wipe.  That left the pearly powder in the crevices, but removed it from the raise surfaces, letting the original painted colour show through.  (I'd started with a purple and blue pattern, so that's what the variation in colour is.)

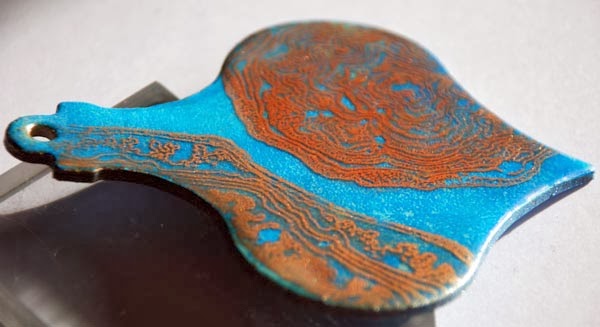
The second bauble started out as a much more uniform turquoise colour.  I did exactly the same technique, using copper PanPastel to highlight the texture.  However this time, after wiping off the excess, I reheated the UTEE until it went smooth again, leaving the copper image looking as if it is floating on the surface - it has a look of traditional powdered glass enameling.


We couldn't choose between the two sets, so they are both our Stamp of the Month for November which you should know by now means that they are at introductory prices for one month.  And yes, there is a multi-buy deal as well so you can save even more if you want them both.

Let me know what you think of them and don't forget to come back and see what the DT have been getting up to with these stamps.