Pin It button on image hover
Showing posts with label Tranquility. Show all posts

Wednesday, 20 May 2020

A Gift For A Friend (by Carole)

Today sees the second post from our Guest Design Team member Carole. She has created two delightful projects to inspire you.

Carole writes:

Hello everyone.

It is my slot as Guest Designer again and today I have two projects for you using the Tranquility set of stamps, a lovely oriental style theme.

The first one is a ribbon holder, which I have found useful. If you like the idea you could have a different one for each colour way. They would look very pretty sitting on the shelf.
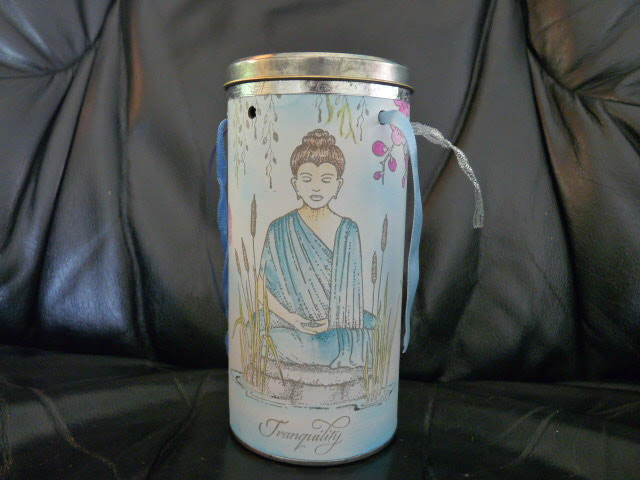


I have used an empty cardboard container and cut a piece of card to wrap around it. This was then decorated with various stamps from the set coloured and stuck onto the cylinder.
The top edge was decorated with silver foil over the strong, red double sided tape.
Holes were then punched around the edge with my punch.

The heart would make a lovely accompaniment for the ribbon holder, if giving as a gift.


Products used: Tranquility stamp set, 12cm heart, black paint, Versamark inkpad, silver embossing powder, beads and card to back.
The heart was painted black and left to dry thoroughly.
I swiped it over with an antistatic bag, particularly important as I was using metallic powder and this has a tendency to pick up every finger print on the project!
The images were then stamped and silver embossed. As my heart was wooden, I needed to be aware and hold it with a clip, I usually use a peg for this, as the wood gets surprisingly hot.
I then wiped the inkpad around the edge and embossed.
The flowers were coloured with Mica powders, to add a slight shimmer.
The heart was then mounted onto a background colour, mine was card, but felt is good too.
The beads were then stuck around the edge.
This is a lovely gift for a friend if you can bear to part with it. Mine cheers me up every time I look at it.

Hope you have enjoyed my project. 
See you next time for something completely different. 
Bye for now and thank you for visiting.
Happy Crafting.
                                                                             Carole

Friday, 8 February 2019

Serenity and Tranquility by Miranda


Hello there,

Today I have made something using two gorgeous sheets; Serenity and Tranquility.
In time when these sheets were launched I was so happy.....finally some beautiful female Buddha stamps! Still find them so beautiful.......

I've made an inky background using Distress inks and stamped (using same colors) fragments of the background stamp; Studded Lattice.

And then some plain black stamping for the focal image......and some cherry blossom branches....
I did colour her using color pencils.


I made a separate border stamping the beautiful Indian designs from the Indian Elephant sheet which matches perfect with the Buddha designs. I am sure you all understand that I have a lot of favorites at CB!
I have blended with Distress inks and colored on the pattern using gorgeous sparkle pens....you can see the effect on the close-ups......isn't it gorgeous? 
I also gave some sparkles to the Buddha........using a transparant sparkle pen.


and the stunning effect of the Signo Ball glitter pens.........


Well, for now this is my last blogpost but I hope to see you again here on the DT blog......
Thanks for all your kind comments and stay creative, 
let's make the world more beautiful with our ART!


Monday, 25 June 2018

Where Imagination meets Reality (by Deborah)

Hello everyone, today sees the final post this month from our Guest Design Team member, Deborah Wainwright. Deborah has created a lovely tranquil project for us this week, mixing and matching several stamp sets to create a colourful scene.

Hello again, today I'm sharing my last piece for a while, and this week I have a tag for you. It's been fun dusting off these stamps and creating with them. All too often we forget our older stamps in favour of new ones, but I hope you have been inspired to play with your older ones, and don't forget all the stamps I've used are still available from the shop.

I used a size 8# greyboard tag from Tando Creative, and gave it a coat of paint using the green (Muted Teal) from the Little Birdie Chalk Paint and Crackle Kit and dried it with a heat gun.

I stamped my main focal point from the Tranquility stamp set and then repeated the stamp onto masking Tissue, cut around the design, and stuck it over the image on the tag. I then repeated this with the flowers. Once both images were masked, using Big Bold Background Belle Flowers and Versamark, I stamped over the masked areas, then sprinkled with a glitter embossing powder and heated it to melt the powder. I then removed the masking tissue to reveal the stamped images below.

Using watercolour paints by Koh-I-Noor I painted first the background flowers, then the main images. Once the first layers were dry I added more pigment, varying the value in this way adds depth to your images. My sentiment is from Punky Expressions.


I hope you all like this little tag, thank you all for your lovely comments over the last few weeks, and I'll see you all soon.

Hugs
Debs xx

Monday, 11 June 2018

Tranquil Wall Hanging (by Deborah)

Hello everyone, today sees the first of three posts this month from a new Guest Design Team member Deborah Wainwright. I am sure that you will all join me in welcoming Deborah to the Team, and that you will be inspired by her fabulous artwork. Deborah has kindly written a few words about herself to help you get to know her a little better:

I am a self taught Mixed Media Artist, Illustrator and Designer. I am fascinated by colour and texture and use both intuitively when I paint, draw, stamp or make stuff. I love to use different mediums, such as acrylic paint, ink, watercolour paints and encaustic, in fact I use whatever I am drawn to in the moment, including recycling.

I taught art journal classes where I lived in Essesx, and recently taught a very successful class at Tullie House Museum and Gallery and have more dates for more classes later in the year. My art has been published in a book, 'Learn to Paint Made Easy', and I am regularly published in craft magazines.

I am inspired by the world around me, and express myself through my art. I love to paint expressive portraits, and often have 'girls' nagging away to be given life on my canvas. Another love is flowers both those around me as well as those that live in my head.

Debs xx


Deborah has created a delighful mixed media piece for her first project, here is what she has to say:

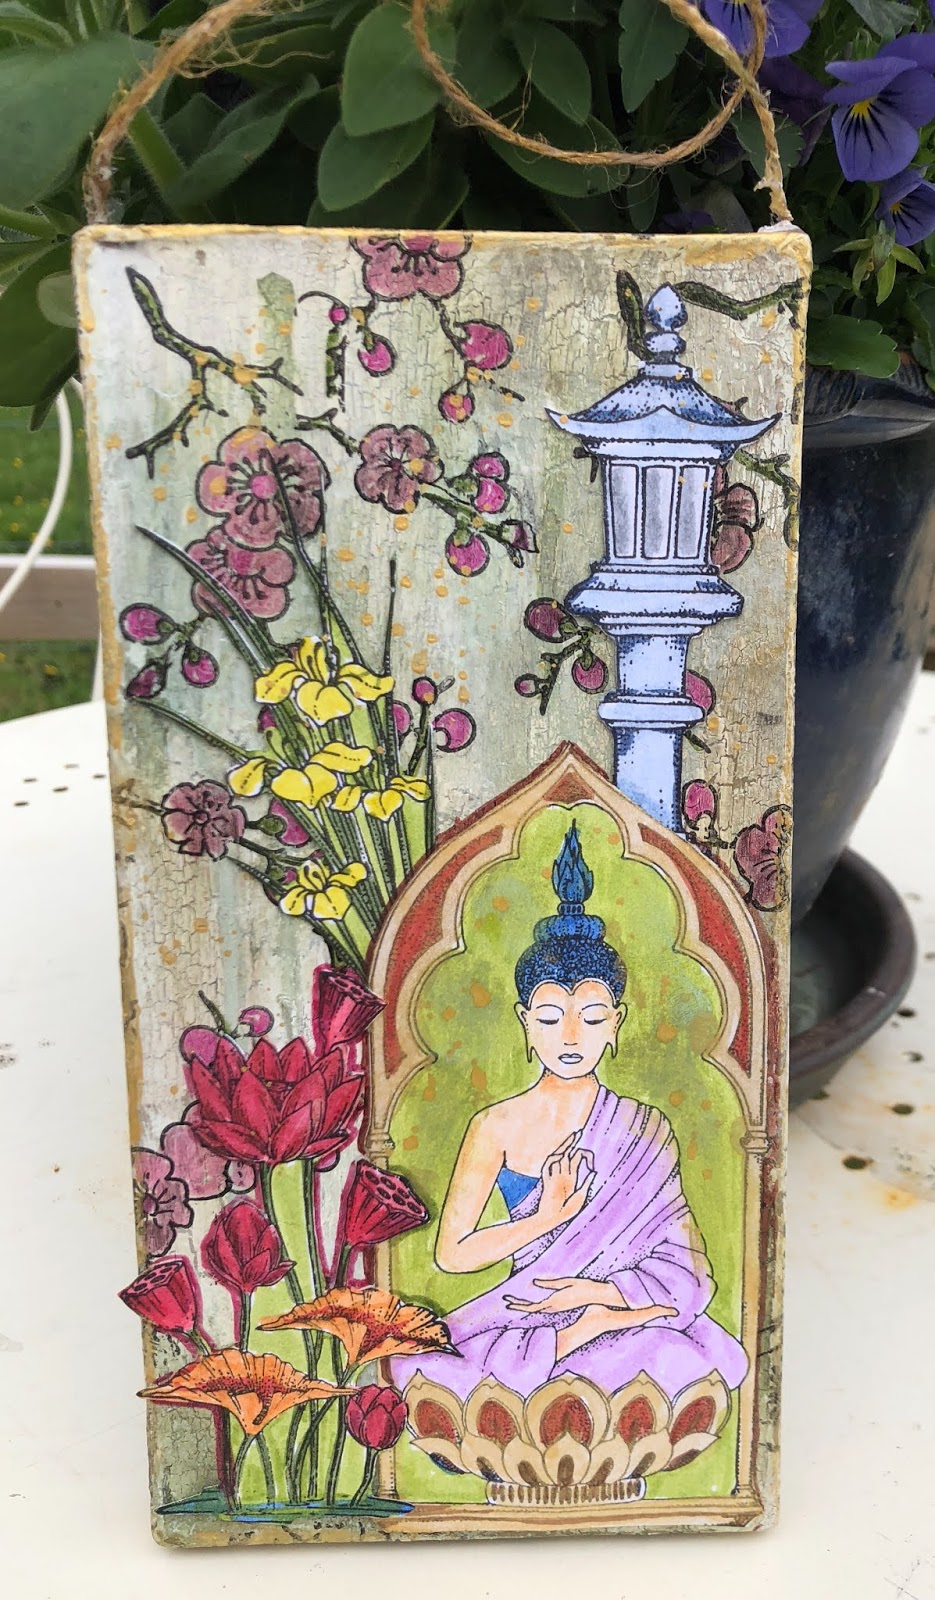
Hello everyone, Debs here, and I'm thrilled to be joining Chocolate Baroque as a Guest Designer. For my first creation I started with a wallboard which I had given a crackle background. On top of this I created my first layer of flowers, which I then coloured with pens.
On a separate piece piece of plain white card using Black Archival Ink, I stamped the focal points and heat set them. Using my favourite watercolour paints I painted the images, before fussy cutting them out. I then attached them to the board. To finish, I added some gold paint around the edges of the board.


Stamps I used were elements from both the Tranquility and Serenity stamp sets.


 Hope you enjoyed this little board, see you all soon,

hugs,

Debs xx


Deborah will be back next week with another post. You can find Deborah's blog here.


Tuesday, 24 April 2018

Spring Wreath (by Judith)

Hello everyone, I have a floral project to share with you today, using some of the stamps from last month's TV shows on Hochanda.

I have created a wreath with a feel of Spring, by choosing pastel colours for the flowers. I created the project by first drawing a circle on a piece of card, and then stamped the blossom image from the Tranquility stamp set around the circle. I masked the images as I went along, and stamped an image from the Wisteria Lane stamp set, using first and second generation stamping.

I coloured the flowers and stems with pencils, lengthening the branches to create a continuous wreath. I added a sentiment from the Loving Sentiments stamp set, and finally added some inking around the edge of the background, using Distress Ink.

Thanks for stopping by, Judith xx

Saturday, 21 April 2018

Tranquility (By Marga)

Hello everyone, here I am with a new card I made for one of the TV shows on Hochanda last month.


This time I used liquid ink for the background and I coloured the image with pencils. The stamps in the background I stamped with coloured ink. I used a white gelpen for the accents.

Stamps I used are: Eastern grasses, Tranquility


Hope you liked my card

Hugs Marga


Tuesday, 17 April 2018

Journaling Card - (by Magda)

Today my step by step is concerning a Journaling Card.

1. Apply white Gesso randomly on an white A4 Cardstock as first mat and let it dry
2. Blend Distress Inkpad considering the light and the dark zone you would like to have and use
    therefore appropriate colours
3. Stamp the images and sentiment of Tranquility with Versafine Onyx Black and colour all with
     watercolors Aquarelle Pencils.
4. Glue your first mat on a second black mat and finally, everything onto your card


Thank you for passing by and have a nice crafting week
Magda


Monday, 16 April 2018

Decorative Mixed Media (by Anne)

Good morning. Today I am sharing a couple of mixed media projects created with Wisteria Lane and Artistic Affirmations stamp sets.

My first is a small decorative hanger.

Materials:
  • Wisteria Lane and Artistic Affirmations stamp sets
  • White board panel (15 X 10cm) and circles (White Board Shapes kit), gold metallic satin card, pink card and turquoise glitter card
  • Decorative lace and border dies
  • Acrylic paints (turquoise, pink, purple)
  • Versamark Inkpad
  • Embossing powders (yellow, pink, purple)
  • Texture paste and gilding wax 
  • Texture stencil 
  • Glossy Accents
  • Scrap lace trim and pink ribbon
  • Faux gems, pearls and sequins
  • Glitter glue and 3D glue gel
  • Variety of small plastic container lids and a straw (for printing)
How it was done:
  1. Texture paste was applied onto the background panel through a stencil.
  2. The white board shapes were coloured with acrylic paints. Plastic lids and a straw were used to print circles. Gilding wax was applied to the edges.
  3. Images were stamped with Versamark and heat embossed with coloured powders.
  4. The hanger was extended on the top and base using die cut panels.
  5. Elements were glued down using 3D glue gel for added depth and dimension.
  6. Finished with lace trim, faux gems, sequins and glitter glue for sparkle.

My second is a small canvas.

Materials:
  • Wisteria Lane, Tranquility and Artistic Affirmations stamp sets
  • 20cm square canvas board, white stamping card
  • Embossing powders (yellow, pink, purple) and WOW (Clear Gloss)
  • Viva Décor crackle colour (pearl teal)
  • Ink sprays (pink, teal, purple)
  • Inkpads: StazOn (black), Brilliance Pigment (variegated pink & blue pearl)
  • Sparkle pens (pink, purple)
  • Fine tipped alcohol pen (black)
  • Puffy paint (green)
  • Glossy Accents and silver gilding wax
  • Faux gems and sequins, 3D glue gel
How it was done:
  1. Crackle paste was applied to the outer edges of the canvas and left to dry overnight.
  2. The canvas was spritzed with coloured inks. Some pink spray was also applied so that it sunk into the crackle crevices, excess being removed from the top surfaces with a damp cloth.
  3. Images were stamped onto the background with Brilliance Ink and embossed with clear powder. Floral stems were also stamped onto white card, embossed with coloured powders and cut out for decoupage.
  4. The sentiment was stamped with Stazon and quickly embossed with clear powder. Black pen was used to enhance the sentiment (the canvas is quite textured so detail doesn’t stamp well).
  5. Images were coloured with sparkle pen and floral stems stuck down with 3D glue gel for added depth.
  6. Glossy Accents was added to some of the flower heads, and dotted over the background.
  7. A little silver gilding wax was applied around the canvas edges and over the crackle texture.
  8. Puffy paint was applied along the base of the canvas and heated to give extra texture.
  9. Finished with lots of faux gems and sequins.


Thursday, 12 April 2018

Fabric Stamping (by Judith)

Hello everyone, I have some projects to share with you today incorporating fabric. I really like to add some texture into my projects whenever I can, as it adds a bit of interest and makes the project look and feel quite expensive, for very little cost. I demoed these three projects on last month's TV shows on Hochanda, and I hope that you managed to watch Lesley and I in action.

To create the first card, I cut some small pieces of cotton fabric, and put some Distress Ink onto a craft mat, which I spritzed with water. I patted the fabric into the ink, moving it around to blot up the ink. I added more ink and water if necessary to get a good coverage of the fabric, but was happy to leave some areas uncoloured. I left the pieces of fabric to dry by themselves.

I frayed the edges of each piece of fabric, and stamped a silhouette image from one of the stamp sets: Tranquility, Serenity, Wisteria Lane or Eastern Grasses, and added a sentiment as well. I chose words from Artistic Affirmations, Amazing Mackintosh Words, and Words to Dazzle and Sparkle. I used Archival black ink to stamp all of the images onto the fabric, leaving the stamp on the fabric slightly longer than I would on card or paper, to allow the ink to grab onto the fabric. You do not need to press any harder.


I attached the fabric pieces to a piece of black card before matting them onto a card blank. A little button with paper string tied through was a finishing touch to each card.

For my next card, I created a paint swatch effect by masking sections of a piece of cartridge paper, and inking three toning colours of Distress Ink. I stamped the silhouette image from the Eastern Grasses stamp set onto the piece of card.I matted the panel onto black card before adding the panel to a piece of linen card.

I coloured a piece of cream ribbon with Distress Ink and stamped it with Archival Ink as before, using a sentiment from the Amazing Mackintosh Words stamp set. I attached the ribbon to the background and then placed the background on a square card blank.

For my final project, I used a Crafty Individuals tag, and stamped the main image from the Tranquility stamp set across the bottom of the tag. I coloured the image with pencils. I added the wisteria image using water based markers across the top, using first and second generation stamping for a fuller effect. The ribbon was made in exactly the same way as before, picking up colour from the craft mat, and then once dry, stamping with Archival Ink. I used a word from the Serenity stamp plate. I like to colour ribbon myself to coordinate with a project, you can see another example here.

I hope that I have inspired you to to have a go at stamping on fabric, I will be back later in the month with more projects to share. Thanks for stopping by,

Judith xx

Wednesday, 4 April 2018

Tranquil Meditation and a Happy Place (by Anne)


Good morning. Today I am sharing some of my recent show samples using Tranquility, Wisteria Lane and Artistic Affirmations stamp sets.

I created 3 different scene cards, one using vibrant happy colours, one in blue & white monochrome and my third was an attempt at Parchment. I hope that you like them.


Happy Place

I love colour so I created this ‘Happy Place’ using a bright cheery colourway.
 
Materials:
How it was done:
  1. The lanterns were stamped onto copy paper and cut out to create masks. I dotted a little zig glue on the back and left to dry. This glue then gives a temporary tac to hold the masks in place while stamping.
  2. The scene was stamped with Versafine, stamping the foreground images first then covering with masks while stamping the images set behind. The scene was extended by drawing with the fine tipped pen (i.e. water swirls).
  3. The foliage across the top was stamped with Versamark and pigment powders were applied with a soft brush. Further foliage was stamped with Wild Honey Distress Ink. The sentiment was stamped with Versamark and heat embossed with powder.
  4. The image was coloured with watercolour pens, dissolved pigments, sparkle overlay and glitter pens. Highlights were added with white pen and additional shading added with pencils.
  5. The image was edged with alcohol marker and by blending with Dusty Concord Distress Ink.
  6. Extra sparkle was added with glitter glue and Glossy Accents. PVA pearls were applied to the border.
 
Tranquility
I have been trying to have a go at Parchment craft as I love the delicate result. I thought that it would make a lovely tranquil version. No picot cutting as I am hopeless, so I cheated with a die. I tried to hide the glue but still ended up with a blob of showing through the parchment – eek! I was fairly pleased with the results but have a lot to learn and more practice needed yet.

Materials:
  • Tranquility stamp set
  • 6 X 6 inch scalloped card blank, parchment, gold satin board
  • 6 X 6 inch decorative stencil
  • Pergamano tools (embossing mat, embossing tools, mapping pen, Sticky Ink and Perga Glue)
  • Inkpads: StazOn (Opaque White), Distress Ink (Tattered Rose)
  • Scalloped circle dies 
  • PVA pearls (tangerine), extra fine glitter and sequins
  • Used tumble dryer sheet
How it was done:
  1. The gold card and parchment were cut out using dies. The background was created using Distress Ink through the stencil (using a blending brush).
  2. The image was stamped onto the front of the parchment using white StazOn. I then embossed the outlines on the back of the parchment using a fine embossing tool, tracing the stamped image. To help aid the embossing tool to glide on the parchment I rubbed over the surface using the tumble drier sheet first.
  3. Larger embossing tools were then used to add shading. Although it is generally called ‘shading’ it is actually ‘highlighting’ as embossing stretches the parchment and makes it whiter. You need to work gently and slowly, leaving the parchment to rest between layers of further whitening. I did tear her cloak (eeeeek) but managed to disguise it with a little Perga Glue which was later covered with glitter.
  4. Sparkly highlights were then added to the front using a mapping pen (dip pen), sticky ink and extra fine glitter.
 
Meditation
I love creating monochromatic blue & white cards. Perfect for a tranquil meditation.
 
Materials:
  • Tranquility and Wisteria Lane stamp sets
  • 15cm square card blank, blue card for die cut panel, white stamping card
  • Versafine Inkpad (Majestic Blue)
  • Water based sparkle pens (blue and clear)
  • Alcohol marker (dark blue)
  • PVA peals
  • Decorative square and arched panel dies
 
How it was done:
  1. The images were stamped with Versafine ink and were coloured with sparkle pens and a damp brush to create shading. Decorative stamped elements were positioned to frame the central image.
  2. The panels were cut using dies and edged with blue marker to frame. 3D foam was used to mount the central image and give it more depth.
  3. Finished with PVA pearls.

Tuesday, 3 April 2018

tranquility by Veronica

 Good morning everyone, hopefully the weather is better today where you are after the rainy Easter we have had.
Maybe I ought to apologise for showing such a watery scene..........................
I love the tranquility set of stamps, but here I used the waterlilies from serenity as well.
I stamped the lilies three times across the base of the card, then masked  them using Pebeo drawing gum before stamping a fourth lily at one side and then the statue from tranquility
After rubbing off the drawing gum I coloured everything with distress inks, using a waterbrush.
The statue was in grey tones to repreent stone, it did end up a bit darker then i really wanted though! For the sky and water I used ink onto a blending mat, added loads of water then used a large paintbrush to roughly colour in the sky and water

Sunday, 1 April 2018

Affirmation Journal (by Judith)

Hello everyone, I hope that you are all enjoying your Easter break. If you are in the UK, then like me, you are probably wishing that you were somewhere a little bit warmer! However, there is always something to be positive about, and that is what I hope my project will help you to discover.

I have made a little journal full of individual cards with positive and motivational phrases. You could make this project for yourself, or to give to a friend, who is struggling with their creativity at the moment. I have covered some pieces of white card with an injection of bright colour, and left the backs either blank, or covered them with plain paper to write your own thoughts. You could add extra stamping if you wish.

I started my project by blending two colours of Distress Ink over the pieces of white card, and spritzing them with water.

 I added a border or background to the cards by selecting some of the stamps from either the Artistic Affirmations, Wisteria Lane, Serenity, or Tranquility stamp sets. I chose a phrase from the Artistic Affirmations stamp set, and added this to each card using black ink, then I added some white highlights to the words to make them pop.

I created some pages to contain the cards by cutting some A4 sheets of black card in half. I then scored these sheets at the 10cms point, and then took half a centimetre away, leaving a 9.5cms flap. I trimmed this flap down to 7cms high and stuck down the side and bottom edges with very thin double sided tape, to create a pocket. I stuck two pages back to back, and then punched two holes a third of the way along from the top and the bottom.

The outside covers were made just a fraction bigger than the actual pages, with black card, and then I coloured the slightly smaller pieces of white card in exactly the same way as I made the little journal cards. I used two book rings to attach everything together, which allows me to add more pages whenever I want to make some more.

I really enjoyed making this project, and hope that you caught my demo on last month's TV show when I made a couple of the cards.

Thanks for stopping by, Judith xx

Saturday, 20 May 2017

fantasy castle (by Veronica)

The second of my samples for the shows last month uses one of the lovely images from the fantasy castles set of stamps - I have to admit these were far more my scene than the fairies!
This started out as playing with distress oxide ink pads on white card, without any idea where I was going. I thought that the palace stamp would fit, as it looked as if it was on a shore, and I already had a watery effect at the base of my very rough landscape. I stamped it with black versafine and clear embossed it before adding colour with brusho powders and watercolour pencils. The palace was stamped onto acetate with the versafine, turned over and  matched up with the original, rubbed firmly to transfer the image onto the watery area. It didn't transfer cleanly, but that didn't matter.
I added foliage from the tranquility stamp set using first and second generation stamping to frame the scene and give an impression of depth - it also toned down the rather bright sky!

Wednesday, 16 December 2015

Guest Post - A touch of Tranquility by Rachel Fisher

Hi everyone, it is already the second week for our new Guest Design Team member Rachel and this week she is delighting us with a card using the Tranquility stamp set. I think we probably all need a little of that at the moment with all the frenzy of the festive season. Anyway, I hope you enjoy this delicious card and have five minutes to just sit and breathe!


Hello again!  This is my second piece for my guest design team stint here at Chocolate Baroque. 


I created this scene using stamps from the Tranquility set and also one from the Fantasy Castles set. I stamped the main image then masked before stamping the other images. Colouring has been done via a combination of distress inks and colouring pencils.

Full details can be found on my blog – Fishers Cards andCrafts.

I hope you have enjoyed what I have done with these beautiful stamps!

Big Hugs

Rachel.

Just love the subtle colouring here, a very tranquil card indeed Rachel, thank you. If you have enjoyed seeing this creation from Rachel, then please come back again soon to see more insiprational artwork from our regular Design Team girls.