Pin It button on image hover

Tuesday 28 February 2017

Gelli Plate Kingfisher (posted by Claire)

Good morning folks, Claire here with a fun card made using the very handsome Kingfisher from Kingfisher Song. I love these stamps and had lots of fun making scenic cards but I couldn't resist giving him a crown for this card lol.


I took a pile of gelli plate backgrounds and chose one for Mr Kingfisher, I also stamped him on another background and added some colour with sparkle pens. I stamped the branch on the gelli plate background and doodles a border with a black gel pen. I cut the kingfisher out and layered him up on 3d foam pads and then matted and layered with white and black card. I took an 8x8 card black and some sequin waste and added some stencilling to the base card using coordinating distress inks. 

I added the sentiment and a few black sequins and as a finishing touch I give him a chipboard crown that was embossed with black embossing powder.

Thanks for visiting today, hope to see you again soon
Claire xx

Monday 27 February 2017

Sparkling Meadows (by Judith)

Hello everyone, I have a couple of projects to share with you today incorporating the 'Caught in Crystal' technique and using some of the lovely silhouette flowers from both the Silhouette Grasses stamp set and the individual Baroque Meadow stamp.

I created a large piece of caught in crystal background, and you can find the full instructions on my blog. I then stamped the Baroque Meadow image, adding the three little silhouette butterflies, using a permanent black ink. I trimmed the piece of background to size, and matted it onto black card.

I found a larger piece of wrinkle free distress background in my stash of left over backgrounds, which was a lovely bright orange, and simply added some pink Distress Ink around the edges so that it toned in with the caught in crystal panel. I added a sentiment from the Words to Dazzle and Sparkle stamp set, and adhered the background to a large black card blank.

I had a piece of the crystal background left over, and die cut an oval piece from what was left. I stamped an individual flower and one of the little butterflies onto the oval, before matting it onto black card as before. I created a background using Pan Pastels, and added some foliage using Versamark, and Pan Pastels over the top. Finally, I added a sentiment from the Words to Dazzle and Sparkle stamp set.

Thanks for stopping by, Judith xx

Sunday 26 February 2017

The Old Stone Bridge by Zoe

Good morning Lovelies, back again with my 3rd project this month featuring the fab new stamps.

I started here with Brushos, just lightly sprinkled and spritzed, I laid some bubble wrap over it and left it for a short time, removed it then let it dry naturally, I sometimes leave the bubble wrap on to completely dry but this time I wanted to get a more "watery" effect, I stamped my image's using Onyx Black Versafine Inkpad, once dry I used Brushos to very roughly paint the image, I was aiming for a more "organic" look lol. I added some glitter glue to the foliage but sadly it never photographs well I find, I edged my design with distress ink to create a bit of a frame, I matted and layered using black card.


Thank you for visiting, I hope you like my card and I've inspired you? Have a wonderful day xx Zoe xx 

Saturday 25 February 2017

Watercolour Scene (by Marga)

Hello all, today I will show you this beautiful stamp from the Kingfisher Song stamp sheet. I stamped the image with Versafine Onyx Black and coloured it with Distress Ink. I punched a round hole in a piece of paper for the sun. I put the piece of paper down on the image where I would like to have the sun and then I coloured the sun with Distress Ink. Around the sun and the image I added some shadow. The sentiment I usd is from the Words to Dazzle and Sparkle stamp sheet, and I stamped this with Versafine Onyx Black ink.


I hope that you all liked my post.

Best Regards,
Marga.

Friday 24 February 2017

Word Cloud Meadow (by Julie)


Hi there, thanks for stopping by. I have a bumper, three card post for you today using the fabulous stamps that Lesley recently demonstrated on Hochanda. If you managed to catch her shows you may have seen Lesley demonstrate a card using this technique so if you did you will be ahead of the game lol!

For the word cloud I have used the sentiments from Words to Dazzle. Basically you need to choose your sentiments and then arrange them onto an acrylic stamp block. Ink them up and test stamp them onto scrap paper. When you like the appearance of your stamped arrangement you are ready to stamp onto your project.

My first card also uses Baroque Meadow and Silhouette Grasses. The base card is the Silhouette Grasses inked up with Moss Green Versafine and then Fired Brick Distress ink was added over the top. The topper was created by stamping the Baroque Meadow in a very pale dye based ink before over-stamping with the word cloud. For this card I coloured the sentiments with brush markers. Don't worry about the ink drying before you are ready as you can reactivate the ink by giving a good huff onto the rubber before stamping. Before mounting the topper onto the card I edged it with Distress inks.


My second card is almost an exact copy of the first but I have used very muted colours. If you find you do not have any pale inks then you can get around this by using your brighter inks but stamping them onto scrap paper before stamping onto your project. Also known as second generation stamping.


Finally for my third card...I have used the same word cloud arrangement as before, however I have inked up the Silhouette Grasses using yellow, purple and grey dye based inks and stamped onto plain white card. I managed to do this without creating any ink splodges so decided to leave the crisp white card background as it was...lol!

Thanks for taking a peek. Please pop back and visit again very soon as there is Design Team inspiration everyday!

Julie xx

Tuesday 21 February 2017

I miss you (by Dominike)

Hello

Parfois, un seul mot suffit pour dire ce que vous pensez.
Parfois, il suffit d'un dessin pour dire combien il est difficile de ne pas pouvoir voir quelqu'un que vous aimez.

Sometimes you don't have to speak for saying your mind.
I think that all is said here.


These wonderful Chocolate rubberstamps are here. They are great !

Kind regards.

Monday 20 February 2017

Never Stop (by Magda)

I had fun in playing with my thoughts for this card.

Step by Step
1.  On your white card blend very lightly in different areas  Distress Inkpad  Cracked Pistachio and
     Fozzil Amber
2.  Position your stencil on the card and apply with varying pressure Distress Inkpad  Lucky Clover
3.  Move the same stencil slightly and apply Distress Inkpad Fossilized Amber
4.  Stamp some grasses from Silhouette Grasses with Versamark Inkpad Onyx Black directly on the
     card
5.  Stamp on white cardstock the sentiment of Words to Dazzle & Sparkle, blend the edges with
     Distress Inkpad  Lucky Clover and attach it with sticky foam on the card.


The stamps of Silhouette Grasses are so stylish and versatile,  I think you have to try them.
Magda

Sunday 19 February 2017

Blue and White Crocus Card (by Anne)


Good morning. Today I am sharing one of my samples with the new stamps recently featured on the shows with Lesley Wharton on Hochanda. I have got a 'thing' about blue & white scenes recently! Tee hee.


Materials:
  • Spring Bird Crocus stamp set
  • 6 inch square card blank and white stamping card
  • Distress Inkpad (Chipped Sapphire)
  • Fine tipped pen (blue) and gel pen (white)
  • Dies to cut square frames and mats
How to make it:
  1. Cut the frame and square mats for layering. Edge with Distress ink and add faux stitching with the fine tipped pen.
  2. Stamp the image and sentiment with Distress Ink. Pull out the colour using a damp brush. Add some ink to a craft mat and use as a paint to add extra colour and shading. Use the white gel pen to add back some highlights if needed.
  3. Mat and layer onto the card front using 3D foam on the topper for extra depth.

Saturday 18 February 2017

Krafty Kingfisher (by Asha)

Hello, friends! I'm back with another project idea. This time I'm going for an intensely vintage look using an image from the Kingfisher Song A5 stamp sheet.

I stamped the kingfisher onto a piece of kraft cardstock using Ranger Archival Potting Soil ink and coloured the image with Faber Castell Polychromos. For that aged look, I applied Distress Inks in Walnut Stain and Vintage Photo all around the edge of the card. Finally, some Stardust Stickles and little white dots on the water to brighten things up.


This image is such a joy to colour and its so versatile too. I've got more details of tools and products over at my blog. My team-mates have created a few beauties  with this stamp to inspire you. And make sure you swing by the DT blog for more project ideas using Chocolate Baroque stamps featured on Hochanda.

Thank you so much for stopping by today.

Beijinhos,
Asha

Friday 17 February 2017

monchrome bridge (by Veronica)

 I thought I wouold try something different using the lovely bridge stamp from kingfisher song, too nice an image to just use in the background.
i stamped the stones from sticks and stones in the foreground, and then the bridge, with the clouds from the seashore scenes stamp set.
The sky was sponged roughly with distress inks, with white pencil highlights to the moon and clouds.
I used grey brusho powder for the bridge and river, with black and grey watercolour pencils for the trees and stones, with more white pencil highlights.
The second version used a mask for the moon, and the iris leaf stamp repeated across the front to give depth. I added some turquoise brusho powder to the grey this time for the river, and stamped the leaves several times across the base card.
I had great frun doing these, and was pleased with how they turned out, so hope that you like them too.

Thursday 16 February 2017

Fifteen Minute Cards

Hello everyone, today we are sharing more of our quick and uncomplicated projects with you. Starting this month, we are only having one of these posts a month, and we are really giving you a value packed edition! The Design Team have created some beautiful cards and we hope that you will enjoy what we have to share with you. The cards and other projects have all taken fifteen minutes or less to complete, and are suitable for beginner stampers, for those of you looking for quick cards to make, maybe for someone who needs a batch card to make for a special occasion, like an invitation or a celebration, perhaps? These cards could be great for craft fairs, or fundraising, as you can make as many cards as you wish, as long as you are hand stamping each item.

You can click on each Design Team member's name to reach their individual blogs, where you will find more information about their projects, and also see more of their fabulous work. So, grab a cuppa and scroll through this month's selection of fifteen minute cards.

Claire's sepia toned card shows a very different way of using this lovely stamp image. You can create a lovely card for the men in your life in a short space of time, using a limited colour palette:

I have gone for a bright and bold background to display the lovely Baroque Meadow silhouette stamp, adding the little butterflies and a sentiment. This card was so quick to make, and the sky is the limit when you change the background colour:


Brenda has created two lovely cards for us this month, the first was made by masking around four squares on the background of the card with masking tape, and inking them with Distress Ink. She then stamped the branch and Kingfisher, colouring them with the same Distress Inks and using one of the flowers from Glade Design a Tree to add some flowers to the branch. She added a sentiment from the Words to Dazzle and Sparkle stamp set.

For her second card, she scribbled three colours of Distress Crayons onto a craft sheet, added water and brushed each colour onto the background.Next she stamped the silhouette flowers using Black Archival Ink, tied a piece of seam binding, and added a sentiment from the Words to Dazzle and Sparkle stamp set.


We have two cards from Zoe next, both on a circular theme, but very differemnt from each other. For her first card, Zoe has picked some of the smaller foliage elements from the Silhouette Grasses stamp set and created a Christmas wreath. This such a simple looking card, but very effective:
For her second card, she has used a circular mask to create a blue moon, added colourful grasses, and a lovely sentiment from the Words to Dazzle and Sparkle stamp set. The little butterflies from the Baroque Meadow stamp plate complete the card.

Dominike has created a set of three lovely watercolour effect cards, and you could use so many of the floral images from Chocolate Baroque to create a card like these. Simply use a water soluble ink like Distress Ink, ink up your stamp, and spritz the stamp with water before you stamp the image onto your background.

 Each card will give different results:
 The amount of water that you use determines how watery your image will appear.

We have a selection of cards from Penny to share with you this month; the first was created by stamping a tree using black ink onto a background from her stash. She used a fine liner pen to 'ground' the tree, by drawing a landscape onto the background. She added leaves using first and second generation stamping. She used a white gel pen at the centre of the leaves, edged the panel with a gold marker pen, and matted it onto black card. She stamped the leaves onto her base card using Distress Inks and added glitter. When the glitter was dry, she added her focal panel to the base card.

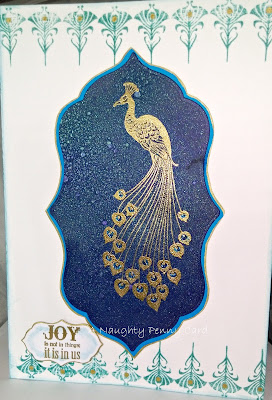
To create her second card, she stamped the peacock using Versafine Ink onto a background from her stash, and embossed the image using gold embossing powder. She die cut a panel around the peacock, and then also cut a mat which she edged with gold pen. She stamped a border at the top and bottom of the base card and added gold pen. She stamped and embossed a sentiment, die cut a panel, then attached both panels to the base card.


For her final card, she stamped the flowers and butterfly onto a gelli plate background from her stash, and embossed them with black embossing powder. She then painted the images with pearl paints, and added some Gothic corners, embossing them in the same way. She matted and layered the panel onto some embossed kraft edged with Distress Ink, and attached it to a base card.

Rachel has created a beautiful collection of cards, the first has been made using Brushos and white embossing:

For the second, she created a background using Distress Inks, and stamped the images using Black Archival Ink:


For her third card, she used repeated stamping and rotation of the base card, using Archival Inks:
For her next card she has used alcohol inks on yupo paper, and then stamped the image using Archival Ink, which she then wiped away, creating a faux resist effect. She added more stamping using Archival Ink over the top. The background was created using Archival Inks.
For her final card, she masked a circle and stamped in Archival, created a Distress Ink background, and overstamped using Distress Inks.

Julie has created a pretty textured card, using the bubble effect stamp from the Sticks and Stones stamp plate. She has used it to create both a background and to decorate her heart embellishments. The hearts have also served as masks for part of her background, and she has used these spaces to add her sentiments from the Words to Dazzle and Sparkle stamp set.


Her next card is a lovely project, using watercolour markers to colour the Baroque Meadow image, creating a very quick clean and simple style card. The coloured butterfly and sentiment are lovely additions.

We have another clean and simple style card from Vronnie next. This card would be so perfect for a sympathy card, such a difficult card to make, but this simple image with the right sentiment is just right.
Vronnie's second card by comparison, is very colourful and cheery, and the beautiful watery background is stunning.
Magda's leafy card would be another great masculine card, the earthy colours are perfect for this leafy stamp:
Anne has given us a super selection to share with you; her first card was created by stamping and embossing the image with white embossing powder. She coloured the background, and lifted some of the colour off, by sponging through a stencil with water, and blotted the excess away. She completed the card by stamping the sentiment and twig, then used a green pen to edge the card and frame.

For her second card, she stamped the images onto a tag using Distress Ink. The card was edged with black pen and a little Distress Ink to frame.

Last but not least, we have a card from Marga, our newest Design Team member. Marga has created her card by placing a selection of the foliage images from the Silhouette Grasses stamp set onto an acrylic block, and inking these with different coloured inks. She stamped the images twice and stamped a small grass image in between the open areas. She cut a square from one of the stamped images, and after matting onto coloured card, placed it over the other stamped image in the corresponding place.

We hope that you have enjoyed our bumper post this month, and we will be back again next month with more projects to share with you. Thanks for stopping by,


Tuesday 14 February 2017

Kingfisher Meadow (posted by Claire)

Good morning all, Claire here with a couple of projects made using this months lovely new stamps.


For this card I began with a background made with mica pigment powders on watercolour card, it's really shimmery in real life but sadly it doesn't show too well in the pic. I overstamped the background with lots of lovely foliage stamps ( you can find all the new stamps here). I stamped the kingfisher on white card and painted him with the same mica pigments, he looked a little flat so I had a rummage in my craft room and found some very old Sakura stardust pens which my some miracle still worked so I used them to give him lots more detail. I cut him out and layered him up on 3d foam pads.  A stamped sentiment in a little punched envelope were added to finish the card.

My second project today is a tag and a pendant made with the leftover ink from making this card. I had a tiny bit of colour left on my craft mat so I misted it with water and mopped it up with some white card. I cut out the tag and stamped with some delicate foliage and edged with silver embossing. I stamped the rest of the card with foliage and used glossy accents to glue a cabochon in place, once that was dry I cut it out and popped it in a bezel and added some green velvet ribbon to make a pendant.


Thanks for taking the time to visit, I hope you're enjoying the new stamps and don't forget to share your projects with us on facebook.
Claire xx


Monday 13 February 2017

Textured Grasses Tag (by Judith)

Hello everyone, I have a large tag to share with you today, that was featured on the recent TV shows on Hochanda.

I used a large Tando Greyboard Tag, which I covered with a piece of watercolour paper, that I had coloured myself, using Distress Inks, left over from a previous project. I stamped the background with a sentiment from the Words to Dazzle and Sparkle stamp set, and a couple of images from the Silhouette Grasses stamp set, to build up a collaged effect. I added some Fossilzed Amber Distress Ink around the edges of the tag.

I then coloured three pieces of 2" x 2" Tando Twinchies with Brushos, and added three layers of clear Ultra Thick Embossing powder. I stamped into the last layer each time while it was still soft, using one of the foliage images, and then brushed a small amount of gold mica powder over the top. I attached the Twinchie pieces to the tag, and added a piece of co-ordinating ribbon to the tag.

Thanks for stopping by, Judith xx

Sunday 12 February 2017

Kingfisher by Zoe

Good morning again Lovelies, I'm back today with my second project using the gorgeous new stamps.

They are so versatile and beautiful, whatever your skill level there is such a wide opportunity to create something beautiful.

Here's my project.

A one layer card using a hemp textured cardstock.
 I started by simply swiping upward directly onto the card using a Distress Inkpad, I then made my moon using a stencil and again Distress inks, I lightly splashed some water onto just the moon to create some texture, once dry I stamped the gorgeous Kingfisher using Onyx Black Versafine at this point I heat dry as Versafine is an oil based ink and takes a little longer to dry, I used the single rock with reed stamp to continue the design, once dry I simply coloured in using pencils, added my sentiment and Voila! A simple card, I think the stamps speak for themselves.


Thank you so much for taking the time to visit and leave a comment, have a wonderful day xx Zoe xx 

Saturday 11 February 2017

Introducing Marga our New Design Team Member

Hello everyone, today we would like to introduce a brand new member to the Design Team; Marga Dounan. You may have seen some of Marga's work on the recent TV shows on Hochanda. Marga has been helping us out, and is now joining us as a permanent member of the Design Team. We asked Marga to tell us a little bit about herself so that you could get to know her a little bit better.

Hello, I'm Marga, I'm 54 years old, I'm living in the Netherlands in a small village. We have a daughter and son, and two grandsons. I started crafting when I got sick 30 years ago, it was not my thing to do nothing, so I went looking for a hobby. I did all sorts of things until I discovered stamping. Since then, I just stamp and play with stamps. I discovered Chocolate Baroque stamps 5 years ago and loved them instantly. My first stamps were Pretty Poppies and since then I bought a lot more, I dare not write how much I have already. Most of all I love to colour stamps, ut I do all sorts of techniques. Therefore I am so glad that I can be part of this great team and I hope you also love the things that I let you see. Hugs, Marga.


Marga's first project  incorporates some of the latest stamps that were featured on the TV shows on Hochanda:


Hello all, here is my first post as a new Design Team member. I'm so glad I may join this team. Today I want to show you this beautiful bird from the Kingfisher Song stamp sheet. I stamped the bird with Versafine Onyx Black ink, and coloured it with pencils. I also coloured the branch with pencils. The leaves from the Silhouette Grasses stamp sheet are stamped with Memento ink. For the leaves, I have also used a green fineliner for some details.


Also, I have used a pencil to shade around the images. The sentiment comes from the stamp sheet Words to Dazzle and Sparkle.
I hope you all like my first post for this blog,


Best regards,

Marga.


Friday 10 February 2017

Kingfisher Song (by Julie)


Hi everyone, hope you are enjoying this month's new stamps. As of tomorrow you can get them all on Chocolate Baroque's web site, but if you cant wait till then, then you need to head to Hochanda, where you can also watch Lesley's shows demoing these fabulous stamps on catch up.

.

My first card is stamped using Kingfisher Song and Sticks and Stones stamp sets. The main image was stamped with Watering Can Archival ink and water coloured with Inktense pencils. I die cut a circle to mask the image and then applied Dried Marigold and Twisted Citron Distress inks to the background. Iced Spruce Distress ink was applied around the edge of the circle. After removing the circle masked I stamped the rocks, (and coloured them with the inktense pencils as before) branches and blossom from the Sticks and Stones set. The blossom was created by dabbing acrylic paint onto the blossom/bubble stamp and then applying Crystal Stickles over the top.


I started the second card by stamping the Kingfisher and then covered it with a paper mask, before stamping the bridge scene. Both stamps are from Kingfisher Song. Next I stamped the rocks in the foreground which come from the Sticks and Stones set. Once I had water coloured everything with Inktense pencils I created the foliage at the front, by inking up the Silhouette Grass stamps with green and grey acrylic paint and adding white pen highlights once dry.
Using a sponge I smudged the edges with white and grey acrylic paint and mounted onto black card. The base is Kraft card which I stamped with the blossom stamp that I had inked up with Picket Fence Distress ink.

Thank you for taking a peek at our blog. Please pop back again very soon.

Julie xx

Thursday 9 February 2017

Martin Pêcheur or kingfisher (by Dominike)

Hello
I like this stamp with a kingfisher (Martin Pêcheur in French). So, I wanted to make a little scene with it for this card.

Bonjour
j'aime tellement ce tampon avec un Martin Pêcheur que j'ai eu envie d'en faire le théâtre de cette carte.


  1. Use a white paper, sponge and different Distress inks to color the background
  2. Apply your different stamps whith black ink
  3. Repeat on another white paper
  4. Stick them together
  5. Stick yhe whole on a white card
Le tout a été réalisé avec une éponge pour appliquer les différentes encres distress. Les tampons ont été appliqués à l'encre noire. Le tout collé sur une carte blanche.

I hope you like it.
Kind regards.