Pin It button on image hover

Thursday 27 February 2014

New stamps: Fantasy Castles and Magical Landscapes (by Glenda)

If you've checked the New Stamps section of the website this week, you may already have spotted our gorgeous new stamps.

Firstly we have Magical Landscapes

http://www.chocolatebaroque.com/Magical-Landscapes-Unmounted-Rubber-stamp-sheet--A5-_p_5873.html

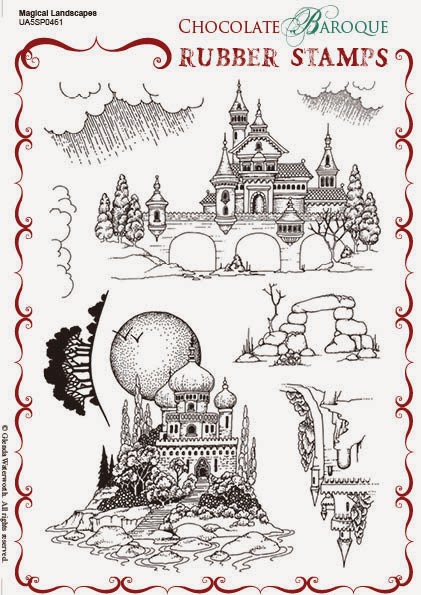
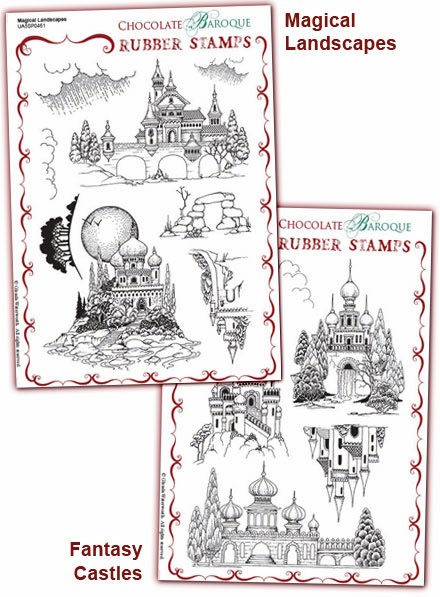
which go perfectly with Fantasy Castles

http://www.chocolatebaroque.com/Fantasy-Castles-Unmounted-Rubber-stamp-sheet--A5_p_5874.html

and of course we have a multibuy

http://www.chocolatebaroque.com/Magical-LandscapesFantasy-Castles-Unmounted-Rubber-stamps-Multi-buy--A5-_p_5875.html


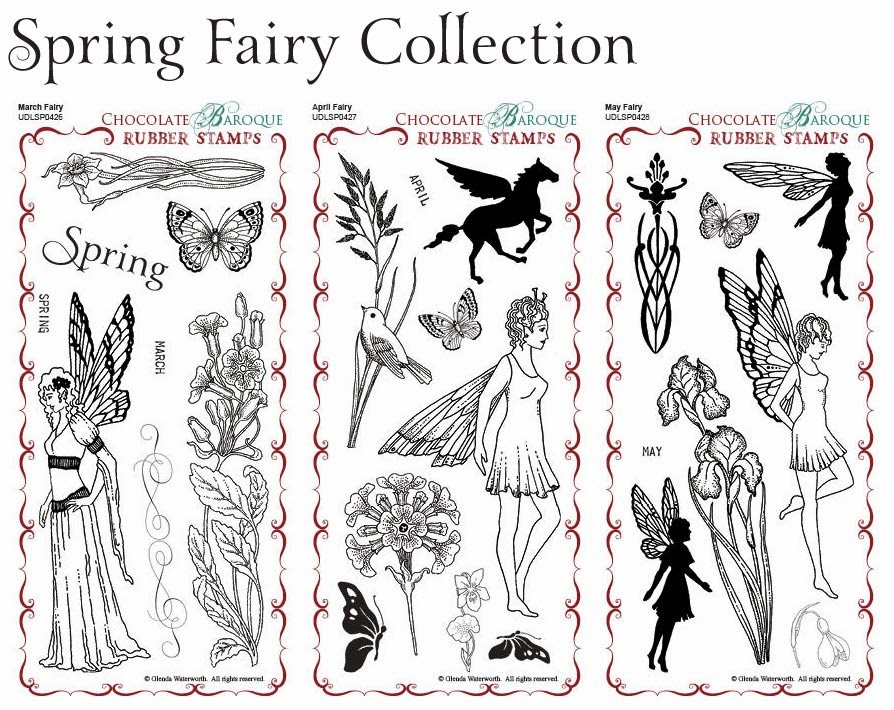
We are also launching our Spring fairy stamps comprising March, April and May, available individually or as a multi-buy.  

http://www.chocolatebaroque.com/Spring-Fairy-Collection-Unmounted-Rubber-Stamps-Multi-buy--DL-_p_5553.html


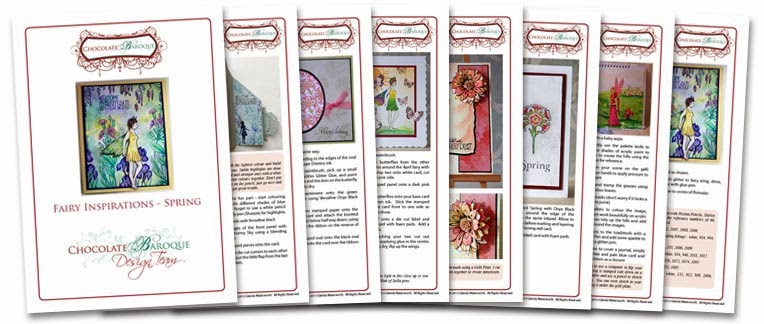
As with our previous Autumn and Winter fairy collections, we've put together a Fairy Inspirations Leaflet which is free for a limited time when you purchase the Spring Fairy Collection.


The card above has been stamped onto a brayered background using a home made kaleidacolour inkpad (I inked the strips with Distress Reinkers) and I brayered onto a matte card rather than the usual glossy or silk.  After stamping the image, I continued some of the lines of the hills out to the edge of the card, then masked off the roof and stamped the clouds.

There are two sets of clouds on Magical Landscapes with rain going in different directions, so I simply rotated the small one and stamped it so the angle of the rain is the same as the large.  The scene is coloured with Coloursoft pencils.

The background is Dylusions sprays with a little stencilling and stamping and I've used a nutmeg brown card for the base and layer.

At the moment you can find all these stamps in our New Stamps department and until the end of March, they are all at fantastic introductory prices.

I can see lots of possibilities for these stamps and you'll be delighted with what the DT come up with over the next month so stay tuned.

And if you don't already know, we reward our loyal commenters each month with a Chocolate Baroque gift voucher, and the more often you comment, the more chances you have of winning, so why not leave a kind word or two for the girls - it means a lot.


PS - talking of Design Team, yes we have selected our new team members and we will be introducing them in a couple of weeks once they've settled in!

Wednesday 26 February 2014

Glittered Rose (posted by Claire)

Good morning, Claire here with a card made using the beautiful Mackintosh Windows stamp set. 


I've made a distress ink background and overstamped with one of the stamps from Mackintosh Windows and then matted on some black card. I stamped the focal image on acetate and embossed with black embossing powder. I coloured the image on the reverse with Graph'It markers and then added some double sided adhesive sheet. Next I peeled the backing off the adhesive sheet and applied Rock Candy gliltter. I layered the glittered image on a die cut square and added a strip of faux gems along the side of the image.

Thanks for visiting today
Claire xx

Tuesday 25 February 2014

Mackintosh Windows (by Shirley)

Hello everyone, I hope you are doing well.

I have one more design featuring stamps from the new Mackintosh Windows and Mackintosh Beauty sets.    


The background is design paper from my stash.  The windows were stamped with black Archival ink and coloured with Prisma Pencils.   I popped them up on a black mat but it's hard to see that in the photo. 

I'm looking forward to more play with the fabulous Mackintosh stamp sets.

Thanks for your visit and have a great day!
Shirley

Thursday 20 February 2014

Mackintosh Windows (posted by Claire)

Good morning, Claire here to share a card made using the beautiful new stamps Mackintosh Windows and fantasy film/fibre (you can find the new stamps here). Like a lot of us I have a box full of Fantasy Film and Fibre that I never seem to use and also have a bag of scraps and off cuts so I thought I'd use some up to give this lovely lady a bit of bling.


The background is made with distresss inks (Peacock Feathers, Everngreen Bough and Seedless Preserves) applied to my craft mat, misted with water and then by swooshing some white card stock through the inky puddle several time. 
The focal image was stamped with Memento Tuxedo black and coloured with Graph'It Markers, inked around the edges and matted on white and then black card. 
I made the film/fibre embellishments by taking a small piece of Fantasy Film layering up lots of little scraps of film/fibre and then holding that in place with another layer of film. I inked the stamp up with Black stazon, put the film/fibre 'sandwich' on top of that and then a layer of baking parchment. Lastly I ironed it on a medium heat. I don't have a craft iron so I use my ordinary iron with the steam turned off.

To finish off I've stamped the sentiment from Mackintosh Sentiments and added some gems and a little bow. Thanks for visiting today
Claire xx

Tuesday 18 February 2014

Best Wishes (by Shirley)

Hello everyone, I hope you are doing well.

I have another design today that features a stamp from the beautiful Mackintosh Windows A5 set.   


The background is Evergreen Bough Distress Ink using an Acrylic Block.  I over stamped using a fragment from Texture Fragments with the same ink.   The Mackintosh window was embossed with black and coloured with Picked Raspberry & Evergreen Distress Inks (using a craft mat, water & brush).

I cut thin strips of black card stock and placed them randomly behind the main image.  My original plan was to place them straight, but I bumped the card which caused them to move and I liked how they placed themselves :)   I popped up the window over top.   'Best Wishes' is from Loving Sentiments

Thanks for stopping by and have a great day,
Shirley

Saturday 15 February 2014

Vellum Bride (posted by Claire)

Good morning, Claire here with another sample using this gorgeous stamp from Mackintosh Beauty as the focal point of the card. I think she makes a beautiful bride. 


I've stamped her on vellum, added some colour on the reverse and then embossed with a ball tool to give some white highlights. I've layered the image up on some black card using some crystal brads to secure the image. The background was made by stamping and embossing the images and again adding some colour with Graph'Its. I've added a black seam binding bow and a pink ribbon rose.

Thanks for visiting today, do keep popping back as my teamies have created some stunning projects with these beautiful new stamps
Claire xx


Friday 14 February 2014

A single Mackintosh Flower (by Debbie)

Hello. I love the elegance of these Mackintosh Beauty Stamps. His style is so popular being recreated in cross stitch, furniture, glass and many other home furnishing. I don't think it will ever go out of fashion.
I've made an A5 card and I wanted to extend the design to fill the card so stamped the flower panel onto white card and coloured with pens. I mounted onto red card and fixed to the card. With a ruler and fine tip black pen and laid the ruler across the stamped panel then drew the lines. I echoed the design on the white card. Many thanks for stopping by Debbie

Thursday 13 February 2014

Mackintosh Flower Girl (by Debbie)

The Girl was the first stamp I inked up from the Mackintosh Beauty set. Like the other girls from the Design Team we have all loved working with them.
I stamped her with Memento Tuxedo Black and coloured her with a selection of Alcohol pens. I used a darker blue along the folds to give a little dimension to her dress.
I mounted the girl image onto blue and silver card then cut six Spellbinders corners and arranged them onto the base card. This is another card that's going into my box of cards with no sentiment on, that I can dip into. Thanks for stopping by Debbie

Wednesday 12 February 2014

Pink Lady (posted by Judith)

I have always been a fan of Rennie Mackintosh, and so I have really been enjoying working with this month's stamps. The designs are just so reminiscent of that period.

I have made a card using the Mini Echoes template from Crafter's Workshop. I coloured some texture paste with acrylic paint, before spreading it over the template onto black card. Once it was dry, I added a deeper colour to create some shadows. I stamped the main image onto a die cut, which I have actually used upside down because it fits the design perfectly this way! I have coloured the image with pencils. I have added a sentiment from the Mackintosh sentiments clear stamp set.


Like me, I am sure that you are enjoying these gorgeous new stamps, and the fabulous artwork that my Team mates have been showing you. Thanks for stopping by, Judith xx

Tuesday 11 February 2014

Pink and Black Stained Glass (by Shirley)

Hello everyone, I hope you are doing well.

I have a design today from the new Mackintosh Windows A5 set.  I've had a lot of fun working with these new beautiful designs.


The background was created using Seedless Preserves Distress Ink with an Acrylic Block.   I embossed all the images with black, cut them out and coloured with Distress Inks (on my craft mat with water and brush).   I added little strips of black card stock to the background before attaching the window images.

Thanks for visiting and have a great day,
Shirley

Monday 10 February 2014

Mackintosh Flower Panels (by Debbie)

For my card today I used one of the panels from this months Mackintosh Windows stamps.
This is a 6 by 6 card and was an easy, quick card to make. I started by stamping onto white card with Versafine then heat embossed with clear powder. The flower heads were coloured red with Alcohol pens, trimmed and mounted onto black. I didn't think that ribbon added the effect I wanted to the base card so I cut strips of black card and cut a few squares to add to the corner. I didn't add a sentiment as I thought I could give it to my hubby for Valentine's Day or his birthday. Many thanks for visiting, Debbie

Sunday 9 February 2014

Foiled Rose Panel (posted by Judith)

Hi Folks, I have created a card for you with the Mackintosh Windows stamp set using some metal foil to create a focal panel. I stamped the image with Stazon Ink, and drew over the lines with an embossing tool. I rubbed black acrylic paint onto the panel, and then wiped the excess off, leaving black paint in the crevices. I added some coloured metallic wax to the leaves and flowers.

I stamped some matching roses onto a piece of background from my stash, that I had made ages ago. I simply added a piece of ribbon and a sentiment from the Mackintosh Sentiments stamp set to finish.


Thanks for stopping by, Judith xx

Saturday 8 February 2014

Mackintosh Bride (posted by Claire)

Good morning, aren't this months new stamps stunning? This is my first sample using them and I both Mackintosh Beauty and Mackintosh Windows to make this card (you can find them here)


The image is stamped with Memento Tuxedo black ink and coloured with Graph'It Markers, I've added a little stickles to the centre of the roses and some faux gems in the corners. I've distressed the edges and layered the image up on black card. I added the lovely rose heart from the Mackintosh Beauty set, again coloured with Graph'It Markers.


The background was made with distress inks, I used Spun Sugar, Evergreen bough and a little Iced Spruce. I used tiny amounts of ink on my blending mat and spritzed with lots of water to get a very muted background. Once this ink was dry I overstamped with some of the Mackintosh Windows, stamping very lightly to give a hint of the design here and there. I've gone to town with lots of lace, ribbon, some rolled ribbon roses and some pretty bead string from my stash.


I decorated the inside to match, but kept to a very subtle colour palette, I made this before the new sentiments were released so I may have to make another, I really enjoyed making this card as these stamps are so pretty. I even decorated a box to match

Thanks for visiting today
Clairexx

Friday 7 February 2014

Mackintosh ladies.......by Miranda


Hello crafty people,

Today I have two cards showing the "Mackintosh ladies' in all their beauty.  The first one is made on a distress ink background  using some salt. I've embossed the panel and roses with Wow Black glint en coloured with water based markers.Added some gemstones..... The sentiment is from the 'Amazing birthday'sheet.


The 2nd one is my favorite and I was inspired by one of the artworks of the wife of Rennie Mackintosh which was an artist too. I will show that too so you can see my source of inspiration......

original artwork of Margaret  Macdonald Mackintosh

Margaret Macdonald | Photos, Facebook, Twitter & Linkedin for Free at Social Register

I have masked the lady( Mackintosh beauty sheet) and stamped two of the panels(Mackintosh windows) on each side and extended the lines so she had a nice matching background. I've stamped on Basic Grey paper and coloured with colour pencils. I've layered her on a gold metallic embossed background and I've stamped the roses on the card behind with Versamark and added metallics Pan Pastel.  I've embossed the die cut flower too and added also some Pan Pastel.


If you want to see another two of my 'Mackintosh' creations, please take a look on my blog
It was fun playing with this beauty! Hope I have inspired you too,
thanks for visiting and till next time!


Thursday 6 February 2014

Beautiful Bride - Mackintosh Style (by Shirley)

Hello everyone, I hope you are doing well. 
 
I have a design to show today featuring the beautiful lady from fabulous new  Mackintosh Beauty.  It was fun to play with some of my dies.


I stamped the beautiful lady on mauve designer paper with a faint pattern and added some colour using Prisma Pencils.   After die cutting the flowers from white card stock,  I stamped them with a fragment from Textured Fragments and rubbed a little Tea Dye & Seedless Preserves Distress Ink over the flower after it was glued together.  I also used a metallic luster on the Flourish and added little half pearls.

Diecuts:  Heartfelt Creations Vintage Floret (flower) & Bella Rose (flourish), Spellbinder Elegant Labels 4 & Labels 4.
  
My talented teammates have beautiful designs to show so I hope you can come back here often.
Thanks for visiting and have a great day,
Shirley

Wednesday 5 February 2014

Birthday Bouquet (posted by Judith)

Hi Folks, I have a Birthday card to show you today, using the lovely new Mackintosh Windows/Mackintosh Beauty Multibuy stamp set. I have created a wrinkle free distress background, and stamped the rose spray from each set onto the background to create a frame for the main image. I have coloured these images with Distress markers. I stamped the main image onto a large die cut and also coloured this with markers before matting it onto black card. I have added a sentiment from the Mackintosh Sentiments stamp set.

Thanks for stopping by, Judith xx

Tuesday 4 February 2014

January Blog Comments Winner


Everyone here at the Design Team appreciates your kind comments.  It makes us happy to know that you enjoy our designs.

Each comment in January was assigned a number and we used Random Org to draw a winner :) 

Congratulations to Dawn Louise you have won a £20.00 voucher to spend on Chocolate Baroque stamps!    Please send a quick email here to confirm your email address and Glenda will send you your gift certificate.

More good news..... Glenda is giving away another £20.00 voucher this month!    One lucky commenter will be drawn again from February's comments.

Good luck from the Design Team!

Monday 3 February 2014

Mackintosh style by Miranda


Hello there,

Today my take on the new lovely Mackintosh style stamps. Aren't they beautiful?
I like the Art Nouveau style very much so these stamps appeal to my imagination. I've made two cards in the same colour combination, different shades of blues and silver.


The first one is a concertina fold card with a lot of space to decorate...... I've embossed the panel with Wow blue lagoon embossingpowder and coloured with water based markers and added some silver ink. I've made a collage of some sentiments of the 'Amazing Birthday' sheet and stamped, coloured and decoupaged the flower from the same stamp. I've used the 'Mackintosh Beauty'sheet.


Than on to the 2nd one.......created with almost the same colour combination only this time I've made a background using Distress inks and a mask. I've added texture with the Viva decor Inca Gold,using the colours silver and turkoois. The bow is a Dynamics die and the sentiment is from the 'Amazing Birthday' sheet. This time embossed with silver and  using the same water based markers.


a close-up of the texture......


Well, stay tuned and watch for more beautiful art work made by the talented ladies of this team!

Thanks for visiting and hope to 'see' you next time,


Sunday 2 February 2014

Purple Mackintosh Panel Card (by Debbie)

Good morning. I hope the damp weather isn't affecting the crafty mojo. I tend to think it helps me concentrate more as there is less to do outside and I don't feel guilty.
I don't usually start with coloured card but love this purple and stamped the roses from the set with Versafine Black Ink and added gold Stickles to the centres. The centre flower panel is stamped with black ink and heat embossed with clear powder. I coloured only the flower with Alcohol pens as I wanted the flower to stand out. The panel was matted onto purple and black and fixed to the card with foam pads. Thanks for visiting and pop by again as the DT have lots more inspirational cards. Debbie

Saturday 1 February 2014

Mackintosh Hearts (by Shirley)

Happy Weekend everyone, I hope you are doing well.

I know I say it all the time, but the new stamp sets are gorgeous.  I have two heart designs today using stamps from Mackintosh Beauty


The background for the above card was created using Ripe Persimmon, Picked Raspberry and Seedless Preserves Distress Inks with an Acrylic Block.   I stamped a couple of the roses from Mackintosh Windows with the same inks.  The main heart was stamped with Cobalt Archival ink and coloured with my Prisma pencils.  'With Love' is from the new Mackintosh Sentiments.

I used a Gelli Plate print for the background below:


I used black Archival ink for all the stamping and again coloured with my Prisma Pencils.   I cut the rose out and also cut around it on black cardstock to make it pop out from the background. 'With love' is again from Mackintosh Sentiments.

I hope you can come back here often as my teammates have beautiful designs to show using the new stamp sets.

Thanks for visiting and have a great day,
Shirley