Pin It button on image hover
Showing posts with label Pretty Poppies. Show all posts

Saturday, 27 November 2021

Pretty Grunge! by Sandra


Hello I'm sharing some cards from the October show on The Craft Store.
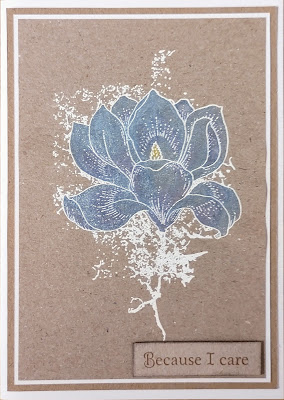
These feature Floral Grunge, a stamp that is great for different colouring techniques.

For my first card I stamped the flower onto Kraft paper and embossed in white powder. I coloured the flower using the Shimmer paints that Lesley had recently. This colour is an iridescent purple/blue....gorgeous! I added a sentiment from Pretty Poppies.

For my next card I stamped onto smooth cardstock with Memento ink and used my alcohol markers to colour. I added a layer of leafy paper to a 8x8 card, put a narrow band of card across the centre with a  sentiment from Pretty Poppies and then added my flower, raised on foam pads.

Thanks for looking

Sandra x

http://isthatthetime.blogspot.com/

Wednesday, 28 April 2021

Inspirational Heart (by Carole)

My third and final project for this session is my Inspirational Heart.

I like making these and tend to use them as decorations as well as coaters. They are larger than normal coasters and I am in less danger of missing it when I put my cup down, if I'm not concentrating.


Products used:- 15cm heart. Mine is wood but you could use other mediums.

Black acrylic paint

Versamark inkpad

Anti static bag

Pearl powder - silver

Pearl paints

Silver embossing powder

Stamps:- Artistic Affirmations- lots of inspirational sayings on this set, lovely and bold 

Pretty Poppies - flowers

Autumn Poppy - leaves

The heart was painted and left to dry thoroughly.

I then wiped it over with the anti static bag. This is important, I think, with the metallic embossing powders in particular.

Stamp the saying first with Versamark and silver emboss so you can position it where you would like on the heart.

Position the flowers and heat emboss with silver.

The leaves were done differently, to give a softer look, although they could be silver embossed like the rest.

I stamped with Versamark and then used pigment, silver powder, to brush lightly over.

The inkpad was wiped around the edge and embossed to finish off.

The flowers were coloured with pearl paints.

If I have used the pearl powder I would normally give it a light spray with a matt sealer as the powders will lift or smudge if touched.

When making it into a coaster I would normally seal with a matt varnish.

Well that's my contribution to the GDT slot for a while.

Hope you have enjoyed my projects and I look forward to seeing other lovely samples from the DT.

 On my blog cchotchpotch.blogspot.com I have posted a few other hearts I have made. Some as coasters and others as gifts.

They became a bit of an obsession with me especially as there are some lovely inspirational sayings in the Chocolate Baroque collection.

Hope you have a good day.

Happy crafting.

Carole.


Tuesday, 11 August 2020

More feathers and flowers(by Miranda)


Hello there,

I am back again with more feathers and flowers.......almost the same stamps as in my previous post but a totally different use of colors and a white,YES....... white background.......did not do much with that.....it was difficult, I admit it LOL....

I used another stamp from the Artist Baubles and I have a lot more of them to play with, really love that set! There are 6 beautiful baubles on the sheet and some design elements.

Used stamps:


I have embossed the feathers with silver embossing powder and used a lovely cabochon to ' hold' them together. 
 I stamped the bauble using Archival Shadow grey. Than I colored the image with Derwent Colorsoft. 
The feathers were colored using Tombo markers. I used the lovely sentiment from the pretty poppies sheet. 

Only added a thin black line and some dots using a black fineliner.


Next time I will be back with something totally different with lots of butterflies........
Thanks for your visit and always like to read your comments.


Sunday, 10 November 2019

Remembrance Day (by Magda)

Hello everybody,

I am just on time to share with you my contribution of this year for the "Remembrance Day".

For this journaling page I used :
White gesso, Acrylic Paint, Distress Ink Pad, Stencils, Aquarelle Pencils,  Pretty Poppies stamp.
It is interesting to see the difference between the two backgrounds. On the left I used acrylic,
on the right Distress Ink Pad.


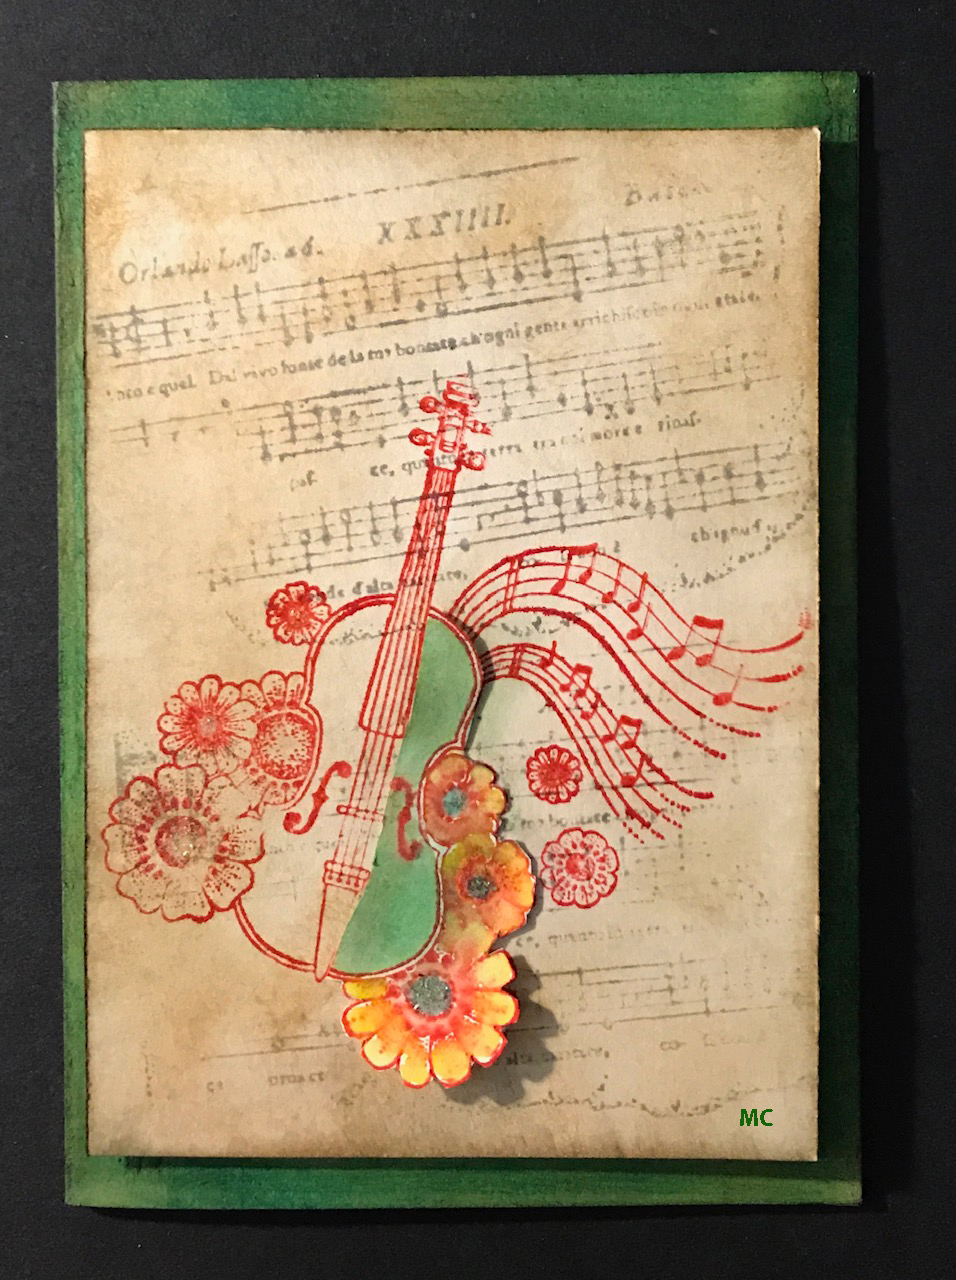
Do you know someone who likes to play guitar ?  

Here a quick idea for a birthday card using two stamps of the set "Music Fanfare" and  Distress Ink Pad for colouring the background, stamping the images and colouring  the decoupage of  half guitar and flowers, I glued on top of the main stamp.


I hope you liked the two projects for today.  Hugs
Magda 


Sunday, 29 September 2019

Colourful village


Morning Peeps, Brenda here again and this time I do have the right cards as the lovely Lesley very kindly took photos of my work (some will remember in my last post I explained I forgot to take photos before posting off my samples.......naughty corner for me), so a big thank you Lesley.

The card at the top uses all four of the new houses which you can find on the multi buy here, all were stamped in versafine black and masked so I could add the background, a Pan Pastel sky and some worker stamps around the houses. I coloured them with Koh-i-nor paints


I kept Kim Moody's Poppy Cottage fairly simple as I wanted to use red to reflect it's name stamping in Versafine Clair, adding just a little colour, matter and layered and some Poppies from Pretty Poppies which I coloured with pencils.


Here we have Bridge House which I stamped first onto acetate to get a reverse print and laid my card onto that, then stamping a second time to extend the house, coloured in with Koh-i-nor paints again as well as some Distress Markers and some foliage stamped in the foreground.


Both of these were stamped with Versafine Clair inks, some colouring added with pencils and stencilling in the background.


Poppy Cottage again, this time with a background stamped with Versafine Clair and Poppies again from the Pretty Poppies set. I added some colour to the doors of the house and inked around with DI's along with a sentiment from the same set.


Bridge House again, this time coloured in with Distress Inks and Markers, a tree created with stamps from Orchard Design a Tree along with more leaves from Take it or Leaf it set.

As always, many thanks for your visit today.

Monday, 29 July 2019

Two Floral Projects (by Sandra)

Hello everyone, I am sharing two pieces for my second blog post with you today.


My first is a card made with the Pretty Poppies stamp set.
I started with a 6" x 6" piece of cream card and stamped the gorgeous poppies twice with Archival Ink, varying the height a little. I then coloured them with pencils and added a blending solution to soften the edges. I blended Tea Dye Distress Ink around the edges of the card and used the same colour with the crackle stamp from Echoes of Italy stamp set to give an aged feel to the card. I added the sentiment and mat and layered with blue and black card onto an 8" x 8" cream card.

My second is a mixed media piece.
I started with an 8" x 8" canvas board and brayered blue, green and beige acrylic paints randomly onto it. I then stamped the tall cog flowers from Punky Flowers onto the canvas and embossed with copper embossing powder. I stamped the flower heads from the same set with Memento Ink onto some smooth card and coloured with alcohol pens. I fussy cut these out and then added more embossing powders to give a verdigris look. I added two little birds, the birdhouse and sentiment from Steampunk Birds stamp set. I finished with a few metal cogs. I think this one will be decorating my craft room!

Thanks for looking,

Sandra.

Monday, 14 January 2019

Still one of my favorites (by Miranda)

Hello everyone, today sees the turn of our Guest Design Team member Miranda Degenaars to inspire you with her beautiful project. Miranda has used some of her favourite stamps sets to create her card, and the stunning colour combination will definitely brighten up your day.

Hello there,

I am happy to be here again and do some guest posts. CB will always have a place in my heart.
I have played with two of my favorite Cb sheets, 'Dusky Damask' and 'Pretty Poppies'. I have worked a lot with these sheets and I never get bored using them. They are simply beautiful and so versatile to use.

I have made a background using Distress inks, resist embossing using clear embossing powder and plain stamping using Distress inks.

The focal image has been colored with Distress inks and colored pencils. Also some stronger accents with a white acrylic marker. One of the must-haves!
 The edge is embossed using snowflake embossing powder.

And ooh I forgot to mention my 3rd favorite sheet ' Artistic Expressions'.......can't do without that one together with the Artistic Affirmations!


If you have any questions, please feel free to ask! 
Thanks for your visit and hope to see you again next week with my 2nd guest post,


Monday, 10 September 2018

Pink Poppies (by Monica)

Hello everyone, we have a brand new Guest Design Team member for you this month! We would like to introduce Monica Edwards, all the way from Florida, USA. Monica will be creating three projects for us this month, and she has written a short introduction so that you can get to know her a little better:

My name is Monica and I am mother of two kids. I live in sunny Florida where the weather is usually warm and a bit too warm for me. I have been crafting over 15 years and love inspiring others to create. I am honored for this opportunity here and hope I represent well.


Stamp image onto watercolour paper using Versafine black ink. Once done colour with watercolour using your detailer watercolour brush pen.

When complete adhere to the front of your card. Now stamp the sentiment using your Versafine ink to complete the look.


Pretty Poppies
62 x 42 Acrylic Block
Versafine Ink- Black
Watercolour brush pen- Detailer
A4 Drawing Cartridge 220 gsm

Monica will be back next week with another project to inspire you.

Friday, 7 September 2018

Butterfly Frame (by Carole)

Hello everyone, we are joined today by our regular Guest Design Team member Carole Cann. Carole will be creating three projects for us this month to inspire you, and her first project is a fabulous piece of home decor; a pretty picture to give to a friend, but that you may want to keep for yourself!

Carole writes:

Good morning  everyone. I am delighted to be showing you my first project as Guest Designer for September.

I have used the small butterfly from Butterfly Poppy Collage, a stamp from Poppy Meadow and the words from Pretty Poppies. The ivy at the top is from the Tall Trees set.
Permanent inkpad
Watercolour pencils
Glossy Accents
Chalk finish inkpads
15cm wooden frame
25cm square frame I had in my stash

I have started with a 15cm wooden frame which has an 8.5 cm heart aperture in the centre.
When I make a project like this, I always try it out on paper first. This enables me to make mistakes in the positioning and layout, which I can correct before stamping onto the real frame.
I did work out beforehand that the butterflies would stamp evenly around this size aperture.
Of course, it does not need to be an aperture, you could make a 15cm card with a heart die cut in the centre, and the butterflies surrounding it.
When I stamped the butterflies, I started with the top three and then stamped one side, trying to space them as evenly as possible. I then 'mirrored' the butterflies on the other side.
Make sure they are completely dry before colouring them in.
I covered each butterfly with Glossy Accents and left them to dry thoroughly.
Then I wiped over the background with the chalk green inkpad.
The background in the larger frame is stamped with another of the Poppy Meadow stamps and the ivy.
For the centre, I used the frame as the template and drew lightly around the aperture with a pencil onto a square of green card.This helped me to position the words and flowers correctly. Rub out the pencil line, stick to the back of the frame and attach to the background.
Further details can be found on my blog.

Thank you for visiting and I look forward to showing you my second project next week.
Happy crafting,
Carole.

Thank you for a delightful project Carole, and for the advice about practising on paper first. We often recommend that you try your ideas out on a cheap piece of paper first, as it takes away the pressure of wasting your more expensive card and other materials. Top Tip Carole!

Friday, 10 August 2018

Beautiful Blue Poppies (by Doreen)

Hello everyone, this month sees the return of Guest Design Team member Doreen Sympson to the Design Team blog. Doreen will be inspiring us with three blog posts this month, and her first project is a colourful design incorporating the fascinating art of acrylic pouring.

Products used:

Pretty Poppies stamp set
Acrylic paints
DecoArt Pouring Medium
Canvas board
Black inkpad
Alcohol pens to colour

Simple if a little time consuming, regarding drying time needed after pour.
Mix the acrylic paints of your choice with the pouring medium, pour directly onto canvas board and leave to dry.
Stamp onto dried pour, and on reflection, I would heat emboss if only to make the line work more visible in a photo.
Colour to complement the colours used in your pour.


Thank you for looking,

Love Doreen.

Thursday, 29 March 2018

A trio of cards (by Annelies Karduks)


As you may be aware I am very privileged to represent Crealies from the Netherlands on Hochanda and this month Annelie Karduks (the owner of Crealies) has kindly done some step by step cards using Chocolate Barqoue stamps and Crealies dies.  I hope you like the combination, so please sit back and enjoy this guest post.


Materials need for all three cards:


Crealies dies for all cards
Crea-Nest-Lies XXL no. 56
Crea-Nest-Lies XXL no. 72
Crea-Nest-Lies XXL no. 24
Crea-Nest-Lies XXL no. 36
Set of 3 no. 48 Flowers 20

Other supplies needed:
Red sticky tape 3 mm
Crealies white velvet cardstock
Crealies black linen cardstock
Magic anti static bag
Versamark ink
Black embossing powder
Heatgun
Chocolate Baroque Masking Tissue
Distress Oxide ink Wilted Violet and Picked Raspberry or
Ditress Oxide ink Candied Apple and Spiced Marmelade
Round blending tool and foam
Crealies Make a sticker out of your die cutted shape
Foam squares
Nuvo drops black

Gefeliciteerd (red and orange):
Chocolate Baroque stamp set UA5SP0423 Poppy Meadow
Set of 3 no. 35 Flowers 17
Dutch text die no. 01


Gefeliciteerd (purple and pink):
Chocolate Baroque stamp set UA5SP0532 Floral Notes
Set of 3 no. 26 Flowers 16
Dutch text die no. 01

Proficiat:
Chocolate Baroque stamp set UA5SP0395 Pretty Poppies
Set of 3 no. 47 Flowers 19
Dutch text die no. 32


Instructions:

  • Die cut a shape with the largest die of Crea-Nest-Lies XXL no 56 and no. 72 out of white and black cardstock. Make a hinge card by scoring the white shape 1,5 cm from the left side. Put sticky tape on the small part and tape it to the frontcard.
  • Die cut the second largest die of Crea-Nest-Lies XXL 24. Use the magic anti static bag and stamp the image with versamark ink onto the die cutted shape. Use black embossing powder to cover the image. Remove the excess of the powder and use the heatgun. Cover the die cutted shape with two bands of masking tissue. Use 2 colors of Distress Oxide ink with the blending tool and foam. Remove the masking tissue. Tape the rectangle to the front of the card.
  •  Download the drawing for the XXL Frames in cm from the website www.crealies.nl click on Downloads 2, find Downloads for Crea-Nest-Lies XXL Frames. Print this drawing on 100%. Optional: Cover the drawing with self adhesive transparent book cover foil for reuse (it needs to be a completely smooth surface. Cut the drawing on the dotted line.
  • Take the 12 cm die and the 14 cm die out of the Crea-Nest-Lies XXL no. 36 and put them up side down. Put 1 cm of red sticky tape on two side of the dies. Tape the dies on the right spot on the drawing. Die cut the frame. Use foam squares and tape the frame on top of the card.
  • Die cut the flowers. Use the same colors of ink for the flowers. Use very thin foam squares to make the flowers and tape them on the card.
  • Cut a piece of sticker sheet you need for the text. Remove the white protective paper of the sticker sheet. Put the cardstock on top of it. Die cut with the text die. Color the text with ink. Remove the other protective paper and you have made yourself a sticker. Tape it on the card.
I think these are just fantastic cards for so many occasions and once you have the concet you can adapt them to suit many stamps from our range.  Thank you Annelies for making these lovely projects and for writing up all the instructions, we hope you will design for us again in the future.

Don't forget you can see much more from our regular design ladies, so please drop in again tomorrow for a completely new project.