Pin It button on image hover

Tuesday 30 December 2014

Octopus hugs (posted by Claire)

Good morning, I hope you're all enjoying the Christmas break (and grabbing lots of bargains in the Chocolate Baroque sale!!). It's Claire here with a card made using the fun new stamps Steampunk Funky Fish and  Steampunk Sea World. I've made a theatre style card by taking two rectangular pieces of card, scoring at 2cm and 4cm in from either end. When you join the two end sections it gives a really fun card that still folds flat to post.


To decorate the card I cur a circular aperture in the front section and used a stencil and texture paste to create the brick effect. Once the paste was dry I added some colour with distress inks in Tea Dye and Vintage Photo.

On the back section of the card I stamped the steampunk bubble machine three times and embossed with gold embossing powder and added some colour with markers before inking around the images with Tumbled Glass distress ink.

The octopus was stamped with memento tuxedo black ink and coloured with Graph'It markers. I cut the octopus out and mounted it on some acetate. I folded a flap over at the top of the acetate and stuck it to the back of the card. I love this technique, I first saw Glenda demonstrate it years ago and it's great for giving your image some movement. Here's pic to (hopefully) show the acetate strip.


Thanks for visiting today
Claire xx

Monday 29 December 2014

Steampunk Funky Fish/Steampunk Sea World By Florence

Hi everyone

I hope you have all had a wonderful Christmas.

Today I would like to share some cards made using some of the fabulous little creatures from the Steampunk Funky Fish and Steampunk and Sea World Stamp sets

These stamp sets are so addictive and such great images to craft with.  The more I use them the more I love them.


The stamps really work in lots of styles whether you want a more simple style of project or whether you want to get inky and create an imaginary underwater scene.


The images also work so well with other Chocolate Baroque Rubber Stamps so you can mix and match the stamps to create your own unique little master pieces.


I made all of these cards in the same way.
If you are new to stamping these cards may look complicated but they are not when you know the order of layers of the colors and stamping.

First stamp your main images that you wish to appear at the forefront of your project ie., the sea monster or the jelly fish.
Mask the images with either a paper or a liquid mask.
  Leave the mask on until the near the end.
Using some Cut-n-Dry foam, colour the whole piece of card (over the masked image) with Distress Inks of the colors of your choice.  Start with a lighter color and then build your colors up.
Take a stencil or mask and place it over the piece.
 Take a darker or a complimentary colored Distress Ink and sponge (over the mask) in areas of your choosing and leave to dry.
Now you can start stamping other images ie., the cogs or background patterns.
If you wish to multi-stamp ie., stamp the same images over the top of each other then it is best to start stamping with a lighter coloured ink first and then use a darker ink to stamp over the top. This helps to create a little bit of depth.  Please see the top of the first card above as an example.
When you have added all of the color and all of the additional stamping you can then take the masks off and color your images and add the highlights.

Tip: Optional -  I fix my ink with a spray fixative and then I add a coat of Mod Podge before I add the high lights. The Mod Podge makes the colors more vibrant.  It also stops the colored ink from contaminating your high lights.

Please feel free to case any of the projects on this post if you wish to.

Thank you for looking.

Wishing you all Health and Happiness for 2015
Florence x


Sunday 28 December 2014

Goldfish Bowl (by Debbie)

 
Hi, it's my intention that today I'll be able to have time to myself to ink up a
couple of new stamps and have some fun. I hope everyone has had a good Christmas.
 
I made this card for my husband whose birthday isn't until August but he loves his fish tank
and spends lots of time looking after the fish in it.
The fish were stamped onto card that had been coloured with spray inks then cut out and decoupaged.
The background is also coloured with sprays and stamped onto then I used pencils to colour the seaweed. For the shape I used dinner plates of two sizes. The cogs on the frame are from
 Steampunk Christmas heat embossed with  silver powder and distressed with black soot ink.


My second is a tag that's gone into a tag book which I've been adding to during this year, a few of my favourite Chocolate Baroque stamps.
 The tag is painted with two blues and white blending from the white to the darker blue.
I used bubble wrap to make the white dots on the tag.
 The Octopus is sitting on a shell from Underwater stamps.
I stamped the shell and the jelly fish from Steampunk Funky Fish onto white card
and coloured with alcohol pens.
I will post the other pages from my tag book on my blog over the next few days.


Thanks for visiting
 
Debbie

Saturday 27 December 2014

A Door Plaque

Hello to you all I do hope you have had a nice Christmas.

 I am  sharing a Door Plaque today, made from the new stamps that have  been released for December

I started by making my background using acrylic paints and a circle stencil. I then stamped the bottom image and coloured with distress inks, the fish was stamped onto scrap paper coloured with some silver paint and fussy cut . The cogs were die cut and covered with brown and silver acrylic paint .


Friday 26 December 2014

Time to Say "Thank You" (by Asha)

Happy Boxing Day / St Stephens Day, my friends! I trust everyone had a wonderful Christmas day with good food, good company and lots of presents. And now it's time to say "Thank You" for those gift vouchers, perfumes, hats, socks, pyjamas, scented candles and ugly sweaters!

My "thank you"s come in the shape of little 3.5" square notes cards. These cards are the perfect size for those little stamps on most Chocolate Baroque stamp sheets which are often overlooked or dismissed to the background on a standard sized card. It's time for these little guys to take centre stage.

I try to keep my thank you notes simple, quick to make and fast to reproduce. But I also make sure there are some that look more elaborate which I save for a few very special people.

The sentiments used in these projects come from the Pretty Poppies A5 sheet, as they are just the right size for note cards ... and, believe it or not (and to my horror!), I don't have any gratitude themed stamps by Chocolate Baroque!

The first card features the little robin from the Snowy Scenes A5 sheet. I heat embossed the snowflakes in WOW Silver and the "thanks" in WOW Bright White. The image is quickly coloured with alcohol markers (no fancy blending) and fussy cut  - an activity I find very therapeutic!


This card features the little baubles from Hearth and Home - which I am using for the first time. Like I said, these little stamps are often forgotten. Here they are heat embossed in WOW Gold Pearl and given a little colour with watercolour pencils. I also embossed the greeting in WOW Bright White. The corners are rounded and together with the oversized die-cuts, the card is taking on a different shape, which I thought was fun.


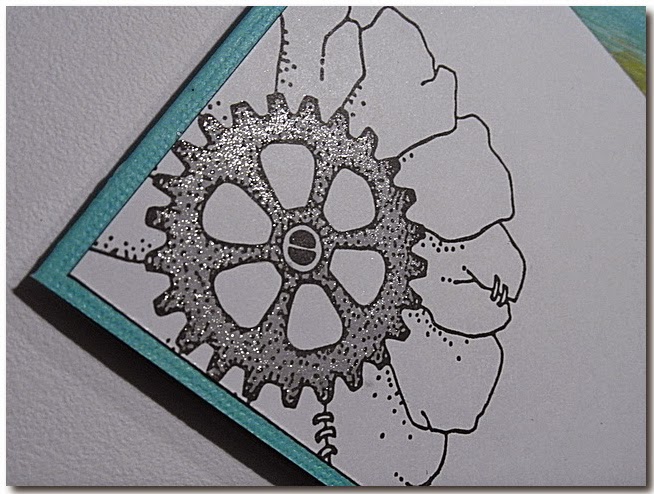
My last sample is the easiest of the lot and you can churn these out in no time. I blended Distress Inks for the background and stamped the little tree from the Pears and Baubles A4 sheet. I made little dots with a Versamarker pen and did some heat embossing in WOW White Pearl for the falling snow. And for a pop of colour, I made 2 slits at the tree trunk, threaded some red ribbon through it and tied a knot. Voila!


So there you have it - my thank you cards for this year. With three different styles and colours,  I hope you'll take away some ideas from here to make yours. You'll find details of how I made these cards on my blog. Remember, you don't have to make them fussy, fancy or elaborate. It's the thought that counts and a simple gesture can mean so much.

Continue with the fun and merriment, friends and I'll see you again soon with some new stamps! In the meantime, drop by the DT blog often because the girls are having such fun with the December release stamps ... oh so gorgeous!

Happy Holidays and here's to a Fun and Prosperous 2015 to all!

Beijinhos,
Asha

Thursday 25 December 2014

Merry Christmas!

On this very special day of the year we just wanted to say a huge thank you for supporting us in everything we do. Visiting this blog and leaving such wonderful comments inspires us all to keep creating. 

You have welcomed our new Challenge Blog with open arms and fabulous submissions. I think we may have pushed some of you out of your comfort zone, but that it good too. We all need to grow and learn and I think we are managing to do that together. Next year we have lots of exciting things planned and I hope you will continue along the journey with us. 

So all that leaves me to say is I hope that wherever you are you can take time to enjoy the festivities and are recharging your batteries ready for the New Year ahead.

A very Merry Christmas from

Glenda, Lesley and Adrian

Wednesday 24 December 2014

Steampunk CAS Style (by Shirley)

Seasons Greetings, I hope you are enjoying a wonderful festive season.

I have a quick make to show today featuring the fabulous fantasy ship from the new Steampunk Sea World set.


I created a mask using a large cog die.    I blended Lavender Distress Ink and then using the TCW Cog stencil I blended Salty Ocean Distress ink over top.  The ship was stamped with Cobalt Archival ink, coloured with pencils and highlighted with a white pen.    Just a note is from Mackintosh Sentiments.


Wishing you a happy and creative 2015!
Shirleyx

Tuesday 23 December 2014

Set Sail (posted by Judith)

Hello everyone, this is my final marine themed post for this month. I have really enjoyed working with these stamps, and have lots more ideas for them.

My project this time around uses the large ship image, which I wanted to portray sailing through a forest at the bottom of the ocean. I stamped the images and then embossed some cogs from the Punky Flowers stamp sheet. I coloured the background using Distress Inks, and then stamped a cog fragment from the Steampunk Butterfly stamp set over the top.

I coloured the images with Inktense pencils and added some fronds at the bottom of the page using the legs from the octopus taken from the stamp of the month set. Finally, I added a sentiment taken from the Steampunkery stamp set.

 Thanks for stopping by, Judith xx

Monday 22 December 2014

Blog Winners (by Glenda)

Just a quick note from me to announce the three lucky winners from my recent blog post about our new cling mounted stamps.

The winners are:
I really like the new website Glenda. I too am hoping for some monetary gifts to spend after Christmas. I love the new stamps they really are special. hope you and Adrian have a good Christmas and new Year.

Great new user friendly website! Love the card with the water colour panel. I own just one set of your stamps, its a Christmas set which I kinda used a lot lately! Guess I could do with a new set for the New Year, hopefully my hubby will get the hints I've been dropping! Merry Christmas.

The new website is beautiful. Very easy to find things. I'm so in love with the new cling mounted stamps, especially the zentangle. Awesome job. Congratulations!

Congratulations to you all - we will be sending you a little mystery prize out in the New Year, so you need to make sure we have all your contact details.  Just click here to send us an email to let us know or confirm your full address - thanks.

And thanks to everyone who left us such lovely comments on the new website, we all appreciate it so much.

Have a great Christmas everyone!


In the dark deep sea......and some CAS cards....by Miranda


Hi there,

Today my last creations of this batch made with the Steampunk sheets.  And again I've used both sheets, Steampunk Funk fish and Steampunk Sea world. In the right bottom corner you can see a fragment of the Seaside dreams. The sentiment is also from that sheet.
I've used one of my many already finished backgrounds waiting to be stamped on.......This is a very dark one, made with fluid inks( like Ecoline) and some silver spatters.......you can see that in the close-up. I've stamped the images with Versafine black and coloured them with my pencils. I did take photos in the evening with artificial light because you can better see the lovely shimmer in the background but also of the metallic Pan Pastels on black and the gold embossing of the gears.


Than I've embossed some black card using an embossing folder with a gear pattern. First I pressed the embossed pieces into my Versamark pad and than I' ve added several Metallic Pan Pastels over it.   And also some hints of blue and purple Pan Pastel to reflect the colors of the background and the card. I also die cut some gears and did some triple embossing with clear and gold embossing powder. I had a tiny left over piece of the embossed paper and used it to create a small card. I've embossed the gear with several embossing powders. And the sentiment is from the Mackintosh sentiments.


Of course it's also possible to create a simple but effective card with these stamps. So onto the clean and simple style now.............I always admire cards with a lot of white space but somehow I can't often manage to left some white space LOL so that's a challenge for me.
I will show you some possibilities........

These cards are made using the colors of the 6th colourchallenge. You can see my other cards on the CB color challengeblog. These cards are very easy and quick to make, lots of white space(very difficult for me) but sometimes you need to create something different and I enjoyed it too!

I die cut a circle template and sponged with several Distress inks, spattered some waterdrops and after drying I stamped the seahorses with Versafine black and gave some accents with the Wink of Stella brush markers. Only added a lovely swirl from the Artistic Expressions. The text is from the Artistic affirmations. I layered the white card on a black one and voila finished!


the sparkly effect of the clear Wink of Stella marker.......


On the next card I used masking tape to create my working area. I only swiped some diagonal strokes with Distress paints and spattered with water. After drying I stamped the steampunk ship with Versafine black and again some accents with the Wink of Stella marker and a white belly pen. I've combined it with some steampunk flowers from ' Punky flowers'. The gears are coloured with the silver Wink of Stella marker.


The Wink of Stella markers have a beautiful sparkly shine which shows best in sunlight and halogen light. I use them often........ At both cards I used a black fineliner(005) to outline the coloured area.


Well hope to have inspired you with these simple and quick cards. Thanks for visiting and I always enjoy to read your comments. 
Wishing you all joyful days and till next time!


Sunday 21 December 2014

Sea creatures on Kraft paper! (posted by Maria)


Hello stamping lovers,

Between shopping, making cards and parcels, I have managed to make some more samples with my favourite Steampunk Sea World and Steampunk Funk Fish stamp sets.


I made the card, on kraft paper, or better on the reverse of a piece of scrapbook paper, it is the same as kraft paper but I liked the colour better. I stamped my sea creatures and the lamps and bubbles from the Punky flowers stamp sheet with Versafine ink, waited till the ink was dry and then used pencils with a lot of pigments to colour these images. I took a white gelly pen for the white accents. Afterwards I took my Wink of Stella golden glitter marker and coloured all over the pencil colours to give everything a golden shine. I took a stamp from the Texture fragments stamp set, and with Versamark and white embossing powder, I created the bubbles background at the borders.
With some embossing enamel powder- shabby white I made the white accents in the background.
For my second project, I made a milk carton that I had seen on other blogs which I thought was such a beautiful package, that I looked at You-tube and found how to make it. I first coloured the card stock as before and then made this package, wouldn't it make a gorgeous present?

I really hope you enjoyed your weekend, and hope you still have the time to make some cards and boxes as Christmas presents, have a lot of fun, and a joyful, happy Christmas to all of you!

Greetings
Maria

Saturday 20 December 2014

Introducing our new Cling Mounted stamps (by Glenda)

Hello everyone, it's been ages since I was last here!

As you may well know, I've been extremely busy lately putting all my energy into building a new website for Chocolate Baroque.  We finally finished and launched it just this week and as well as a fresh new layout and better navigation, we launched a brand new collection of individual cling mounted stamps.  Our wonderful designer, Sue, has done it again - aren't these gorgeous!

http://www.chocolatebaroque.com/cling-mounted-singles.html

I managed to squeeze in a little stamping time recently, but with most of my creative energy going into decisions about fonts sizes and heading colours, my crafting had to be super simple.  To me, that's the beauty of this collection of stamps - you don't really need to do much with them to get a good looking card.


The green panel on this card is a piece of watercolour paper, coloured with Distress Stains over which I have embossed the image in black.  I cut carefully around the swirls and layered it onto white then black and onto a 7 inch square card, with the corner flourishes from the gorgeous Butterfly Dreams stamp set.

I also had a little play with Stampbord.  These pieces are all coloured with dye inks or distress stains or a mixture of both.  I stamped with black Archival ink on all of them.


It's been a long time since we did a giveaway on the blog, so I'm going to ask you to pop over to the new website and check it out - read the new website guide if you have time (there's a link on the home page) and let me know what you think.

I will pick three lucky winners on Monday (22nd Dec) to receive a mystery Chocolate Baroque stamp bundle.  Who knows, it could be your lucky day!

Have a great weekend everyone,


Friday 19 December 2014

Colourful Steampunk under the Sea (by Shirley)

Hello everyone,  I hope you are doing well.

I'm back with another Steampunk under water design using the fabulous Steampunk Sea World and Steampunk Funky Fish stamp sets.


I used Dylusions inks in the background including white.   I blended Distress ink over the Cog stencil by TCW and stamped the bubbles from the Decorative Edges set with Salty Ocean Distress Ink.

The rest of the images were stamped with Cobalt Archival ink, bleached out and painted with Dylusions inks.  I highlighted with several metallic and white Gellyroll pens.  The curly top designs at the bottom are from a stamp in the Punky Flower set.

Thanks for your visit and have a wonderful festive season.
Shirleyx

Thursday 18 December 2014

Rusty Steampunk Funky Fish (posted by Claire)

Good morning, Claire here with a quick card made using Steampunk Funky Fish. I'm really enjoying playing with this months new releases, they are such fun and quirky designs and a refreshing  change from Christmas crafting too. For this card I've tried to create a rusty effect using foil tape and alcohol inks.

I've used two of the stamps from Steampunk Funky Fish for this card. I began with a distress ink background (using Broken China, Tumbled Glass and Weathered Wood distress inks). I stencilled over the top with Mowed Lawn distress ink though a Crafters Workshop Cell Stencil. Next I used the same stencil and blotted with damp kitchen roll to remove some of the colour. I stamped some foliage (from Seadragon) with Mowed Lawn distress ink. I distressed the edges and matted the background on some copper mirri card.

I took some foil tape (from the plumbing supplies department of my local DIY store) that I'd attached to a scrap of white card and added some colour with alcohol inks in shades of blue and green. I stamped the fish and the seadragon with Versmark and embossed with copper embossing powder before cutting them out and popping them on my background with 3d foam pads.

Thanks for visiting today
Claire xx

Wednesday 17 December 2014

Steampunk Sea World - Quick Cards By Florence

Hi everyone

Today I would like to share with you two cards I made using the Ship stamp from the new Steampunk Sea World Set.

For these cards I have kept the design pretty simple.  Apart from cutting out the ship, which I have to say didn't take too long at all, these cards were put together in a matter of minutes.


.....and the same card in shades of green and tan.


To make these cards is really straight forward.
Stamp the sentiment along the edge of the base card.
Stamp the ship image onto a separate piece of white card and cut it out.
Color the ship and leave to one side for the moment.
Cut out a small frame and stamp on to it the Cogs pattern (second card).
Cut a piece of backing paper slightly larger than your frame.
Make up the card as seen using foam tabs to attach the small frame and the ship.

For these cards I used Archival Ink for Stamping and water color crayons for coloring the ship.
White Base card size 13.5 cm x 13.5 cm.

Thank you for looking
Happy Stamping

Florence


Tuesday 16 December 2014

Zentangle Seahorses and F is for Fish (by Debbie)


Good morning.
 I have been having great fun with these under the water themed stamps.
For my first card I started with a blank piece of card and stamped the seahorses then
drew the wavy lines around them with gel pens.
I zentangled with the gel and glitter pens filling in between the lines to resemble waves.
It took a few hours to fill the lines but was very therapeutic. When I stood back and looked at the card the Seahorses disappeared into the background so I drew around them with a charcoal pencil and smudged it.


For my next card I found in an old dictionary and took out the page with the words fish on.
I stamped with Black Versafine and clear embossing powder and coloured the fish with pencils, again thoroughly enjoying the time spent filling in the details.
I outlined the fish with the charcoal pencil so they stood out from the words.


Thank you for visiting
Debbie

Monday 15 December 2014

Seahorses

Hello to you all, I am  again sharing a sample made from the new stamps that have just been released for December 
I first made my background using acrylic paints, I then used a circle stencil and distress ink to make some bubbles.....My Seahorses were stamped, coloured with Gelato's and fussy cut,before gluing these to my tag I stamped some fish and glued down the diecut cogs. To finish off I inked all around the tag with Black Soot Distress ink and added the ribbon.

Sunday 14 December 2014

Little Gifts For Christmas (by Asha)

Good morning, everyone. We are now a fortnight away from Christmas. Ideally all your cards should be in the mail and it's time to look at finalising the gifts. I've got 3 projects to help you make those pressies extra special.

1. Gift Card Holder

Gift cards make perfect presents ... when you run out of ideas! It can be a special gift when housed in a beautiful box. And you can't beat the wow factor of heat embossing.
Red and Gold - always a striking combo. That magnificent tree is from the Turtle Doves A5 sheet, heat embossed in gold and matted on gold card stock. I also did some tone-on-tone stamping in the background with the little snowflake from the Snowy Scenes A5 sheet with Versamark.

This is a top opening box, revealing a pocket for the gift card in a slide-up mechanism. The sentiment is from the Christmas Magic clear stamp set, heat embossed in gold. I have link to a video tutorial for this project on my blog.


2. Gift bag

If you're super organised and have all your gifts ready for giving, how about making gift bags to house them. The WRMK Gift Bag Punch Board, available from the Chocolate Baroque store, makes light work of it. Here's one I prepared earlier:
I made the medium sized box and the main star is the jolly man from the Santa Baby A5 sheet. He is coloured with water-colour pencils, fussy cut and popped up with foam tape in front of heat embossed snowflakes from the Snowy Scenes A5 sheet.

Water colouring is easy and very forgiving - just what you need when in a hurry. Trust me, it really is that simple. Just lay down the colour as shown below and, using a fine brush, let the water do all the work. No fancy blending or shading. I have details of the colours used on my blog.


3. Gift Card and Treat Box

And when you want to spoil someone - go for the double whammy: Gift Card and a treat  - all in one box.
 I decorated the top of the box with the wreath from Hearth and Home A4 sheet, coloured with alcohol markers. Keeping it simple with just some ribbon.

The box opens revealing the gift card in a pop-up mechanism with room for a few golden nuggets! I've got details on how to make this box on my blog.

Three project ideas to help you with your festive preps: elegant, playful and extravagant - there's something for everyone. I hope these projects inspire you to play with your Chocolate Baroque Christmas stamps.

Thanks for stopping by. The rest of the Design Team are having fun with the gorgeous December release stamps, so please stop by regularly for more crafty ideas.

Beijinhos,
Asha

Saturday 13 December 2014

Along the Edge of the Sea Bed (posted by Judith)

Hello everyone, I have another watery sample to show you today, using the Steampunk Funk Fish and Steampunk Sea World stamp sets, currently on offer as Stamp of the Month sets.

I started my sample by stamping the seashell edge taken from the Seaside Dreams stamp set near the bottom of my background, but splitting it in half, and stamping a piece on either side of the page. I also created a mask of the image, and covered the original stamped image with the mask. I then stamped the octopus from the Steampunk Funk Fish stamp plate in between the two images, and masked that image as well. I stamped the seaweed edge slightly higher up the page in the middle, and then a piece on each side, to create a continuous run behind the first set of images, and masked these as well. I used some water based acrylic inks, which I diluted and blended to get the colours that I wanted, and then coloured the background, using a turquoise for the sea area, and an ochre colour for the sand. I added extra interest to the sea area by sponging Distress Ink through a stencil to create a bubble effect. I stamped several fish onto adhesive labels and coloured these with water colour pencils, and also stamped a few more directly onto the background. I chose to stamp the background fish with blue ink, so that they appeared to fade into the background slightly, toning the colours down on these fish as well. I removed the masks from the images on the sea bed, and coloured these with watercolour pencils, blending the colours with a waterbrush. I added a stamp from the Nature Fragments stamp set along the edges for a bit of extra funky seaweed.

Thanks for stopping by, Judith xx

Friday 12 December 2014

Steampunk fish and lots of fragments..........by Miranda


Hi there,

It's my turn today to show some creations made with those cool steampunk fishy stamps! I like them and they are great to match with all of the fragments too.......I've been playing with the Steampunk Funk fish and the Steampunk Sea world and combined them with the Tangled and Harlequin fragments on the first card. The backgrounds were made using Derwent art bars with the acrylic bloc technique, water and aquarel paper. I also used a lot Wink of Stella brush markers (silver and clear ) to add that lovely sparkle. The words are from the Words of Wisdom and I've cut it in 3 pieces.


On the second card I've been using the Nature elements sheet too. As you know by now I love all the fragment sheets, they are so versatile and can be used very often with many occasions. I've created a sea world with beautiful malachite rocks.......one must have a bit of imagination mmm?


I've coloured the fish with twinkling H2O's and Maya Gold silver paint(Viva decor) which has a very rich sparkle! Just gave these two shrimps some other color to get a bit of contrast. The words are from the Words of Inspiration sheet. Both cards are coloured with my old Karisma pencils. They have  a similar quality as Prisma color pencils and Derwent soft color.

Hope to have inspired you with the combination of all these stamps,
thanks for your visit and comments and till next time!