Pin It button on image hover
Showing posts with label guest design team. Show all posts

Monday, 17 August 2020

Lovely Butterflies (by Miranda)


Hi there,

Miranda again with the promised butterflies.........This time I have used an 'old' Crealies create a card die which can display all these butterflies very well. (it is still available)

These are the stamp sets I have used:


And there are many more sets of Chocolate Baroque with butterflies, so there is more than enough to choose from..........also the new launched sets have beautiful butterflies!


I have used a die cut (Love) and did some watercoloring onto thick rough surfaced watercolor paper.
The large butterfly on the heart is from the Fluttering hearts set. I have used mica strips to attach the butterflies on.

 All the images are stamped using black Archival ink and colored with water-based markers and colored pencils.


Hope you did like my take on the butterflies........
Thanks for watching and till next time with more butterflies,


Tuesday, 11 August 2020

More feathers and flowers(by Miranda)


Hello there,

I am back again with more feathers and flowers.......almost the same stamps as in my previous post but a totally different use of colors and a white,YES....... white background.......did not do much with that.....it was difficult, I admit it LOL....

I used another stamp from the Artist Baubles and I have a lot more of them to play with, really love that set! There are 6 beautiful baubles on the sheet and some design elements.

Used stamps:


I have embossed the feathers with silver embossing powder and used a lovely cabochon to ' hold' them together. 
 I stamped the bauble using Archival Shadow grey. Than I colored the image with Derwent Colorsoft. 
The feathers were colored using Tombo markers. I used the lovely sentiment from the pretty poppies sheet. 

Only added a thin black line and some dots using a black fineliner.


Next time I will be back with something totally different with lots of butterflies........
Thanks for your visit and always like to read your comments.


Wednesday, 29 July 2020

Feathers and Flowers (by Miranda)


Hi there,

Today my last post for July....but I will be doing more posts in August, yeah!

I have used the next stamp sets:
Tangled Garden rubber stamp sheet A4 (only for the small circle between the feathers)

And here the full card......lots of layers......I used many stamp sets but that was not my intention when I started......The idea was only to use the center bauble and the feathers......but along the way I could not stop LOL. Do you recognize that?

It can also turn out to be too much and overdone......but okay it became an abundant party of colour and shapes....


The background was done using distress inks on an acrylic bloc. Then I stamped the bauble using black Versafine. On the left side I stamped the similar flowers from the Floral Notes using Memento Tangelo. On the edges I used a fragment of the 'make your mark' sheet. I embossed all the feathers using Wow gold embossing. Colored them and decoupaged them. Yes, that is a lot of work but worth the effort I think.
I masked the bauble and stamped some feathers onto the background too.
And of course I did some pencil coloring too on the bauble.....


To 'hold' the feathers together I have used the flower center of the tangled flower from the Tangled Garden sheet. But of course you can use other small stamps for that too.
And finally I embossed the dots and circles from the ' make your mark' set.
The word 'Love' is from the Artistic Expressions sheet.


Hope you like my abundant mood today,
have a crafty and lovely day,


Friday, 24 July 2020

Make your mark (by Miranda)


Hello there,

It's me again, with some inky inspiration.......hope you like it.

Today I have used these stamp sets:


Again a background from my stash, this time made with Derwent Inktense art bars. When you use these, your background will be waterproof......

First I stamped the Mosaic flower using Memento London Fog. Then I stamped fragments of the 'on the tiles' background around the image.

I have used one of the stamps of the 'make a mark' set to create a structure on the edges using Memento Cottage Ivy. You can see that grungy structure below ...


here you can see the sparkle of the embossing powder a bit better.....
I have colored the flowers with my Derwent Colorsoft and used a white acrylic marker for some accents.

Then I did some embossing on the circle stamps and the dot texture. Make your mark is such a versatile stamp set, a real must-have and I will use that one a lot!

For the circles I have used Wow Cupcake Heaven, a lovely hot pink glittery powder and on the sequin dot stamp I have used Wow Peridot and 'jealous guy'. They have such funny names......

I stamped the text 'I make time to make Art't  from the Artistic Affirmations but only the words ' make Art'


Thanks for your visit and hope to 'see' you next time. Will be back next week!
Stay safe and creative,


Sunday, 19 July 2020

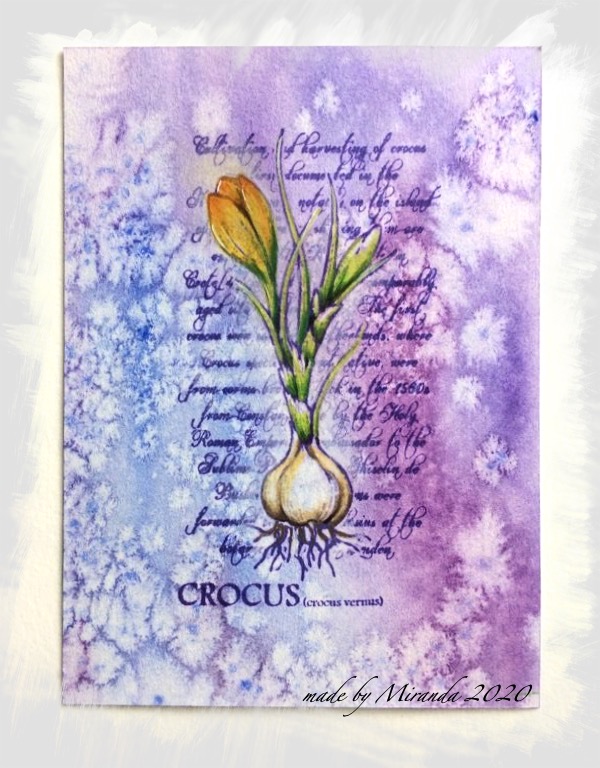
Elegant Crocus (by Miranda)


Hi there,

Today my 2nd guest post using an oldie.......but still a beautiful one......
Okay, I agree it is not Spring but Summer but hey who cares........at the moment the weather is more like Spring and I love it!


I had this background for quit a while in my stash......I did create it on heavy watercolor paper using the Derwent Art bars on an acrylic bloc. I always pre wet my paper with these watercolor techniques.
I did sprinkle some coarse and fine salt onto the damp paper and let it dry for some hours. When you sprinkle salt when the paper is too wet it won't create these white areas but you will get dark spots under the salt. And it will take a very long time to dry.
When the paper is totally dry you can wipe of the salt. And it create such beautiful structures.....


Then I stamped the whole image using a violet ink. And colored it using color pencils.
I am still a fan of the Derwent coloursoft pencils. I have many other brands too but still pick these when I am coloring on inky backgrounds.....they have such a great grip on the paper and beautiful pigment.


Hope you did like my take on this stamp,
thanks for your visit and till next week, have a lovely Sunday!


Monday, 13 July 2020

Follow your heart, it knows where it wants to go (by Miranda


Hi crafty people,

Happy to be back again to share some of my crafty moments with you.

A very true quote ' Follow your heart, it knows where it wants to go. How often I do not listen to that? Do you recognize that?

Well, now on to the less serious part.......

I had a play with the The Folk Art Garden Rubber Stamp sheet - A5. This is such a beautiful and large stamp with lots of beautiful designs in it. So you can imagine that it took me a while to colour every element.......
I did stamp using black Versafine ink on a colorful distress background.

Then I started coloring using my color pencils and using Acrylic markers for accents. I also used some gold accents using glitter pens.


On the photos below you can see the shine of the gold much better.....


Thanks for your visit and always enjoy reading your comments. 
Till next week....

Stay safe and stay creative!


Wednesday, 24 June 2020

Katya, goddess of the sea(by Miranda)


Hello there,


Today is my 3rd and last guest post  for this batch. I did enjoy working with these lovely stamps.

A while ago when I just got the Katya stamp I was thinking to make her more versatile......leaving out her headdress, then she could be every lady you would like her to be.

And then I saw recently Judiths' lovely take on that too.......Oooh, I was thinking I can't do the same......In the days/years I was a member of the DT team it happened often that we had the same thoughts about a stamp then we used to say to each other ' great minds think alike' so with that in mind I started changing her.......trying to do something else......

I used the stamping tool for this, it will be easy using that. I only removed a part of her headdress. So it could also be a crown or decoration .....I wanted to do something with a sea theme so I changed her into a goddess of the sea.......IMAGINE........

I had an inky background in my stash and it was perfect for the colors I wanted to use...


First I did stamp Katya using Memento Londog Fog, it's a very neutral color and you can easily color over it with pencils. I left out the upper part of her headdress. I draw some wavy lines that could be her hair......Then I stamped and masked several of the large scalloped shell. And one tiny shell.......and at the right side the beautiful seahorse......

Then the fun coloring started using pencils.......I used Derwent color soft. And some highlights using a white acrylic marker.

I missed some structure so I added the square bubbles here and there using Memento summer sky. Than in the lower parts of the card I stamped the bubbles using Versamark and brushed some mica powders over it.....it creates a lovely shine(see photo's below)


I did use:
Underwater rubber stamp set-A5(seahorse and large scalloped shell)


Well, these were my ' adventures' with Katya, hope you did like them.
Of course I will be here again somewhere in the future.....(if life is not playing ball)
Thanks for your comments,

Stay safe and be creative,


Wednesday, 17 June 2020

More 'Katya' inspirations(by Miranda)


Hello there,

Today I have more inspirations for you, made with the beautiful Katya stamp. This time some work with alcohol based markers and not to difficult as in coloring techniques.. I certainly am a colorist, but I can imagine that some people don't like too much coloring.......it's always labour intensive.
So I did create one card , stamping plain black and only adding some gold paint. And on another card I did only use 3 colors which you can see in the photo. 

So I will begin with the most simple one....
I did use:
Artistic Expressions(the word Beauty)

I stamped the image using Memento black, the most suitable ink for working with alcohol based markers.
The gold coloring is done with an ultra fine brush and some Gansai Tambi gold paint. It is opaque and you can see the  lovely shine on the photo above and below.
First, I stamped Katya.......than I stamped the flowers and leaves on a separate piece of paper and decoupaged them. I also stamped some leaves directly on the card where they would fit in.


The 2nd one, using the next materials:

Not my usual color combination but I think it creates a lovely contrast. Also used some glitter pens for that sparkly effect.
Stamps:

I stamped alle the parts in the same order as the previous card. 
I searched for an open flower in my CB collection and found the large flower from the Tangled Garden. 
I stamped it with Memento Black and over stamped the first layer of the flower using the big bold Leafy Brocade background. 
Then for the 2nd layer I used the panel background stamp from the Paisley elephant and also for the top layer, the center of the layer.

Ofcourse you can also use just one stamp for the entire flower. But that is the luxury of having a lot of stamps to choose from.....

I choose some matching alcohol markers to color with. And some accenting with the sparkle pens. Although it's hard to catch the shimmer ......it really sparkles...

Then I wanted to give the black/white gold card more colors so I took that one again and changed the whole card using the 'traditional Russian folk art ' colors.
And here she is.......

Here you can see the lovely shine of the gold paint.......


So, you can either color a lot if that is your thing, but you can also give just one color like the gold accents. Or keep a limited color palette with just 3 colors.
No need to use a lot of blending with different shades, just one plain color.

Hope I did give you more ideas with this lovely stamp, I really like her! Next week again.......a complete change of 'Katya' into..........stay tuned......


Thanks for your visit and always love to read your comments! 
Any questions? Feel free to ask,


Wednesday, 10 June 2020

With Love from Russia (by Miranda)


Hello lovely people,

It's been a while and I am happy to be here again! I have a few blog posts for you and this is the first one. I had this stamp for quit a while in my stash and I really had a good time playing with it......
When I need some inspiration I always look on Pinterest and this time I searched for Russian colors and patterns...... I came in Russian spheres......so this was my inspiration.....

And when you see these flowers and patterns.... CB has a lot of designs which would match perfectly ...


Russian folklore

I started with a Distress ink background and stamped 'Katya' using a light brown ink(Memento Peanut Brittle) so I did not have harsh outlines.
I masked her and stamped the 'Silhouette palaces' behind her using the same ink.
I did use the Masking Tissue from CB and I am really thrilled about that! It's the most great masking paper I ever did use! At the moment it is out of stock, but I really am a fan!

Then I took the lovely background panel stamp from the 'Paisley elephant' sheet. Also stamped that with the same Memento ink. I stamped it partially. And on the upper left side I did stamp a text from the 'Words of Wisdom' using a grey ink.

Then the fun part began.......coloring with my Derwent pencils.....indeed labour intensive but if you like to color then it is fun.....
When I was satisfied I used another stamp, the large 'crackle stamp '
for the finishing touch I used a white and black acrylic marker for some accents.


The sentiment is from a cling stamp 'Shared beauty'.


And here a bit of digital fun....Katya in different colors and styles.....
Well, I think she looks great in any color.....


Hope you did like my take on this beautiful stamp and if you are inspired..take out your crafty stuff!!
Next time I will show some other possibilities with this stamp.

Thanks for visiting and till next time,