Pin It button on image hover

Monday 31 October 2011

Full moon over the vineyard

My card today was inspired by a friend talking about her wedding in Italy. She was married last year and had always wanted to marry there, her husbands family are from Italy. I made her invitations and wish I'd had this stamp set then. They married in the town square the violins playing and then walked with the guests to the hotel which is set in it's own grounds. Their photographs are amazing. I'm thinking of making them an anniversary card using these stamps.


I stamped the image with tuxedo black memento ink onto white card and coloured with copics and distress inks. Then stamped again to decoupaged the wall and trees. The main image is mounted onto card that has variagated leaf on the edge of it. I used paper from the Echoes of Italy pack and stamped the corners using the long ivy corners from Wedding Belle.

Thank you for stopping by

Debbie

Sunday 30 October 2011

Another Italian view (posted by Judith)

Hi folks, I wanted to show you another sample that I made using the fabulous 'Echoes of Italy' stamp plate that Glenda has just released over on Chocolate Baroque My previous sample reflected the very bright colours around the Lake Garda area, but for this project, I wanted to incorporate some softer hues. I first called this project' From Senate to Ruins', as the border reminded me very much of a Roman senator's toga, and the arch was the remains of a grand building centuries later.

I stamped the arch, and masked it, using Eclipse tape, then formed the hills using torn paper, and inking against the edges. I used softer colours the further away from the front of the view I went. Purples and greys always work well to suggest distance. I then stamped some trees from one of the larger villa stamps either side of the arch. I coloured the arch using Polychromos pencils.


I quite like the main picture off centre on the card, for an unusual change in style. These stamps have been a real pleasure to work with.Keep checking back for more samples from my team mates this week. Thanks for stopping by, Judith xx

Saturday 29 October 2011

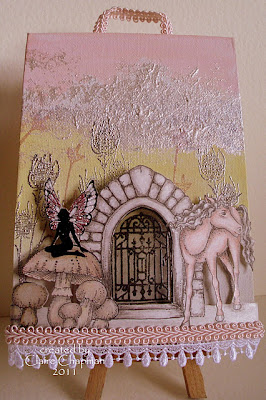
Fairy Door

Hi there, my project today uses a stamp from the new themeplate 'Echoes of Italy' but theres a lot more to these stamps that just scenery. As soon as I saw this stamp I thought of a Fairy Door and decided to create a small canvas combining the beautiful gate with some of my old favourite stamps.


I made the background with acrylic paints, using pink and yellow for the background and then adding clouds with white and pearl paint applied with scrunched up kitchen roll. I then stamped some foliage  stamps from Autumn Hedgerow and embossed some with silver embossing powder and some with pink embossing powder.

To create the scene in the foreground I used the unicorn and fairy stamps from Gossamer Wings and the mushrooms from Nature Table, masked them with Eclipse Masking Tape  and  then stamped the arch from Echoes of Italy . I coloured the scene with Derwent Coloursoft pencils, added a little glitter and then cut it out, cutting the gate section out of the arch. I then stamped the gate on acetate and embossed with black embossing powder to create a wrought iron effect and attached it to the reverse of the scene. 

To give the project some depth, I curved the scene and used silicone glue to attach it. As a finishing touch I added some lace and braid around the bottom and a little braid to hang the canvas, attached at the back with double sided tape. To cover the back I painted a piece of card with some acrylic paint and attached it again using double sided tape.

I hope you're enjoying all the inspiration from the DT this week
Claire xx

Friday 28 October 2011

Autumn's lovely Smile

At this time of year, I love all of the different shades of brown and red around on the leaves, and I wanted to reflect that when I used these lovely new stamps from the 'Woodland Dreams' stamp plate. I chose to stamp my images onto Kraft card, to create a muted background, and used clear embossing over all of the images. I used a green ink to add shading around the edges, to correspond with the ribbon that I used. Lastly I used a sentiment that I am very fond of from the 'Nature's Peace' stamp plate, which just went with this card perfectly.


There are some fabulous images on this stamp plate, as you will have seen from Glenda's introduction. Keep checking back for more samples this week from the Design Team. Judith xx

Thursday 27 October 2011

A leafy frame (posted by Elaine)

I am pleased to post a project using the new Woodland Dreams plate. I loved the leaf stamp, in fact this plate was made for me as I love nature themed projects.


First of all I cut an oval aperture in a piece of medium brown card and then I stamped the leaf randomly around it in russet archival ink. I added a little shading with a brown pencil. Then I overstamped with gold Brilliance ink. I wanted to create the effect of vintage fabric. I heat embossed the leaf in gold and then carefully cut out and mounted the leaves to frame the aperture. I heat embossed the tree in gold onto a large piece of dark brown card and then mounted the frame on top.

There are some delicious stamps on this new plate and you can find it on the Chocolate Baroque website here

There will be more design ideas to come this week from my fellow teamies.

Elaine

Wednesday 26 October 2011

A Taste of Italy in a Scrapbook page!

I was very excited when I heard that Glenda was introducing some Italian themed stamps, as I regularly go to Italy on holiday. I have just come back from a trip to Lake Garda, and couldn't resist using the opportunity to blend the stamps and my holiday together. I decided to make a scrapbook page. I am not a natural scrapbooker, but I really enjoyed making this project.

I used a lovely Prima mask, which is available from Chocolate Baroque, and coloured my background paper with several colours of Distress Ink. I then used the fabulous crackle stamp to create an aged plaster feel to the whole page. I stamped the two large images onto watercolour paper, and coloured them in with Polychromos pencils, adding a mount behind them. I used two holiday photographs which reminded me of some of the lovely places we had seen, and then made some brightly coloured flowers, using a Crealie die and some vellum. Everywhere we went, the flowers were growing in abundance, and the colours were really vivid, just like these.


I hope that I have given you just a little taste of Italy in my scrapbook page, and that you can see how lovely these stamps are. Keep checking back all week for more samples from the Design Team. Thanks for stopping by, Judith xx

Tuesday 25 October 2011

Echoes of Italy and Woodland Dreams

The girls are ahead of me here - I've been without a working computer at home for over a week and I had real problems with Blogger too, but the computer is back and things seem to be working fine now.

So, October's new stamps are two new A4 sets packed with beautiful images. 


Echoes of Italy has been in the pipeline a long time and I'm sure the images will seem familar to anyone who has visited Tuscany, though they could equally be from Provence or other rural mediterranean areas.

Woodland Dreams is a much more stylised and decorative interpretation of trees and woodland and makes really striking contemporary cards.  The simple shapes are easy to mask out, so lots of potential for using them with interesting background techniques.

The girls will be adding more of their artwork to the blog over the next week or two, so do keep coming back for more eye candy!

Wish you were here

My card today is from the Echoes of Italy stamp sheet which I must say I fell in love with when I recieved it. The images stamp so well and they are so detailed. They are a pleasure to colour and I think take you to a serene place. I have lots of friends who holiday in Italy and always tell me of the relaxing and refreshing times they have had while there.


I coloured to the trees with various pens and drew under the trees to add a hint of grass. The sky is made from Dried Marigold Distress Ink and Sailboat Blue Adirodack Brights. The grass is Crushed Olive. I mounted onto white and black card then onto an olive green base card.

There's more inspiration to follow from the DT so keep popping back

Debbie

Saturday 22 October 2011

Echoes of Italy

Hi there, my card today is using the newly released 'Echoes of Italy' themeplate. Its decidedly nippy here today so these stamps are a perfect reminder of warm sunny days. There are some gorgeous stamps on this sheet, from tranquil scenes to ornate baroque patterns and a fabulous crackle stamp that will be used again and again. Its a great time to place an order too as Glenda is offering free P&P until 27th October.


For this card, i've used one of the beautiful scenic stamps for the focal images, simply stamped onto white card (from the Essential Card Pack) with Vintage Photo Distress ink and watercoloured with the same inkpad. To create the background I tore a sheet of copier paper to make a mask for the hills and then stamps the trees from the same stamp in rows across a square of white card. I used the reverse piece of the mask to cover the trees and used Cut'n'Dry foam to add the hills again using Vintage Photo distress ink. The backing paper and focal image have been distressed again with Vintage photo and overstamped with the crackle stamp. They are both matted on some copper pearl card. The only embellishment i've added is a little copper organza ribbon overlaid with a die cut border made using Crealies 17

Thanks for visiting today, I hope my card has brought a little sunshine to a chilly day. 
Claire xx

Tuesday 11 October 2011

Snow falling on trees

The card I have today I must admit took a little time to work out but once the grey matter in hy head woke up and thought methodically I was on to card number three.

Top tip: Draw a line from front to back of stamp with permanent pen so that you can see where the base of the tree is and it makes it easier to see where the stamps are lined up.


I stamped the trees from the Fat Robin stamp sheet three times onto copy paper using the pen line to help me line them up. Then I tore the copy paper for the snow covered ground. Place the paper mask over silk art card and brayer Adirondack sail boat blue.
When the sky is dry stamp the trees using the pen lines on the stamp to help. Dot the snow using a Inkssentials opaque white pen. I added the Merry Christmas sentiment to the bottom. I used silver mirri and blue card to layer then mounted onto the base card.
The base card has been stamped with snowflakes.
This really is a quick card to make.

Thanks for popping by and please come back as there's more inspiration to come.

Debbie

Monday 10 October 2011

Fat Robin.......

Hello there,

Today a creation made with the Fat Robin sheet, another beautiful Christmas sheet from CB. I have made this one with one of my favourite techniques, stamping with white ink on black paper and coloured with the Derwent soft colours. As you can see I've added lots of gemstones........and the colour...well it has become a pink robin instead of a red one......I've used the Christmas greetings background paper and also added an acrylic tag.

Enjoy the day and till next time,

Sunday 9 October 2011

Robin and a ribbon

Hi there.
My card today is a quick card that will be ideal for making batches. This is a 5x6 inch white base card. I used brush markers to colour the stamps and as I wanted the robin, leaves and the berries different colours. It's been a long time since I've used brush marker pens and had forgotten how much fun they are to work with.
I added the organza ribbon to compliment the red of the berries.


I hope you are enjoying the samples from the Design Team.

Debbie

Saturday 8 October 2011

Fat Robin

This is my first card as a member of the Chocolate Baroque Design team and the first card I made with the gorgeous new Christmas stamps. I think Fat Robin will be one of those all time favourite stamps that come out every Christmas.


The backing paper is from the Season's Greetings cd, printed on vellum and attached to mats of gold and brown card with brads.

The main image is embossed with brown embossing powder and painted with twinkling H2Os. I added flat backed glass nuggets to the snowflakes attached with gold stickles for some extra sparkle

The flowers are made from Kraft glassine, cut with Crealies Flowers 10, the centres are dots of the new Burgundy Stickles. I added some glassine leaves again diecut with Crealies (shapes 12)

To finish off I added a  c robin embellishment made from clear UTEE, heated and then stamped with the Robin corner stamp while still hot.

Thanks for popping by,
 I hope all the projects from the DT this week are giving you lots of inspiration and ideas for your Christmas projects
Claire xx

Friday 7 October 2011

Winter trees from the 'Fat Robin sheet'

Hello there,

This one I have made using those beautiful 'crispy' trees from the Fat Robin sheet.They are so detailed and beautiful. I've just stamped them with white ink and added some shades with pencils. I've used the Christmas greetings paper and stamped another pair of trees onto that with Brilliance Thyme/Olive. As you maybe see I've drawn some extra branches in the frame All it still needed was a Nestie label with ribbon. I have kept this one simple and clean. Sometimes the image is so beautiful that it needs almost nothing.

Well have a nice day and till next time,

Wednesday 5 October 2011

Stained Glass window..........


Hello there,

Again another creation with the new Christmas stamps and this time I've used the 'Stain glass Christmas' sheet. I enjoyed it very much to colour that beautiful window. I also used a template from Crealies for the star at each side of the card. And again I've used that great Christmas greetings paper. All these papers are so lovely and fits perfect with those stamps. Only added a ribbon and some gemstones.


Well, are you already in the mood for some stamping and colouring............till next time

Tuesday 4 October 2011

Candlelit Window (posted by Lesley E)

Good morning everyone,

I hope you've all been enjoying the fabulous inspiration from my team mates this past week.  Today it's my turn to share again so here's my second card made from stamps in this latest release of gorgeous designs.  This set is aptly called Stained Glass Window.

 I embossed a piece of grey pearlescent card with the Tim Holtz texture fades Brickwork Folder and then cut round the edges following the line of the bricks.  I then added a little colour by gently applying pink, bright green and tan cube inkpads over the surface before adhering it to a 19 cm square white card blank with double sided tape.  I then stamped the lovely window image onto acetate with black Stazon ink, applied sheet adhesive to the back and then applied the gilding flakes before adhering this to the card using double sided tape again.

I then restamped the holly from the bottom of the window onto white card with the Versafine, coloured the leaves with Coloursoft pencils, cut them out and decoupaged them onto the acetate image using silicone glue.

I then stamped the sentiment from an old set called Seasons Greetings directly onto the base card as shown.

Finally I stamped the holly/pine spray which comes from the Christmas Tweetings set released a short while  ago, several times onto white card with the Versafine inkpad, coloured with Coloursft pencils before cutting them all out and arranging them on the card as shown using silicone glue.  I always shape my decoupage with a bone folder or my fingers before adding  it to the card.

Finally add dots of red Pearl Pen to the holly berries.

That's all from me today folks.  Keep watching as I'm sure it won't be long before there's more Design Team inspiration for you.  As always, many thanks for your visit.  We do appreciate you dropping by.

Hugs
Lesley  Xx

Monday 3 October 2011

Winter's Night by ikki

Hi, my card today uses stamps from the theme plate Christmas Cheer.  I was looking to produce a dramatic  effect to highlight these fab stamps, so chose the colours of black, white and red.  The background is a messy mix of shimmer mist and distress inks on copy paper, overstamped with various snowflakes and the christmas greeting and then diecut with a Grand Nestie Label.  For the white edging I used a glue stick and white embossing powder, I have a liking for this type of embossing as you will see from the edging on the Nestie snowflake!  The centre piece I felt needed little embellishment being such a statement in itself, so I stamped with a black inkpad then tripled embossed with a clear embossing powder,  adding just a touch of colour to the trees and roof to draw the eye in. 


Materials used:
6" black linen textured card
Cardstock : white, black glitter
Stamps: Chocolate Baroque – sentiment, snowflakes, winter scene
Nestabilities: Grand label 1 #2
Snowflake
Perfect Medium
Embossing Powder: black, white
Promarkers: yellow, leaf green, red
Stickles : star dust
Shimmer mist: candy pink, angel mist, sunlight mist
glue stick, foam pads

Hope you're finding interest and inspiration from the DT's artwork using these new stamps.

Back soon with more, until then enjoy your crafting.

ikki

Sunday 2 October 2011

Snowflakes and a sentiment

This is my first card from the Christmas Cheer stamp set.The girls on the Design Team have some fantastic cards that will be posted here.
The background started as one piece of card. I used Versamark to stamp the snowflakes and heat embossed with clear powder. The card was cut into three pieces and coloured with Victorian Velvet and Broken China Distress Ink. These were mounted onto silver card.


The snowflake toppers were easy to cut out as there were no curved cuts. A silver flatbacked gem has been added to the centre. I love the sentiment it's so ornate. I used the Nestabilities Label 18 and it's quickly becoming a favourite.


The team have some wonderful cards to show over the coming days, pop back to take a look.
Debbie

Saturday 1 October 2011

Steampunk Christmas


Hello there,
Today my creation with the Steampunk Christmas sheet, if you like steampunk than this is really it! And even if you feel uncomfortable with steampunk ......if you work with these stamps you will change your thoughts about that. Because they are a mix of the raw style of steampunk and the  well-known elegance and beauty of Chocolate Baroque. This is definitely one of my favourites!

 I have used a water coloured(salt technique)  piece of paper from my stash in brown/blue shades. Most of the time I make a lot of these papers at one time so I have always something to grab..... I embossed the steampunk flowers with gold EP and coloured them with water based markers. I also used the gear border die from Tim Holtz and added an acrylic tag. All the stamps I've used are from the same sheet.
Hope to have given you inspiration, creative greetz,