Pin It button on image hover
Showing posts with label Elegant Crocus. Show all posts

Sunday, 19 July 2020

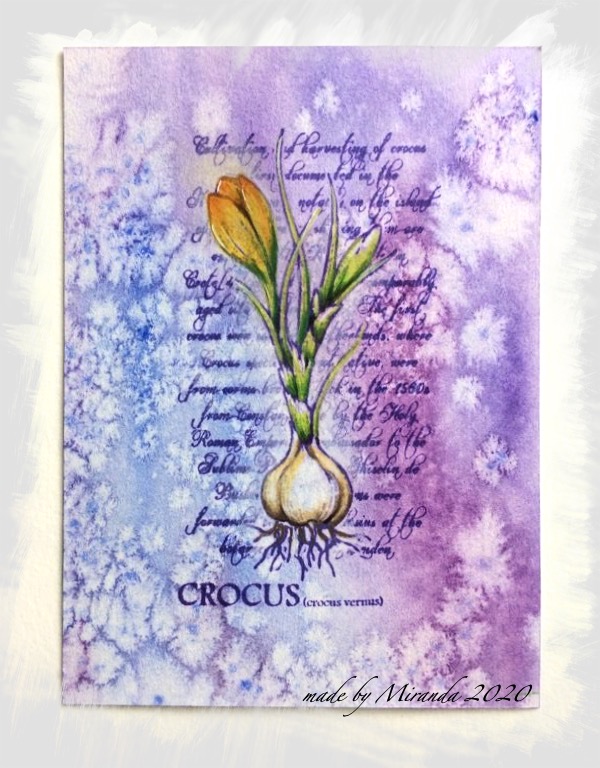
Elegant Crocus (by Miranda)


Hi there,

Today my 2nd guest post using an oldie.......but still a beautiful one......
Okay, I agree it is not Spring but Summer but hey who cares........at the moment the weather is more like Spring and I love it!


I had this background for quit a while in my stash......I did create it on heavy watercolor paper using the Derwent Art bars on an acrylic bloc. I always pre wet my paper with these watercolor techniques.
I did sprinkle some coarse and fine salt onto the damp paper and let it dry for some hours. When you sprinkle salt when the paper is too wet it won't create these white areas but you will get dark spots under the salt. And it will take a very long time to dry.
When the paper is totally dry you can wipe of the salt. And it create such beautiful structures.....


Then I stamped the whole image using a violet ink. And colored it using color pencils.
I am still a fan of the Derwent coloursoft pencils. I have many other brands too but still pick these when I am coloring on inky backgrounds.....they have such a great grip on the paper and beautiful pigment.


Hope you did like my take on this stamp,
thanks for your visit and till next week, have a lovely Sunday!


Monday, 16 March 2015

Spring Bird Crocus - Altered Slide Mailer By Florence

Hi everyone

I hope you have all had a lovely weekend.

Today I would like to share with you a slide mailer that I decorated using the new beautiful Spring Bird Crocus Rubber Stamp Set.  The multi buy option for the 3 new sets can be seen here.  These stamps are stunning.

I had so much fun with this project.  I hope you like it.


All images have been stamped using Archival Ink and colored using water color crayons.
The panels have all been made in the same way.  The images have been stamped and masked.  The panels where then dipped and swished into some diluted Distress Ink.  Dilute the ink by patting the ink pad onto an acrylic block and then spritz it with water.


The Front Cover


Base coat the slider with one coat of Gesso and two coats of purple paint.
Stamp the images for the front cover, the inside front cover and the back cover onto white card stock, color the images and trim to size.
 Attach the stamped pieces to the front and the inside cover of the mailer using PVA glue.


Inside the Mailer


Using old book pages or pretty papers, cut out two panels and attach them to the slider with PVA glue as seen on the right hand side of the photo above.
Stamp two Crocuses (I used a stamp from the Elegant Crocus set) or stamp and cut out two Crocuses from the larger stamp image shown below.  Color the two Crocuses and keep them at the side for the moment.


Tear some thin strips from a book page or pretty papers and attach these, using glue, to all of the edges as per the photos.
Attach the stamped image to the back cover using foam pads.  Place the foam pads on the underside of the panel at the top and at the bottom leaving a space in the middle to place the ribbon.


The Back Cover


Apply some gold wax or paint to all of the edges of the slider including the painted area as shown below.


Finally, attach the two Crocuses using silicon or foam pads to raise the heads of the flowers slightly.


That's it from me today.  
Thank you for looking.
Have a great week.

Florence x

Wednesday, 23 April 2014

Elegant edges by Miranda


Hi there,


I've made 3 cards using the lovely Elegant Edges from Chocolate Baroque combined with some other sheets. The first one is made using the Gingko leaf border and the separate stamp of the Gingko leaf. I've made this one in green with gold shades. With all tree cards I' ve used my favorite technique with the acrylic bloc and Distress inks. Did some partial gold embossing and some white embossing on the little rectangle. I've used the text from the Elegant Crocus sheet. I've embossed the little gingko leaf with gold and decoupaged it.


The second one has been done with the honeysuckle border and the main image is from the  Fragrant Honeysuckle sheet from CB. Coloured with waterbased markers in matching colours. I've embossed the card partially with an embossingfolder and added some Inca Gold wax over it. The text is from the Loving sentiments.


And finally the third one with an unusual colourscheme for me......using the Primula edge and some stamps from the Elegant Spring flowers. A lot of decoupaging and the text is from the Fairyland words. I've used waterbased 
markers and colour pencils to colour the images.


And finally I've made some smaller cards with the left over cardstock and stamped images.......no need to waste them mmm?

Here they are......


Well, hope to have given you some inspiration with these edges, they are great to combine with some of the other older sheets from CB.
If you have any questions about these, please ask and I am happy to explain.


Thanks for visiting and I always enjoy to read your comments, till next time and enjoy stamping!


Thursday, 5 April 2012

Coloured Crocus by Glenda

I have a card to share with you today that features the beautiful border from the Elegant Crocus stamp set.  I stamped it onto white card and coloured it with pencils, then inked around the edges with toning Memento inks and layered it onto a plain white mat.


The sentiment is from Butterfly Dreams and was die cut after stamping (to get the positioning right).  Before removing the die, I drew around the inside with a fineliner pen, then once that was dry, I inked around the edges with Memento inks.

The lace paper is one of the designs in the Prima Meadow Lark paper pad and a simple green polka dot ribbon adds a little contrast.  The gingham butterfly is die cut from another of the Prima papers and finished with a little Stickles on the body and gems on the antennae.

I hope you all have a wonderful Easter and let's hope the sunshine comes back!


Thursday, 29 March 2012

Crocuses with a touch of Deco-dence (posted by Judith)

Hi folks, here's another sample from me, using some of the new stamps available on the website I have used the 'Elegant Crocus' stamp plate for this sample.

I created a side step card, using yellow card, and stamped the Deco crocus border onto a strip of card. I masked a part of the stamp before I inked it up, in order to create a continuous strip, as I needed a longer piece of border than one length of the actual stamp. This meant that when I stamped for the second time, I omitted the end crocus. I coloured the main image with Polychromos pencils, using an image from a gardening catalogue for inspiration!

Thanks for stopping by, Judith xx

Saturday, 24 March 2012

Spring Celebrations (by Glenda)


It's my turn to share some of the cards I've been making with our latest stamps and I have two coordinating cards to show you.  The first is made using the primula script stamp from Elegant Spring Florals.  I have coloured it with copics, then carefully covered all of the coloured area with a Versamark pen and embossed with clear embossing powder.  After trimming the panel and rounding the corners, I added shading round the edge using Memento Dandelion and Canteloupe inkpads.

The yellow layer has been stamped with the primula head using Adirondack butterscotch ink, giving a subtle tone on tone effect on the bright yellow.

The sentiment is from the Artistic Expressions stamp set, stamped with Memento London Fog which is also what I used to shade the die cut.  The backing paper is from Prima which inspired the whole colour scheme.


The crocus card was coloured and embossed in the same way and this time I used Adirondack pigment ink, Purple Twilight, to shade around the edge.  I used Memento Lulu Lavender to stamp the little repeat pattern on the white layer then went for a contrasting background paper which you will find on the Essence of Nature CD.  

The sentiment is a rub-on on a clear acrylic fragment.  I used two jump rings to make sure it lay flat rather than twisted - something to bear in mind if you want to use flat dangly charms on your cards.  The large jump ring goes through the knot of the ribbon and connects to a smaller one on the embellishment.


These are both 8x8 inch cards - a size I used to avoid because I felt it was too big.  I've grown to love the bigger sizes now though and enjoy using space to balance design elements.  Hope you've enjoyed these two cards and there's more to come from the rest of the team soon.


Sunday, 18 March 2012

Purple and yellow Easter and spring creations (by Miranda)

Hello there,

The new stamps of Chocolate Baroque are gorgeous don't they? I've enjoyed creating with them and I was very much in a purple and yellow mood.....(if that's possible) So here they are.........
The first one is a very simple one. I've just masked the coloured area with masking tape and sponged with Versamagic thatched straw and spring pansy.  Then stamped the eggs with different colours Versamagic .I removed the tape and  drawn with a black fine liner two thin  lines to accentuate the sponged area.   The tassels are stamped with black and I've attached some gemstones there. Then stamped the text and the card was finished after layering with black and some mirri paper.
The 2nd one is......also in purple and yellow and when I red the sentiment this idea came up........
The background is done using the Distress Inks Mustard seed and Dusty Concord  with the acrylic bloc technique, the window from the Textured fragments sheet is stamped with the same Distress ink and afterwards I gave some details with coloured pencils and ultra fine glitter. The cross( Easter traditions) and crocus ( elegant crocus) are embossed with a mix of two WOW emboss.powders. Then coloured with the same colours distress markers. They are great! I've decoupaged the cross and crocuses. Well that's it for today, hope to have inspired you and see you next time!
Spring greetz,

Saturday, 17 March 2012

New Spring and Easter Stamps

I'm delighted to announce a new batch of stamps.  Firstly we have Easter Traditions which is perfect for those of you who celebrate the true meaning of Easter.  The crosses are beautiful in their own right and I'm sure will be useful for sympathy or confirmation cards.  I actually fancy making some jewellery with the crosses, maybe air dry clay or polymer clay studded with crystals.

This card was made by embossing the large cross with clear powder, then adding Distress Stains and lots of water.  I've found it's one of those 'leave it alone' techniques - the more you mess with it, the more blended the colours become.  You need to know when to stop and wait patiently for it to dry.

I will be doing a giveaway next Friday and picking three winners from all the comments left during the week - who knows, it might be your lucky day!

Then we have two gorgeous floral sets, Elegant Spring Flowers and Elegant Crocus, both with a hint of Art Nouveau.  These are great for colouring in and the script background stamps are perfect with Versamark and chalks or Perfect Pearls.


There is a multi-buy deal on the two Spring Flower sets as well - don't forget to log in first to see your best price, these are all on special offer for Guild members.


Here is a card made with the Elegant Spring Florals.


The sentiment is from Birthday Swirls which is one of our 'Last Chance' stamps that I've been asked to keep by lots of people.  It's a rather useful little A6 sized set - do you think we should keep this one in the range?  Leave a comment below and let me know what you think.


Stay tuned for more gorgeous artwork coming soon from the rest of the team.