Pin It button on image hover

Tuesday 31 May 2016

Danelion Clocks with Brusho Inks (by Debbie)

Sometimes it you just need to clear everything off your desk and limit the amount of things you work with. I am a terrible clutter bug as I like all things close by but it was becoming a hindrance.
So I selected a limited selection of stamps and a packet of note cards, I have in my stash, Brushos, white card, black and grey inkpads and clear embossing powder.


I started by stamping and embossing the Dandelions from three different sets of Chocolate Baroque which are firm favourites of mine. Very carefully I tapped the Brusho pots only wanting a small amount of colour on the dandelions. Next, I sprayed a fine mist of water over the powder and watched the magic happen.
I love the way the inks have spread around.
Here are a couple of close up photographs of these quick make cards.


Many thanks for visiting
Debbie

Monday 30 May 2016

Short and Sweet- More Fifteen Minute Cards

Hello everyone, it's time for another bumper batch of inspiration from the Design Team and Guest Design Team girls today, as they offer you their second set of projects this month, that have taken no more than fifteen minutes to complete. We have some super ideas to share with you, and hope, as always, that you will find some ideas that will have you reaching for your own craft supplies, wanting to have a go at making something yourself. We do hope that we can show you how quick and easy cards can look amazing, and that there are so many stamps in your Chocolate Baroque stash that can be used to make this style of card.

Julie's card combines a dotty stencil and one of the stamps from our Punky Flowers stamp set. She has used a great sentiment on her card:

Rachel has created a delightful clean and simple seaside themed card, perfect for a masculine Birthday. Simple pencil colouring is enough to add some colour to this lovely scene:
Zoe has created a colourful card using one of our edge floral stamps, some colour, and added a sentiment. You can vary the image, and create a Christmas card, or even a sympathy card, there are so many possibilities:
Gerrina's card combines colourful flowers and geometric lines, a great way of creating a quick background:
Claire has used linen card for her project, which adds a lovely texture to the design:
Shilpa's card combines a fabulous textured background and beautiful butterfly in a monochromatic colour scheme. She used Shabby Shutters Distress Paint to colour the background before stamping the texture stamp with Mowed Lawn Distress Ink. The butterfly was stamped seperately and coloured with markers.
She has added some sequins to give a bit of shimmer to her project, before mounting her background onto the card blank with 3D foam pads.
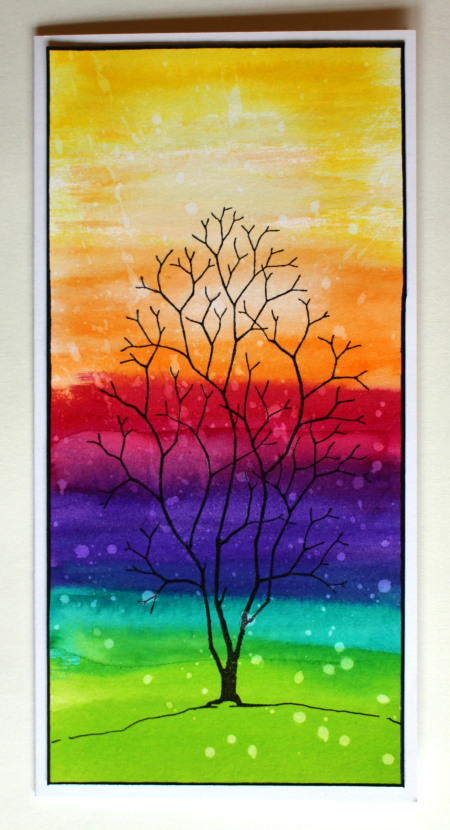
Anne has created two lovely cards for us this time; the first is a graduated rainbow card, using one of the tree stamps featured in the recent TV shows on the Craft Channel:
The second, is a very clever card in a circular design, in much softer colours. She has used Distress Inks to create her background, and the scalloped edges throughout, are very effective:

Lesley's bright and cheery card was created by stamping her image using Archival Ink, and adding some pencil colouring. She then swiped some Dylusions spray across the card using a piece of Cut 'n' Dry foam. Her sentiment was added using 3D foam pads.
Magda created a background using Distress Ink and water, which she trimmed to size. Using a left over piece, she created a vase for her flowers. She stamped the flower image onto a smaller piece of white card, and added the vase. Finally, she stamped her sentiment, and edged the piece of card with the same colour ink.
Brenda has created two lovely cards for our blog post this time. To create her first card, she inked the Bluebells from the Spring Foliage stamp set, using water based makers, spritzed the stamp with water, and once she had stamped the image, dragged some colour from the image using a water brush. The sentiment is from the Glorious Spring stamp set. The diagonal line was also drawn using the same colour marker.
Brenda's second card was created by masking a section on the card and colouring the uncovered area with Distress Inks. With the mask still in place, she spritzed the area with a mica spray to blend the colours, and then randomly stamped the sentiment from the Words of Wisdom stamp set. After removing the mask, she stamped the tree from the Spinney Design a Tree stamp set, using Coffee Archival Ink. The sentiment was stamped again onto a seperate piece of card to add to the front of the card.

Vronnie has used the beautiful rose from the Punky Hearts stamp set to create her lovely card. Her bronze tones mean that this could work as a masculine or feminine card:
So there you have our second batch of quick and easy cards this month. We hope that they will inspire you to take the plunge, if you have been feeling hesitant as a new crafter. There are lots of great ideas shown above, and if you pop along to the relevant blogs of the Design Team girls, by clicking on the links that we have provided, you will pick up lots of handy tips from them.

Look out for more fifteen minute posts coming from us next month, and lots of daily inspiration as always, from the regular Design Team posts. Thanks for stopping by,


Sunday 29 May 2016

Framed Flowering Baroque Heart (by Julie)

Hello and today it's me, Julie showing you my last creation for this month, using the rather wonderful Flowering Baroque Heart


For this project I stamped and embossed with white detail embossing powder, onto black card and coloured with pigment powders. Then I took some kitchen towel so that I could dab Brushed Pewter Distress paint over the background.
For the frame I used this little 15 cm x 15 cm MDF number. I chose a leaf design stencil and applied molding paste, through the stencil and all around the little frame. Once dry I coated the entire frame with black Gesso, gold gilding wax and Brushed Pewter Distress paint to create an aged metal finish.
I cut the stamped heart to size, placed in the centre of the frame and applied a black, gloss paint pen around the inside of the frame.

Many thanks for taking a look. Please call back very soon for another Design Team member's inspiration.

Julie xx


Saturday 28 May 2016

Variations on the same theme (exquisite edges)

Hello
Today, I would like to show you two cards very different with the same stamp.
The first one is made with brushos and the other one with ink spraid.

Bonjour,
Aujourd'hui, je voudrais vous montrer deux cartes très différentes mais réalisées avec le même tampon. La première est faite avec les brushos et la deuxième avec des encres vaporisées.


I used bleach to clear up some flowers.
J'ai utilisé de l'eau de javel pour éclaircir quelques fleurs.

I hope you like this. A bientôt.
Kind regards.

Friday 27 May 2016

Gilded Heart (By Anne)


I created this one by recycling the clear packaging from the Flowering Baroque Heart clear stamp. Alternatively it could be stamped onto acetate using black Staz-On ink.


Materials:

  • Image from the clear packaging coming with the Flowering Baroque Heart stamp
  • 6X6 inch card blank, pink and black plain card
  • Alcohol ink pens (teal, pinks, orange)
  • Gilding flakes (gold mix) and acrylic glue
  • Gilding wax (light and dark coppery gold)
  • Stickles glitter glue (Diamond)
  • Stick on faux brads (black)
  • Ribbons (teal and pink)
  • Embossing folder


How to make it:

  1. Cut out the image from the packaging and colour the back with alcohol pens leaving the background clear.
  2. Paint over the coloured areas with white gesso. This gives an opaque background to the translucent alcohol inks. Note: you need to work fairly quickly without over brushing the gesso as it will lift some of the colour from the inks. Leave to dry.
  3. Apply a thin layer of acrylic glue to the back of the image and cover with gilding fakes, pressing down lightly. Leave to fully dry overnight. Once dry brush off excess flake with a sponge. Edge with a black alcohol marker and mount onto pink card (with acrylic glue) to frame the topper.
  4. Use the embossing folder to emboss the black card. Lightly apply gold gilding wax to the raised edges. Trim and glue to pink card.
  5. Wrap the panel with ribbon and glue onto the card front. Attach topper with 3D foam pads for dimension.
  6. Finish with a few dots of glitter glue on the flowers, add faux brads and ribbon bow.

Thursday 26 May 2016

Fabulous Ornaments launch today (by Lesley)

I am so excited to be launching some gorgeous stamps today.  Baroque Ornaments is a collection of six individually cling mounted stamps each with their own unique pattern.  These are loosely based on the traditional mandalas but Sue has used her imagination to bring them right up to date.

I am sure you just want to see them now to here we go with the first three.

From left to right there is Tangled Baroque Ornament, Dots 'n Stripes Baroque Ornament and Palm Fan Baroque Ornament.

The second three look like this


I think Sue has done her usual magic and created some stunning images. Each individual stamp is cling mounted and cut out ready for you to starting playing as soon as you get them out of the packet. And of course we have this full collection available as a money saving multi-buy if you really can't decide.

Here is a sneaky peak at a gorgeous sample from Zoe which shows the Teardrop Silhouette stamp off to perfection.


I hope you have as much fun with these as the Design Team, who have been colouring and inking and creating more exciting samples for you to show off the new stamps.

I think that Zoe has chosen a wonderful sentiment for her card, it eptomises what stamping is all about. It really is an adventure into creating your own art and seeing just how imaginative you can be. So why not join us on a new adventure everyday with our wonderful Design Teams' daily dose of inspiration.


Wednesday 25 May 2016

Key to my Dreams Tag (by Shilpa)

Hello everyone, Shilpa here, glad to be back with my new large mixed media tag.

I've used Chocolate Baroque Key to my Dreams stamp set.
To create this background, first I adhered a few pieces of masking tape. I applied a thick layer of white gesso, creating texture. Next I used spray inks and Distress Paints in purple, green, blue and green randomly, untill I was satisfied, drying the layers inbetween.

I stamped the key and sentiment with black Archival ink, and coloured it with thin gold paint. I attached them to the tag with foam adhesive for dimension and my tag was ready.

Thank you so much for stopping by, and your support. Shilpa.

Tuesday 24 May 2016

Flowering Heart (by Asha)

Hello everyone. I'm back to share with you another project featuring the Flowering Baroque Heart single clear stamp. Today I have something simple with a shabby feminine look inspired by an old hand embroidered pillow:

How To:
  1. Stamp the the Flowering Baroque Heart image on to kraft cardstock using Ranger Glacier White Pigment Ink
  2. When completely dry, colour in with Faber Castell Polychromos.  
  3. Cut out image with heart shaped die and ink the edges with Vintage Photo.
  4. Prepare background using patchwork technique and ink the edges with Antique Linen.
  5. Cut out heart shape using same die as in #3 above and inlay the focal image.
  6. Finish with lace and Liquid Pearls.
Quite simple, isn't it? I hope you'll give it ago. And don't forget to swing by often for more crafty inspiration from the rest of the team.

There are more photos over at my blog, including a few of your favourite Chocolate Baroque stamps in action in tiny village store in Nieuw Weerdinge, Holland.

Thank you for stopping by and have a lovely day!

Beijinhos, 
Asha

Monday 23 May 2016

Old Favourites Revisited (by Judith)

Hello everyone, I have a card to share with you today using some stamps that have been in my stash for a little while. Sometimes it is great to look at your stamps with a fresh viewpoint, and try using them in different ways. I have always used the Snake's Head Fritillary stamped individually as a focal point on a card, but wanted to create a meadow effect with the flowers for this particular card. I have used a combination of black and grey Versafine Ink to create a depth to the flowers, helping some of them fade into the background, and used a grey pencil in some of the colouring to tone down the flowers that appear to be nearer the back of the picture.

I have added some stencilling to the background, using the same palette of colours, and used a couple of butterflies from the Harebell and Thistle butterfly stamp sets. I added a greeting from the Birthday Words stamp set, and mounted the background onto a large black card blank.

Thanks for stopping by, Judith xx

Sunday 22 May 2016

brusho tree

 These are a couple of the samples for the recent show on the Craft Channel featuring brushos and the arboretum tree stamp sets.
I used the tree from the spinney plate for these cards, and the sentiment from words of inspiration
I was trying to create a landscape for the first one, got a very different effect from the one I was aiming for, but that is part of the fun with brushos!.
I used watercolour card with turquoise and leaf green brusho after stamping the tree with black versafine ink and clear embossing it. The powders were sprinkled onto dry card,, with most of the green over the actual tree for the foliage, and the blue for the sky -  and a lot of spritzing with water. The tiny dot of orange was meant to be the sun rising behind hills ................there are sort of hills if you have a good imagination!
I cut the card down to fit onto a 6"x6" sqare black card blank, and stamped the words on a cut-off bit of the card.


The second card was made in the same way, adding the red and green brusho powders with a mini spoon to give the effect of autumn leaves, Again onto dry card, which was heavily spritzed with water - I spread the green round the base of the tree with a clean paintbrush, and added the darker green at the base of the tree using the very tip of the paintbrush dipped into the powder.

Thank you for reading this, hope you managed to see the shows - I thought  Lesley did a wonderful job! Please keep checking the blog, the girls have done some really fab samples for the shows

Veronica

Saturday 21 May 2016

Decoupaged Heart (posted by Claire)

Good morning, Claire here with a card made using the beautiful new stamp Flowering Baroque Heart. This is such a pretty stamp, perfect for so many projects.


I stamped the heart with Versafine Smokey Grey on white card and then overstamped with one of the beautiful background stamps from Dusky Damask using the same inkpad. I stamped the heart four more times and coloured the flowers with coloured pencils. I cut the flowers out and decoupaged them in layers to give a 3d effect.


The sentiment is from 'Best Relative Ever' clear stamp set, stamped in black versafine ink. I layered this up on black card and then made a larger background. I stamped the same background stamp randomly on glossy card with versamark and then brushed over grey dye ink. It doesn't show up too well in the pic but it creates a lovely resist effect. 

To finish off I've added a bow and a button from my stash.

Thanks so much for visiting today
Claire xx

Friday 20 May 2016

Flowering Baroque Heart by Zoe

Good morning, I'm back again for my second post of the month. So today I'm sharing with you my sample using the beautiful Flowering Baroque Heart

This stamp to me has a real "Classic" feel to it, one that you'd come back to time and time again, it has a vintage look about it, I feel it would be very versatile, Birthday, Valentine's, even sympathy!

Simply stamped using a Smoky Grey Versafine Inkpad onto Linen texture card which I'd cut using a stitched nesting die and coloured using Inktense pencils and a waterbrush, I stamped a second image onto some scrap linen card, coloured and cut part of the bigger flowers and decoupaged to give some dimension, I added some glossy accents to the centre but unfortunately it hasn't photographed well.

Gone all Vintage with my second card.
Kraft card base, my background is spray inks and a lacy stencil inked through with distress ink, I distressed the edges and added a die, I stamped my heart on white card and coloured it in with Distress Markers and a water brush, once dry I brushed over with a Matt Medium Gel and once dry I cut it out and adhered it using 3D gel.


I really enjoyed using this stamp, not my usual style but it's nice stepping outside of the box occasionally lol

Thank you so much for taking the time to visit, I love reading your comments, have a great day, big hugs Zoe xx


Thursday 19 May 2016

Babushka Dream (by Magda)

What's the difference between Babushka and Matryoshka ? 
There is no differences if not in the origin of the name, and it is very interesting to read about the tradition and the meaning of these nested dolls. They are special and have their own charm, as the new stamp set of Chocolate Baroque, that  inspired me to do this page.


Step by Step

1.     Put white gesso randomly on a journaling page.
2.     Colour here and there with Distress Crayons using black and white and Hickory Smoke.
3.     Wipe with baby wipes.
4.      Repeat points 2 and 3 till you are happy with the result.
5.      Stamp with Distress Inkpad Ground Espresso the houses of Babushka stamp set.
6.      Stamp with Versafine Onyx Black some grass of the Floral Edges stamp set.
7.      Colour with Distress Broken China through a stencil pattern between the houses.
8.      Colour randomly with white embossing paste or white gesso mixed with gold embossing powder or gold Stickles through Mini Gothic Romance stencil to lighten.
9.      Stamp with Versafine on a separate cardstock the babushka dolls, colour them and cut out the figures.
10.  Cut out some pictures of Moscow in a suitable size.
11.  Stamp the sentiment with black Versafine and glue the dolls, the sentiment and the pictures on the journaling page.

Have fun with the cute Babushka set! 
Magda 


Wednesday 18 May 2016

Spot the Birdie Journal page (by Shilpa)

It is the second week of Shilpa's guest designing and this week she is treating us to the most luscious art journal page, so sit back and relax for a little while to enjoy this.


Hello Everyone, Shilpa here, 

I would like to share with you a mixed media journal page today for which I've used Abstract Fragments and Spring Bird Tulip stamp sets.


To create the background I have used crackle texture paste, acrylic colors and stencils. To bring on the color on the full surface I've used Heidi Swapp color shine sprays in greens.


This beautiful bird stamp image is stamped with jet black archival ink and colored with watercolors.


Here are few more close up views


Thanks so much for stopping by, I'll come back here next with another mixed media project.

Shilpa


Love the freshness of this colour and the textured background is fabulous. Another big thank you to Shilpa for her contribution this week, looking forward to seeing her next design.

Hope you are enjoying the diversity of our blog and that you will join us again soon for more inspirational projects.