Pin It button on image hover
Showing posts with label Words of Love. Show all posts

Sunday, 13 February 2022

red roses

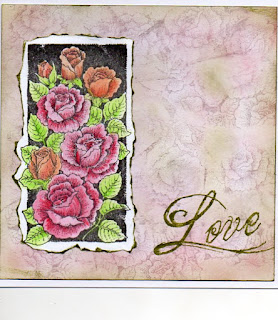
Carrying on the Valentine theme, some more samples this time using the main image from the Rose and thistle stamp set as well as the sentiment from words of love

The main image was stamped in black versafine ink and coloured with watercolour pencils, then torn out and edged with versafine ink. The background was sponged wiith distress inks in worn lipstick and peeled paint and parts of the stamp were randomly stamped in worn lipstick.. Sentiment stamped in versamark and gold embossed.

Same stamp stamped in grey versafine and part coloured with watercolour pencils. To make the coloured roses stand out more i added some elderly stickles with a brush and then covered the coloured areas with glossy accents. Once it was really dry i fussycut it out and added on to a distress oxide background. The diecut sentiment is from  rose stem script stamp set


My last card uses the main image from the rose stem script set stamped in versafine again and coloured with watercolour pencils, torn out aned added to torn mat of green card.  
The background was made with the rose stamp coloured with Koh-i-nor brush pens , randomly stamped then spritzed with water to make the colours run.
Sentiment from harlequin rose set stamped in black versafine ink


Friday, 4 February 2022

heartfelt (by Veronica)


For my first post this month I chose the  Harlequin Rose and Words of Love stamp sets - I thought they would be appropriate as Valentine's day is approaching......

The first one  is 7" square, the background is distress oxide inks  squeezed lemonade, peeled paint and salvaged patina sponged randomly and part images from the Rose Stem Script set and  words from Tall Trees set also used to overstamp.The sentiment is from Words of Love, stamped in black versafine and candy apple distress oxide inks. The main images were stamped onto spare card with verxafine ink, coloured with watercolour pencils and fussy cut out. If you snip  the leaves carefully you can weave two images together. I glued just the bottom halves onto the card, so the the centre pieces will stand up slightly


The second card is a very simplified version of the first, with red and black lines drawn with marker pens round the image and no sentiment - this is a 6"square card


Another  6" square version, again coloured with pencils this time trying to get a rainbow effect - in hindsight I think it would have been better to start the rainbow at one side of the image and not do individual leaves....

this was a single image, fussy cut round the edges of the design only and glued onto a distress oxide background. Background was stamped with the rose from Rose Stem Script coloured with marker pens and randomly stamped over the card, thne spritzed with water to blend the images. Distress oxide inks were then sponged over the dried card , sentiment added in black versafine and the wobbly lines drawn with a fineliner.


Sunday, 5 July 2020

Two Bookmarks (by Zoe)

Good morning Lovelies and welcome to my first post this month.
I hope you managed to catch the amazing shows last month on Hochanda featuring these amazing stamps.

I used Chocolate Baroque's Strip Stencils to create both backgrounds.
The first using the fabulous Tangled Birch stamp.
My second bookmark I used the words from the show as my background and diecuts to create the focal point, I do love verses and words to create backgrounds. https://www.chocolatebaroque.com/words-of-unmounted-rubber-stamp-multi-buy-a6.html

Thank you so much for visiting, I do hope I have given you some inspiration.
I'll be back later in the month with a couple more samples from the show.
Until then, stay safe and keep well.
Big hugs xx Zoe

Friday, 3 July 2020

Rather a lot of purple by Brenda

Good morning everyone, today I have some cards to share using the stamps from the June shows on Hochanda where the lovely Katya featured. She really is a lovely image and a delight to work with and it seems that without realising it I was having a bit of a purple day when I created these two.

The above card has an Oxide ink background onto an arch shaped base card created with dies. Katya was then stamped with Versafine black as were the Butterflies from Just Butterflies and sentiment from Words of Love and a few pearls added to embellish.


For the background to this one I used a piece of acetate which I dabbed with Oxide ink and a spritz of water and dabbed onto the card as I only wanted hints pf colour rather than covering the whole piece. I then randomly stamped with images from Rustic Fragments, Baroque Ephemera and Edgy Edges and a sentiment from what remains my favourite Chocolate Baroque sentiment set Words of Inspiration. Finally I stamped and cut out two clock faces from Timeless along with two wire circles (sourced from one of hubby's greenhouses!)

Have a lovely day.

Saturday, 17 March 2018

"The house in the middle of nowhere" by Brenda


Good morning, today it's my turn to share more creations of Lesley's Hochanda show which was all about cottages and houses. The title of my posts refers to the name given to the top card by Hochand's presenter Dave Bradford which I think it sum's it up pretty well.

My stating point was to stamp the house from the Town Houses but I think it works OK as a Country house, in fact it's not unlike the remote location where I live in the Fens on a single track road to nowhere. Only difference is we don't have any hills, it's totally flat as far as the eye can see and on a really clear day you can see Ely Cathedarel.

The sky has been done with Pan Pastels then the skyline, house and garden coloured with Distress inks and markers, the fence and trees added from English Cottages and Village Life and a pond and patch in the front garden also done with DI's and finally a flower border across the the front. 


I used the same house as above from Town Houses, stamped in black Versafine and added some colour to the front door before placing inside two die cut hears. Some tiny hears stamped and cut out from and sentiment from Words of Love all stamped in Versafine red.


Monochrome all the way with this one, a background created with the key form English Cottages and Versafine black, the the house from Town Houses stamped with the same, then a masked sun/moon and Pan Pastes to add some sky and a path before stamping some trees and bushes.


For my final card I used just the trees from Village Life stamped onto cardstock coloured with sparkle pain, cut each out and arranged into a flower. The corners are from Baroque Corners and inked with Distress Markers.

Many thanks for popping in to take a peek today.

Tuesday, 20 June 2017

Amazing day (by Brenda)


Good morning Peeps, today I would like to share some more Butterflies with you and judging by how quickly they sold out on Hochanda you love them as much as I do.

For the above card I stamped one of the Butterflies from the Just Butterflies stamp set six times using Black Versafine onto some yellow DP and cut them all out. Using an A5 white card blank I added a piece of the same paper which I matted onto black before fixing onto the base card.

Next I used a mannequin die and cut from black cardstock and mounted onto the card base at an angle and then fixed five of the Butterflies to create a skirt and added a yellow tripe bow at the waist. The sentiment from the Words to Dazzle and Sparkle is stamped with the same black ink onto white card, matted onto black and fixed to the card with foam pads. I added the sixth Butterfly to the card and used small black pearls down the thorax of all the Butterflies and wire antenna to the single one.


For my second card I stamped the large Butterfly from the Patchwork Butterfly set slightly off the page using Versamark and heat embossing with Detail Gold and Ruby Embossing Powders. I sprinkled some aged Spice Frantage around the image and heated and finally stamped the sentiment from the Pretty Poppies set again using Versamark and Detail Gold Embossing Powder.


For my final card I used Distress Inks Broken China, Vintage Photo and Peeled Paint to colour a piece of card, cut a panel and then randomly stamped the flourishes from the Patchwork Butterfly set using Versamark and Detail Gold Embossing Powder. Using the remainder of the inked piece of card I stamped three Butterflies from the Just Butterflies set and cut them out. The sentiment is from the Words of Love set stamped in Coffee Archival Ink, the Butterflies placed into position with wire antenna added and Liquid Pearls down the thorax and trail.

I hope you all have a lovely sunny day and my thanks for your visit today.


Wednesday, 17 May 2017

Gothic Card (by Penny)

Hello everyone, today we have another project from our Guest Design Team Member Penny. She has created a fabulous Gothic style card using a range of techniques.

Penny writes:

To create my card, I used stamps from the Gothic Fragments and Words of Love stamp sets. I used Distress Inks, dies, stencils and an embossing folder from my stash.

I created the background by blending Distress Inks onto a piece of card, faux bleaching, stamping and stencilling. I added some die cuts and a sentiment.

You can find more details about Penny's project over on her blog. Penny will be back next week with her final project for the month.


Monday, 30 January 2017

Romantic Roses (by Julie)

Hello crafty people. I have two romantic cards to share with you today.


My first card is made with the Harlequin Rose set. The centre panel is stamped with the smaller rose design that I inked up by applying brush marker direct to the stamp and then stamping onto the card. I masked off the stamped image before adding more roses. Don't worry about the ink drying before you are ready to stamp the design, a few deep breaths or "huffs" onto the stamp will reactivate the ink and you are good to stamp. The tassel border has been stamped into each corner. To get the distressed look I stamped the excess ink off onto scrap paper, before stamping onto the panel. The white base card was stamped with the small rose stamp as before, using Sepia Versafine ink and the centre panel was finished off with some sepia coloured lace ribbon underneath the stamped sentiment.


For my second card, the base card was coloured with Shaded Lilac Distress ink and stamped with the tassel border from Harlequin Rose. The leafy panel is the new Leafy Panel background stamp that I have coloured with brush markers along with the  rose which you can find on the rather wonderful Rose Stem Script  set and to finish off I added a sentiment from Words of Love.

Thanks for stopping by and please be sure to call back soon to see some more Design Team inspiration.

Julie x


Saturday, 28 January 2017

Miss You (by Magda) - Words of Love

My third "Romance" project for this month is a Tag, that you can also use as a bookmark to remind you.

Step by Step

1. Spray 4 pieces of Tando Creative Twinchies  with the colors you like of Deco Art Media Mister 
    using as the last colour a shimmer spray.
2. Stamp with Versafine Onyx Black  the Heart and Miss You from Words of Love Rubber stamp
on the dry pieces
3.  Glue the Twinchies with Ranger Triangular Collage Glue stick on a black tag  and colour a piece
     of Rayon  Seam Binding 14 mm ribbon with Distress Stain Barn Door for the embellishment


Thank you for passing by, and start to think about how you can use the lovely Chocolate Baroque Stamps for your Valentine projects.

Magda


Friday, 27 January 2017

My Love is Yours card (by Anne)


Good morning. I am excited to share one of my samples for Lesley’s first TV shows on Hochanda at the start of the month. Lesley demonstrated several sets of stamps from Chocolate Baroque featuring a romantic theme with gorgeous roses and heartfelt sentiments. Great for creating projects for loved ones, Valentines Day, Weddings and Anniversaries too.

Materials:
How to make:

Stamp the rose panel twice in Pumice Stone Distress Ink. Trim and edge with alcohol marker.

Lightly colour the roses with Victorian Velvet Distress Ink and blot with kitchen towel (to stop the stamped image from bleeding too much). Stamp the sentiment with Distress Ink. Attach the ribbon and glue to the card front.

Stamp the hearts with Versamark and emboss with gold powder. Colour with watercolour pen and a water brush. Cut out and apply to the card front. The large leafy heart was attached with 3D foam for added depth.

Sunday, 22 January 2017

Rose Canvas and Leafy Trails (posted by Claire)

Good morning, I hope you're all having a lovely crafty weekend. This morning I'm sharing a couple of projects made for Lesley's last shows on Hochanda.

Do you ever start a project with one idea and go off on a complete tangent and make something completely different? That's what happened with this canvas as I coloured the gorgeous roses from Rose Stem Script with my pencils planning to make 3 CAS cards but got totally side tracked and ended up making this lol.


I used acrylic paints to create the background, adding some stencilling with texture paste and then created texture around the images to frame them. I used scrunched up tissue paper with matte gel medium and once it was all dry I added silver highlights with gilding wax. I stamped the sentiment on an acrylic tag and embossed with silver embossing powder and added some little roses that I'd made with air dry clay to finish off. I wasn't sure how the tissue would work but it's quite solid once the gel medium is dry.

My second project is a card made with PanPastels and distress inks. I began by creating the background with PanPastels and then overstamped with the beautiful Leafy Trails Big Bold Background stamp. I watercoloured the image with distress inks and then distressed around the edges with Gathered Twigs distress ink. I layered the image on cream and brown card and added the sentiment (from Words of Love) with some garden twine. I used a couple of little berries and some ribbon to finish the card off.


Thanks for visiting, keep checking back as my teamies have lots of beautiful projects to share!
Claire xx

Thursday, 19 January 2017

Hearts and Flowers (by Julie)


Hello, I hope you are enjoying the romance theme that we have for you this month. The stamps are some of my favourite, especially the lovely new Belle Flower background stamp that the centre piece of this decorative frame has been created with.


For this piece I first added a good coat of white Gesso to the picture frame and once dry, sponged on some gold and silver Aztec paint. To protect the finish I gave the painted frame a good coat of Acrylic Wax.
The background was all stamped with Sepia Versafine and I used the really lovely rose stamp from Harlequin Rose and over stamped it with the Love sentiment from Words of Love.
For the hearts I melted some clear and silver ultra thick embossing enamel in a melt pot and poured through a metal, heart shaped cookie cutter that I had placed on the Belle Flower background stamp. Once the enamel cools enough to remove the cookie cutter and stamp, dust the stamped image with copper mica powder and spritz with water to set.
Assemble the frame and adhere the hearts with 3d glue gel.

Many thanks for taking a peek.

Julie x 

Saturday, 14 January 2017

Leafy Trails card and gift box (by Anne)


Good morning. I am excited to share one of my samples for Lesley’s first TV shows on Hochanda at the start of the month. Lesley demonstrated several sets of stamps from Chocolate Baroque featuring a romantic theme with gorgeous roses and heartfelt sentiments. Great for creating projects for loved ones, Valentines Day, Weddings and Anniversaries too.

I have used the Big Bold Backgrounds Leafy Trails stamp to create this card and to decorate a small gift box to match. I embellished using the Rose Stem Script stamp and a sentiment from the Words of Love set.

Materials:
How to make:

Stamp the leafy background with Versamark and heat emboss with gold powder. Trim stamping card to fit the card blank leaving a small border. Round the corners with a punch or scissors. Edge with the alcohol marker.


Open out the box and lay flat. Mine was cut on the Silhouette Cameo, but you could use a die cut or a ready-made plain box. My box measured approx. 30 X 21 cm when opened out. Stamp and emboss the box sides with the leafy stamp.


Colour the card front and box with sparkle pens. Spray with a coat of sparkle varnish. Glue the background mat to the card front.

Cut a strip of card, stamp the sentiment and small border with teal ink. Trim and edge with alcohol pen. Attach to card front with 3D foam.


Stamp the rose panel in Versamark Ink and emboss with gold powder. Colour with watercolour and sparkle pens (both are water based so can be used together). Cut out the rose and lightly shape. Tie on a ribbon and glue to the card with 3D glue gel.

Thursday, 12 January 2017

Harlequin rose (by Veronica)

Today I am sharing some of the samples from last week's great tv show, I thought the set looked fabulous, hope you did too!

For all of of these I used the lovely large stamp from
Harlequin rose, stamped onto white card with black versafine and clear embossed, and then brusho powders.


For this one I stamped the image twice, and added lemon and red brusho to the rose on one image, spritzed with water and cut it out when dry. Glued over the matching part of the second image, swirl painted with mica powder using a waterbrush.


This one I used lemon, red and lime green over the rose and leaves and spread the colour using a damp paintbrush. Grey powder over the background, again using the paintbush to spread it, and more gold mica on the swirl.


Card blank this time was 8" square, with the sentiment and heart from words of love stamped at the bottom left.


More 'traditonal '  use of brsuho on this one, with lemon, leaf green and red sprinkled over, trying to keep the red and green over the rose and leaves, then spritzing with water.


There are some really stunning samples still to show you from the rest of the team, so keep checking to see them, you won't regret it!


Monday, 9 January 2017

Variations on a Theme (by Judith)

Hello everyone, I hope that you are enjoying our romantic projects this month, and that we are giving you lots of ideas for those special occasions for which you might need to make cards and gifts.

I have two cards to share with you today using the same stamps, but varying the ideas to give two completely different looks.

For my first card, I stamped and embossed the large lacy border and the small heart image from the Harlequin Rose stamp set, using Versamark and clear embossing powder onto a piece of smooth card, which I had cut slightly smaller than my card blank. I coloured the background using a range of Distress Inks, blending them where they met, to create a graduated background.

I ironed the embossing powder off the card using some cheap copy paper underneath the iron to absorb the embossing powder, (remembering to turn off the steam!). I spritzed the background lightly with some water, to create a slightly mottled effect. I stamped the large 'love' from the Words of Love stamp set and added some cream seam binding before attaching the background to the card blank.

To create my second card, I used the same small heart image, and stamped it randomly onto a scrap piece of black card. This time, I used some sparkly red embossing powder, for maximun impact. I added some red card as a matting layer behind the background before I attached it to a white card blank. I stamped the large 'love' using red ink.

The second card was a very quick card to make, and would make a super Valentine's card for the man in your life, whereas the first card is much more feminine, with the vibrant colours. I hope that I have shown you how versatile these stamps can be. Thanks for stopping by, Judith xx

Wednesday, 4 January 2017

Harlequin Rose card and gift box (by Anne)


Good morning. I am excited to share one of my samples for Lesley’s first TV shows on Hochanda today. I am looking forward to being able to see more fabulous demos from this talented lady. Lesley will be bringing some gorgeous sets of stamps from Chocolate Baroque featuring a romantic theme with gorgeous roses and heartfelt sentiments. Great for creating projects ready for Valentines Day, but also suitable for Weddings and Anniversaries too.

I have used stamps from the Harlequin Rose set to create this card and to decorate a small gift box to match.

Materials:
How to make:

Trim stamping card to fit the card blank leaving a small border. Stamp the decorative border with Versamark and heat emboss with gold powder.


Open out the box and lay flat. Mine was cut on the Silhouette Cameo, but you could use a die cut or a ready-made plain box. My box measured approx. 20cm square when opened out. Stamp and emboss the box sides with the border stamp.

Colour the card front and box with Distress Ink using a sponge. Colour the border flowers with teal sparkle ink.

Stamp the sentiment onto the card front with Distress Ink. Stamp the mini border with teal ink. Distress the card edges and glue to the card front. I used the edge of my scissors to do this.


Stamp 2 mini tags with the small heart and emboss with gold, emboss along the edges too. Colour with Distress Ink and then with teal pen. Add ribbon and fabric rose and glue in place on the box and card.

Stamp the rose panel in Versafine ink and trim fit on the card front. Ink the card edges with Distress Ink and roughen.


Colour the leaves with teal and clear sparkle pens. Colour the rose with Distress Ink; applying to a palette and picking up colour with a water brush. Brush over the highlights with clear sparkle pen. Attach to the card front with 3D foam.

Tuesday, 3 January 2017

Garden of Love (by Asha)

Happy New Year, everyone!

For my first DT post of 2017 I'm going floral with this card using the gorgeous Big Bold Background Belle Flowers stamp. The inspiration for my card came from the various colouring books so widely available today.

I stamped the image with VersaFine Onyx Black and coloured it with watercolours. The sentiment is from Words of Love, heat embossed in red onto a strip of vellum. I finished the card with a few sequins.


This is a super easy card, perfect for Valentine's Day, engagements... even weddings.

I've got more details of tools and products over at my blog. And don't forget to swing by the DT blog often because at the rest of my talented teamies have some amazing projects up their sleeves.

Beijinhos,
Asha

Saturday, 17 September 2016

Home Decor (by Magda) Soft Form Relief Paste

I thought about a sentiment of home decor for my second post of September and as with the previous project I am again using Soft Form Relief Paste.

1. Spread a thick layer of Soft Form Relief Paste Pearl on the whole Words of Gratitude Rubber
    stamp and let it dry completely for about 24 hours.
2. Remove the shape and blend only on the sentiments you will use with Distress Inkpad Salty Ocean.
3. Cut the sentiments you have chosen and keep the rest for future projects.
4. Make a panel using corrugated cardboard, altering the surface.
5. Darken some areas with Distress Inkpad Walnut Stain.
6. Use Soft Form Relief Paste Pearl and Transparent on Ronda Palazzari Texturised Stencil in some
    areas of the panel to give texture.
7. Add extra colour to the panel and the sentiments with  Tim Holtz Distress Crayons set 2 red.
8. Stamp the little heart of Word of Love set on Kraft Cardstock and cut all around the shape.
9. Glue the sentiment pieces and the heart with Inkssentials Glue n Seal matte
10. Don't forget the red ribbon as hook.

Did my home decor inspire you?
Magda


Sunday, 8 May 2016

A Loving Heart (by Judith)

Hello everyone, I have a project to share using the new Flowering Baroque Heart clear stamp with you today. This is such a pretty stamp, and a great addition to the clear heart stamp range.

I started my project by adhering some book pages to a chipboard heart, and once the background was dry, I coloured it with Distress Crayons, spritzing them lightly with water, and adding a bit more here and there, moving the colour around with my fingers and a baby wipe. I dried the background with a heat gun, and stamped the heart image, using Versafine Onyx Black Ink. I stamped the image again onto a pale piece of scrapbook paper, and coloured the foliage on the spare image, and the heart on the chipboard shape with pencils.

I cut the foliage image out from the scrapbook paper, and decoupaged it onto the chipboard heart, and added some fine glitter to the stamens of the flowers. I added some gold paste to the edge of the heart.

To create the main background, I glued some strips of bookpaper to a chipboard square, and added layers of acrylic paint to the background, drying each layer, to avoid muddying the colours. I painted some strips of lace to tone in with the flowers, added some tiny mosaic tiles, and stamped the word 'Love', from the Words of Love stamp set.

Keep checking back for more inspiration from my Team Mates using this lovely stamp throughout the month. Thanks for stopping by, Judith xx

Saturday, 3 January 2015

Everyone should have a Heart (by Judith)

Hello everyone, I have some heart-related makes to show you today, suitable for those occasions where a bit of romance might be involved; Anniversaries, Valentine's, etc. I am working with the Punky Hearts and Fluttering Hearts stamp sets, and want to show you how versatile these sets can really be.

My first card is a very quick card for those occasions when you do not have much time to make something. I stamped a large flourish from the Butterfly Dreams stamp set onto a small square card using brown ink. On a piece of scrap paper from my stash, I stamped the apple and half of the butterfly from the Fluttering Hearts stamp sheet. I used waterbased markers to ink the stamps, enabling me to get the multi-toned effect. I also stamped a half butterfly directly onto the card. I cut the images out and attached them to the card, and finally added the sentiment in the bottom corner.
 My next card is again very CAS in style, as I wanted to create a masculine card suitable for an Anniversary or Valentine's card. I masked off a large area of the background, leaving only a horizontal strip showing, and then stamped the area with the floral heart using black ink, covering it with clear embossing powder. I then added some colour using three different tones of Distress Inks, before removing the paper masks. I stamped and embossed the heart once more onto a piece of kraft card, before cutting it out, and adding it to my design with 3D foam pads. Finally, I added a sentiment from the Words of Love stamp set and matted my background onto black card.
 My last project is a mixed media tag, using a real mixture of stamps, which I love to do when creating my projects. Full details of how I made this tag can be found on my blog if you are interested.

 I hope that I have given you some inspiration with my projects. Keep checking back every day to see what my Team mates have come up with, they have some delightful projects to show you. Thanks for stopping by, Judith xx