Pin It button on image hover
Showing posts with label Harlequin Bouquet. Show all posts

Monday, 26 April 2021

brusho flowers (by Veronica)


This was experimental, but I liked the result and decided to repeat it using all the floral stamps from this month's show

.

The first was a card using the crackling rose stamp, just stamped onto white card using black versafine and clear embossed before sprinkling with grey brusho powder and spritzing with water. A black mat, and a base card sponged with grey distress ink and randomly stamped with part of the rose stamp in the same grey.


The base of the concertina was an A3 sheet of gold card cut to give 3 panels 5x7". The four main images were stamped in black and clear embossed before adding the grey brusho powder. On the last two panels the crackling rose was stamped in grey in the corners , and sentiments stamped using black versafine.


Sunday, 25 April 2021

Rosy, Rosy.

Hello. I'm sharing the last of my samples made for the Hochanda (now known as The Craft Store) show in March. Lesley was showcasing some beautiful, individual floral stamps.


My first card uses the Floribunda Net stamp. Such a pretty stamp.
I stamped with VersaMark and embossed with Pink powder, I then used watercolour inks to colour. I used a punch on the corners and mat and layered onto some mirror card.


My next card uses the beautiful Crackling Rose stamp. A lovely stamp, especially if you like to colour.

For this card I stamped in brown archival ink and coloured with watercolour pencils. I added a die cut rose leaf and some pretty pink design papers.


This card uses the Flora Musica stamp. 
I stamped in Memento ink and used alcohol markers to colour. I layered onto an oval die cut. For the background I used a stamp from the Dusky Damask stamp set.


My last piece today is a grey board heart which I covered with some design paper and Brushos. I stamped the Harlequin Bouquet stamp in Archival ink and coloured with watercolour pencils. I then added some crackle glaze, being careful not to move the pencil. When it was dry I added some antiquing cream to highlight the crackles. I finished with a sentiment from Life is So Much Better.

Thanks for looking
Sandra x


Saturday, 17 April 2021

flower power (by Veronica)

One of my favourite stamps was in the shows last month, the lovely flora musica and i have two versions to share today. The first is a very CAS card, simply stamped onto a  square of white card. The stamp was inked with distress marker pens and stamped using a stamping platform. I used a damp brush to draw the cololur out into the flowers and leaves and stamped the sentiment from birthday words in the bottom corner. The card was edged with ablack marker pen before mounting onto a white card blank.
The second version was again stamped using marker pens, this time edged with distress ink and mounted onto a dark red car. The background panel was sponged with matching distress inks, and randomly overstamped using just the flowers and a swirly music stamp from the music fanfare set. The same sentiment was stamped onto spare card and cut out using a punch,

the next cards use the harlequin bouquet  stamp, the first stamped in grey versafine onto white card and then again using black versafine onto spare white card, The first piece of card was coloured using wild honey distress ink and water on a craft mat, and the harlequin part of the stamp stamped randomly using the same distress inkpad to create the background. The flowers and leaves on the second image were coloured with marker pens, cut out and glued over the first images.
The base card was sponged with hickory smoke distress ink, then the image stamped randomly using the wild honey distress ink
The second version is more muted, inked first with distress markers then overstamped qwith black versafine. Background card sponged with hickory smoke and a pink distress oxide 
( probably worn lipstick, but not sure!) then randomly stamped with the harlequin part of the stamp using the grey.
Sentiment from say it vertically


My final card uses the floribunda stamp, stamped in versamark onto kraft card and white embossed. I sprinkled truquoise brusho powders over the flowers and spritzed with water. Mounts were white and turquoise card onto a square card blank , and the sentiment stamped in turquoise ink onto a scrap of white card edged with the same inkpad and matted onto a scrap of kraft card


Tuesday, 13 April 2021

Blue Florals (by Judith)

Hello everyone, I hope that you are all keeping well. I have a couple of projects to share with you today featuring stamps that we brought to the TV shows last month. Both projects share a common theme, I have used blue tones to colour the flowers. You can colour the images however you like, so why not use blue, or whatever colour you prefer? You can match the colours that the recipient loves, a favourite colour scheme, or the gift that you might be giving. 

To create my first card, I created a Brusho background, using green, turquoise and purple, and once this was dry, I inked through a stencil, using the same colours of Distress Ink. I stamped a verical sentiment from the Say It Vertically stamp set over the top.

I die cut an oval and stamped and embossed the Harlequin Bouquet, using Versafine and clear embossing powder. I coloured the image with watercolour pencils and lightly blended the colours with a water brush. I edged the oval with Distress Ink.


Another Brusho background formed the basis for my second card. I stamped the Floribunda Net over the top using Versafine once more. I added some stencilling with a mesh stencil using gilding wax this time, adding a bit of subtle shimmer. I coloured the roses with pencils, and then used a glittery pen over the top for more sparkle. I used a sentiment from Life is so much Better to create a frame.

I will be back later in the month with more projects to share with you. 

Thanks for stopping by, stay safe and take care,


Judith xx


Saturday, 10 April 2021

Musica and Harlequin (by Rachel)

 Hello there - Rachel here today with some samples from the March shows.

In this first make I used the flora musica stamp and one of the black and white papers that Lesley produces. I started by stamping the image onto the paper and colouring the flowers using alcohol pens. I then used the paper almost as rice paper and adhered it to a 6x6 inch piece of greyboard. Next I added the sentiment then used some resin to seal the whole thing. Once dry (this took a couple of days) I added the whole piece to a piece of paper and added this to a card blank. Finally I added the sentiment.


For this second card I used the Harlequin Bouquet stamp - I created an alcohol ink background on yupo paper then inked up the stamp with lift ink - I removed the ink and used the piece with the removed ink to form the topper background. With the ink I lifted I stamped on the card blank I was going to use. Next I cleaned the stamp and then used it to stamp in black ink onto a piece of white card. I then fussy cut this image and added it to the topper which I layered onto black card as a mat. Finally I added more stamping to the background card using summeritme ink and also black ink.

I hope these samples have given you a few different ideas.
Have a great day!
Hugs
Rachel xx


Tuesday, 26 September 2017

Harlequin Bouquet Canvas (by Anne)


Good morning. Today I am sharing a small canvas created with the lovely floral collage stamp - Harlequin Bouquet.

Materials:
How to make it:
  1. Stamp the image onto stamping card with Versafine and heat emboss with clear powder. Colour with water based pens.
  2. Randomly Spritz the canvas background and cover with UTEE while wet. Heat to melt. I wanted a bit of a random texture rather than smooth glass effect. If you want more texture pour a bit more powder onto the hot UTEE and melt. Ink the sentiment with StazOn and press into the molten UTEE. Leave until it sets before peeling away. I found the image was a little feint so darkened using an alcohol pen – drawing into the impressed lettering.
  3. Apply the glitter paste with a palette knife onto the background using the leaf stencil. Apply modelling paste through the butterfly stencil. Leave to dry.
  4. Lightly spritz the watercolour card with inks (you want it to be lighter than the canvas background so that it stands out). Cut out the frame with the decorative die and apply some ink to the edges with a sponge to define. Trim the main image to fit behind the frame and glue together. Mount onto the canvas with 3D foam.
  5. Finish with touches of glitter glue.

Tuesday, 19 September 2017

Roses and Reindeer's (by Brenda)


Hello all, I'm here again to share a few more of my samples from last months Hochanda shows where Lesley inspired us all with more beautiful stamps.

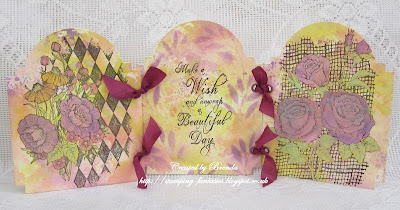
For my first share I gave a piece of watercolour card a watery covering of DI then stamped Crackling Rose with Versafine black and coloured in with sparkle pens. The sentiment is from Loving Sentiments which I cut into several pieces to arrange around the bloom. The edges have been lightly inked, matted onto coordinating cardstock and a organza bow added down the side.


Reindeer Landscape is such a lovely stamp and I decided to keep it fairly simple. I stamped the main image and added some watercolour to the sky using a mask to block out the moon plus a little shading to the hills, then stamped part of the image twice onto a larger piece of card so that I could raise the focal coloured one in the centre to carry the scene either side. I also stamped one of the Deer again, cut it out and decoupaged offsetting it to the left.


My last share is a bit more inky indulgence using die cuts to create the base card which I then inked with Oxide inks and stamped with Harlequin Bouquet and Floribunda Net, coloured in with the same inks and the sentiment from Loving Sentiments stamped with Versafine black. I also added some leaves using leaves using the Useful Leaves stencil. Finally the three pieces were then tied together with seam binding threaded through eyelets.

Happy day all.

Thursday, 14 September 2017

Trilogy (by Magda) - Floral Backgrounds

In order to complete the projects with the Floral Backgrounds from Chocolate Baroque, I am sharing with you my Trilogy with the following stamps :
Harlequin BouquetCrackling Rose  and  Floribunda Net.

For the backgrounds of all the cards I blended several colours of Distress Ink Pad.  I stamped the images with Versafine Onyx Black, coloured the flowers and leaves with watercolour pencils and
highlighted the petals with Stickles Crystal.
I used the sentiments from the fabulous Loving Sentiments set.

Harlequin Bouquet,


Crackling Rose


For this card, just for having it different, I cut out the shape of the mat and the front of the card, as you can see below.


I hope you enjoyed passing by. Thank you
Magda


Friday, 8 September 2017

A Quartet of Flowers (by Judith)

Hello everyone, I have some floral projects to share with you today, that were featured on last month's TV shows on Hochanda. These cards were made using the individual floral stamps from the shows, and I used a range of techniques to create the cards.

For my first card, I coloured the background with Distress Ink, and then stamped over the top using a stamp from the Harlequin Fragments stamp set, again using Distress Ink. I stamped the Harlequin Bouquet individual stamp onto a die cut oval, using purple ink, and coloured the image using Distress Inks and a water brush. I added a sentiment to the background from the Loving Sentiments stamp set.


For my second card, I created a background using Brushos and kraft card. I stamped the Floribunda Net individual image onto another piece of kraft card, and embossed it using white embossing powder. I coloured the image using Brushos and a water brush. I stamped the setiment from the Loving Sentiments stamp set onto a smaller piece of kraft card, again using white embossing powder. I have inked the edges of each piece of card using red ink.

For my third card, I coloured the background again using Distress Inks, and used the Large Crackle Background for added texture. I cut a postcard sized piece of card, and stamped the Crackling Rose individual stamp, adding images from the Mail Art stamp set, to create a postcard effect. I created a small sentiment strip using words from the Loving Sentiments stamp set once again.


Long term viewers of the blog will have seen a rendition of this final project, which I remade for the TV show. I hope that you will not mind seeing it again, using the Flora Musica stamp set:

My Team mates have made some beautiful projects using these lovely stamps. Do keep checking back this month to see their designs. Thanks for stopping by, Judith xx

Wednesday, 6 September 2017

Flora Musica (by Brenda)


Good morning all you crafty Peeps, I hope you week is going well.

Today I have some creations to share using the stamps that Lesley showcases on Hochanda in August, the first show featured a wonderful collection of Vintage inspired floral stamps and the second show was all about Winter and Christmas. I will share a few of my samples for both shows with you next week.

Starting with the card at the top which features Flora Musica which I stamped onto a Distress Oxide background and the used DI's to colour the image. Using Decorative Edges I stamped some random harlequins using the same Oxide inks, a little Butterfly from Just Butterflies and sentiment from Words of Inspiration which I think is my all time favourite Chocolate Baroque sentiment set.


For this card I again created an Oxide ink background and the overstamped with the holly from Winter Birds using Versafine blue ink. The central panel has a sentiment from the new Christmas Word Plate and again the same holly around the edges.


This one was a bit of an experiment !! Yet another Oxide ink background............yes I am a bit obsessed with them and over stamped with Harlequin Bouquet which I stamped with Versafine black and coloured in with the same DI's. I then covered the whole piece with three layers of  Versamark and heat embossed each layer with detail clear poweder and then the madness set in..........I cut the piece into seven piece and rearranged onto a piece of coordinating cardstock, but do quite like the finished effect.


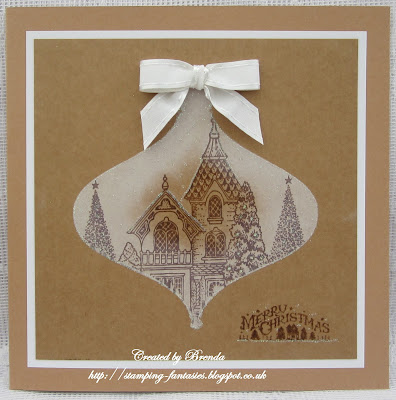
For my final card I used Kraft card, a mask and a white inkpad to create the Christmas bauble shape and with the mask still in place stamped the house from New England Winter using Gathered Twigs DI and finally the little sentiment set from Frosty Trees and a white bow to finish.

As always my thanks for popping in today and I hope I have inspired you to go check out the lovely stamps from the shows.


Tuesday, 5 September 2017

Flowers with backgrounds (by Marga)

Hello all, today it's my turn to show you something. 

This time I have two cards to share with you.


The first card is made with Distress Inks and some colouring with pencils.
I also used the stencil Seasonal Elements in the corners.

The stamp I used is Harlequin Bouquet


The second card is stamped with Versafine Ink and I have coloured the flowers with pencils.

The stamp I used is Flora Musica.

Hugs

Marga

Monday, 4 September 2017

Floral Beauties (by Julie)

Hello, today I have two pretty floral cards to show you. These stamps are so easy to work with and make beautiful cards completely by themselves. 


My first card is stamped with Harlequin Bouquet. I started by stamping the design in the centre of the card and colouring with Magic Pencils. To create the faded background, I inked up the Harlequin Bouquet with a very pale brown dye ink and stamped around the coloured image, before adding Distress inks over the top. I finished off the card with a sentiment from Loving Sentiments.


My second card is stamped with Flora Musica and made in a similar way to my first, however this time I stamped the main floral image onto separate card and cut out using a die cutting machine and an oval die, which I then mounted onto blue card.
The base card was stamped with Flora Musica and a very pale blue dye ink pad. I inked the edges with Squeezed Lemonade Distress ink and finished off with a sentiment from Loving Sentiments

Thanks for stopping by and please pop back very soon for more Design Team inspiration.

Julie xx

Sunday, 28 February 2016

Floral Musica and Harlequin Bouquet Cards (by Anne)


I have two cards to share with you today using the lovely new floral collage stamps – Floral Musica and Harlequin Bouquet.
 

I hope that you like the new stamps this month as much as we all have on the DT.

Happy crafting, Anne x.

 Materials:


 How it was done:

The images were stamped onto watercolour card with Versamark (Black Onyx). They were then masked with Pebeo Drawing Gum. I love this masking fluid. It is so easy to apply, and remove. Also brushes are cleaned easily with water.

The background washes were created by scribbling ink onto my glass mat and picking up with a wet brush and painting onto dampened card.

The masking fluid was then removed and the flowers coloured with watercolour markers, using a damp brush to blend.

The images were then cut out with dies. Seedless Preserves Distress Ink was blended in from around the edges to frame.

Harlequin Bouquet:

The topper was edged with black pen and a little glitter.

Pale blue card was embossed with harlequin texture on the top left and bottom right corners. The flat areas of the background were stamped using the floral stamp and Tumbled Glass Distress Ink. Faux stitching was added with black marker. Seedless Preserves Distress Ink was blended in from the edges. Organza ribbon was attached and the mat glued to the card front. The topper was attached with foam pads for added depth.

The butterflies were stamped onto pale blue card, coloured with watercolour pens, cut out and glued to the card front. The card was finished with a little more glitter glue and PVA pearls.

Floral Musica:

The topper was edged with black pen and a little gilding wax.

Cream and purple card were embossed with a script embossing folder. The dark card was sanded back to enhance the texture. Seedless Preserves Distress Ink and a little gilding wax were then used to further enhance the texture. The pieces were glued to the card front.

The sentiment was stamped onto a die cut tag using pink and purple watercolour pens to give varied shades when stamped.

Foliage was cut from gold card and glued to the card front along with ready made flowers and butterflies (these were in my CB Stash Box special offer that was recently available). The topper and tag were attached with 3D foam.

The card was finished with faux stitching and some gold PVA pearls.

Friday, 19 February 2016

Beautiful Bouquets (by Julie)


Hello, it's my turn today and I have two cards made with a couple of this months brand new individual cling mounted stamps.

My first card's main image is Harlequin Bouquet, which I have stamped with Onyx Black Versafine and then water-coloured with brush markers. The butterfly is from Honeysuckle Butterfly and the background stamps are from Harlequin Fragments and Floral Eggs. Peacock Feathers and Spiced Marmalade Distress ink was sponged over the background and the eggs were highlighted with a white pen.


My second floral card has been stamped with the brand new Floribunda Net. I have used watercolour card, which I first stamped using Onyx Black Versafine and then covered the roses with masking fluid. Once dry I spritzed the card with water and then dropped on various colours of Brushos. 
After everything was dry I removed the masking fluid and coloured with a very light-grey brush marker and added a light touch of green to the leaves. 

Thanks for stopping by.

Julie xx
Thursday, 11 February 2016

Flowers Galore (posted by Claire)

Good morning, Claire here with  two cards to share today, both using some of this month's new releases .


This first card features the beautiful Flora Musica, I've coloured the image with Graph'It markers and as I didn't have an oval die to fit I went for it and cut it out. It was a wee bit wonky but I dusted on a little Black Soot distress ink and distressed with a craft knife. I drew round the image on black card and cut that out too,  I create the background with Festive Berries and Aged Mahogany distress inks applied to my craft mat, misted with water and then swooshed the card through a few times. Once that was dry I stamped with some of the stamps from Music Fanfare and again distressed the edges before mounting on black card. To finish off I've added some faux gold pearls in the corners, a shabby red seambinding bow and a brass button from my stash.

My second card features Harlequin Bouquet, I've got a bit of an addiction for harlequin stamps so  I'm sure this one will be a firm favourite. I began by creating the background, I used black texture paste through a harlequin stencil on white card. Once that was dry I distressed with Black Soot distress ink and a craft knife and layered it on black card. I stamped the focal image with Memento Tuxedo Black ink and coloured with Graph'It Markers.


I cut the image out, distressed with a kraft knife and layered it with 3d foam, adding a bow and paper flower to finish off.

I hope you're having as much fun with this month's new stamps as we are. 
Thanks for visiting today
Claire xx

Thursday, 4 February 2016

Blooming New Stamps launched today (by Lesley)

Where did January go?  Did you blink and miss it too, because I can't believe it is February and I am telling about a fabulous new stamp launch.

We are still in individual stamp mode here at Chocolate Baroque towers, although I promise you that we have not abandoned our A4 and A5 sets but you will just have to wait and see what we have in store on that front. I'm an awful tease aren't I!

Anyway, back to the single cling mounted stamps that are on release today and all I can say is that they are delicious. There are four stunning florals, each set on a different background, available as individuals and our usual money saving multi-buy.

Crackling Rose

Flora Musica

Harlequin Bouquet

Floribunda Net


Sue has once again drawn us some glorious images and I have combined them with a selection of backgrounds. These are large stamps, with three of them measuring over 5", so they will make a real statement on your project. Great for a good selection of occasions and just excellent for playing with!

On the four samples shown here I have stamped on to die cut hearts and coloured with watercolours and I think you will agree that these beautiful images just speak for themselves. The Design Team are busy stamping, colouring and creating as I write this so be prepared for some amazing samples over the course of this month from our talented girls.  

One last thing. If you are a member of our Chocolate Baroque Facebook group then why not show us what you have created with these new stamps, or any of our stamps for that matter. We love to see your work and you never know, you could feature in our Readers' Gallery

Bye for now.