Pin It button on image hover
Showing posts with label Soft Form Relief Paste. Show all posts

Saturday, 8 January 2022

The Versatility of Damask by Doreen

The Versatility of Damask 

Firstly I would like to wish everyone a Happy New Year, I do hope you all enjoyed a good Christmas too.

My first projects today use the Damask Panel perfect for using in its own right or as a background which is how I chose to use this background which I have taken from my stash of Brusho pieces. I also used one of the many beautiful butterflies from the Chocolate Baroque selection.

I stamped the butterfly using a Versafine Clair Nocturne inkpad and then covered the whole of the stamp in Versamark the colour comes from Salvaged Patina and Kitsch Flamingo embossing glazes sprinkled onto the Versamark and heat embossed.


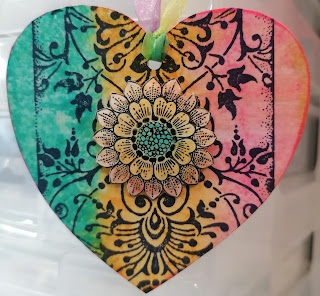
The second is a heart shaped sample using Distress Inkpads on an acrylic block which is spritzed with a little water and a swiping action straight across the Damask Panel onto the  background. Then I stamped the Song Thrush onto  a piece of card and painted using the same Distress Inkpad colours used for the background, then I fussy cut the large flower to decorate the Panel. Shape the flower and apply using Silicone Glue Gel to apply to the heart. Use a light varnish or spray to give a sheen and then put ribbon through hole to hang.


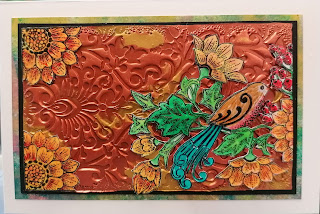
The final sample shows a background using a Soft Form Copper and a Gold Relief Paste applied directly to the stamp and left to dry overnight. I also used the Song Thrush to decorate this card just cutting out desired elements and applying to the background using a strong PVA glue.

Thank you for looking in today

Love Doreen

Monday, 23 January 2017

blue roses (by Veronica)


For one of the samples for Lesley's first show on Hochanda I made this small  notebook.

The cover was covered using  tissue paper coloured with brusho powders and crumpled up, glued on to the cover with modge podge. I used purple and turquoise powders.
The plaque used soft form relief paste and mica powders. I brushed the powders over the rose and leaves of the rose script stamp before adding the relief paste and leaving it to dry overnight. Once it was dry and peeled off the stamp, it was glued on using pva glue.
The mica powders are absorbed by the paste, and will not brush off - you will get a stained stamp though, but it will clean off.


close-up of the plaque, and the open notebook


The large 8" square card used the large stamp from the harlequin rose set, coloured with blue and green brusho powders, with grey powder for the background, and gold mica powders for the swirl. The large lacy border was stamped onto the base card using broken china distress ink, whicgh was also sponged round the edges.
Card mats were gold, green and blue.


The last one is red, not blue and shows the lid of a snall hexagonal box also covered with crumpled tissue paper.
I stamped the large image from harlequin rose three times, coloured it with promarkers, cut out the rose and decoupaged it. The 'raindrops' are glossy accents.


Lesley will be back on Hochanda at the end of the month  with a one-day special, featuring some really lovely stamps that are a little bit different, so check the programme listings for times, you won't want to miss this one!

Meanwhile, my team-mates have some lovely samples to show you using the roses.............

Monday, 5 December 2016

angels (by Veronica)

 I have been playing with one of my favourite Christmas images, the lovely angel of light.
This one was stamped directly onto a 5"x7" black card blank, (with fingers firmly crossed that it would be straight!), using versamark and stamp'n'bond powder, then a gold mix of gilding flakes.I had originally thought of trimming it down and layering it up, but decided to leave it as it was.


The second version was actually started first, using the silver soft form relief paste to cover the stamp after brushing some areas with mica powder.
Once it had dried, I found that I hadn't put enough powder on to add colour, so painted over with more mica pigments mixed with water. I wanted a starry background, so sprayed the black base card with white decoart shimmer mist - got a bit more of a nebula than starshine though,,,,,,,


The final version was stamped onto white card with versamark and a black sparkle embossing powder, then coloured with mica powders mixed with water.
I tore the card close to the image, using a ruler to get the torn edges as straight as possible, then added blue, silver and lilac matts before mounting onto a white card blank.
The blue and lilac matts were coloured round the edges using the same mica powders used on the angel.


I have left plenty of space to add a greeting, once I have decided where this one is going, I shall leave the first two without a greeting on the front.

There are some beautiful samples coming from the rest of the team, so do keep looking every day. Thank you for all your comments, we love to read them

Veronica

Friday, 25 November 2016

holly script

A very easy card from me this time, using one of the older sets, holly script.
I had a play with some old mica powders and the soft form relief paste this time. I dusted the stamp with red and green mica powders on the berries and leaves before covering it with the silver relief paste and leaving it to set.
Once dry, I carefully peeled it off and mounted it onto a piece of black card, then onto a 15x15cm white card blank. I was pleased that the mica powders are firmly held by the the paste, and don't rub off.

Everyone has been having fun this month, so keep checking to see what goodies are coming up

Veronica

Sunday, 25 September 2016

steampunk butterfly

 For my last DT post this month I did another canvas as we are still playing with textures.
I used a brick wall stencil and texture paste on two corners, then acrylic paint over all the canvas. I wanted a sort of peeling paint effect, so added some Decoart antiquing cream in patina green and rubbed it off over the bricks. It wasn't quite right, so I scrubbed it with a baby wipe and then added distress rock candy crackle paint , which was a bit better.
I stamped the steampunk roses onto tissue paper with archival ink, then coloured on the reverse with alcohol marker pens. I tore them out, then added to the base with a matt multimedia medium.
They didn't quite blend in with the background, but I didn't dare trying to get them off and trim them some more!


For the butterfly I brushed some metallic mica powders over the stamp before I added the black soft form relief paste over the whole stamp and left it to dry.
Once it was dry - about 30 hours this time - I peeled the paste off the stamp, trimmed the edges and glued onto the canvas.
I was very pleased with the butterfly, though I had forgotten just how little powder you needed......and how it gets everywhere!

Saturday, 14 March 2015

Framed Tulips by Julie

Good morning to you all, I hope your weekend has got off to an enjoyable start. As tomorrow is Mother's day here in the UK and it will also be Easter very soon, I thought a gift idea might be useful, so I have up-cycled a 13.5 cm x 18.5 cm photo frame using the new Spring Bird Tulip stamps and a couple of Crafter's Workshop Templates.
  • Start off by spreading Soft Form Relief Paste through the 12 x 12 Texturize template and then paint with blue, pomegranate and green acrylic paint. Finish off with gold gilding wax.
  • Cut a piece of white card measuring 9.5 cm x 14.5 cm, ink the triple tulip stamp using Onyx Black Versafine and stamp twice, also make a mask of this stamp.  Now cover the tulip stamp with pearl Soft Form Relief Paste and leave 24 hours to dry. You can then colour with red, purple and green alcohol pens when you have peeled the image from the stamp.
  • Colour the two stamped tulips with red and green water colour pens and then place the mask over them. Using Broken China Distress ink, sponge through a 6 x 6 Tattered Lace template for the sky and sponge Peeled Paint Distress ink through a 12 x 12 Texturize template for the grass.
  • Finish off by mounting the Relief Paste tulip onto the picture with silicone glue.
Many thanks for looking and if you wish you can find another Chocolate Baroque design using the new Spring stamps over on my blog at http://craftyjools.blogspot.com/.

Please be sure to pop back here tomorrow when another Design Team member will have a wonderful project to show you.

Monday, 2 February 2015

Fabulous Flowers (posted by Judith)

Hello everyone, I have two very different cards to show you today, incorporating the Sketchy Doodle Landscape/Flowers Multibuy stamp set.

For my first card, I wanted to create the feeling of a stained glass window by Gaudi. I coloured my background with Tumbled Glass Distress Ink. I stamped the flower and leaf images onto the background, and then masked these before placing a stencil on the left hand side. I sponged Salty Ocean, Shaded Lilac and Peacock Feathers Distress Inks through the stencil, covering these with a coat of Transparent Soft Form Relief Paste.

Once the Soft Form Relief Paste was dry, I added a bit more colour to the background, with Faded Jeans Distress Ink. I stamped an image from the Texture Fragments stamp set and one of the flower images from the Sketchy Doodle Flowers set over the background. I removed the masks from the flowers.

I created the large flower by spreading some Gold Soft Form Relief Paste over the stamp, and allowing it to dry overnight. I peeled the thin film off my stamp very carefully. I coloured the film with metal paints and added some gilding wax. I stuck a large flat-backed gem in the centre.

I chose to stamp the flower and leaf images onto a seperate piece of card, and coloured these with watercolour pencils. I cut them out and decoupaged them over the original images. Finally I added the focal flower.


My second card uses the lovely floral frame image on the Sketchy Doodle Flower stamp set. I stamped the image onto a die cut piece of smooth watercolour paper. I masked the outer area of the image, leaving the oval uncovered. I added some colour using Distress Inks, blending them together where they met. I removed the mask, and coloured the leaves with a watercolour pencil.

I created the background by stamping a leaf taken from the Thistle Butterfly stamp set, using the same colours that I had used on the main image, randomly over some smooth watercolour paper. I die cut some leaves from the same paper and coloured them with Distress Ink. Finally, I assembled the card adding dark brown card and ribbon. I have left the card without a sentiment for now, as it is such a versatile image that it will be useful for many occasions.

Thanks for stopping by, Judith xx


Saturday, 3 January 2015

Everyone should have a Heart (by Judith)

Hello everyone, I have some heart-related makes to show you today, suitable for those occasions where a bit of romance might be involved; Anniversaries, Valentine's, etc. I am working with the Punky Hearts and Fluttering Hearts stamp sets, and want to show you how versatile these sets can really be.

My first card is a very quick card for those occasions when you do not have much time to make something. I stamped a large flourish from the Butterfly Dreams stamp set onto a small square card using brown ink. On a piece of scrap paper from my stash, I stamped the apple and half of the butterfly from the Fluttering Hearts stamp sheet. I used waterbased markers to ink the stamps, enabling me to get the multi-toned effect. I also stamped a half butterfly directly onto the card. I cut the images out and attached them to the card, and finally added the sentiment in the bottom corner.
 My next card is again very CAS in style, as I wanted to create a masculine card suitable for an Anniversary or Valentine's card. I masked off a large area of the background, leaving only a horizontal strip showing, and then stamped the area with the floral heart using black ink, covering it with clear embossing powder. I then added some colour using three different tones of Distress Inks, before removing the paper masks. I stamped and embossed the heart once more onto a piece of kraft card, before cutting it out, and adding it to my design with 3D foam pads. Finally, I added a sentiment from the Words of Love stamp set and matted my background onto black card.
 My last project is a mixed media tag, using a real mixture of stamps, which I love to do when creating my projects. Full details of how I made this tag can be found on my blog if you are interested.

 I hope that I have given you some inspiration with my projects. Keep checking back every day to see what my Team mates have come up with, they have some delightful projects to show you. Thanks for stopping by, Judith xx