Pin It button on image hover

Wednesday 31 August 2022

Fabulous Flowers - Part 3 - by Zoe

Good morning lovelies and welcome to my final post for August, featuring these amazing Floral stamps from last month's TV shows.

I loved creating these samples, the stamps are so beautiful and very versatile, once I started creating, I couldn't stop.

I've used Linen textured Card stock on my first tag, bookmark and tag, along with some coloured backing papers and Vellums on a few of them.

I've used a variety of mediums for colouring my designs and backgrounds, from Inktense pencils, Distress Inks, and liquid watercolour inks. 


Thank you for visiting today, I hope you like my creations.

Take care and have a wonderful day xx Zoe xx

Tuesday 30 August 2022

Harebell by Doreen

Harebell

Hello everyone, today  I would like to share a quick but effective card with you using the Harebell Butterfly stamp set. I had the background left over from a previous make but it just uses the original Distress Inkpads applied and blended with brushes.


This card is quite simple already having a spare background or you may have some printed papers that you would like to use.
I  decided to stamp in a different colour as normally I tend to stick to my old faithfuls Grey, Black or occasionally Blues. With this card I have used Versafine Clair Purple Delight.

Stamp your main image almost centrally and stamping off the edges using other images from the set plus using the silhouette stamp for your foliage at the bottom of your images.
I have coloured the images using Inktense Pencils blending the colour with water.
I simply mounted this onto a blank white card as I really didn't think it needed anything else. If you do not have the Inktense Pencils, Watercolour Pencils or paints will work equally as well if painting my go to paints are the Koh - I - Noor watercolour paints which Lesley tries to bring to the shows as regularly as possible and are worth their weight in gold.

Thank you for looking in
 
Love Doreen 


Monday 29 August 2022

Inky Inspiration by Natalie

So, this blog piece is actually three in one; August has been a mad month in both good and bad ways. Here, are my three projects all in one go for this month's blog.
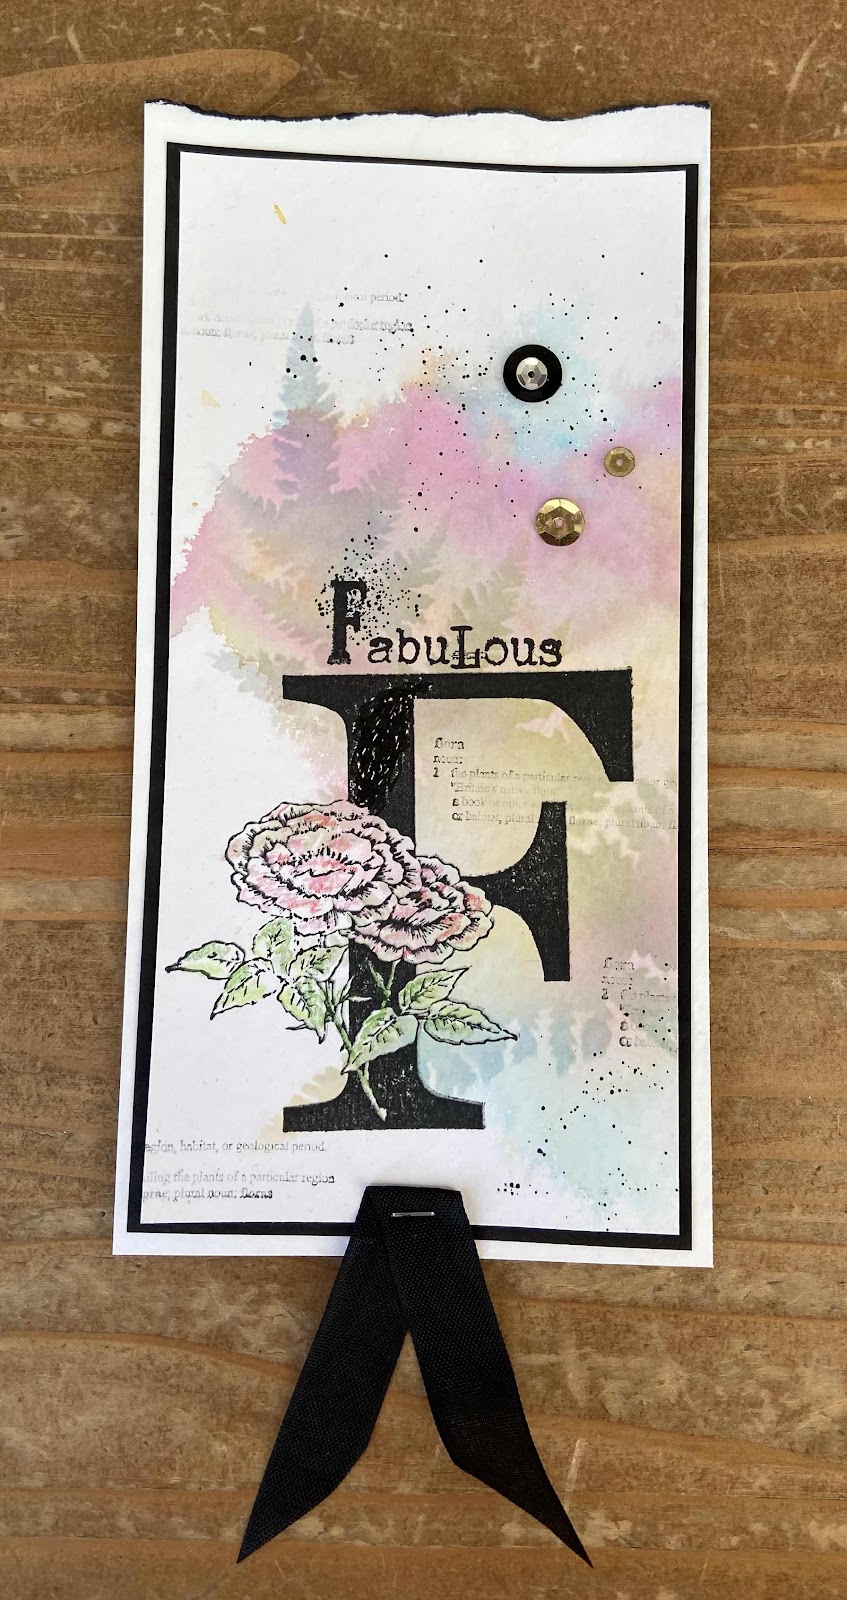
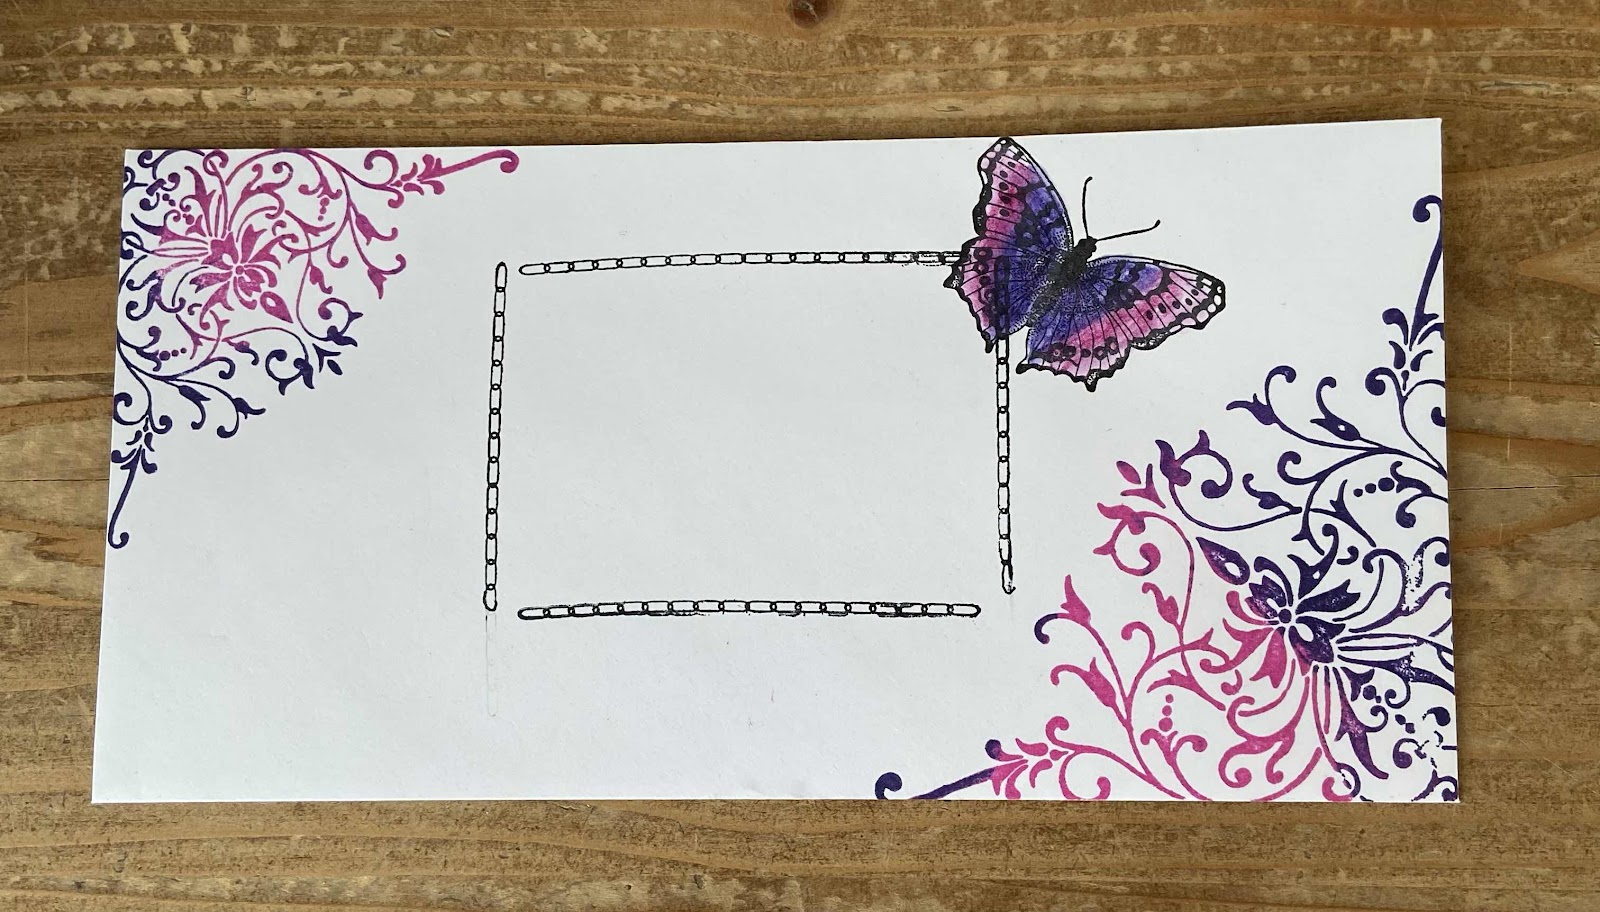
Inky Background 1

This project is all about cartridge paper, which often gets overlooked in our stamping. It is a great way of adding layers without bulk, and is much easier to fussy cut.

Start with an A6 piece of cartridge paper, ink up with Saltwater Taffy Distress Ink and Weathered wood using a large blending brush. The paper is easily saturated so allow it to dry completely naturally. Once dry, tear it into two at roughly a third of the way down. Adhere to a piece of stiff card with a gap between the pieces. Trim this to a tag shape. Again, allow any wetness to dry and then brush around edges with more Saltwater Taffy.

Onto another piece of cartridge paper stamp two butterflies and flower bud, using Prize Ribbon Archival ink; such as these from Harebell Butterfly. Add a touch of watercolour using Saltwater Taffy squeezed onto your glass mat to your butterflies. Set aside to dry. Onto the next piece of cartridge paper, stamp the diamond background pattern using Weathered Wood. Tear a small strip to form the top section of your tag.

Adhere the diamond background piece to your tag. Next, ink up a couple more stems with Prize Ribbon Distress Ink and spritz with a light coating of water for an instant watercolour look. Stamp onto your tag directly and allow to dry. You can also add a smaller stem in Saltwater Taffy.

Going back to your Prize Ribbon Archival ink, stamp the herringbone ribbon from Making more Marks at the centre top of the tag and at the bottom left hand edge. The cotton thread stamp from the same collection looks great stamped in Saltwater Taffy as a finishing touch to your stamping. Add a pink toned eyelet to finish your tag.

Optional: Adhere your tag to your card, doodling a thread for it to hang on either vertically or horizontally. I used a blue fineliner to complement the colours used in the tag. 


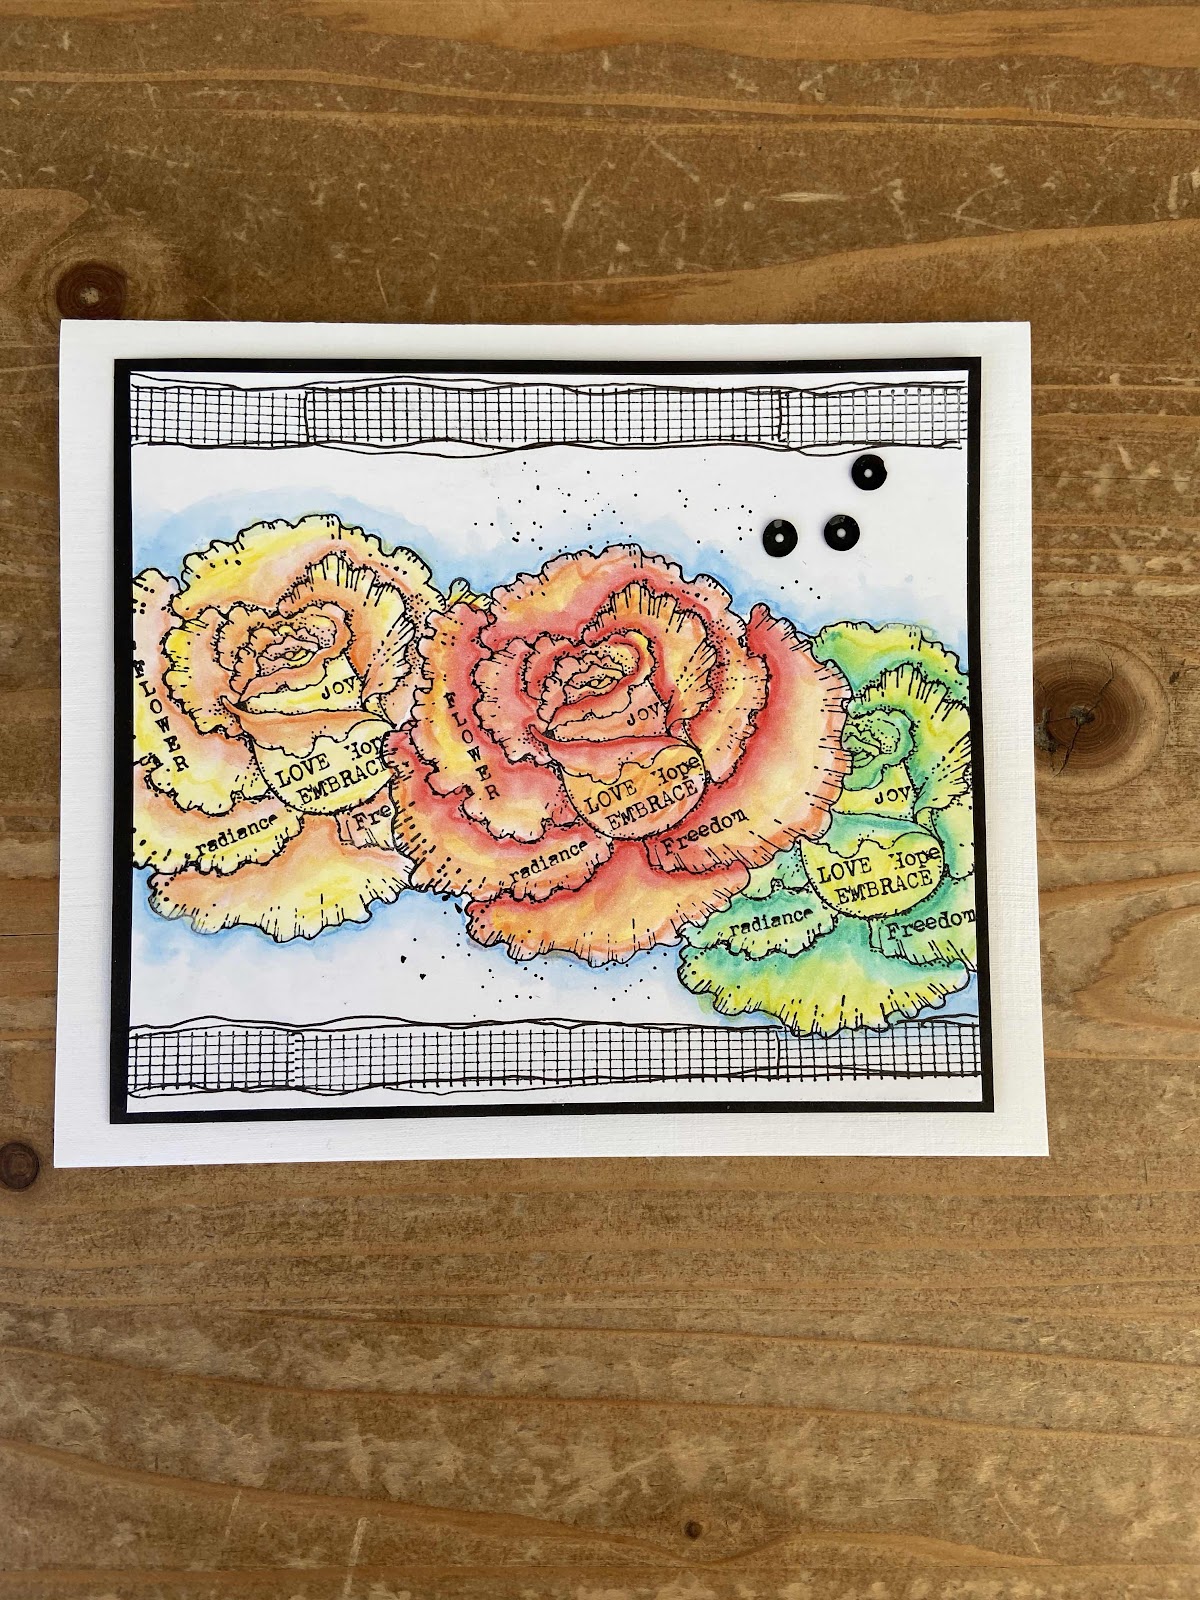
Using ink as a guide

This project is all about your ability to write an x. If you are looking for a mindful project, this is the one for you. Grab your coloured pencils, turn on the zen music of your choice and focus on those x's.

Start by stamping the grid image from Small Graph Paper using a brown ink of your choice. You want to get this as clear as possible without looking too perfect. Over the top, stamp the O from O is for... in a pale ink that is just dark enough for you to see the edges of the tree detail.

Next, start by "colouring" in the O with a dark brown pencil drawing an x to every square wholly covered in ink, or use a half stitch, quarter stitch or ¾ stitch around the edges. I found it easier to do the colouring this way round. You then want to use different shades of green to make the tree canopies pop along the a different shade of brown for the trunk. Finish with the green of the hills.
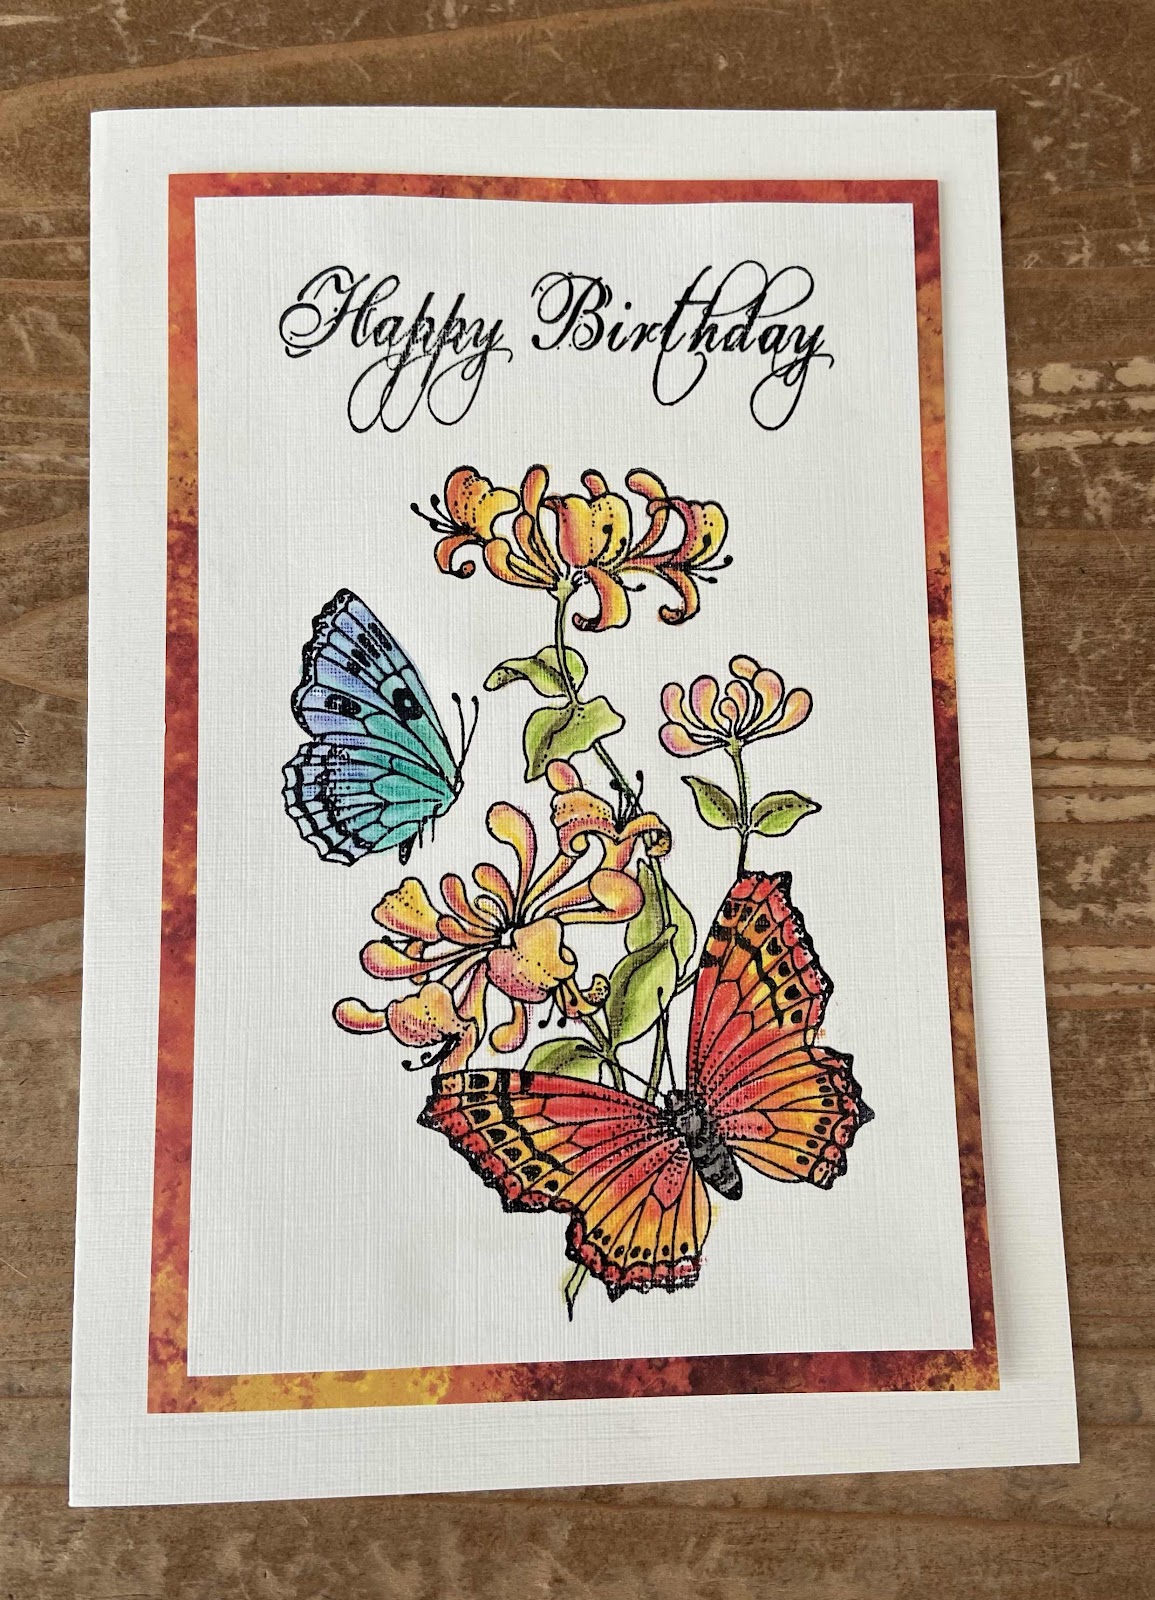
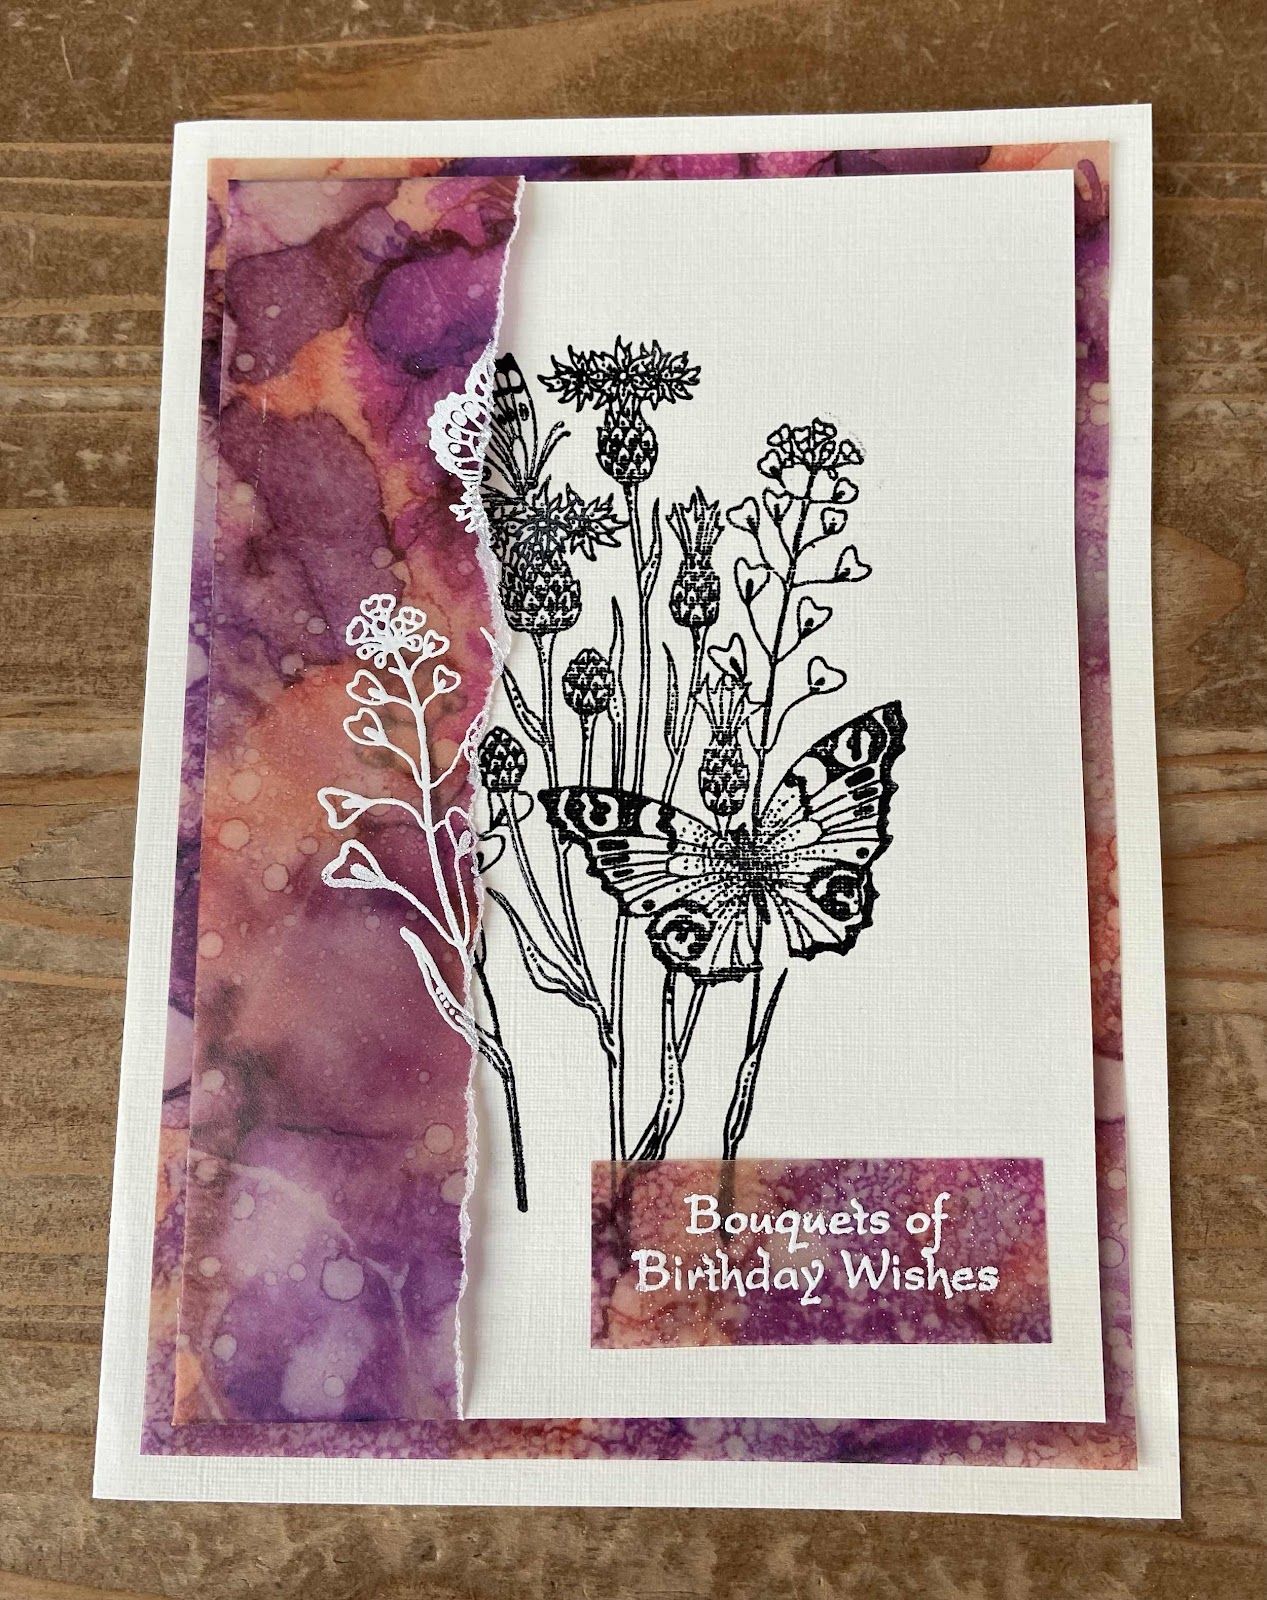
Inky Background 2

This card uses the images from Thistle Butterfly by stamping wet in wet.

Start by creating a splodge background by applying your dye based ink to your glass mat or blending mat. Spray watercolour card with water generously and place into the ink multiple times to pick up colour. To add stronger colour, ink up one of the stamps with the same ink and spritz lightly with water to stamp wet into wet. Allow the colour to bleed into the still wet background by holding slightly longer in the stamp.

Heat dry and stamp with the same ink using the dandelion image in green archival ink around the outside. Add watercolour to the buds of the dandelions and a little warm yellow to the tips. Stamp your main image the same way and colour with the same ink as your background to make the image feel like a field of the same plant.

Mount to a white card base and create a border around with a fineliner. Stamp your sentiment onto a spare piece of card. Trim and add a border of green card. Adhere your sentiment and voila!
 

Sunday 28 August 2022

Old Oaks And Roses


 This is the last post for this month showing some samples from July's shows, where we had lots of gorgeous stamps to use.  For my first creation I used 'O Is For' , you get three stamps with this set, the main image , a small oak tree and a verse.  I used the small oak tree to build up a background on a Distress Oxide background, I stamped the little tree using Versafine Clair in a green.  Using the same inky background I did it on a die cut circle.  I stamped the main image and added detail with some gilding flakes then matt and layered.


My second creation is made using Freedom Flower, another set with a main image then two worker stamps.  So for the background using the new Saltwater Taffy Oxides I edged the card fading to the centre.  Using the dotty worker stamp I went over the top of the ink around the edge.  I stamped out the main image colouring with matching Distress Ink, I stamped a further twice fussy cutting two layers to decoupage.

Thank you for looking and I will see you next month with more samples to see.

Happy crafting

Tracy x

Saturday 27 August 2022

nature book (by Veronica)


I made a little book featuring several of the stamps from the shows last month  - it didn't quite go to plan, either in making it or posting it!

The first pic is of the covers, I used grey boards from tando covered on both sides with some designer paper that had been around for ages, overstamped with the nature words strip on the back and the F is for on the front. 

 I tried a concertina fold to add the inner pages, and discovered that I should have left a gap between pages  - but too late, as it was well stuck down by then. At least I know for next time......


The inner pages were a mix of inked and brusho backgrounds , and I have shown as many as possible , but not in order as blogger kept losing the pics - sorry, but I gave up trying to sort them out, if it's simple OK, complicated, no way 

Most of the colouring was done with pencils, both watercolour and a cheaper version of polychromos 


Friday 26 August 2022

Different Backgrounds by Sandra

Hello, I am sharing the last of my cards from the July shows on Create and Craft.

These two cards feature stamps from Butterfly Daisy Collage and I have used a couple of different background techniques.


For my first card I used a "mop up" piece of card which I had used Distress Inks and a harlequin stencil on. A great way to use up those pieces you have been saving!  I stamped the main image from the stamp set in archival ink and then used a die to cut it out. On a larger piece of card I used one of the smaller stamps to fill around the sides. I also used Small Graph Paper to fill any gaps. I then mat and layered these onto a 6x4 card base.


For my second card I used Distress Inks randomly over a DL sized card and dried it with my heat gun. I then stamped some flowers and butterfly from the stamp set in VersaMark ink and clear embossing powder. I then covered everything with black Distress Ink and wiped it off to reveal where the embossing powder acted as a resist. I finished by running it through an embossing folder with  a branch effect and highlighting with gold wax. I trimmed it down and mat and layered in gold and then onto a DL card base.


 Thanks for looking

Sandra x

Wednesday 24 August 2022

Brusho Tree (by Julie)

Hello fellow crafters, just popping by to show you a make I did.

Step 1. Take an 8" x 8" card blank. With a black micron fine liner pen 1-3 I did a freehand squiggle frame with faux stitching.

Step 2. Take an A4 white card and using Brushos or Pixie Powders, I used the former in Emerald, Turquoise, Leaf Green, Purple and Gold, then spritzed the card with tiny bits of Brusho on it with water. Leave to dry, it can be dried faster with a heat gun.

Step 3. Cut out an oval with a die and also a frame using the same die, plus a die two sizes bigger, in gold card.

Step 4. Stamp various leaves from the From Nature 2 stamp set, using gold embossing powder. Cut them out.

Step 5. Cut five strips of acetate in various lengths, crease a 1/4 inch at one end. Glue a leaf at the other end of the acetate and allow to dry.

Step 6. Take your Brusho oval and turn it sideways, stamp and emboss the bare branch tree from the Tree of Knowledge stamp set using gold embossing powder.

Step 7. Stick frame on foam pads to the lower part of the card, but above your hand drawn frame, then glue your Brusho oval to the centre.

Step 8. In the centre, make a Brusho mount and mat white card to it and stamp sentiment in gold embossing powder. 

Step 9. Take the creased end of your acetate strip and stick to the card on the hand drawn frame line, spacing them out and leaving a gap to show the sentiment. I hope you like the card, when standing, the leaves hang forwards and dangle.


Thanks for stopping by,


Regards, Jules x


Tuesday 23 August 2022

A Touch of Pink (by Judith)

Hello everyone, I hope that you are keeping well. I have a project to share with you today showcasing some of the products featured on last month's TV shows on Create and Craft. 

To create my project, I started with one of the fabulous black and white papers designed by Lesley. I attached this to a MDF panel using matte medium. I stamped the large flourish from Butterfly Daisy Collage in two of the corners, and added the Small Graph Paper randomly stamped using a pink Versafine Clair ink. I just used parts of the stamp to give a patchy effect, and used the stamp held in my hand, rather than on a block. I added Distress Ink around the edges with a blending brush.

I stamped and embossed the Freedom Flower twice onto a spare piece of the black and white paper and cut it out. I coloured the image with shimmer paints, before decoupaging the flower and attaching it to the background. I used a grey pencil around some of the petals to give the impression of extra layers, adding shading for more depth.

Thanks for stopping by, Take care,


Judith xx


Monday 22 August 2022

Fabulous Flowers by Zoe - part 2

Good morning Lovelies and welcome to my second post for August.
Today I’m showcasing some samples I made for the fabulous shows last month.

I love using Linen textured card stock, not just for the base but also for stamping on, I feel it just adds that touch of class. I used some backing papers I’ve had in my stash for years, I rarely use them as I do enjoy creating my own backgrounds but figured I should use them. So simple stamping using Nocturn Versafine  Claire inkpad and clear embossing powder, coloured using Inktense pencils. 

The Envelope is the same technique.

My third project is again, simple stamping and heat embossing on Linen Card Stock, I used a coloured Vellum from my stash, also heat embossed with white embossing powder, for the overlay and mat and layer.


Thank you so much for visiting my post today. I hope you like my samples.
Have a wonderful day xx Zoe xx

Sunday 21 August 2022

Butterfly Blue by Doreen

Butterfly Blue

Good Morning everyone, today I would like to share this card with you very simple but to my my mind, pretty card.


This card does not use the hero image from the Briar Rose Butterfly A5 set of stamps but just two of the worker stamps.
I first cut a square of smooth stamping card and marked the centre just for guidance.
Then using the Versafine Clair Paradise stamped the beaded image at four opposite angles on the card. It does not need to be perfect. Do the same again with the Versafine Clair Twilight and then for the centre I inked just the tips with the Versafine Blue Belle and stamped the image just twice opposite one another. Then with add some ink in the centre with a stencil brush.
Using a scrap of card stamp the Butterfly and cut out, then colour with the stencil brush which should have enough ink left on from colouring the centre. Shape the butterfly and just add some glue to the thorax, if you have some glue gel add a little to under the wings and then position onto card. If you don't have the gel some double sided foam tape will work just as well.

The next thing I did was add some seed beads to the Twilight stamped images which believe me take quite a while but is worth the effort, I had these in my stash and they just seemed perfect to finish this image. Then my final thing was to add some glossy accents to the markings on the Butterfly which I did using a cocktail stick as I didn't want to risk squeezing the bottle to hard and ending up with a big blob on my Butterfly.

Thanks for looking in Today 
Love Doreen 


Saturday 20 August 2022

Hot Days - Tangled Garden, Words to Dazzle and Sparkle, Scrumptious Succulents

 Hi,  A new Journaling page with a yellow Sunflower of Tangled Garden is waiting for you in those hot days.   I blended several Distress In Pad for the backgrounded and stenciled randomly with a matching  darker color. The decoupage of leaves and the flowers are also colored in contrast with Distress Ink Pad.   The sentiment of Words to Dazzle and Sparkle is stamped directly on the page with Archival Jet Black 


I want to end this month with a fresh Scrumptious Succulents Tag, I used: Archival Jet Black   watercolor, and orange ink pen


Thank you for passing by, hugs

Magda 

Wednesday 17 August 2022

Ivy Christmas Tree (by Julie)

Hi Crafty friends, today I'm sharing a card I made with you. 

Step 1. Take an 8" x 8" white card blank

Step 2. Add a layer of deep red card 7 1/2" x 7 1/2"

Step 3. Take a 7 1/4" x 7 1/4" white card square, ink up the Christmas word strip from Slim Word Strip 2. Ink it up in shades of Red Distress inks: Barn Door, Crackling Campfire, Aged Mahogany

Step 4. Taking the slim dotty stamp from the same stamp set, ink it up in Blueprint Sketch Distress Ink, do this twice so that you have done two strips of blue. 

Step 5. Ink up the Positivity word strip in the same shades of red as the top stamping 

Step 6. Ink onto white paper all three sizes of Ivy leaf from the From Nature 2 stamp set in a mixture of colours. Gold Dewdrop Ink, Crushed Olive and Forest Moss Distress Ink, Green Oasis Versafine Clair Ink.

Step 7. Cut out the ivy leaves, curl tips upwards, them glue one by one using the largest at the base and working upwards to form a fir tree shape. Tuck a spare ivy leaf behind top word strip.

Step 8. Glue mini baubles from stash onto the tree.

Step 9. Take single Tomte Gnome from A Tomte Christmas stamp set using Twighlight Versafine Clair Ink. Cut out and colour with alcohol pens.Use White Puffy Stuff for hem, hat and beard.


May I thank you for dropping by,

Regards, Jules x


Tuesday 16 August 2022

Harebells And Notelets


This is my second post this month for the shows that were in July, using some really gorgeous stamps.
My first make is a notelet set, I do enjoy making the notelet sets,  I used several stamp sets for this project, I used Harebell Butterfly, Honeysuckle Butterfly, Briar Rose Butterfly and Thistle Butterfly.  I started by creating the box to put the notelets in and as you can see used the Harebell hero (main image) stamp for the front, the notelets are made using a worker (smaller) stamp from each set.  I masked the edges of the cards off, then using three colours of Distress oxides did an ombre background, I stamped the images in the centre, then matted and layered each card.  For the envelopes I took a circle mask and added some ink to each corner of the envelopes. I then stamped one of the worker stamps over the top.


I absolutely love this image from Harebell Butterfly set that I used for my second creation, I started this one by stamping my image then using Distress Oxide and a stencil brush I added some ink around the image, I coloured the image using Aqua pencils then adding water to blend.  I very lightly drew with a pencil a rectangle with a ruler to frame it.  I went around the pencil line free hand so's not to have an exact straight line with a fine liner.  Using the Oxides I did a matching backing paper to matt and layer on.

Thank you for looking, I will be coming back at the end of the month with a couple more samples.

Happy crafting

Tracy x

Monday 15 August 2022

Luscious Christmas card nr. 1 (by Miranda)


Hi there,

Miranda here with some Christmas inspirations during the hottest time of the year.......but hey just think cool......

Always love to make these cards and fortunately I have a studio where there is air conditioning.

I used these beautiful Christmas stamps: Big Bold Background Poinsettia  (for the background)and the Gothic angels sheet and the Big Bold Background Christmas Baubles where I cut out some of the baubles.

This is one of the cards for a coming workshop, Miracle Christmas with Chocolate Baroque.


I worked with Distress Oxydes for the background and colored the decoupaged element using my Tombow markers. lots of gold embossing powder really makes it rich....


                    Hope you like my take on this Christmas card, next time there will be more......

Thanks for visiting and till next time,


Sunday 14 August 2022

graphs (by Veronica)

Good morning everyone, I hope that you are all not melting in the heat at the moment - as far as I am concerned, it's a close run thing!

Two more samples from last month's tv shows today , this time using the Small graph  paper stamp as the main image. I have to admit to a feeling of relief when others also went a bit wild!

The first one just has the graph part of the stamp stamped in black in the centre of a 5.5" square white card. The letters from Just Useful  and the scribble from Make More Marks also stamped in black, and the squares from Make More Marks stamped in red. I also filled in some of the scribble loops with a fine line pen.


 For the second card most of the graph stamp was stamped in blue ink, with the line from Making More Marks in green to make the graph line. The A from Just useful in black, and then a sentiment from Words of Comfort and Cheer added in black to finish

Saturday 13 August 2022

Freedom (by Sandra)

Hello, I am sharing a couple more of my cards from the July shows on Create and Craft.

My first card uses the O is for.... stamp set.
I stamped the main image onto some smooth cardstock in Memento ink and coloured with alcohol markers. I then used the mini tree stamp from the set and stamped around the edge of a slightly larger piece of card, changing the direction of the stamp each time. I then mat and layered these onto some black card and onto an 8x8 card base.


I used Freedom Flower for my next card.
I started with a piece of drawing cartridge  about 6.5" square. I stamped the flower image in the top right corner in archival ink and then covered with a mask. I repeated this 2 more times, varying the placement of the flower across the top of the card. Whilst the flowers were masked I used the splatter stamp from the set and stamped along the lower edge of the flowers. I removed the masks and coloured the flowers with watercolour pencils. I added the word "Gratitude" from Artistic Expressions.


 Thanks for looking

Sandra x

Friday 12 August 2022

Scaling Up Those Little Projects (by Judith)

Hello everyone, I hope that you are keeping well. I have a few projects to share with you from last month's TV show on Create and Craft, showcasing some of the beautiful floral butterfly stamps that we had on the show. 

I like to make a few quick cards when I can, they are so handy to have in my stash when I need a card in a hurry. I also like to make a batch of them, several at a time, so that I can give them as a gift, or just to build up a store of cards to use later. I love to make little 4" x 4" cards, they are a lovely size to create and to give as gifts. I created two different types as demos on the show last month, and here is how I created them:

The first card was created using a piece of Drawing Cartridge just slightly smaller than 4" x 4". I swiped some Distress Ink onto an acrylic block, (green and blue), and spritzed it with water. I placed the Drawing Cartridge onto the block, and then peeled it away, to get a watercoloured background. I left the background to dry naturally. I stamped the daisy image from Honeysuckle Butterfly twice onto the background, using black ink, and added a butterfly. I also added some foliage from the same stamp set using green ink in first and second generation stamping, to give the impression of a field of flowers. I varied the height of the foliage. I coloured the flowers and butterfly with pencils, using a simple palette of pink, yellow and green. I edged the background with turquoise ink.

To create my second quick card, I selected a piece of black and white paper created by Lesley, which I cut down to size. I added sponging with green and purple inks to create hills, and pink or orange ink around a circle mask to create the impression of a sun, (a technique that was inspired by the lovely Jean Hardy). I used Versafine Clair ink in various colours to stamp foliage from the stamp sets, and added a butterfly which I coloured in co-ordinating colours.

These little cards are lovely in their own right, but I wanted to show you that they could also be used as larger cards too. I created backgrounds for both of these cards very quickly using the butterfly on the card to pull everything together. For the first card, I used the blue and green ink as before to create a Distress Ink background, as you have seen me create so many times before, and then I simply stamped the butterfly randomly over the top in turquoise and green ink. I edged the background in the turquoise ink as I had done with the smaller card. It makes a really pretty large card suitable for any occasion, just add a suitable sentiment, or leave it blank and add a sentiment inside.


 For the second card, I used a piece of grey card, and added the butterfly stamped with pink and orange Versafine Clair, it's an unusual colour combination, but really pretty, just the same.


 I hope that I have given you lots of ideas for these lovely stamps, thanks so much for stopping by,


Take care,


Judith xx

Wednesday 10 August 2022

Beginner's Card (by Julie)

Hello fellow crafters. Here is a quick beginner's card I've made...

Step 1. Take a DL card blank, then using the long dotty background stamp from Slim Word Strip 2, ink up in Versafine Clair Meadow yellow. Stamp this three times slightly overlapping each time, until the card is covered.

Step 2. Ink up in Versafine Clair Nocturne Black ink, use the Birthday word strip from the same stamp set and stamp across the middle of the card.

Step 3. Take the small ivy leaf stamp from the From Nature 2 stamp set, ink up in Versafine Clair Green Oasis.

Step 4. Stamp a couple of sentiments from the From Nature 2 stamp set.

Step 5 Add a handrawn frame wiggly line style around the edge and add faux stitching with a micron fine black pen.


Thank you for taking the time to have a look and hope you find it useful,


Regards Jules x


Tuesday 9 August 2022

Fabulous Flowers by Zoe

Good morning Lovelies and welcome to my first post this month.
I don’t know about you, but wow! This year is flying by.
Anyway, today I’m sharing with you some samples I made for last months fabulous shows.

I made a Journal style bookmark using Watercolour card which I’d spritzed with water first then just dropped some liquid Watercolour inks I have onto it and let it spread and dry, I used a leaf stencil from my stash with Distress ink. Second generation stamped the dictionary from the set, I used a very loose colouring technique with pencils and bit of splish splash splosh with a pen to create some speckles for added interest.

The same technique for my second sample.

And using masking tissue to create layers with my flowers, I coloured using Inktense pencils and water to create a Watercolour effect, and of course a bit more Splish splash splosh.


Thank you so much for spending your time visiting today, I hope you like my creations.
Have a wonderful day xx Zoe xx