Pin It button on image hover
Showing posts with label Owl Edges. Show all posts

Monday, 30 August 2021

Perfectly Perched


Perfectly Perched

The stamp used in the making of these cards is called
It is a very detailed stamp and full of potential. The first one is quite easy to make as is the second of the cards although it is a bit more fiddly if you choose to cut it out as I have.


The Bauble is made using a stencil, but if you don't have one fold a piece of paper in half and cut the shape you would like. Using a low tack tape position your bauble in place, stamp your image through the stencil, using the Distress Inkpad and a soft blending brush define the shape of your bauble. Spritz your paints with water and colour your image.
Then finally using the twig from the Owl Edges stamp sheet and the Versafine Clair Green Oasis stamp randomly around the image. 


This second card was stamped using a White Inkpad and White Embossing Powder onto Black Card. I used Iridescent Watercolour Paints to colour this piece and mounted the image after fussy cutting it onto a gold satin card with some green sheer ribbon on two of the corners. The image is mounted onto the card using a silicone glue gel. 


Thank you for looking in today

Love Doreen xx 


Saturday, 28 August 2021

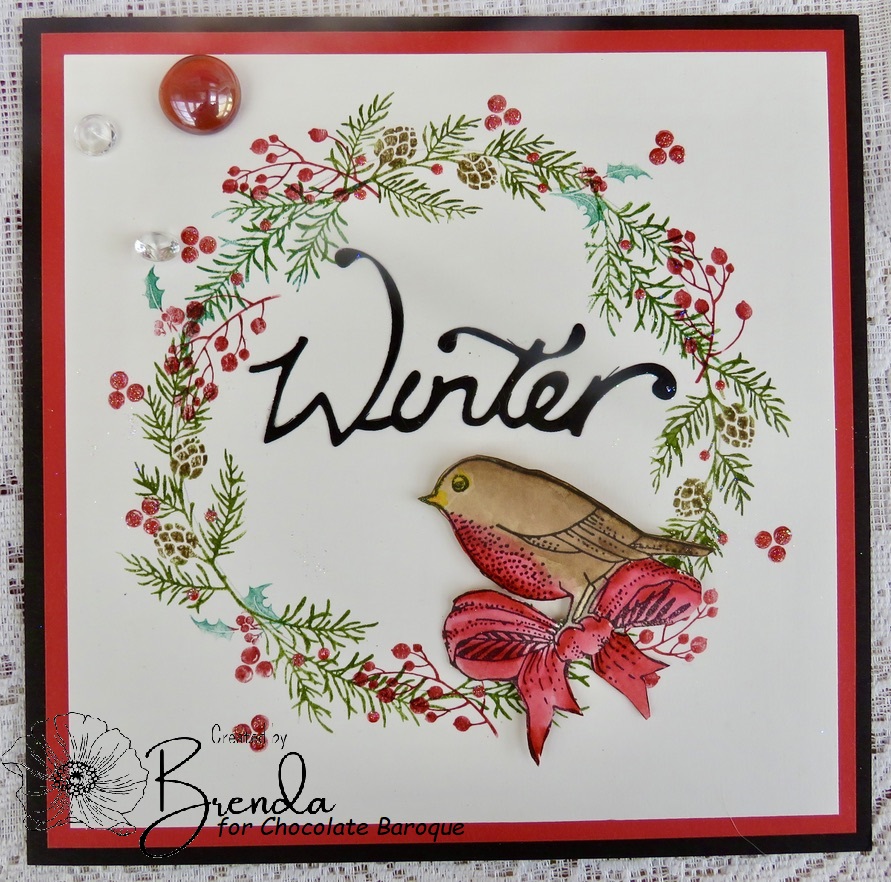
Pink Digitalis by Brenda


My final post for this month with  three more shares of work from last months TV shows. Above and below a hexagonal box and a set of cards using stamped from Honey Bee which is such a useful set. I  stamped, coloured and cut out several Digitalis to decorate the top of the box.

Below a Winter card using the Robin from The Gift and a collection of worker stamps used to create a wreath into which I place the Robin after colouring and cutting out.

My final share is a stepper card using Majestic Crane and Owl Edges all stamped, coloured and cut our to add to the 'steps'.


Wishing you all a good weekend, perhaps with a little bit of crafting as well.

Wednesday, 18 August 2021

The birds and the bees by Rachel

 Hello there! Rachel here with you today with more inspiration from the July shows. In this first sample I have used the honeybee stamp set to create a ceramic plate. I stamped the images in ink and then painted in glaze before having the paint fired in the kiln.


In this next sampe I have used a piece of patterned paper in the background and to that I have added a simply fussy cut stamped image from the Majestic Crane stamp set. I like the contrast between the background and the white image. I love that sentiment too.

For this final make I used the owl edges stamp set and created a bookmark. I stamped the image on white card and coloured it using mica powders. Another very quick and simple make.

I hope I have given you some inspiration on ways to use your stamp sets.
Big Hugs
Rachel x


Tuesday, 3 August 2021

On the Edge (by Sandra)


Hello, I am sharing some cards I made for the July show on The Craft Store.

My first card uses stamps from Owl Edges and Flora and Fauna. I brayered dye inks in shades of green, blue and purple onto some silk coated cardstock. I then stamped the Bulrushes from Owl Edges onto the bottom edge in black archival ink. Using VersaMark, I stamped the dragonflies from Flora and Fauna and embossed with holographic powder. I then mixed some mica powder with water to make a “paint” to colour them with.


For my second card I made a double gatefold base and stamped the floral edge stamp from Owl Edges on the fold so that they met in the middle when the card was closed. I coloured the image with watercolour pencils. Inside the card I made a little scene using the branch and single owl, which I masked and stamped twice. The sentiment is from Steampunk Birds


Next I have a lovely geranium in the terracotta pot from Flora and Fauna. A beautiful image for colouring with watercolours. I added the butterfly from the same set and the sentiment is from Floral Clock.  


My last card today is the poppy seed heads, again from Flora and Fauna, which I coloured with watercolour pens. I added some dragonflies and gave them some sparkle with Stickles. The text is from Polygon Poppies.


Thanks for looking
Sandra x

Monday, 2 January 2017

new dawn (by Veronica)

2017 sees a new start for Chocolate Baroque, when Lesley has her first show on Hochanda on Wednesday - I shall be firmly glued to the tv at 1100 and 1700 to see what new techniques she comes up with!
When sorting out my craft space post-Christmas, I found loads of stash, including some little (if at all, to be honest) used stamps, that were must-haves at the time that got sidelined....I am sure we all have them somewhere! I decided to use a couple of them and have a quick play among the chaos, and this is one of the results.
The main stamp is from owl edges, and the sentiment from see beauty - I usually give sentiment stamps a miss as I can almost guarantee I won't stamp them straight, but clear stamps are a help, and I manage to get them a lot straighter than otherwise, so risked adding this one to the card blank......
Background using distress inks, narrow black mat on a 5"x7" white card blank.

The main focus of the DT this month is romance, and here is my first 'official' sample, using the lovely harlequin rose stamps.It has been around for a while, but is such a useful set for general cards, not only for Valentine cards.
I stamped the main stamp with black versafine, clear embossed it before adding colour with brusho powders, and mica powder for the swirl in the corner. Background stamp from the same set, stamped with wild honey distress ink, which was also brushed round the edges.

I hope you all have a very happy, healthy and crafty new year.
Veronica

Thursday, 3 December 2015

2 or 3 little things

Hello
It is unsual for French people to send cards for Christmas. The tradition is for the new year. So these cards are examples of what I realized for 2016. "Meilleurs vœux" is "All my best wishes".

Ce n'est pas habituel pour les français d'envoyer des cartes pour Noël. Traditionnellement c'est réservé à la Nouvelle Année. Voici quelques exemples de celles que j'ai faites pour 2016.


This one is made on a glossy paper. I apply 2 colors, yellow and red, on paper and pull the colors to obtain the effects. Then I apply the stamp.
Celle-ci a été réalisée sur du papier glossy. J'applique 2 couleurs, jaune et rouge, directement sur le papier et je tire pour obtenir l'effet souhaité. Puis je tamponne.

 This one is made on a piece of paper painted with acrylic. I paint the branches and the light with Zig.
Celle-ci a été faite sur un morceau de papier peint à l'acrylique. Les branches et la lumière sont peintes au feutre Zig.

And the last one is made with a piece of Canson paper painted with acrylic.
Le dernière est faite sur un morceau de Canson peint à l'acrylic.

I hope you like. Thanks for your comments which give me a great pleasure. Kind regards.
J'espère que vous aimez. Merci pour vos commentaires qui font toujours plaisir. A très bientôt.

Dominike


Friday, 30 October 2015

Exquisite Edges meet Owl Edges (posted by Claire)

Good morning, Claire here with a couple of cards made using this months new stamps.

For my first card, I've used the beautiful 'Exquisite Edges' and combined it with an old favourite from Elegant Spring Flowers to create a Spring themed card.


I began by making a distress ink background, splodging Peeled Paint, Shabby Shutters,Squeezed Lemonade and a little Scattered Straw distress inks onto my blending mat, spritzing with water and mopping up the in with my card, dabbing up any excess ink and then splashing with water. I stamped the edge stamp with Memento Bamboo Leaves ink and used part of the same stamp to create the corner motifs too.

The primula image was stamped with Memento London Fog ink,coloured with Graph'it markers and inked around the edges with distress ink left on my craft mat. I've added ribbon and pearls to finish off.


My second card today combines both of the new 'edge stamps to create a kind of stepper card. I didn't do any measuring at all to make this card, I just used the stamps as a guide to where to fold my base card. I began by cutting a sheet of A4 card down to the width of the stamps and stamped the owls and branches across the top, colouring them with coloured pencils . I stamped the bullrushes and the pretty floral edge with Memento ink, coloured with pencils and cut them out, leaving a little border around the images. 


Next I used my scoring board to fold the card, using the stamped images as a guide, you can see better in this photo.


Thanks so much for visiting today
Claire xx


Saturday, 24 October 2015

Framed Exquisitly (by Julie)

Hello and thanks for swinging by. I am so excited to show my creations made with this months Exquisite stamp sets, so I hope you like them.....

My first card is made using the Exquisite Edges and Fresh Blooms stamp sets and is basically two sets of frames setting off the lovely flower from the Fresh Blooms in the centre. 
So that the edge stamps do not over stamp each other I created a mitred corner by using copier paper to mask off half of the corner at a 45 degree angle. To make this easier I cut a square of copier paper approx. 10 cm x 10 cm and then cut it in half on the diagonal. I then used the two pieces to mask each corner while I stamped each edge of the card. I repeated this process for the centre panel before stamping and fussy cutting the central flower. 
The flower was coloured with Polychromos pencils, the centre frame was stamped using Cornflower Blue  Archival Ink and the outside edge frame was stamped in grey Versafine with a few added white highlights. I finished off by edging the card with Worn Lipstick Distress ink and Cornflower Blue Archival Ink.

I decided to use the cute Owl Edges for my second project and started by inking up the floral edge with Sepia Versafine and stamping each edge of the base card. I then covered the base card with Shabby Shutters and Worn Lipstick Distress inks and highlighted the bulrushes with a white highlighter pen. I then die cut a 12 cm and 7 cm circles for the centre panels and stamped them with the single flower. The smaller circle was coloured with the same Distress Ink as before but I added Tea Dye to darken it slightly, before stamping the twig and adding the stamped owl that I cut from separate card.
The larger circle was coloured with Polychormos pencils along with Shabby Shutters and Worn Lipstick Distress ink over the top.
To tie in the teal colour from the owl I added dots of Evergreen Bough Distress Paint to the outer edges of the larger circle and dabbed the same paint around each corner of the base card.
Dabs of Crystal Stickles were added around the card for a final touch of bling.

Thanks so much for stopping by and hope to see you again soon.

Julie x

Sunday, 18 October 2015

Butterfly Stepper Card using Exquisite and Owl Edges (by Anne)

The new Edge stamp sets are gorgeous – they are so versatile and can be used in so many different projects and mixed & matched with other stamps in your collection. I have combined mine with some patterned paper and stamped butterflies. I hope that you like it.  
 

Materials:


How to make it:

  1. Stamp the border along the top and bottom edges of the decorative paper.
  2. Stamp the sentiment and small floral motif. Extend the stems by drawing with fine liner pen. Colour the floral motifs with pencil.
  3. Trim the paper slightly to fit onto the card base and give a fine border of the white card showing. Enhance the edges with green ink and glue on the die cuts.
  4. Stamp the steps masking the card where needed using a sheet of scrap paper. Glue on the card front.
  5. Stamp the butterflies and colour with alcohol ink pens. Glue to the card.
  6. Add Glossy Accents to the butterfly bodies. Finish by adding sparkle with glitter glue.
Happy Stamping, Anne x.

Friday, 16 October 2015

A couple of cards (posted by Claire)

Good morning, Claire here with a couple of cards made with some of this month's new releases. As always Lesley has released some beautiful stamps and this first card is made using stamps from both Gingerbread Christmas and Exquisite Edges

I love these ornate edge stamps and I thought this one had a look of mistletoe so I decided to create a Christmas card. I stamped the edge four times on kraft card with Versamark and embossed with white embossing powder. I cut them out and layered them up with 3d foam pads to create a frame. The focal image is from Gingerbread Christmas, again stamped with versamark on kraft card and embossed with white EP. I  stamped the sentiment with  Festive Berries distress ink and used the same ink with a waterbrush to add a little colour to the rest of the image.  I stamped snowflakes from the same stamp set into the corners and again embossed them with white. Once my frame was in position, I added little red pearls and created faux stitching with a white pen. I made some little candy cane 'kisses' by stamping the candy canes onto kraft card with red ink and using a white pen to colour the open areas.

My second card is made using stamps from Owl Edges and Walnut Stain distress ink. 


I began by very lightly applying distress ink to the top 1/3 of the card with a shaving brush, then I masked the moon and hills using copier paper masks and intensified the colour. I inked in a couple more hills, making each slightly lighter.

I stamped the bullrushes stamp across the foreground using both first and second generation stamping. Next I stamped the branches and the owl and used a waterbrush to colour the owl. I inked around the edges and added some string and a little brass owl charm.

These are such lovely stamps to use, I hope you're enjoying all the inspiration from my teamies this month, keep popping back as they've got lots more beautiful projects lined up too.
Claire xx


Monday, 12 October 2015

Owl Edges - Cards By Florence

Hi everyone

Today I would like to share with you two cards made with the fabulous Owl Edges. 

The Owl Edges are a new addition to the Chocolate Baroque Edges Range which can be seen here.


To make this card
Stamp, emboss and color in the floral edge.
Take a mask and Distress Inks and create the pattern on the background.
Stamp the corner flourishes and "Tranquility".


To make this card

Stamp and emboss the Owl Edge.
Take a mask and Distress Ink and create the pattern on the background leaving a clear space for the small Owl.
Stamp the small Owl and the Sentiment.
Make up the card as seen.


Thank you for looking
Florence x

Saturday, 10 October 2015

Exquisite Cards (by Julie)


Hello Crafters, hope your weekend is going well. Today is my turn to show you what I have been making with the fantastic new Exquisite stamps that have just been released by Chocolate Baroque.

My first card has been created using the new Owl Edges, along with Artistic Expressions for the sentiment.
I cut a mask for the moon using a circle die and created the background with Spiced Marmalade, Mustard Seed and Hickory Smoke Distress inks. I blended them together with Cut n Dry foam and a few touches from a water brush. The sentiment and the bulrushes were stamped with Onyx Black Versafine and the card was finished off by adding white highlights to all of the stamped images.


My second card comes courtesy of the lovely Exquisite Edges set. This set is so versatile and doesn't have to be used just for edges.
I started by stamping the decorative edges with Grey Versafine and then covered the entire background with Squeezed Lemonade Distress ink.
I inked up the Art Deco style, flower edge with Watering Can Archival ink and stamped it a few times onto plain white stamping card. Next take three different sized circle dies and select which parts of the flowers you want to cut and then put them through your die cut machine.
I have coloured the flowers with Polychromos pencils, glittered them with a Hologram Viva glitter pen and finished the card off by edging everything with Weathered Wood Distress ink.

Thanks so much for stopping by and hope to see you here again soon.

Julie x

Tuesday, 6 October 2015

Give A Hoot Hoot Hoot! (by Asha)

Good morning, fellow Chocoholics. It's my turn to show you the October release stamps in action. My projects today feature stamps from the Owl Hedges A5 sheet.

In this card, I've used the individual owls and the grassy border from  Owl Hedges  to create a scene where the owls are looking out from a crack in the side of a barn.  To create the barn wall I embossed a piece of card stock with the wood grain folder and dirtied it up with distress inks. Then cut it into ½" strips, inked the sides and rearranged them. Next I tore a hole and adhered the strips down. Then came the grassy border and the sentiment from Words of Comfort stamp set on a piece of vellum. Finally the owls: coloured with Faber-Castell Polychromos, fussy cut and adhered in the opening.


More owls on my second card. This time I'm showcasing the row of owls on a branch from the Owl Hedges sheet. I created the background by blending Distress Inks and stamping the the row of owls and added a little movement with a stamp from the Seasonal Fragments sheet.  Then I stamped the owls again on a separate piece of card, coloured with Faber-Castell Polychromos, fussy cut just the owls and adhered them to the card. Finally, a greeting from the Birthday Words sheet.


That's all from me today. The Design Team has loads more projects lined up for you. Don't forget to drop by again ... soon. As usual, more pictures and details of supplies used to make these projects are available over at my blog.

Have a beautiful day!

Beijinhos,
Asha

Monday, 5 October 2015

Owl you need is Love (by Judith)

Hello everyone, I hope that you are enjoying the inspiration provided by my Design Team Mates using the current Stamps of the Month. I have chosen to make a tag using the Owl Edges rubber stamp sheet.

I started my project by creating a wrinkle free distress background on a plain tag, using Distress Inks. I stamped the bullrushes across the bottom of the tag, and added the small branch up one side of the tag. I stamped the little owl onto a sticky label and then coloured it with pencils. I also coloured the branches with pencils. I added some shading around the edges of the tag, and stamped a sentiment from the Steampunk Birds rubber stamp set onto the background.

Finally, I added some co-ordinating ribbon to the tag.

Thanks for stopping by, Judith xx

Friday, 2 October 2015

Twit Twooooo (posted by Claire)

Good morning, Claire here with my first sample created using this month's new stamps. As always the stamps are a real joy to work with. This morning's card features some of the stamps from Owl Edges.


This was a very quick card to make using white cardstock and a Vintage Photo Inkpad. I began by lightly dusting some ink over the top half of the card with a stencil brush. Then I masked the moon and tore a paper mask for the hills and dusted more ink around the moon. I carried on creating the background by moving the paper mask down and dusting ink over to create the hills.

Next I stamped the branch and owl and used a water brush with a little more ink to colour the image. I stamped the bullrushed at the bottom of the card using first and second generation stamping. Next I distressed the edges with a craft knife and applied some more ink using an ink blending tool. 

To finish off I've added some twine and a little owl charm.
My teamies have created some stunning projects with this month's new stamps so don't forget to keep checking back for more inspiration.


Claire xx

Thursday, 24 September 2015

Stamping on the Edge (by Lesley)

Welcome to the launch of our October stamp sets, which this month sees two additions to our Edges series. Our previous edge sets have proved very popular, so here we have two new A5 sets which are bound to become a favourite in your crafty stash.

First we have the loveable Owl Edges


followed by the elaborate Exquisite Edges


Both these sets are available as individuals or as our normal money saving multi-buy.

The Design Team ladies are in full creative mood with these designs and I know you are in for some eye catching ideas next month. Here is a card made by Zoe which shows how you can combine the gorgeous edges with that sweet little owl.


Also released today are the last of this year's Christmas stamps, both of which are clear sets.


I just know that kids will love making cards with the Gingerbread family, whilst the baubles and flourishes would be fabulous for batch making.  

Here is a card I have made using papers from A Weekend in Seville, a different to look to the traditional Christmas don't you think?


Once again Sue had designed some unusual and amazing stamps that are full of fun and versatility and will give you hours of pleasure.