Pin It button on image hover
Showing posts with label Happy Flowers Day. Show all posts

Friday, 31 December 2021

Floral Fun

Floral Fun

Hello all, I hope you have now recovered from your Christmas meals and are all suitably satisfied having had a very enjoyable time.

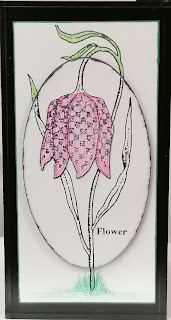
Today I would like to share some of my floral makes from the November Shows. The first shows a simple card using The Snakes Head Fritilary taken from the Happy Flowers Day stamp set. I find it amazing how such a delicate flower can have such beautiful detailed markings, isn't nature just wonderful ?

I stamped this image twice firstly onto a piece of white card and then onto an oval piece of mountboard which I found in my stash.

I coloured just the leaves and some of the stem on the card and just the head of the fritilary on the Mountboard, with a few strokes of the pencil at the bottom of the stem to ground it with some blades of grass. Very easily lined up to mount with double sided foam tape to make a quick, simple but effective card. 


One of my favourite florals so beautiful and needing so little time to make for an effective and easily made card suitable for any number of occasions depending on how you decide to colour it.


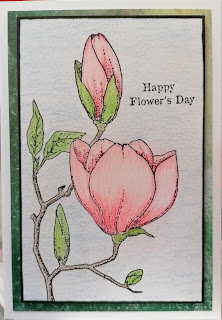
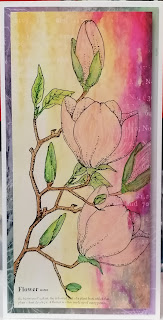
Another of the Magnolias how could I resist this is quite simply stamped onto Chocolate Baroque designed card and coloured using Koh-I-Noor Brilliant Water Colour Palette these paints are such a delight to use and the card accepts the watercolour without a problem.


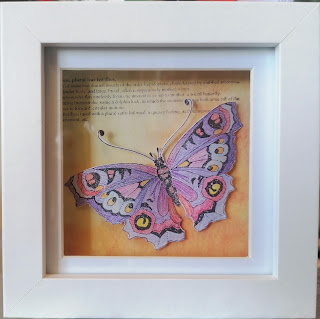
Finally for something a little different from the set, this beautiful Butterfly deserved to be showcased by itself, don't Chocolate Baroque do beautiful butterflies ? 
This is mounted in a small shadow box I have had hanging around for a while now but this stamp was the perfect size to fit it so I stamped, coloured and fussy cut the image and then mounted it into the box having stamped the dictionary explanation of the Butterfly onto a complimentary coloured piece of card. 


Many thanks for popping in today, may I also take this opportunity to wish you all a Very Happy New Year.

Love Doreen

Thursday, 31 October 2019

Hearts and flowers by Rachel

Good Morning! Its the final post of the samples from the September show and I hope there's nothing scary in this post! Just lots of my samples from the show!
This one was made on a gelli print background using the geometric trading hearts stamp. I coloured sone of the squares in using water colour pencils. 


For this one I used the artists trading heart outline on another gelli background and then masked off the heart and stamped the celebration bouquet all around the outside. My trusty water colour pencils then came out to colour the blooms!

More using the geometric trading hearts and maskingthe first heart before stamping the second one.


A bit more of a scene this time creating the background using a sun mask and blue/green ink before then filling in the sun. I overstamped and masked the snakeshead fritallaria and coloured with water colour pencils.


Finally I used the butterfly from the happy flowers day stamp set to create this card! Simple repeat stamping on an inked background and colouring in using water colour  pencils.

Hope you have a great day - big hugs Rachel xx

Friday, 25 October 2019

Heart of the Garden and Butterfly Bouquet by Penny


Good morning peeps, I hope you are all keeping well and dry!  What's with all this rain?  My garden has gone from parched to swamp in such a short time!  
It's my last post of the month today and I've got a piece of home decor and a card to share with you.

Heart of the Garden.

For this Home Decor piece I have used stamps from the Filigree Trading hearts and Celebration Bouquet sets; Distress Inks, texture paint, chalk paint, black Versafine ink, clear EP, CB stencils  Seasonal Elements and Useful Leaves, a gold pen and Koh-I-Noor paints.  


I stamped and embossed the filigree heart image in black Versafine and clear EP three times onto white card then cut them out.  I painted them and added dots with a gold pen.  I did the same with the bouquet.


I took a canvas board and painted a background with chalk paint, then used stencils with DIs and texture paint to add some foliage and flowers.   I attached the hearts to the board then attached the bouquet on top.


Butterfly Bouquet.

This is a quick and pretty piece of artwork that would suit many occasions.  I have used stamps from the Celebration Bouquet and Happy Flowers Day sets; grey Versafine ink, alcohol pens and DIs.  


I took a piece of CB Luxury Smooth White Paper and stamped the bouquet in grey ink.  I coloured the image with pens and added a shadow line.  I then took a spare piece of the paper and stamped a butterfly in grey ink.  I coloured it with the pens then cut it out.  I matted and layered the focal panel onto a white base card, then I stamped a sentiment along the bottom of the card and added a couple of foliage stamps.


I really like this quick card, it is ideal for when you need a hand made card in a hurry!  


Thank you for dropping by today, I hope to see you next month when I'll be back with some more crafty fun.  

In the meantime take care everyone,


                            xx  Penny  xx 


Friday, 18 October 2019

Butterfly tag by Brenda


Morning everyone, Brenda here with some more shares using last months new stamps.

The first is a tag inked with Distress Oxides, some stencilling and some second generation stamping using the edges of Celebration Bouquet, sentiment from Happy Flowers Day and two Butterflies from the same set coloured with the same inks. I mounted the tag onto some corrugates and, arranged some string onto the tag and fixed the Butterflies in place.


A Brusho background and a die cut lattice panel fixed over it and the beautiful Magnolia from Happy Flowers Day coloured with the same Brusho's, cut out and arranged over the lattice. The sentiment is from Filigree Trading Hearts.


Here I have used some of the Designer Papers town into strips and fixed across the base and a heart from Geometric Trading Hearts stamped onto a piece of the matching colourway DP and little dots of Liquid Pearls added in the coordinating blue.


This one was really simple to make stamping the heart from Geometric Trading Hearts with Versamark and embossing with detail gold EP, cutting out each heart, scoring down the centre and fixing the hears back to back to create a hanging decoration. Note.........don't forget to fix the hanging cord into the centre before gluing the final hearts together. I also added some curling ribbons at the same time as the hanging cord.


Finally the lovely Celebration Bouquet stamped into an Oxide background, coloured in with Koh-i-Noor paints, some background stamping, a bot and tag sentiment from Happy Flowers Day. 

Have a lovely weekend.

Thursday, 17 October 2019

Hearts, Butterflies and Flowers (by Sandra)

Hello

I'm sharing with you my second post from the August Hochanda show.

For my first card I made a background using Brushos choosing blues and greens. I then stamped the flowers from Celebration Bouquet and embossed in white.


For my second card, I used water colours to make a soft background on cartridge paper. I then stamped the bouquet and embossed in gold and coloured with water colour pens.


Next I used the Butterflies and Dictionary definition from Happy Flower's Day stamp set. I bleached the colour from the butterflies and used a soft blue/green water colour.


For this card I used the Butterflies again with the Triple Layer Stamping method and kept it very simple in the black and white colours.


Next are the fabulous Artist Trading Hearts. For this card I used  the Filigree Trading Hearts set. I  used some glossy card and alcohol inks to make a background, I then stamped and embossed the crackle heart and the butterfly from Happy Flower's Day and cut them out and mounted onto a blank card with a sentiment.


For my last piece, I used a piece of grey board which I added some modelling paste through a stencil and some acrylic paints. I stamped the heart onto a background paper I had made on the Gelli Plate. I stamped the leaves onto some card and cut them out and hung them from the heart to make it look a bit like a dream-catcher.

Thanks for looking
Sandra

Monday, 14 October 2019

Beautiful Magnolia by Rachel

Hello there! Rachel here today and I would like to share my makes from the September shows - particularly those involving the magnolia from the Happy Flowers Day stamp set.

First of all my ceramic piece. Curved stamping surfaces are always more of a challenge but this large stamp worked easily on the vase. I stamped in ink which burns off on firing, then over painted in glaze and outlined in brown. I added the butterfly on the rear of the vase too.


This next card involved a gelli plate background that I created using inks on a 6x6 inch square gelli plate. I applied the ink with my brayer and played around with using the brayer to make 'mountains' at one area. Then I added some splats of water before pulling the print. Next I stamped the artists trading heart and the magnolia before colouring with water colour pencils.


This final background was made using pixie powders and a stencil before stamping the image and again colouring with water colour pencils. 


I do hope this has given you a little inspiration of ways to use your stamps!

Have a great day!

Hugs

Rachel xx

Sunday, 13 October 2019

Happy Hearts and Flowers Day by Debbie


Hi everyone, it's my turn to show you the samples I designed for the September Chocolate Baroque Hochanda show. We had some lovely florals & hearts to choose from and a wealth of options for your imagination. 

Here's my first design using Celebration Bouquet


For this one I simply embossed the image with white powder onto Kraft Card and sponged with Distress inks Blueprint Sketch, Peeled Paint, Barn Door and Fossilized Amber.

I then layered onto white & Kraft card before attaching to an A5 Kraft card blank. Very simple but clean and delicate. I just love all the fine detail in this stamp. 


Next, we have Happy Flowers Day


This is one of my favourites and for this one I began by flicking some brown ink onto an 

8 x 8 ivory card blank. Next I die cut some hexagons and then stamped parts of the magnolia, butterfly and script using a black inkpad. I coloured with pencils and attached 2 strips of burlap onto the card blank before attaching the hexagons.


I just loved September's stamps and once I got going, I just couldn't stop! My next sample incorporates the great Artist Trading Heart and Geometric Trading Hearts.


This again is a simple design. I stamped both hearts onto card which I had smooched (wipe the card through watered ink on your craft mat) Distress inks onto using a black inkpad. I then cut them both out and stamped the sentiment and image onto the plain one.

I stamped Square Bubbles onto a 6 x 6 white card blank using a grey inkpad and sponged Distress ink Wilted Violet  around the edges.  


 Finally, we have the Snakehead Fritillary from Happy Flowers Day  


For this card I stamped onto a white die cut oval (a smaller one for the sentiment) using a purple inkpad and then stamped again without re inking the stamp (secondary stamping) which gives you an interesting shadowy effect. I coloured the flowers in the foreground using pencils and mounted onto a grey A5 card blank.


That's all for this time but I'll have lots more to show you layer in the month including the samples which didn't make it onto the show. 

Thanks for visiting Debbie


Tuesday, 8 October 2019

Bouquet of Sunshine and Smiles and Pink Magnolia by Penny


Bouquet of Sunshine and Smiles.

Morning Peeps!  I hope you are all well and enjoying the lovely Autumnal colours that are starting to come through!  I'm back to share my first post with you this month featuring stamps from the Celebration Bouquet, Happy Flowers Day and Filigree Trading Hearts sets, CB Mask/ Stencil   Useful Leaves and Kaleidoscope of Butterflies, Distress inks, black Versafine ink and alcohol markers.  


I began by stamping the bouquet image onto a piece of CB Luxury SmoothWhite Paper using Versafine ink and coloured it with pens.  I did the same with a butterfly then fussy cut both images.    


On a plain piece of CB's Designer Papers I added DIs through a couple of stencils to create a background, then added gold pen around the edges.    I took a white base card and stamped one of the worker images around two edges.  I attached the background panel to the base card, off setting it to the side.  I then attached the bouquet and butterfly with 3D glue, stamped and die cut a sentement then attached it to the card with 3D glue.


Pink Magnolia.

This project uses stamps from the Happy Flowers Day, alcohol pens, Distress Inks, CB Stencil Kaleidoscope of Butterflies, black Versafine ink, clear embossing powder and an embossing folder from my stash.


I stamped and embossed the Magnolia image onto smooth white paper, then coloured it with pens.  I added a few stencilled butterflies using DIs then blended ink around the edges of the panel.  I took a piece of Kraft card and embossed it through a folder, then attached it to a white base card.


To complete the card I stamped a sentement along the bottom edge of the base card.


Thank you for popping in today, I hope that you have enjoyed this post and that I've encouraged and inspired you to have a go!  I'll be back later in the month with some more crafty fun!

In the meantime take care,


                        xx  Penny  xx


Friday, 4 October 2019

A Bouquet of Smiles by Brenda


Good morning Brenda here with some samples from last months programmes on Hochanda which features lots of beautiful new stamps.

My first share above used the pretty Snakes Head Fritillary from the Happy Flowers Day set. My starting point was an inky background using Distress Oxides along with some stencilling and a die cut corner. The flowers were stamped using Distress Markers direct to stamp along with a spritx of water, cut out and arranged on the base, some twine,  sentiment and shrink plastic Butterfly from the same set.


Another Oxide background and stencilling but this time I used bleach through the stencil to remove the colour and leave the flourish pattern. Sentiment and Butterflies from the same set as the above card stamped with Versafine Clair.


This is the beautiful Celebration Bouquet, stamped in Versafine Clair onto a background created with a stencil and Distress Inks, the adding colour to just a few of the blooms.


The new Filigree Trading Hearts and Geometric Trading Hearts were really popular on the show and for this one I die cut three different sized hearts onto card which I first covered with some DP, stamped onto them with three of the hearts from the sets, the sentiment and coordinating DP down the leading edge.


Finally the beautiful Magnolia from the Happy Flowers Day set, stamped with Versafine onto black cardstock and heat embossed with detail clear EP, then coloured in with Twinking H2o's along with a sentiment from the same set.

Thanks so much for your visits today.


Thursday, 3 October 2019

Marvellous Magnolias

Hello
I'm sharing some of the cards I made for the August show on Hochanda which featured the Happy Flower's Day stamp set. This set contains a lovely selection of flowers, butterfly, sentiments and dictionary definitions.

I did a few cards featuring the Magnolia stamp and did different techniques for each of them.

My first card, I stamped and embossed onto Kraft card and used thin bleach to lighten the card, added a sentiment and a pretty punch down the side.


 For my second card I stamped and used water colours and a sentiment from Birthday Words


For my third card I stamped the Magnolia and then masked it off and stamped again.


For the last card I stamped the image onto some card 3 times and used two of the images to decoupage the Magnolia.


Also on the stamp set are the Snake's Head Fritillary and a butterfly. I have used them here with words from Artistic Expressions in the background.


Thank you for looking
Sandra x