Pin It button on image hover
Showing posts with label Rose Duo. Show all posts

Wednesday, 14 October 2020

Floral Grid (by Christine)

Hello everyone, today sees the first of three posts this month by our Guest Design Team member Christine Patch. She has created a delightful card for your inspiration, and kindly provided a step by step tutorial for you. 

Christine writes: 

Hello everyone

It's my turn again on the blog to share some crafting ideas using lovely Chocolate Baroque stamps. So much has happened in the world since I was first on this blog but crafting with beautiful products remains a joy.

I thought I would share a 'how to' on this occasion. It started very simply with a die cut circle in white card. 


My idea was to create an image using several flower and leaf stamps, with a bit of added extra (in this case butterflies). I decided against adding any background to the white card since I wanted the images to stand proud.

Next step - add a grid. Out comes a black fine liner pen and ruler. I added temporary adhesive on the back of the card so that I can use the lines on my black glass mat to ensure the lines were straight. My ruler has a one centimetre line so I used that as a spacer.

On to colouring using Polychromos pencils and some shading to give additional depth. I also added some small circles with the fine liner pen where all the lines intersected.

Finally, I added two of the butterflies from my original stamping, colouring again with the pencils, but adding some clear sparkle gel for a little impact. A sentiment stamped in black and mounted on white then red card finished the card.

It's not a quick card to make but I think it's worth the effort.

I hope you like this design and might consider trying it yourself but adding your own spin. The stamp sets I used were:

Celebration Bouquet

Rose and Thistle

Rose Duo

Autumn Hedgerow

Butterfly Mind

Happy crafting!

Christine

xx


Saturday, 30 June 2018

A Rose With Love (by Zoe)

Good morning Lovelies and welcome to my final post this month featuring the beautiful stamps from the May Hochanda shows.

My first card I used some papers from my stash. I heat embossed first onto my background in white and secondly onto a red backing paper and then a green. I fussy cut my second and third image to decoupage and added some gold sparkle brush pen to the ribbons and added a few sequins to finish.

I used my Gel press to create this background and stamp with the gorgeous On the Tiles background stamp using a similar colour. I stamped the grasses from the Rose Duo stamp set in various Versafine inkpad colours, and the final grasses I used sparkle embossing powders in gold and copper to give some sparkle and texture.

Thank you so much for spending your time to visit and leave a comment.
Have a wonderful day xx Zoe xx

Friday, 29 June 2018

Kissed bubbles by Brenda


Brenda here with my last post for this month using some of the stamps from last months Hochanda shows. 

The top card was really fun to make, I used an acrylic block and Distress Oxides and created the background by using the acrylic block to kiss stamp Square Bubbles which I inked with three different colours, cleaning the stamp between each colour. I then stamped the Fern from Rose Duo using Versafine black and used one of the small sentiments from "I shall be your Wings" to ground the images.


For my next share the background was created with Mica powders, followed by stamping Rose Duo which I then bleached out and coloured in with pencils, then added some texture paste through a stencil and also some Butterflies using Kaleidoscope of Butterflies Mask and DI's.


Finally one from an earlier show using the smaller stamps from Honey Bee and Fragrant Honeysuckle, stamping them onto hexagons cut out with a die and inked with DI's and fixed to a black base card and a few glass beads added.

I hope I have offered some inspiration today and my thanks for your visits.

Saturday, 23 June 2018

Wish - by Magda

Good morning
Let's start this day with a wish after all the rain we have had lately.  I hope my rainbow card will bring some warm sunshine to everybody.

Step by step

1. Blend dark sky colours on a white cardstock using Stylus Tool and Distress Ink Pad
2. Apply rainbow colours of Distress Ink Pad on the feather from the sheet  "I shall be your wings"
3. Stamp as topper the sentiment of the same sheet and glue it on the card


As you can see, my second card is a decoupage one
Step by step

1. Stamp on a white cardstock two feathers from "I shall be your wings"  with 
    Distress Ink Pad Vintage Photo and one feather with Distress Ink Pad Black Soot in second
    generation
2. Blend the feathers using a Watercolour Brush - Detailer Tip, let dry and cut the image out.
3. Colour a white cardstock with Distress Ink Pad Mowed Lawn 
4. Stamp the background stamp "On the Tiles Individual" with Distress Ink Pad Fired Brick
    and cut the sape out.
5. Stamp ""I shall be your wings" sentiment on a piece of white cardstock coloured with           
    Distress Ink Pad Vintage Photo
6. Assemble the mat as shown in my sample and glue with Zig 2way Glue Pen - Broad Tip


I thought to use a Kraft Tag as third project for today.

1. Stamp the rose from the"Rose Duo" rubber set with Versafine Onyx Black 
2. Colour the rose with white Charcoal Pencil 
3. Blend if necessary with Lyra Splender Blending Pencil 
4. Colour a white cardstock with a mix of yellow  Distress Ink Pad shades to have a contrast
4. Stamp the sentiment from the plate Words of Inspiration with Versafine Onyx Black                    
    in second generation


I hope you had fun in visiting my page, thank you for passing by and see you next month with more samples.
Magda

Sunday, 17 June 2018

Mostly Masking (by Judith)

Hello everyone, I have several projects to share with you today showcasing the lovely stamps featured on the May TV shows on Hochanda. We also took Masking Tissue onto the show, and a lot of my projects reflected the use of this product.

For my first card,  I created a Pan Pastel background, tearing strips of paper to create hills, and adding a green colour at the bottom half of the card, toning in some grey as I moved up the card, to represent hills in the distance. I created a sky using blue and pink pastel coloured tones.

I stamped the floral spray from the Lords and Ladies stamp set repeatedly across the lower half of the card, varying the height of the stamp. I added a stamp from the Silhouette Grasses stamp set using second and third generation stamping for this stamp, to create some depth, as if there were a meadow of flowers. Two little butterflies from the Baroque Meadow stamp plate, and a sentiment from the Words to Dazzle and Sparkle stamp set completed the card. All of the stamping was done with a green Versafine ink, and the images were coloured with watercolour pencils.


I wanted to create a one layer card that would be cheap to send in the post, but still have the look of a multi layered card. Using a piece of masking tissue, I coloured a piece of drawing cartridge with Distress Ink, first around the outside of a central panel, adding shading, and then stamped over the background using the Square Bubbles stamp. I then removed the mask, and added the corresponding reverse mask, leaving the central panel uncovered, and inked the edges of that area with the same background colour as before.

I stamped the foliage stamp from the Rose Duo stamp set using first and second generation stamping in blue and green dye based inks, then ensured that all of the ink was completely dry. I stamped and embossed the foliage image with Versamark Ink and copper embossing powder. An optional extra at this point was to edge the background with Versamark and tip copper embossing powder over the edges, before embossing the foliage.

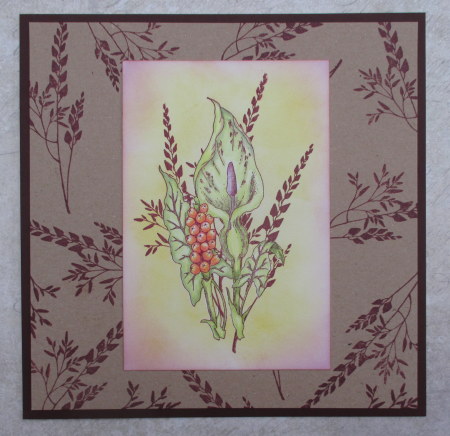
My next two cards are based on a very similar colour scheme to each other, and use the lovely Cuckoo Pint image from the Lords and Ladies stamp set. For the first card, I created a background using the foliage stamp from the previous card, stamping onto kraft card with a plum coloured ink. I created the main image by stamping the Cuckoo Pint, masking the image, and again stamping the foliage, again using plum coloured ink for stamping. I coloured the flower with pencils. adding Distress Ink to the background for a soft finish.

The next card was created by adding Brushos to kraft card and spritzing them with water. I added some toning hessian, a button and ribbon to the background. To create the focal piece, I stamped the Cuckoo Pint, and masked the image before stamping the On The Tiles image. I coloured the image with Distress Inks and a water brush. The two images have been coloured in similar colours, but the different mediums give a very different effect.

I hope tht you are enjoying the DT's projects with these lovely stamps, do keep checking in for more inspiration. Thanks for stopping by, xx

Thursday, 14 June 2018

Rainbow Grasses (by Zoe)

Good morning Lovelies and welcome to my second post using these beautiful grasses from the Hochanda show last month.

I made a card and matching envelope this time.
I masked the edges with masking tape and masked a moon on the card and address window on the envelope using masking tissue. The card is Linen Texture card, I just love inking over the texture, I think it gives a classy look. I used dye based inkpads with brushes to get a smoother blend. Once I blended my colours I simply stamped using Versafine black ink. I used second generation stamping on the envelope, added a few glittery dots to the card and a sentiment. Very simple, but pretty I think?


Thank you so much for your comments, I hope you will join me later in the month for my final post. Have a wonderful day xx Zoe xx


Wednesday, 13 June 2018

Summer Roses by Brenda


Hello Peeps, Brenda here fresh back from my travels around the Mediterranean. Today I have some more shares from my samples for Lesley's recent Hochanda shows. 

I really like the fresh Summery colours of the above card which I created using the Rose Duo stamp set, stamping and masking the image several times using black Versafine around a square piece of watercolour card. I then coloured in with sparkle pens and added a focal quotation from Loving Sentiments, matted onto black card and added a pew pearls to embellish.


The feathers from "I shall be your Wings" yelled out necklaces and earrings to me and it seems they did to quite a few of us on the DT. I stamped the feathers with black archival ink onto shrink plastic and after shrinking down coloured the back with Chameleon pens and used some jump rings to attach to the corded necklace.


This Rose from Rose Duo really is beautiful and on most of my samples I kept them fairly simple to allow the image to do the talking. For this one I used a stamp positioner........a fairly new purchase and I am wondering why I resisted for so long as it makes techniques such as this one so easy. I first inked the image with distress pens addinf more colour with additional stamping, left to dry for a few minutes and then went back in and stamped with Versamark and then heat embossed with gold detail gold powder. After removing from the stamping platform I added a little more colour, matted and layered onto a base card and added a few pearls.


For this card I used the same technique as the above card using Rose Duo but used silver embossing powder. After stamping and once I was happy with the colours I masked the edges of the piece and used DI's to add some colour building up from the masked edges.

As always my thanks for you visit and kind comments and I hope I have offered a little inspiration.

Thursday, 7 June 2018

Rose and Feathers - by Magda

Hello,
I am so pleased to share with you the new stamps from Chocolate Baroque that are as usual, very detailed.
Here below you will find two step by steps, a journaling page and a card.


Journaling Page:
1. Cover your journaling page with white gesso
2. Blend Distress Ink Pad  Seedless Preserves and Worn Lipstick with a Stylus blending tool
3. Stamp randomly with water the background stamp  "On the Tiles Individual" and some
    feathers from "I shall be your Wings"  and let dry
4. Stamp some other feathers with Distress Ink Pad Antique Linen
5. Stamp with Versafine Onyx Black    the "Rose Duo" image
6. Add some colour to the rose
7. Stamp the sentiment from the rubber plate "I shall be your Wings" with Versafine Onyx Black 


Card:
1. Colour the white cardstock mat with Brusho watercolour red, yellow and orange, and let dry
2. Stamp the feather from "I shall be your Wings" on the right side of the mat with Versafine Majestic 
    Blue
3. Stencil white embossing paste on the left side of the mat and let dry
4. Apply a light coat of Stickles on the feather and on the embossing paste
5. Stamp the sentiment from the same plate "I shall be your Wings"  
6. Use some twine as decoration
7. Colour the second mat using a matching colour of the stamp
8. Glue both mats on your card


Thank you for passing by
Magda


Sunday, 3 June 2018

Dare to Dream (by Judith)

Hello everyone, I have two projects to share with you today, showcasing the beautiful I Shall Be Your Wings stamp set that we featured on last month's TV shows on Hochanda.

For my first project, I decided to make a dreamcatcher. I chose a large flower from the Diamante Delights stamp set, as it reminded me of the centre of a dreamcatcher, and stamped that onto a piece of drawing cartridge. I drew two circles around the outside, using a circular die, and drew some lines inside using a fineliner pen to complete the design. I added three feathers underneath the circle, and again, hand drew some beads on 'strings', to add to the design, using the fineliner pen.

I wanted to create a very soft, dreamy background, and used a combination of soft colours on the background, blending Distress Ink, and splattering it with water. I painted the images with watercolour pencils and a water brush. Finally, I stamped the sentiment onto a spare piece of drawing cartridge, and cut it into sections, before adding it to the background.

My second project was a TV demo, which you may have seen. When I saw these stamps, I knew instantly that I wanted to make both of these projects, and they turned out just as I imagined them. I drew a large circle onto a piece of drawing cartridge, then stamped two of the feathers before adding a mask. I stamped the other two feathers, and masked them as well. I added foliage using one of the images from the Lords and Ladies stamp set, and I used first, second and third generation stamping to build up depth.

I painted some twigs using a medium and small brush with Distress Ink and water. I wanted the twigs to look rather rustic, so I added some little wispy bits with the finer brush. I added the rose from the Rose Duo stamp set, which I had coloured with pencils and fussy cut. A sentiment in the centre finished the project before I matted the background onto dark green card.

I hope that my projects have inspired you to use these lovely stamps. Thanks for stopping by, Judith xx


Friday, 1 June 2018

Peacock feathers by Brenda


Good morning, Brenda here and a post scheduled as I am away in the Mediterranean sunshine, well as I write this on a rainy day in the UK I am certainly hoping it will be sunny. My shares from my samples from the recent Hochanda shows where Lesley showcases some beautiful new stamps.

The top creation is Peacock inspired, the base is a greyboard tag coated in white gesso followed by acrylic paint. Using a stencil I added some brickwork using gesso mixed with sparkle paint as my medium and left the top fairly rough to give texture. Next I randomly stamped Square Bubbles and the Fern from Rose Duo using Majestic Blue Versafine. The feathers from "I shall be your Wings" have been stamped with Versamark and heat embossed with detail gold powder and coloured in with Twinkling H20's.......I have not used them for years and decided they had been left unloved for far too long. The sentiment is from the same feather set and finally I added a seam binding bow and inked around the edges of the tag.


A fairly simple DL card and matching envelope. The beautiful Rose from Rose Duo was stamped onto both with Versafine black and coloured in with pencils and the panel matted onto coordinating cardstock.


Here we have a background created with acrylic pain and brayered onto a piece of heavy cardstock, I do this quite randomly not worrying about any lines created by the edges of the brayer as that all adds to the interest. The four feathers from "I shall be your Wings" were stamped with Versamark and three colours of embossing powder shaken across them, if you hold the piece end on the powder will dust across the leaves to give a graduated effect. Finally a piece or organza ribbon.

My thanks for popping in to take a peek today.