Pin It button on image hover
Showing posts with label Wild Meadow. Show all posts

Tuesday, 12 July 2022

Elephants and Dragons! (by Sandra)

Hello I am sharing some more of my cards from the shows on Create and Craft in June.

These shows featured stamps that were to be retired, so I hope you were lucky enough to grab a bargain!

My first card uses Paisley Elephant. 
I started by stamping the small Paisley stamp all over my base card in blues and purples. On another piece of card I stamped the Fan shape onto some pink card and embossed in silver,  I coloured a piece of card with distress inks and then stamped the Paisley block and embossed in red and I stamped the Script onto some card and added distress ink and splashes to give an aged look. Finally I stamped the  Elephant onto smooth card, coloured with alcohol markers and fussy cut it out. I then played about with the different pieces until I found a layout I liked before gluing down.


My next card features Here Be Dragons! A great set for children (of all ages).  I started by making a background of mountains with a stencil and then added a moon. I used distress inks and a stencil brush to colour. I stamped the Dragons in Memento and coloured with alcohol markers. I then added some foliage from Wild Meadow and the sentiment.


Thanks for looking
Sandra x


Sunday, 14 November 2021

Numero Uno by Sandra

Hello, I'm sharing some more cards from the October show on The Craft Store.
These cards use the Numerology stamp set, a really useful set for main images and backgrounds.

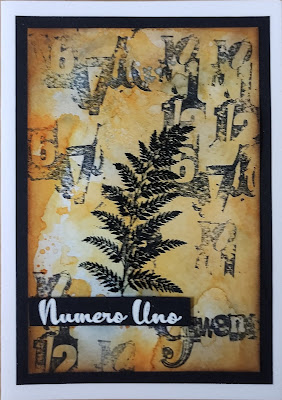
For my first card I made an inky background with Distress Inks and water. When it was dry I stamped over the background using the 2 larger number stamps with Archival Ink. I realised that I had picked up an old ink pad which was a bit dry, but I carried on and quite liked the distressed look! I stamped  and embossed the fern from Wild Meadow as a focal point and added the Numero Uno onto a piece of card to finish. I layered onto some black card and then onto a 7x5 card.


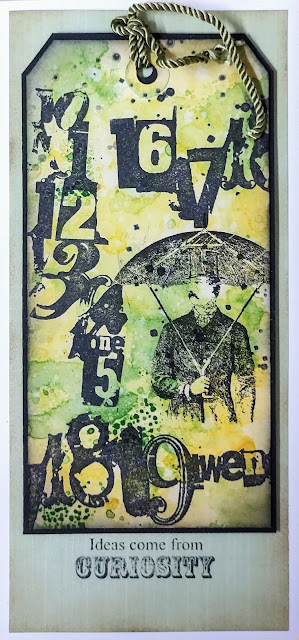
For my second card I made an inky background again and cut out a tag shape. I  stamped the numbers randomly over the background and then stamped some splatters. I added the man with his umbrella from Eccentric Edwardian stamp set.  I then layered the tag onto some black card and onto a DL card. I added a sentiment from  Punky Expressions.


Thanks for looking
Sandra x

http://isthatthetime.blogspot.com/
 

Monday, 25 January 2021

ATC collection - by Magda

 Good morning,

sometimes it is really pleasant for me to do ATCs and Chocolate Baroque has a lot of small stamps that match perfectly for this purpose.

I used for theses 6 ATCs :

White Cardstock cut in ATC size, Distress Ink Pads,   Archival black, stencils, white and silver embossing paste, white pen, stickles,  and of course the beautiful stamps

Fantasy Castle,  May Fairy,  Wild Meadow and Words to Dazzle & Sparkle


Thank you for passing by, hugs
Magda


Thursday, 21 January 2021

Floral Collage (by Judith)

Hello everyone, I hope that you are all keeping well. I have a project to share with you today using some of the stamps that were featured on last month's TV shows on Hochanda. 

I created a background using a stencil and a piece of drawing cartridge. I brushed three colours of Distress Ink through the stencil, a blue, lilac and green, to give a soft backdrop for the rest of the design. I added a stamp from the Baroque Ephemera 1 stamp set in each of the four corners, and then stamped the Movie Strip Collage image onto the background. I stamped and embossed the flower portion of the image three times onto a spare piece of drawing cartridge, and coloured the images with watercolour paints.

 I cut the images out, and worked out the positioning of the flowers on the background. Before I stuck them onto the background, I added some extra splats using an image from Butterfly Mind, and a fern leaf from Wild Meadow.

I will be back later in the month with more projects to share with you. Thanks for stopping by, take care,


Judith xx

Monday, 14 December 2020

Live Life in the Clouds

Hello, I'm sharing some more of my cards from the Hochanda show in November.

My first cards feature stamps from the Tree House stamp set. I have used Distress Oxides for the background, stamped with an archival ink pad and coloured with Distress Markers. I used a foliage stamp from Wild Meadow to frame the lower edge of the card.


On this card I stamped the image twice and used a fine liner pen to extend the stamp lines to make it into one scene.


My next cards are from Floral Perfumery stamp set.
I used watercolours with a lot of water to make a soft background. I then stamped the main image from the set  with the lovely sentiment. I used watercolour pencils to colour the perfume bottle and flowers.


For  this card I used my stamping platform to make a wreath shape with  the single flower and leaf stamps, masking where needed. I used watercolour pencils and mat and layered a sentiment for the centre

 
Thanks for looking
Sandra x

Tuesday, 8 September 2020

Let the Butterflies Dance by Brenda


Morning Peeps, I have a couple of cards to share using the beautiful stamps from last months Hochanda shows which all centred around Lesley's vintage clocks.

And please do make a note to tune in tomorrow as Lesley will be back on our screens with a One Day Special and I promise you won't want to miss out on the new stamps which are absolutely beautiful...................OK I'm a bit biased, but honestly they are.

After building up a background with Distress Oxides and some of the worker stamps from Stroom Clock I stamped and cut out the floral and Butterfly elements from Floral Clock, coloured it in and placed over a die cut circle frame. Sentiments from both stamp sets, some white splatters and a couple of metal index clips.


The Seriously Gorgeous Postcards designed by Lesley were also released in the shows and here I have used one, stamped the single Parsley from Parsley Clock using Stayzon and given them a little colour, added some grasses from Wild Meadow and Shrink Plastic Butterflies. The sentiment is from the same stamp set.


And here's one using the entire Parsley Clock stamped onto a stencilled background, I added two coloured of Oxide to a stencil, spritzed with water then stamped the focal image with Versafine black, stamped another of the flower heads along the bottom and coloured all. A Butterfly and sentiment from the same set.

Have a good Tuesday everyone.

Friday, 27 September 2019

Stylised Houses (Part 2)

Hello
I'm here again to show the remaining cards from the August show on Hochanda featuring the Bookmark Stylised House Collection.

My first card is from the Bridge House set . 
I stamped and water coloured the image. I then cut an aperture out of a piece of card and used a brick stencil and modelling paste to create a view.


My next card is from the Turret House set.
Using a stamp platform I stamped the image in Archival ink. I then re-stamped using a variety of Distress Inks. I added some Brushos to the background and spritzed with water to release the colours. Unpredictable, but a lovely technique!


Finally I made a little Tag Book using the sentiments from the stamp sets.  I also used stamps from Wild Meadow and Patchwork Butterfly.


Thanks for looking,
Sandra x

Monday, 31 December 2018

A New Year Wish (by Judith)

Hello everyone, it is hard to believe that another year has passed. I hope that you have all enjoyed a wonderful Christmas, and are looking forward to 2019 with optimism and hopes for a year full of promise. Some of you will not have had people to share Christmas with, or may have missed loved ones. You may not be feeling that the New Year brings much joy, or anything to look forward to. We hope that you can feel part of our community, and know that we are always here to share your crafting experiences, and offer friendship through the blog and our Facebook Group. We also have a Ning Group where you can make friends with other Chocolate Baroque fans, and chat and exchange tips and ask questions. If you sign up for the weekly newsletter from Chocolate Baroque, the links for all of these places are included within the newsletter.

Personally, I have had a mixed year, but I always feel that a new year offers the possibility to try new crafting challenges, and to learn new skills. I always want to be able to do something else! My craft room is bulging as it is, but there is room for more, and I love to experiment with colour and texture. My two projects that I am sharing with you today are both very cheery, and will hopefully chase away the Winter blues. The first one is a scrapbook page that I made as a TV demo for the Hochanda shows last month, featuring Lesley's Designer Papers 8" x 8" - My Floral Soul, and the Movie Strip Collage stamp.

I started the project by stamping a fern from the Wild Meadow stamp set onto the background. I added a sepia photograph of my parents, celebrating their golden Wedding Anniversary. I changed the photo to a sepia effect, because I wanted to use it for a different occasion. I stamped the flower image onto a spare piece of card a couple of times, and coloured it using Koh-I-Noor paints. I decoupaged the image, and added it to the page. I made my own ticket, and stamped a sentiment from the Shared Beauty stamp set onto the centre. I added brown ink onto a couple of scrabble tiles, which are my Mum and Dad's initials and a bingo piece, to represent the number of years they have now been married, and also added those to the background.

These papers are lovely for scrapbook pages, they are the perfect size, and are great to add a bit of stamped detail if you wish. I added a piece of kraft card behind mine for extra stiffness.

My second project uses the same background paper , but in the plain version, to make a pretty card. I stamped the Be Kind image onto some book paper a couple of times, using Versamark and gold embossing powder. I added three different colours of Distress Ink for shading. I also stamped and embossed the image onto a piece of kraft card, and added the book page flower layers onto the kraft card script layer. I then adhered this panel to the decorative paper. I stamped the sentiment onto the background with a deep orange ink, which I then used to edge the paper. A kraft card mat finishes the card.

Thank you for your support in 2018, your visits to the blog, and your kind comments. Have a wonderful New Year, and we look forward to your visits in 2019.

Take care and best wishes,

xxx

Sunday, 23 December 2018

Lovely Meadow (by Penny)


Hello peeps, well the big day is nearly here - hope you're more prepared than I am!  Actually it's only a bit more wrapping to do now so that's not too bad.  I hope you can all take a little time to join me for a bit of craftiness though, I'm sharing a bright and cheerful card full of meadow flowers today.  I have used several images from the Wild Meadow set, Versamark ink, white EP, Distress inks and one of the designer papers from the My Floral Soul set.


On a piece of Kraft card I stamped several floral images to create a 'meadow' and embossed them in white.  I coloured them with DIs and edged the focal panel with a white marker pen.  I cut a piece of the designer paper to size and attached it to a white base card.  I then attached the focal panel.


I cut a tag from some spare Kraft card and stamped some more meadow images, then embossed and painted them as before. When they were dry I added some glitter as highlights. I added some lace and attached the tag to the card.  
Thanks for dropping by today, I hope you've enjoyed this little project and I'd like to wish you all a very Merry Christmas and a Happy New Year! 

Xx Penny xX

Saturday, 22 December 2018

Wildflowers Through the Seasons (by Judith)

Hello everyone, I have a project to share with you today ustilising the fabulous Tagtastic stamp featured on last month's TV shows on Hochanda. I wanted to show another use for this stamp, and paired it up with the Wild Meadow stamp set for my project.

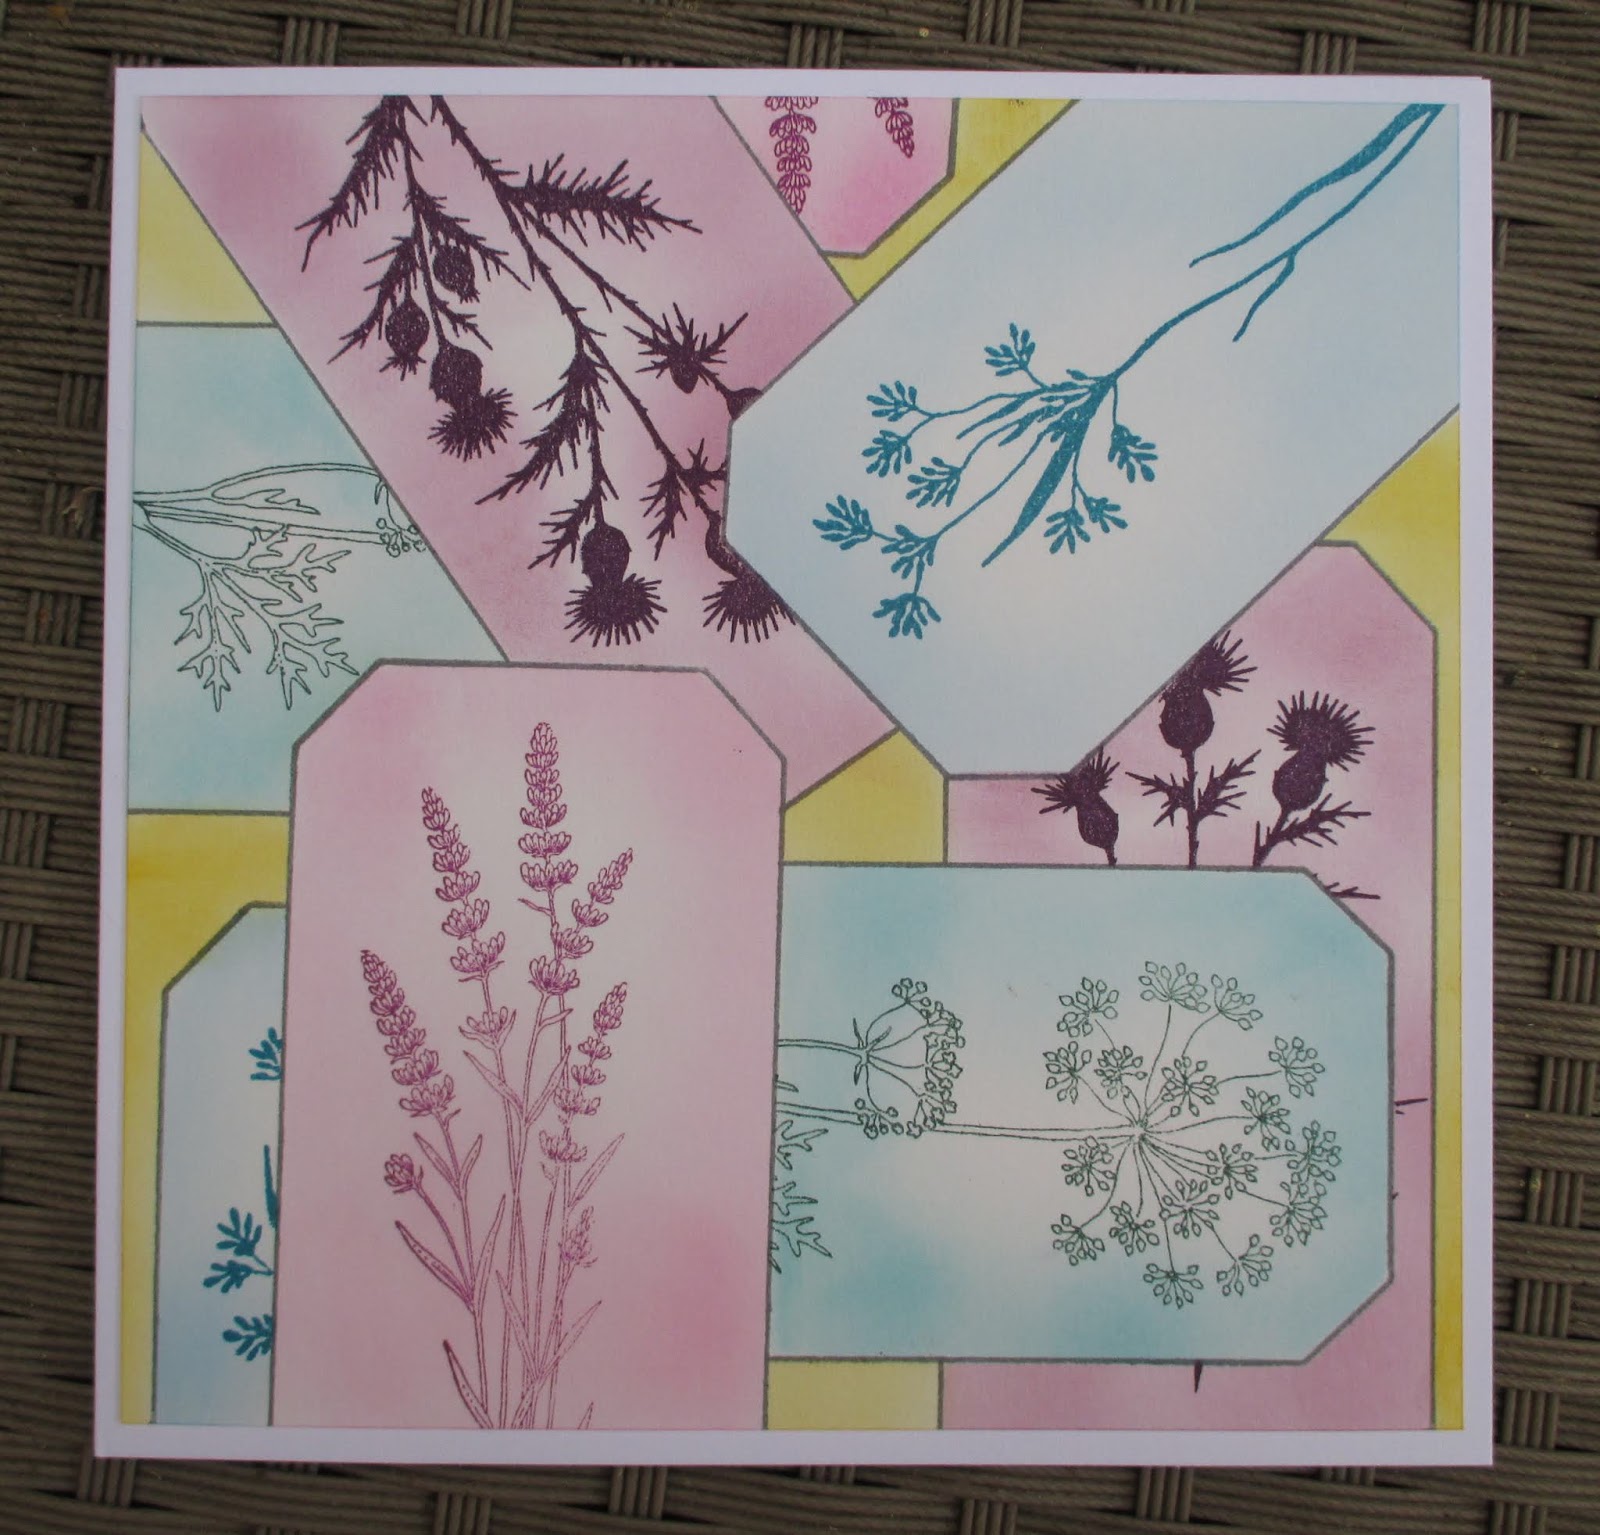
I started by stamping the image on masking tissue several times, and cutting the image out. I then stamped the image onto my background a couple of times, and then masked the images. I stamped the image again, masking those images, and continued, building up layers of the tag, until I had filled the page. I then added a background colour to fill in the 'blank' areas. I added different colours to the tags, using reverse masking, and then stamped foliage into each tag, while the reverse masks were in place. This meant that the foliage stalks did not overlap the edge of the tags.

I had great fun creating this card, and you could use the idea in a much smaller way for a tag or mixed media project.

I have a bonus project which I created more recently, as I needed to make a Christmas card for my lovely Hubby. I used one of Lesley's beautiful papers, one of the plain designs. I drew a circle in pencil, and added a few snowflakes, which I embossed using white embossing powder. I added a sentiment from the Let's Get Festive stamp set, and built the wreath using foliage from the Wild Meadow stamp set. I added a touch of shading to make the snowflakes really pop.


I will be back later in the month with more ideas to share with you, but would like to take this opportunity to wish you all a very Happy Christmas. I hope that you can enjoy the day, whatever you are doing. Thanks for stopping by,

Judith xx

Wednesday, 19 December 2018

Butterfly frame by Brenda


Good morning to you all, Brenda here and I hope you are almost prepared for Christmas, only 6 sleeps now!!

My first share this time is a little frame which I stamped with Distress Ink and the lovely Fern from the Wild Meadow set, I used two colours to ink the stamp to give a variegated look and then distress the edges with the same colours. Inside the frame I used one of the Designer papers and stamped a sentiment from Shared beauty and stamped, coloured and cut out three Butterflies from April Fairy and Just Butterflies.


Here I have a tent card using Movie strip collage which I stamped once, masked and stamped a second time, coloured with with pencils and added some Distress Ink around the blooms.


I loved the colour of this particular sheet from the Designer papers and followed the colourway stamping images from Wild Meadow and Floral grunge with Versafine Clair inks. I made the base shape with the Tagtastic stamp stamping three times with Versamark and embossing with detail white, then cutting out the three tag shapes slightly larger to create a black frame. I fixed the thee together with card hinges in the back, fixed the stamped papers, some cord and embellies. I also stamped sentiments from Be Kind and Shared beauty.

This is my last post before Christmas so I would like to wish everyone a peaceful Christmas season.


Tuesday, 11 December 2018

gift box (by Veronica)

 Today I am sharing a couple of samples using the shared beauty stamp.
I had some hexagonal boxes lying around that hadn't been used, and one just fitted this stamp....
The box was white, so it got a base coat of peeled paint distress oxide ink, and was then stamped with the fern from wild meadow in iced spruce distress oxide ink.
I stamped the image several times in black versafine and clear embosssed them.
On one image I coloured the ferns and leaves with green brusho powder,  the word with yellow, and the flowere with orange then I cut the entire image out and stuck it onto the lid.


The remaining images, I coloured the flower only using orange brusho powder activated with a damp paintbrush.
 Once they were dry, I cut out sections of the flower and decoupaged them onto the original base image.


I also made a very grungy looking card with this stamp, using a white embossed image and black brusho powder.
The background was randomly stmaped with the ferm from wild meadow using a dark blue ink pad, and the same ink sponged round the edges.


Sunday, 9 December 2018

Autumn Harvest by Penny

Hello peeps I hope I find you all well, I have my first project of the month to share with you today.  I know everyone is probably up to their eyes with Christmas preperations but if you have a couple of minutes why not grab a cuppa and join me for a bit of crafty fun!


 I'm sharing a sample from last months new stamp releases, featuring the beautiful Shared Beauty stamp, several images from the Wild Meadow set, one of the gorgeous new designer papers from CB My Floral Soul; Distress Inks, copper EP, Versamark ink and some bits and bobs from my stash.


I cut a piece of the paper to size and stamped the Shared Beauty image in one corner, using Versamark ink, and embossed it with copper EP.  I masked the image with masking tissue then stamped and embossed some images from the Wild Meadow set.  I removed the masking tissue then used Koh-I-Noor paints to colour the focal image. 


I stamped more meadow images around the edges of a white base card, using DIs and blended some ink around the outer edges.  I matted and layered the focal panel before attaching it to the card.  I stamped and embossed a sentiment onto white card, die cut it and added ink before attaching it to the card.  A cheerful, colourful card for many occasions.
Thank you for dropping by and I hope this project inspires some of you to have a go!  


I'll be back later in the month with some more crafty fun, keep well evryone and try not to stress too much over Christmas!


                             xx  Penny  xx


Saturday, 8 December 2018

Colourful Tags (by Judith)

Hello everyone, I have a project to share today using some of the stamps and papers that we brought to you on last month's TV shows on Hochanda. I wanted to use a little bit of everything in this project, and incorporate lots of colour to cheer up these gloomier days that we are having at the moment.

I started by stamping three of the Tagtastic tag shapes with Versamark, and covering them with white embossing powder. I also added three of the little tag 'hole' shapes onto the background of each tag, and then heat set everything. I stamped and embossed three of the flower designs, Shared Beauty, Floral Grunge, and Movie Strip Collage, and a little butterfly from the Wild Meadow stamp set onto some of the lovely papers designed by Lesley, and used the papers to help me decide on the colours that I used to colour each tag. I settled on three colours of Distress Ink for each tag.

Once the tags were coloured, I stamped the sentiments from the Shared Beauty stamp set over each tag in the same colours of Distress Ink. I cut the flowers and butterflies out of the papers, and adhered them to the tags, and then attached the tags to a tryptich made from corrugated card. Finally, I added some rainbow coloured ribbon to each tag.

Thanks for stopping by, Judith xx

Tuesday, 4 December 2018

Meadow-tastic (by Julie)

Hello, today I have two meadow themed cards stamped with Wild Meadow to show you.


I started my first card by inking up various floral stamps from Wild Meadow with dye inks and stamped onto smooth stamping card. I find it easier to start with the lighter coloured inks and then gradually overlay the images with darker inks. Once I had completed the background I carefully blended Broken China Distress ink over the entire card and stamped the sentiment which is from Words of Inspiration. For the tag I inked up the Tagtastic design and stamped it onto a separate piece of stamping card. Then I inked up the floral images as before and stamped onto the tag. It doesn't matter if the images overlap the edges of the tag as you need to cut the tag out anyway. Choose a decorative eyelet from the Tagtastic set and stamp it where you would thread your ribbon. Punch a hole through the eyelet using a crop-o-dile or something similar and then thread your chosen ribbon.
Cut your background to size and mount on top of black card, before attaching to your card blank. The tag was then stuck into place with 3d foam pads.


My second card is a quicker DL version of  the first card. I kept the background clean and simple by just stamping the floral designs onto the card blank and leaving the clean white card showing.
The Tagtastic was stamped onto spare card as before and the floral images added before cutting out. To make the tag stand out I blended Broken China over the entire tag. Threaded the tag with ribbon, before attaching to the front of the card with 3d foam pads.

Thanks for stopping by and please call again for daily Design Team inspiration.

Julie x

Monday, 3 December 2018

Where imagination meets reality (by Rachel)

Hello there! Rachel here today with the first of my posts from the November shows. I did so love working with those papers - and I thought the new stamps were just gorgeous.


I started off by using one of the papers to fill the back of this box and then stamped on it using some stamps from the wild meadow stamp set. Next I stamped the Shared Beauty image onto a piece of the paper and fussy cut it and hung it from the washing line in the box. Finally I repeated this process with the Floral Grunge stamp and then decoupaged that image up.

I do hope you feel inspired by this piece - I was so pleased to see it displayed so prominently in the shows!

Big hugs

Rachel xx

Tuesday, 10 July 2018

A Burst of Colour (by Judith)

Hello everyone, I am back to share more of my prickly projects with you today, featuring the stamps from last month's TV shows on Hochanda.

To create my first card, I trimmed two pieces of drawing cartridge slightly smaller than A5 in size. I sprinkled Brushos over one piece of card and spritzed the card with water. I then placed the second piece of card over the first, to create two coloured backgrounds. I left both backgrounds to dry. The second background will be useful for a project at a later date.

I stamped three of the images from the Scrumptious Succulents stamp set onto the background, then covered the images with masks that I had already stamped and cut out. I stamped two more images in between the masked images and then drew a line between all of the images to create a landscape, using a fineliner pen. Using the Square Bubbles stamp, I stamped below the landscape line using second generation stamping. The stamp creates a stone effect, which is perfect for the cacti to stand upon.

I used the same colours of Brusho powders to colour the cacti images, adding a couple of additional colours, (red, orange and yellow). I sprinkled a little bit of each colour onto a large acrylic block, but you could use your craft mat, and added a bit of water to them, so that I could use them like watercolours. More water creates a paler colour, but you can then go over the images with a bit of stronger colour to add shading. You can be as creative as you like with the colours, I had a lot of fun creating a vibrant fantasy collection of cacti. I then painted the little stones in the same colours, being completely random. I added a sentiment from the Blossom and Grow stamp set.

My second project is full of colour too. I wanted to create a lovely sunset, and stamped the tall leafy image from the Blossom and Grow stamp set a couple of times first of all. I masked the images and masked an area for the sun, then coloured the background with Distress Inks. I chose vibrant pinks, oranges and yellows, blending them, and adding a spritz of water.

I stamped some foliage from the Wild Meadow and Silhouette Grasses stamp sets, using coloured dye based inks. I added the little birds from Landscape Edges and a sentiment from Scrumptious Succulents. I removed the masks and coloured the foliage with pencils.

I hope that you will be inspired by my projects to try out some of these ideas. Thanks for stopping by,

Judith xx


Sunday, 20 May 2018

Back to Nature (by Judith)

Hello everyone, I am sharing a few more cards showcasing the beautiful stamps that were featured on last months Hochanda TV shows. You may have caught some of these cards on the shows.

For my first card, I have used one of the very versatile whiteboard shapes made by Tando, exclusively for Chocolate Baroque. These shapes are great, already being white, as they can be inked up straight away without needing any preparation. I added a bit of soft colour in tones of orange and green, and did the same to a piece of drawing cartridge that was going to become the card background. Using a honeycomb stencil, I added some colour using Distress Ink, repeating this on the background. I stamped a bee on the heart, using Versafine Onyx Black Ink, and masked the image, before stamping a foliage image from the Essence of Nature stamp plate. I coloured the bee with pencils, and added a sentiment to the heart.

To complete the background, I stamped the honeycomb image from the Honey Bee stamp set, again colouring the bees with pencils. I added stickles to the bees' wings. To complete the card, I added some green ribbon and green card as a matting layer.

For my next card, I chose an old book page and stamped the pretty foxglove image on to the paper. I added two bees, and coloured the images with pencils. I added some shading around the edge of the page, and then stamped a pretty fern image from the Wild Meadow stamp set around the edge, using two coordinating colours. I used the same foxglove and bee images to stamp over some kraft card to complete a background for the book page focal image. I selected some deep plum card to mat the layers.

My final card was a fairly quick card showcasing the fabulous Textured Art card that is available on the website. I coloured the card very quickly by placing Distress Ink on my craft mat, spritzing it with water, and laying the card on top. I stamped the lovely butterfly tree from the Essence of Nature stamp set, and added the small tree either side, to create the appearance of a little woodland. I added some colour under the trees to 'ground' them, and painted the butterflies.  Adding the main sentiment was all that was needed to complete the card.

Thanks for stopping by, Judith xx

Sunday, 3 December 2017

Stillness (by Magda)

Hello everybody, this morning I am sharing three pages with you that I hope will inspire you.

Front page : coloured with Distress Ink Pad

1. first, colour 3/4 of the A4 White Cardstock. The upper section in blue shades and the lower  
    section in green/brown shades blending Distress Ink Pad
2. stamp with Versafine Onyx Black on a piece of stash paper the clouds of the set Landscape Edges 
    and cut the outline.
3. place the "stencil" on the cardstock of point 1 and colour the sky section blending
    blue shades of Distress Ink Pad as shown below


4.  create the landscape using Chocolate Baroque Mask and Stencil - Useful Leaves blending
    green shades of Distress Ink Pad and stamp the grass of Wild Meadow stamp sheet
5. stamp the sentiment of Words of Inspiration stamp sheet with  Versafine Onyx Black


Flower page on the left : coloured with Brusho
1. colour the background with diluted Brusho colours and spritz some crystals on it.
2. stamp the flower of Fresh Blooms A5 sheet with Versafine Onyx Black, colour it and cut the  
    outline
3. stamp the sentiment of the same Fresh Blooms A5 sheet with Versafine Onyx Black on a matching 
    coloured brusho piece of cardstock
4. Glue flower, sentiment and string on your page using Inkssentials Glue n Seal

Butterfly page on the right : coloured  with Distress Paint and  Aquarelle Pencils
1. apply White Gesso on your page, colour it with Distress Paint using the colours you like, apply 
    again White Gesso  and darken some areas with the same Distress Paint you used previously
2. stamp a butterfly from the Tangled Garden A4 sheet on a piece of A4 White Cardstock, colour it with 
    Aquarelle Pencils, and cut out it for decoupage
3. Glue the butterfly and the sentiment on your page using Inkssentials Glue n Seal 
4. stamp some little butterflies randomly around the pages with Versafine using the colour you most 
    like, and don't forget to use some embellishments to complete the project.


I hope you enjoyed reading this step by step and thank you for passing by.
Magda