Pin It button on image hover

Friday 31 May 2019

Bees (by Magda)

Hi again
Mixed media journaling is for me very relaxing because the thoughts fly from the head to the page:

blending Distress Paint acrylic colours on white gesso, stencil several items, stamping the new stamp "Garden House" with Archival Jet black, colour with Faber Castell aquarelle water colour pencils in matching tones, highlighting here and there with Stickles and finally dividing the sentiment.
What do you say about the result of this page ?


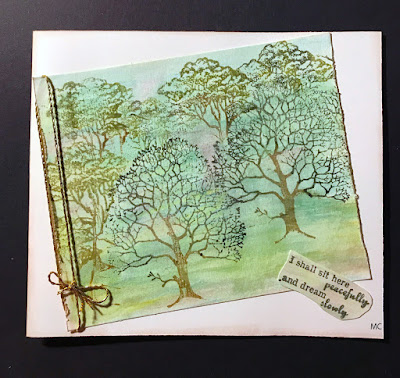
As last project for this month I used the other new Plate of Chocolate Baroque "Trees a Crowd"
a collection of trees and sentiments.

For this card I used watercolor paper, Archival Jet black for stamping and Faber Castell aquarelle water colour pencils for coloring.

At first I coloured the background with the pencils using the technique of holding two or more pencils together before blending with the wet brush.


Then I stamp the trees masking them if required in order to create the scene.  I assembled the mat on the card, stamped the sentiment and finished the card as you can see. 


I wish you a nice crafting June, see you soon again

Magda. 

Wednesday 29 May 2019

evening trees (by Veronica)

I tried just using one ink pad with these lovely stamps from the trees a crowd set . I used chipped sapphire distress oxide as i wanted a night-time scene, with the traditional torn paper to create the landscape. I stamped the trees first and did the landscape around them for the first card - the birds were drawn in using a waterbrush.
Sentiment is a favourite of mine and comes from the words of inspiration set
 The second card has the same colour scheme, but with the landscape done first and the trees added afterwards.


I used the same colour scheme for another stamp, which I used on the lid of the box I made to hold a set of coasters featuring different stamps from the set.
The coasters were originally beermats which were coated with white gesso before they were stamped and coloured. It doesn't show in the scans but they were finished with a very thin  coat of crackle medium to seal them.

Monday 27 May 2019

Autumnal Tag Art and Summer Garden - by Penny


Hello lovely Peeps, I hope you are all well and enjoying some lovely weather wherever you are.  I'm back with my second post for May, a couple of cards featuring some of the gorgeous and quirky house stamps from the April shows.


Autumnal Tag Art.

I have used stamps from the Acorn House, Trees A Crowd, and Tagtastic sets; sepia Versafine ink, clear and gold embossing powders, alcohol markers, Distress inks, and some ribbons from my stash.


I began this project by creating the tag.  I stamped the Tagtastic image onto white card with Versamark ink and embossed it with gold EP, and did the same with one of the 'holes'.  I then stamped one of the tree images in sepia ink and embossed it with clear EP.  I coloured the trees with pens and painted a background using DIs, then cut out the tag.  On another piece of white card I stamped the Acorn House in sepia ink and embossed it with clear EP.  I coloured it with pens and cut around the image, leaving a margin around it.  I blended ink around the edges then attached it to the tag with 3D foam.  I completed the tag with some ribbon and bakers twine from my stash.


I took a piece of Kraft card and stencilled some trees onto it using DIs.  I used a gold marker pen around the edges of the background panel and attached it to a white base card.  I then attached the tag to the card.  On a spare piece of Kraft card I stamped a sentement using brown DI, put gold pen around the edge and attached it to the card.


Summer Garden.

I have used stamps from the Garden House and Honey Bees sets, white embossing powder, Versamark ink, Distress Inks, and some Hessian from my stash.


I took a piece of Kraft card and stamped the Garden House image and the Bee Hive image using Versamark ink and embossed them with white EP.  I added a couple of Bee images then painted the images using Distress Inks.  I added white marker pen around the edges of the panel, then stamped and embossed a sentement at the top of the panel.  On a spare piece of Kraft card I stamped and embossed the flowers from the Garden House image, painted them and cut them out.  I took a cream base card and stamped a honeycombe image repeatedly around the edges of the card using DI.  I then used strips of Hessian from my stash, pulling out some fibres to create a fringe.  I attached it to the back of the focal panel with red liner tape, then attached the whole panel to the base card.  I added the flowers with 3D foam.


Thank you for joining me on the CBDT blog today, I hope you have enjoyed these projects - I certainly enjoyed creating them!

Take care everyone, I'll see you next month with more crafty fun,


                            xx Penny xx

Saturday 25 May 2019

Stamping on Patterned Paper (by Judith)

Hello everyone, I have some more projects to share with you today showcasing the beautiful bookmark style houses that we brought to Hochanda last month. These three projects formed part of a TV demo that I did on one of the shows. I wanted to demonstrate how to stamp onto a patterned surface, and when an image is coloured, the image pops out, and the patterned surface recedes to the background.

I used a piece of Lesley's Chic Script Designer paper pack, and cut  a piece of the script paper to size. I stamped the Tree House onto the paper. I added a few lines at the bottom using a fineliner pen to finish the landscape, and coloured the image with pencils. I added shading with grey pencil for added depth.

I took a plain piece of green paper from the pach, and using one of the trees from Trees a Crowd and a sentiment, I created a piece of background paper using Memento Ink. This was really quick to create, and you can have your own designer background in minutes! I inked the edges of both pieces of paper with the green ink for definition. As you can see, the script paper looks great as a background, and the house sits really well on the pattern.

For my second card, I used the large Tagtastic stamp and stamped onto a piece of book paper. I stamped the Garden House image inside the tag, and coloured the image with pencils once again. I added a bit of shading on the background using Distress Inks.

For the large background, I used a large acrylic block and added pink, blue and green Distress Oxide which I spritzed with water. I smooshed it across a piece of drawing cartridge in one go. I stamped two bees from the Honey Bee stamp set, and added a sentiment. I coloured the bees with pencils.

For my final card, I created a gelli print background, adding a bubble effect texture, and stamping a sentiment randomly over the background. I used a Crafty Individuals script effect tag and stamped the Heath Robinson House, which I then coloured with pencils. I added bright red highlights which I matched with a bright red ribbon. I added shading to the tag with Distress Inks, matching the colour of the gelli print background.

I hope that you have enjoyed my projects this month, I will be back next month with lots more to share with you, thanks for stopping by,

Judith xx

Friday 24 May 2019

Quirky structures- by Zoe

Good morning Lovelies and welcome to my second post this month featuring the stunning new stamps that were on Hochanda last month.

Using a brayer and neon acrylic paints on Linen textured card I then used a stencil and slightly damp cloth to remove paint in areas, simple stamping and a white gel pen to highlight areas.


Watercolour Card and paints.

Hemp sack textured cardstock and pencils.

Journal page coloured with Distress Oxide inkpad and water then stamped using Distress ink and a waterbrush to pull out the ink.

I love this technique at the moment, it’s Watercolour Card, sprinkled with Brusho’s, strayed with spray starch, little bit of very fine glitter and wrapped in wrinkled clingfilm to dry. I heat embossed the image in black.

I used a tag die to create a card, simple stamping and coloured with Inktense pencils.


Thank you for spending time to leave a comment, I hope you like my creations.
Have a wonderful day Zoe xx 

Wednesday 22 May 2019

Under the Sea (by Pat)

Today sees the final post this month by our Guest Design Team member Pat. She has created a watery themed card to inspire you.

Pat writes:

Hi there everybody, this week I decided to go underwater, not literally though, the sea down here is still far too cold for that. I love the fun images found on the Steampunk fish sets- Steampunk Funky Fish and Steampunk Sea World, and I also used bubbles from the Floral Heart, Distress Inks and a white Posca Pen.


I started with the background using a piece of acrylic sheet to transfer the spritzed inks to the white card, building up the colour and drying in between the layers until I got the coverage I wanted. I then stamped the images, the bottom ones in green, and the seahorses and nautiluses in blue. In order to keep it uniform I extended the outlines of the seabed by using some green ink on the end of a pokey tool which worked quite well, as a black pen would have been too dark. I know strictly speaking you should heat emboss over Distress Inks if you are going to watercolour, but I didn't want hard lines, and in the few places where the lines were blurred a little I used a bit of coloured pencil to fill them in. I did on the other hand make sure that the waterbrush was just damp and not overly wet.

I finished by stamping the bubbles and darkened the edges with a bit more blue ink, and used the Posca Pen to add some white to some of the bubbles and the eyes of the seahorses and nautiluses.

Thank you for taking a look today, and as this is my last Guest Designer post for now I'll say cheerio, but will be back later in the year.

Best Wishes,

Pat x

Tuesday 21 May 2019

Monochromatic woodland by Brenda


Hello Peeps, Brenda here sharing some more trees and bookmarks. 

For the top card I stamped a selection of the trees from Trees A Crowd, cut around the tops and used a die to create an aperture which is easily done by placing the bottom section of the die behind the tree so the pop up in from the background. The top section can then be mounted with foam pads to give a dimensional look with in this case just a sentiment from the same set.


I created a little box using a score board and dies to give a decorative top, added panels to all four sides using stamps from Acorn HouseGarden HouseHeath RobinsonTree House and Trees A Crowd. Next I made four tags and stamped the houses onto these, coloured in with pencils, stamped elements from each a second time and decoupaged. 

                            
Finally, all four were mounted onto corrugated and seam binding tied to the top of each and the four tags fit nicely into the box.
                                 

An inky background using Distress Oxides, some stencilling and a sun added after creating the background by placing the mask and inking around it, I find doing it this way preferable in some instances as it's less stark and blends in with the background. Next I stamped Acorn House twice using Versafine black and then used Silhouette Palace 1 mask and DI to the background and sentiment from the same stamp set.


For my final share today I took a piece of card and stamped the large tree from Trees A Crowd using Versafine Clair, randomly stamped one of the smaller trees using another colour of the same ink and added some leaves to the focal tree using an stamp from Spinney Design a Tree. I then used an oval die to cut the centre which I then lines up and mounted with foam pads Finally some sentiments from the same focal stamp set. 

As always many thanks for your kind visits and words of encouragement.

Sunday 19 May 2019

Landscape ( By Marga)

Hello everyone, here I am with a new card.


I made this landscape with one of the stamps from the stamp set Trees a Crowd. I stamped the trees with Forest Moss and the hils I painted with Brushed Corduroy.

Hugs Marga

Saturday 18 May 2019

Tree house and Garden House (By Rachel)

Hello there! Rachel here today - I have some more samples to share with you from the Shows in April and this time it is my samples using the Treehouse stamp and the Garden house stamp.
On this first card I stamped the image in flitterglu and added metal flake - it showed the image up very well on the black card.


Next I again used the Tree House stamp and this time used inks to create a scene around it. 


Next I moved to the Garden House stamp and for this first sample I used silver relief paste to create the image and added it to some preprinted paper. 


In this second and third sample I used the stamp to create a scene - in this first case on a card.


and finally on an MDF tag. 


I do hope you have enjoyed looking at my samples and may gain inspiration from them.
Have a wonderful day!
Hugs
Rachel xx

Thursday 16 May 2019

Fifteen Minute Cards

Hello everyone, here we are with our regular monthly post featuring cards and projects from the Design Team created in Fifteen Minutes or less. Our aim with these posts is to share time saving tips and ideas and to show you how to create beautiful projects in next to no time. So grab a cuppa, and enjoy this month's selection.

I have created two projects to share with you this month. My first card was made using a scrap of background from my stash, which had originally been created by inking around some leaves from my garden. I stamped the large tree from Trees a Crowd onto a piece of watercolour paper using Black Archival Ink, then carefully sprinkled red, green and orange Brushos just where I wanted them. I spritzed the Brushos with water. I inked around the panel with Distress Ink. I added a sentiment strip to complete the card.

My second project is a large tag, I added background colour by covering a large acrylic tag with Distress Ink and spritzing it with water before swiping it across the tag. I used the same tree image as before and added a smaller tree image from the same stamp set stamped using green ink in first and second generation stamping to create the foliage. A sentiment, ribbon, and hand drawn birds completed the tag.

Brenda has created a series of cards using leaf stencils and Distress Inks. She has then stamped an image from the Trees a Crowd stamp set onto the background using coloured ink. She added liquid pearl dots to finish.


For her final card, she stamped and embossed the tree onto vellum, laid the vellum over a piece of patterned paper and added a bow. She added a sentiment stamped vertically onto the background.

Two from Rachel using the large tree image next, showing how you can vary the look of this image once again. For her first card she has used white embossing on kraft card and coloured the leaves using pens and pencils.


To create her second card, she used white embossing on black card, and added colour with mica powders, a fabulous dramatic effect.


We have more dramatic colour up next from Zoe, who has created two beautiful envelopes. We love seeing Zoe's beautiful Mail Art each month, and it is very quick to create, a bit of masking to create a window or a strip, and you have areas of colour or spaces to write an address.


We have a selection of projects from Magda next, she has created a tag which has been coloured with Distress Ink and flicked and spritzed with water. The image was coloured with watercolour pencils.
 

 She has created a Brusho background for her next project:

 Finally, she has used watercolour pencils and added Distress Inks to edge the background. She stamped the images with Distress Inks also.

Carole has created a very pretty card for us, she pressed Victorian Velvet Distress Ink randomly over the card, and spritzed lightly with water. On a spare piece of card she repeated the process, dried the card and stamped the top part of the Briar Rose stamp, and cut out a square. She repeated the process for the sentiment. She dried the background and stamped the Briar Rose image. She positioned the square so that it overlapped perfectly on the background.

Finally, we have three projects from Penny, to create her first card, She stamped and embossed the fir trees on black card using black ink and clear embossing powder. She repeated this step and added moon and clouds. She used a silver pen to add highlights and to ground the trees. She stamped and embossed the tag over the scene, cut it out leaving a border, then added silver pen to the edges. She attached the tag to some greyboard and added some ribbon and lace to finish.


For her next project she stamped and embossed the small trees using white embossing powder onto navy card. She used a white gel pen to ground the trees and add a snow drift, then painted some shadow with light blue pearlescent paint. She added glitter to the trees the die cut the image into a circle, adding silver pen around the edges. On a card base she stamped the trees in one corner and added the sentiment along the bottom before adding the main circle to the card.

Lastly, she stamped the Heath Robinson House onto drawing cartridge using grey ink. She used Koh-I-Noor pencils to colour parts of the image, and matted it onto red card before adding some ribbon and a button. She stamped a sentiment and attached the panel to a base card.

That brings our collection of projects to a close for this month. We hope that you have enjoyed what we have shared with you, and that you will try out some of the designs for yourselves. We will be back next month, but in the mean time, do check out our regular Design Team posts.

Thanks for stopping by,